
 Member
OKC isnt bad, nothing too exciting except for all the earthquakes and waiting for one of the energy companies to go belly up. Beyond that, things are good haha.Originally Posted by tjm3

I couldnt justify new axles when i had worn inners and could swap sides for the outers. I just finished packing the outers with cv2 as best I could by hand. Another tip on the outers, have a second set of hands to help and it takes all of 5 minutes for both sides total.
The idea that you cant swap sides, or whatever that myth is, probably comes from axle splines that sheared from yielding beyond the cyclic load stresses. At least on the outers. My inner's cages were quite worn beyond pitting to sizable material removed
edit: the 911 cv joints are ridiculously tight on the m3 inner axles, using a soft dead blow hammer to get it down on splines.
Last edited by OKsweetrides; 03-01-2015 at 06:57 PM.
1998 M3 Sedan - LS3 M12T56 - A bad addiction.
Member
Did this myself 8+ years ago, the outer clamps that come with the boots would not clear the housing so the axle could not spin, so a local shop in SoCal safety wired them on, been like that ever since.
John
'95 Hellrot M3 w/Dove
AA Euro HFM Stage II (w/21# Injectors & Software) W/Gen III Exhaust - URI Crank Pully - FDM w/3 Row M Coupe Rad - 3.23 LSD - Vogtland Club Spec/Koni SA - UUC Red w/Enforcers - TMS Shims/Rear Camber Bars w/QA1 inners/Sways - VMC F/TMS R End Links - X-Brace - Perf Ultimate/SS Brake Lines - GC Tower Mounts/RTAB Shims - ZKW's w/5000K Hid - Fog Delete - Alpine 9847/Pioneer TS-C130R Kevlar Components/Pioneer PRS-X340/Stealth Box's/Wired Zune 120GB - OE LTW CF Sills/Glove Box Plate - Staggered Black M-Spoke II's w/235/40 (front), 255/40 (Rear) Nitto NT05's - Rolled Fenders!
***Got a '95 M3? (actually pretty common on all years! Even happened to Racer Seth Thomas!) Check Your LSD! http://forums.bimmerforums.com/forum...d.php?t=390209
Member
Any chance anyone has access the photos in the original post?
2011 BMW M3 6MT
2011 Ford F250 King Ranch
1969 Toyota FJ40
2011 BMW 128i (wife's car)
Member
Lets see if this works
My Drip Loops Are Better
No good, unfortunately. I was hoping someone had them saved as I have to replace my outer boots. I had my axles rebuilt a couple of years ago but they must have used universal boots. The outer boot is too large and rubbed slightly on the upper control arm causing it to tear open a bit and spit some grease out. I doubt there would be any issue leaving them be, but if I can fix it myself, why not. I already ordered new inner and outer boots. I'll just add/replace grease if needed.
Member
I have it saved in an Intenet Explorer MHT file. Do you have a Windows computer?
My Drip Loops Are Better
I do and would love it if you don't mind
Sent from my Pixel XL using Tapatalk
Member
PM me an email address. Ill send later when Im back home
Sent from my iPhone using Tapatalk
My Drip Loops Are Better
Sent
Sent from my Pixel XL using Tapatalk
Member
Emailed them. Let me know if not received or any problems rendering.
Member
BMW E36 M3 Expert
You can just upload the pics in that file Joe, and then requote the post with the updated url.
You can email it to me and Ill host it if needed.
Member
I can do that. One for the team ...
My Drip Loops Are Better
Got them, thanks a bunch. I've recently started saving threads myself to prevent losing stuff like this. I was going to do exactly what Brett suggested, but it looks like you're already on it
Doesn't look like too tough of a job. Just messy.
Thanks again!
Member
NOTE: I have re-posted the original post with links to copies of the original pictures.
Original post by ckpit55
DIY: Half-shaft R&R - Outer CV Joint Rebuild
As you guys know, the inner CV joints are rebuildable as documented in Cal's awesome thread here: http://forums.bimmerforums.com/forum...+cv+joints+diy
What you might not know (or maybe you do) is that the outer joints are also serviceable. I get PM's periodically about it so figured I'd do a write up / picture guide of the process since I finally have another pair of axles to reassemble.
**Specs/Part Numbers before Starting**
*All part numbers are for an M3, if you have a non-M car check realoem.com to verify parts compatibility.
Suggested grease - Redline CV2. http://www.redlineoil.com/product.aspx?pid=82
Outer boot replacement kit (Need Qty 2) - PN# 33-21-9-067-806-M60. Available at Pelican parts and many other vendors.
Rear axle nut (Need Qty 2) - PN# 33411133785
Grease quantities for the outer joint (Per Bentley): M3 - 100g. Non-m - 80g.
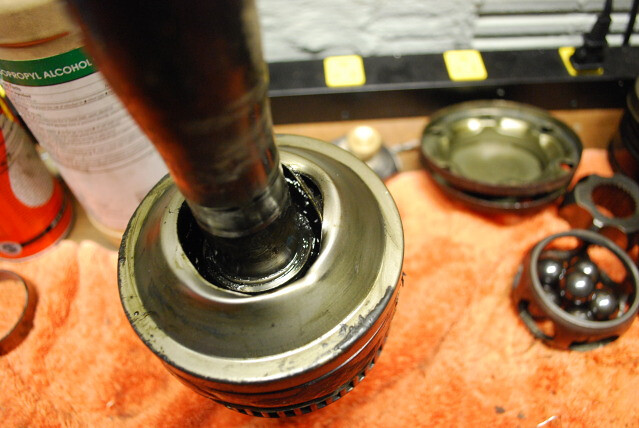
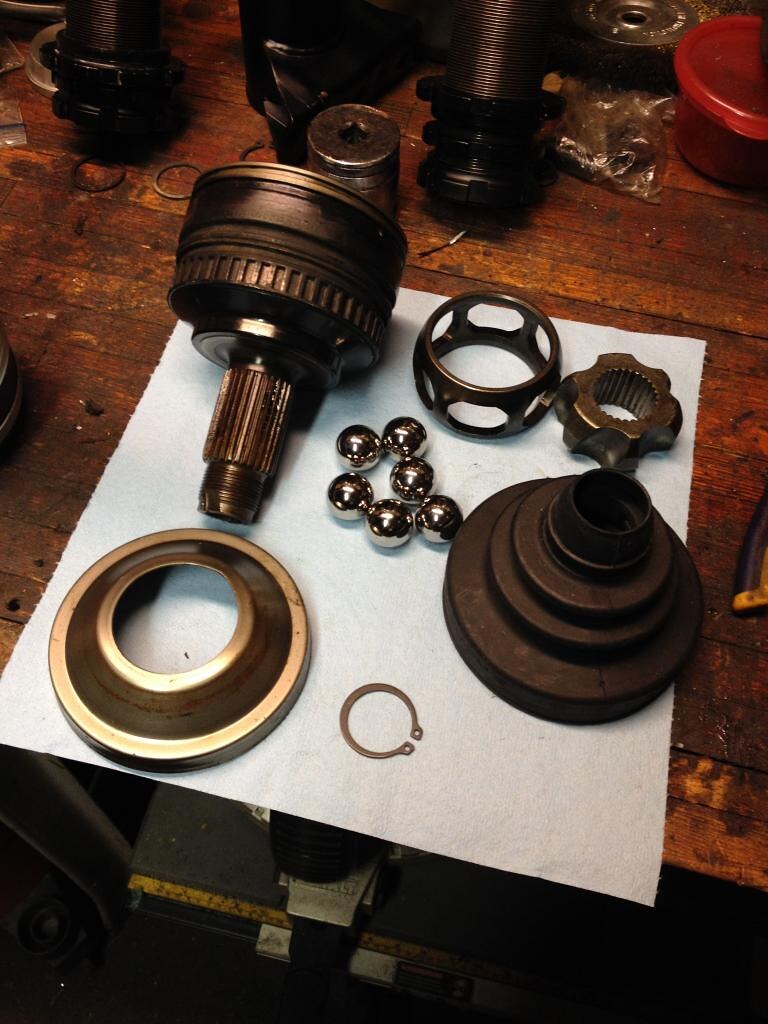
Disassembly (borrowed from previously):
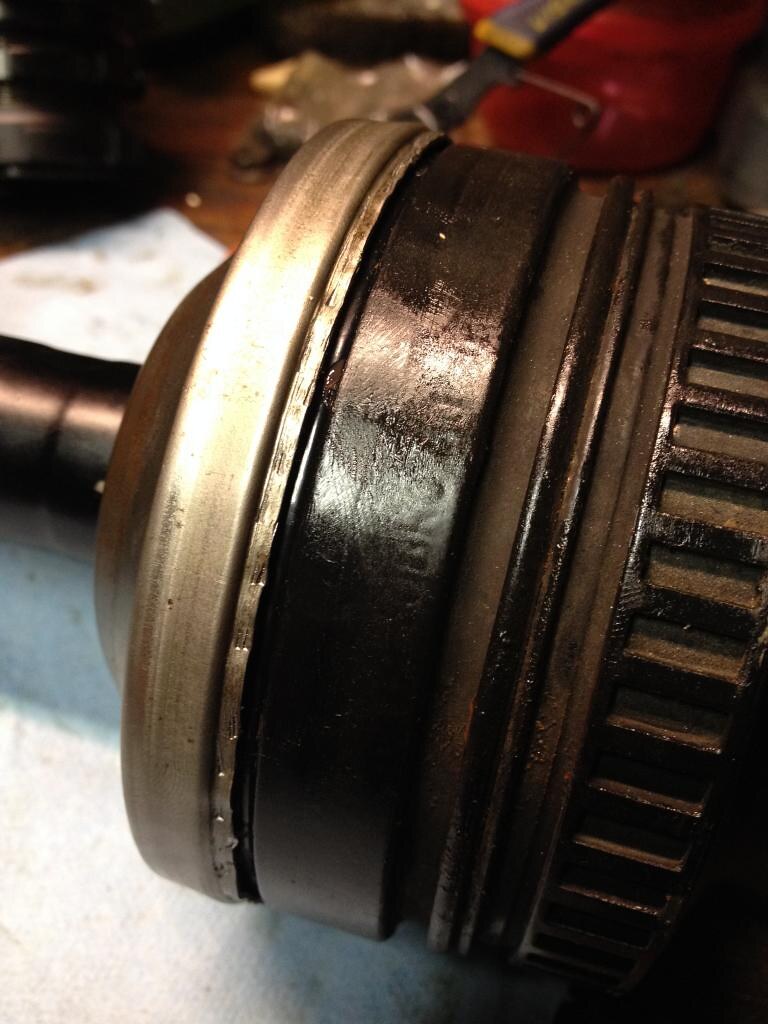
After you cut the boot off, you're left with a metal retainer cap. It's common for these to develop cracks around the perimeter of the ID due to abuse over the years, so you're going to want to inspect them for that. Once you get them off, you'll want to either weld up the cracks or cut out the loose pieces to prevent anything from fully separating and dropping into the joint and destroying it. Due to the thickness of the metal it can be kind of difficult to weld, so unless you got a TIG I wouldn't really recommend it. If yours don't have any damage, then proceed on.
Damage (both were comparable)
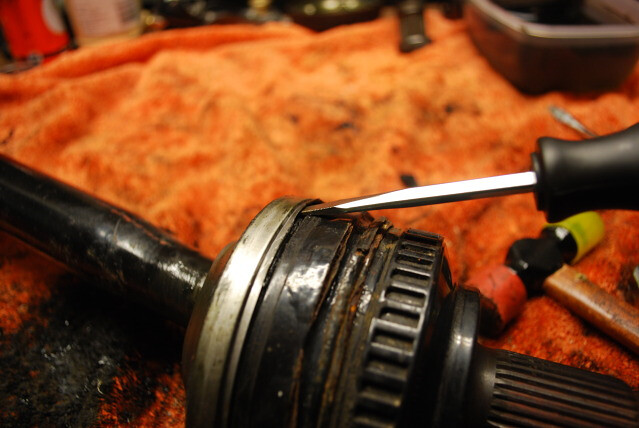
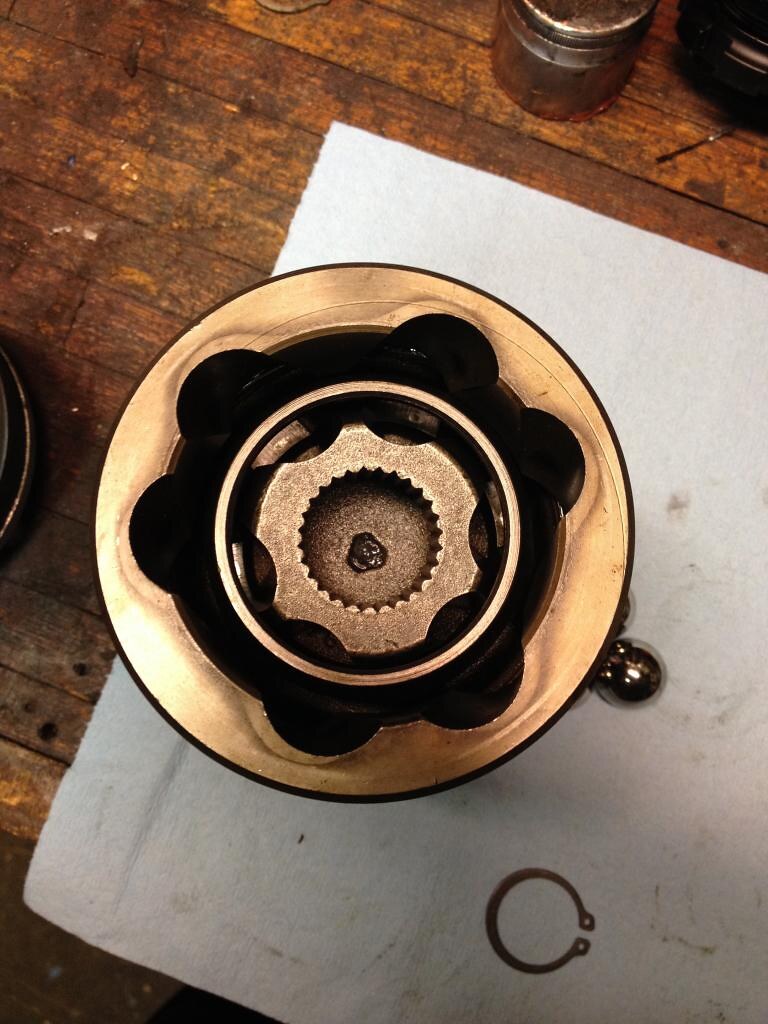
The cap is secured to the housing by a crimp around the perimeter. Work along the seam of the housing with a screwdriver tangentially. Don't pry up yet, all you want to to is lift the metal lip slightly.
Once you've got it uniformly lifted all the way around you can started gently and gradually prying the crimp up and over the retaining feature on the housing. Go slow, you don't want to tear / crack the edge.
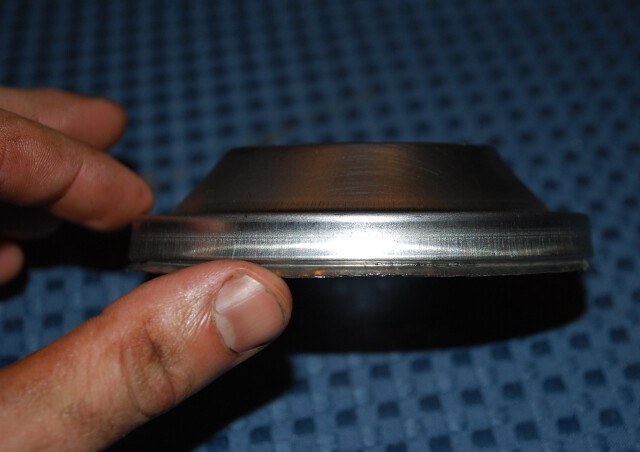
Once you're up over the lip all the way around, start tapping the housing gently to pop it off the housing. End result.
No harm done
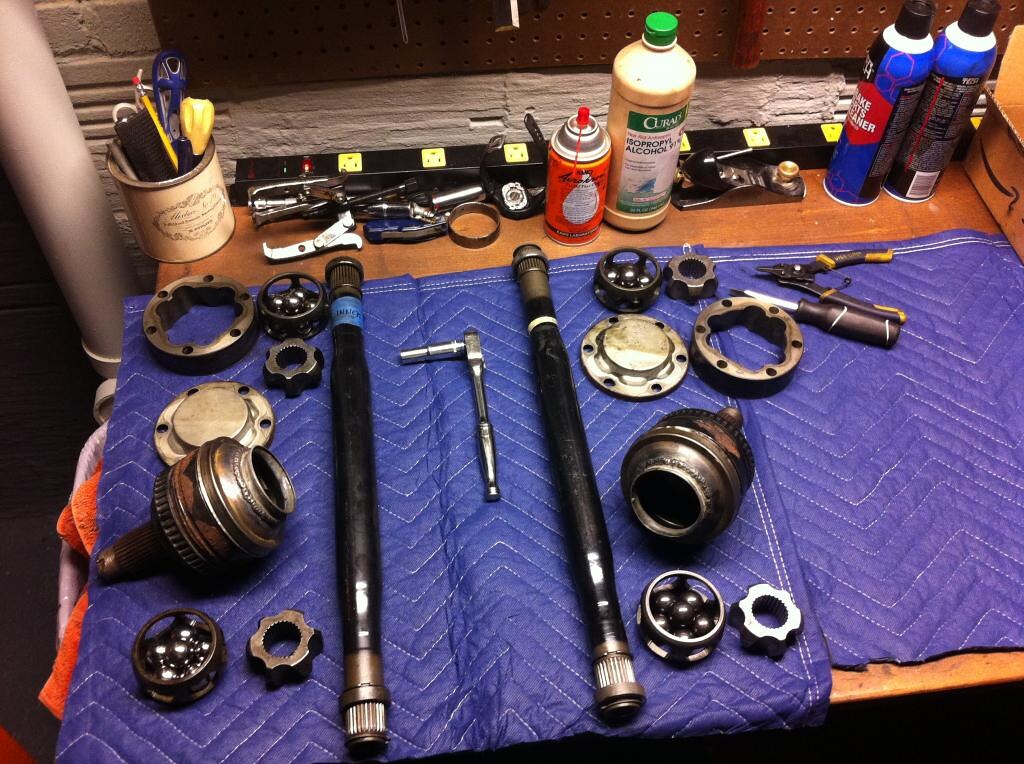
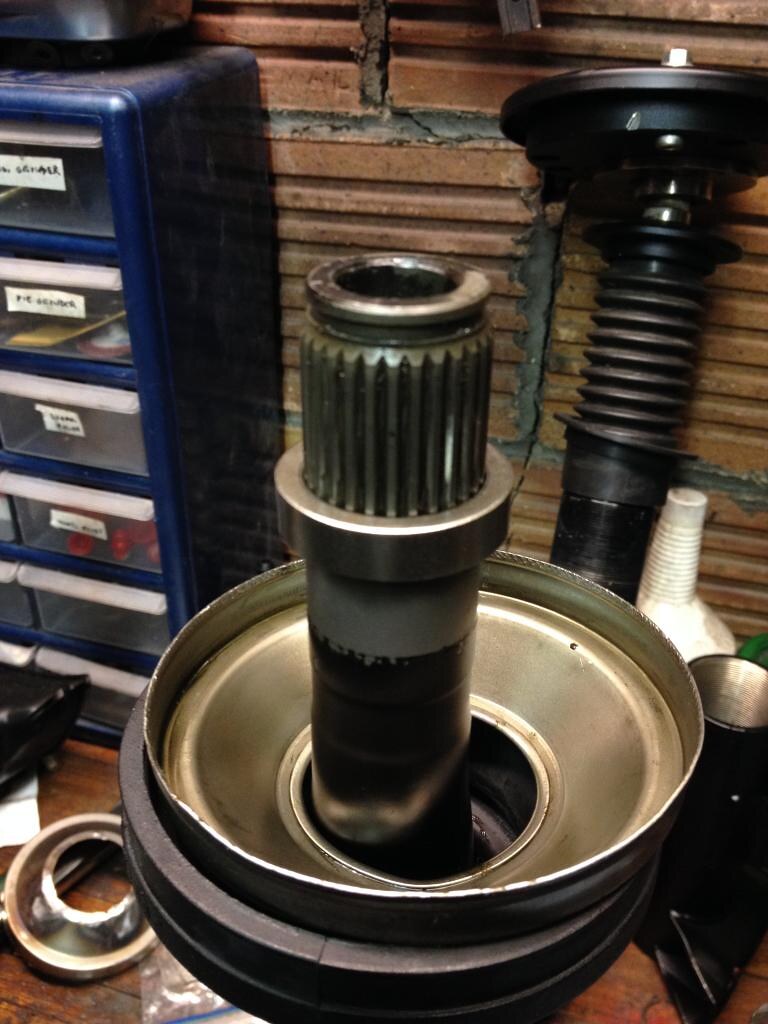
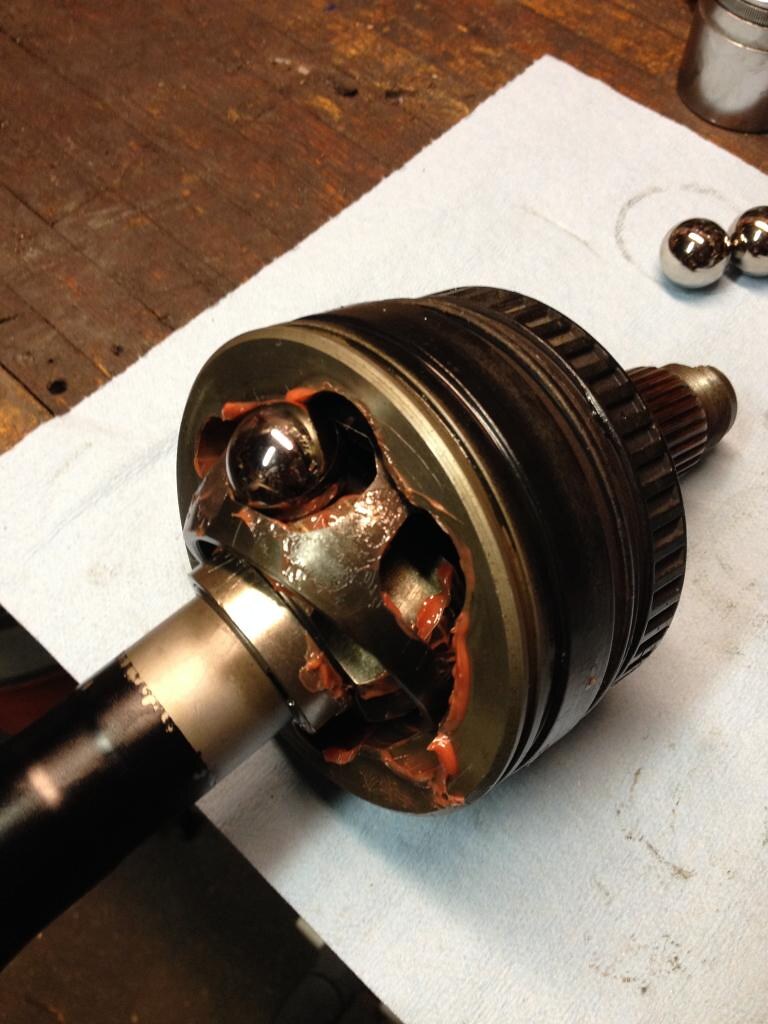
Half shafts fully disassembled.
Reassembly:
Follow Cal's thread (linked above) to put the inner joints back together. Once you do, you're left with this.
Clean all your parts and get them ready for install
Some reference things before starting....a lot of this is the same as the inner joint but figured I'd post it anyway.
This is the top of the inner race (faces towards the end of the shaft)
Bottom (faces the inside of the shaft and mates up against the washer)
And if you find yourself unsure of what side of the shaft is associated with what, the end of the outer-joint side of the shaft is stamped thusly
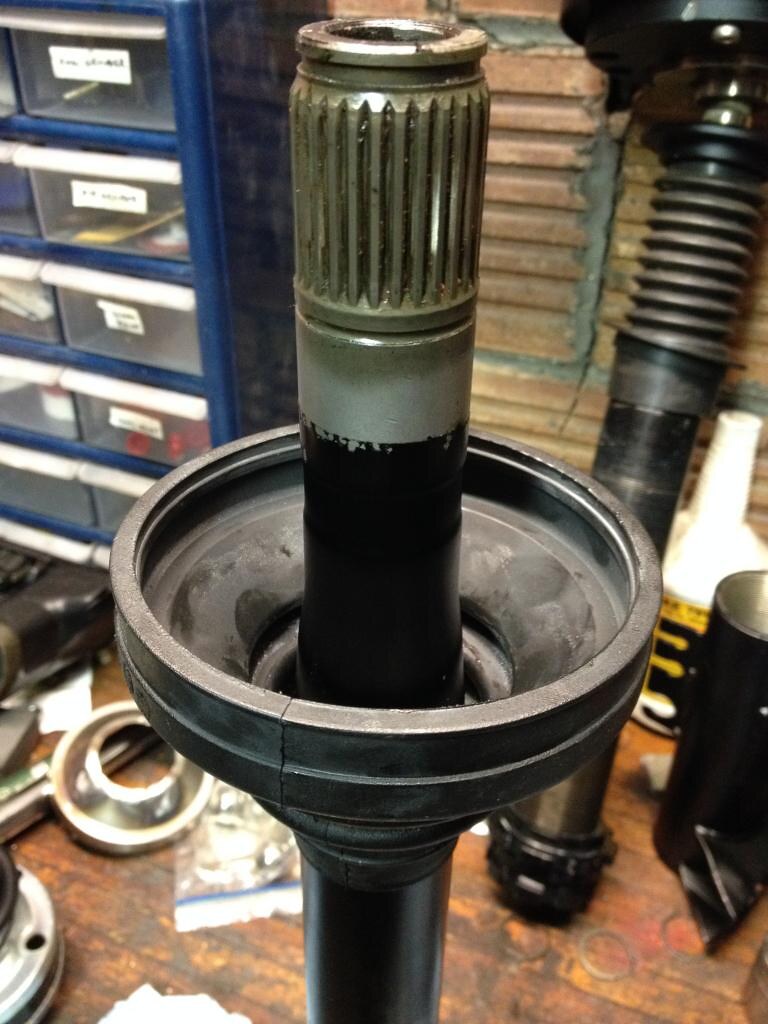
Moving on. Slide on the boot. I found that it is much easier to do this after removing the lower snap ring.
Slide on the retainer cap. It's easier during assembly if you press the boot around the perimeter of the cap temporarily to hold it in place and to keep it from sliding around / getting in your way.
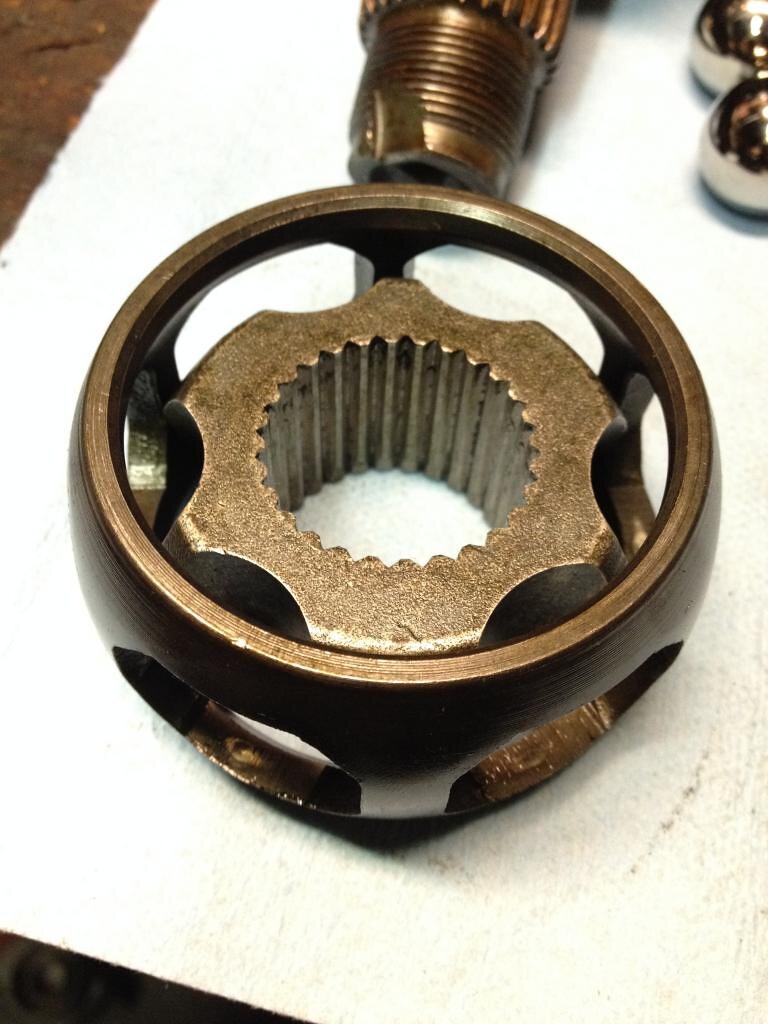
Replace lower snap ring and inner race "washer".
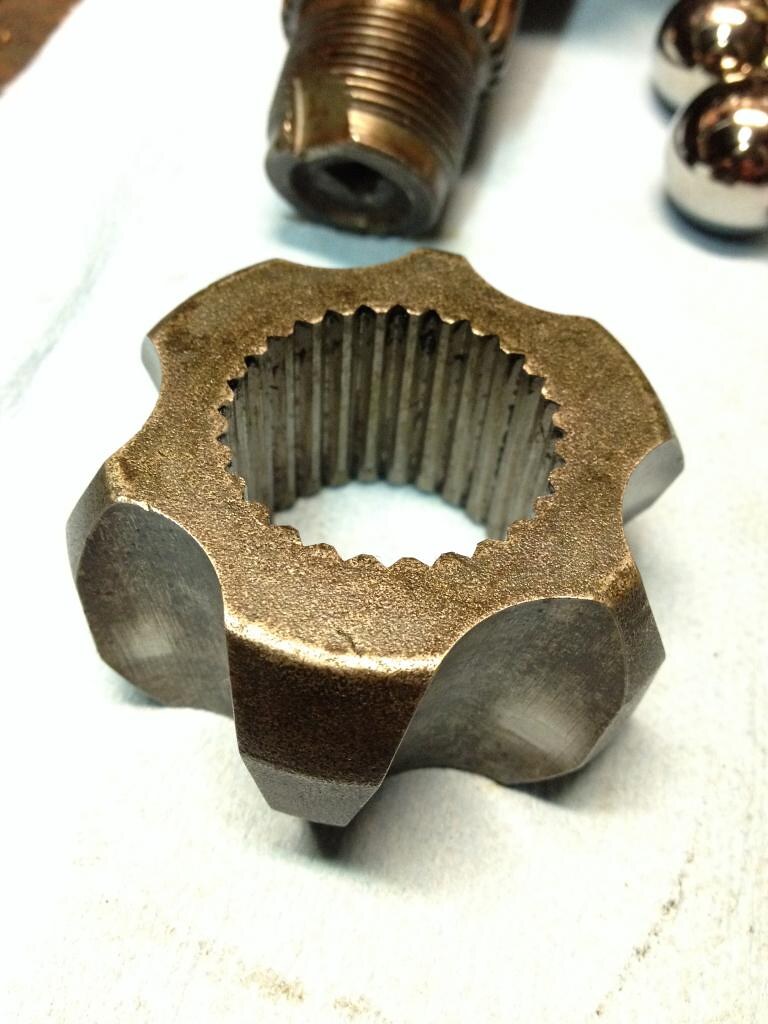
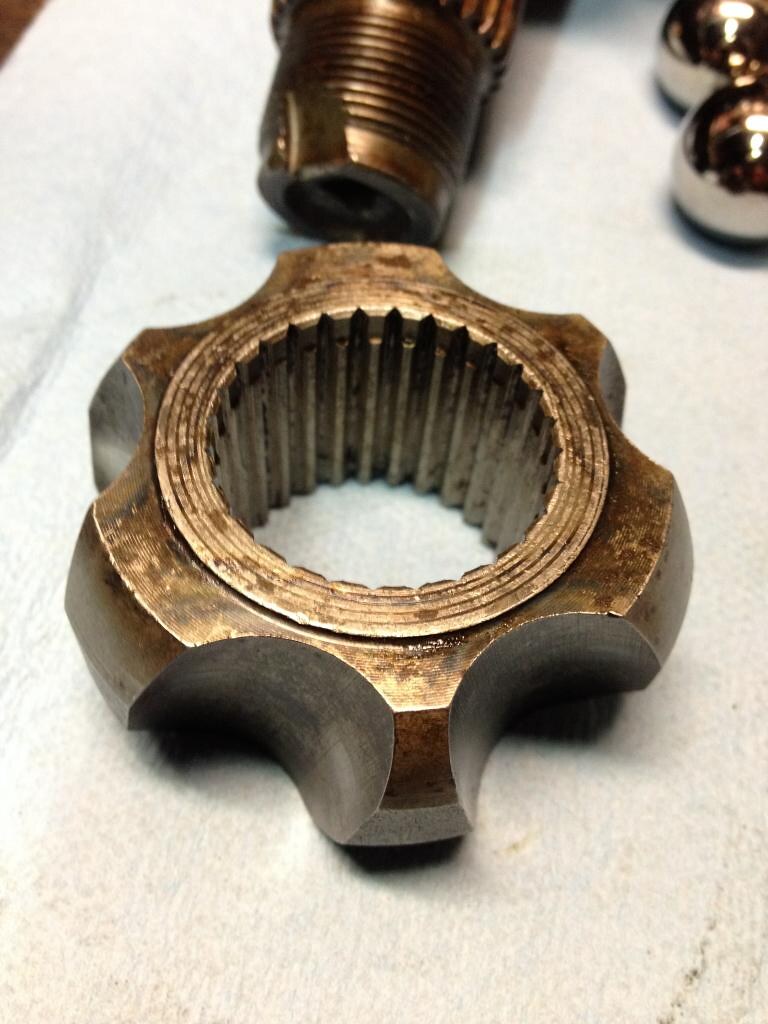
Install inner race into the cage before installing on the shaft splines.
Press the inner race / cage on until the snap ring groove is exposed and install the (new) snap ring.
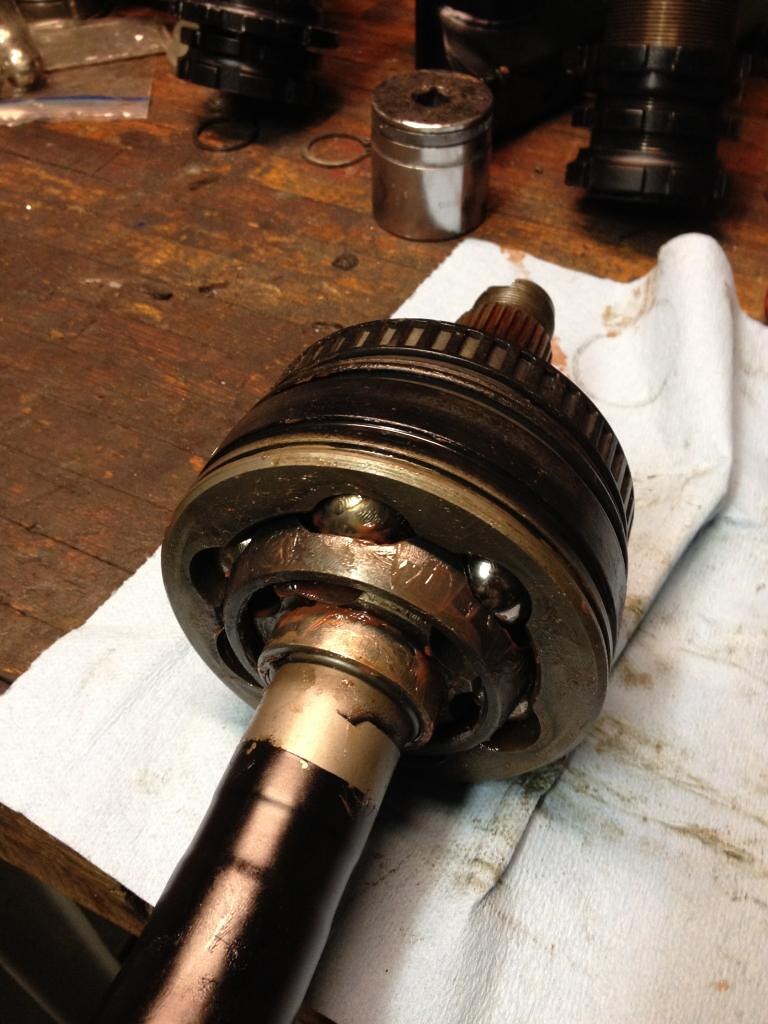
Lightly lubricate the inner race and you're left with this
Before continuing - a note on orientation. It's the same as the inner joints, mate the thinner section with the wider section.
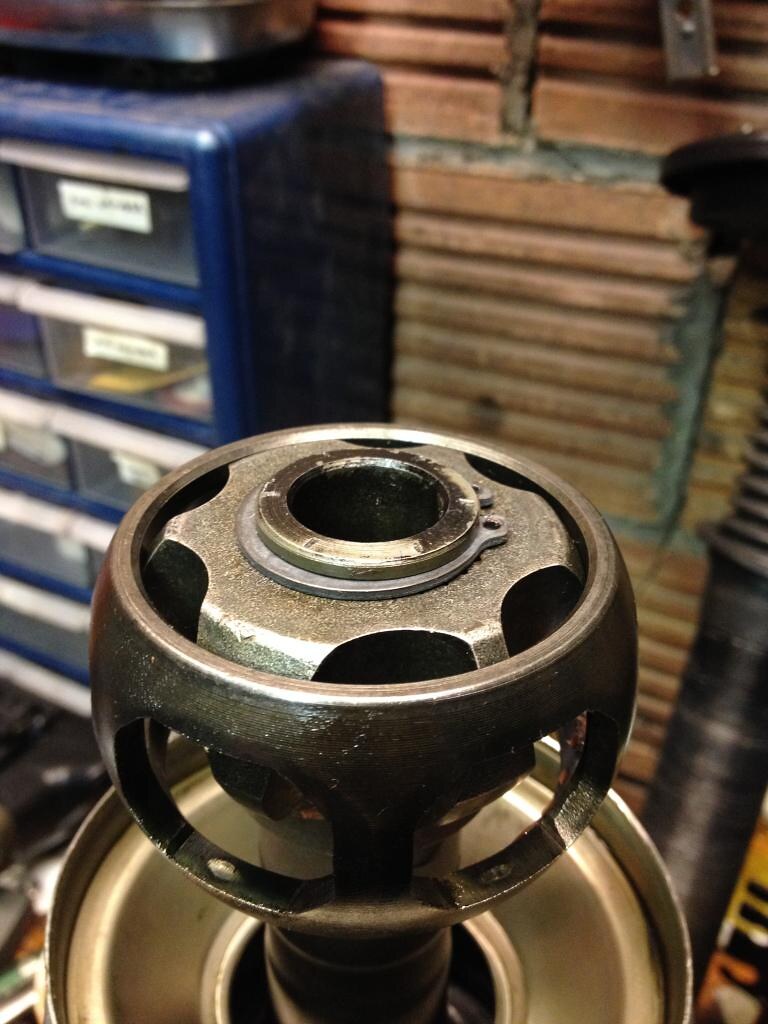
Now comes the hardest part - getting the bearings back in. I found it best to lay the housing down on its side on the end of your bench for a couple reasons. 1) you don't have to support the weight of the shaft as you're manipulating it to work everything in, and 2) it gives you more room to work.
I'd suggest to start by installing every other bearing, then work in the others. After installing each one, don't try to force it back into the neutral position if the shaft is stuck at an angle...this is a good way to drop bearings. Work at it a bit and let it find its home. You'll find that there's a sweet spot where the bearings become unloaded and everything will drop right back in.
Once you get all the bearings installed, move the shaft back to the center and then DON'T LET IT MOVE. At this point the retainer cap isn't on to prevent the axle moving far enough to drop bearings into the bottom of the cup and cause you to start all over again.
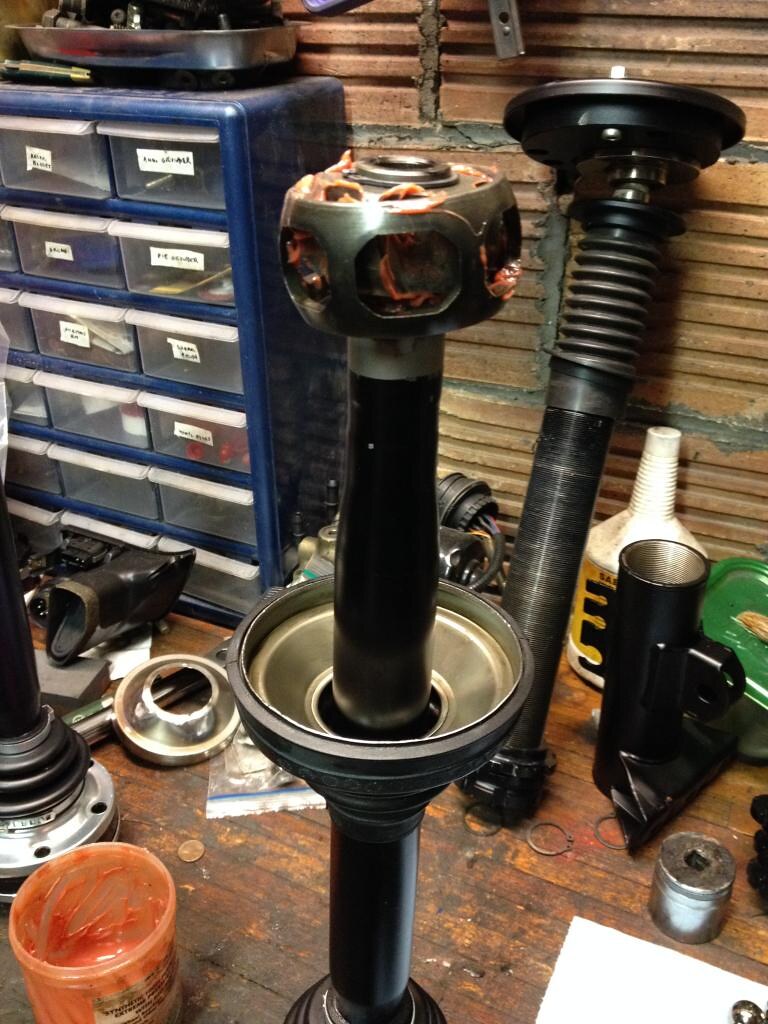
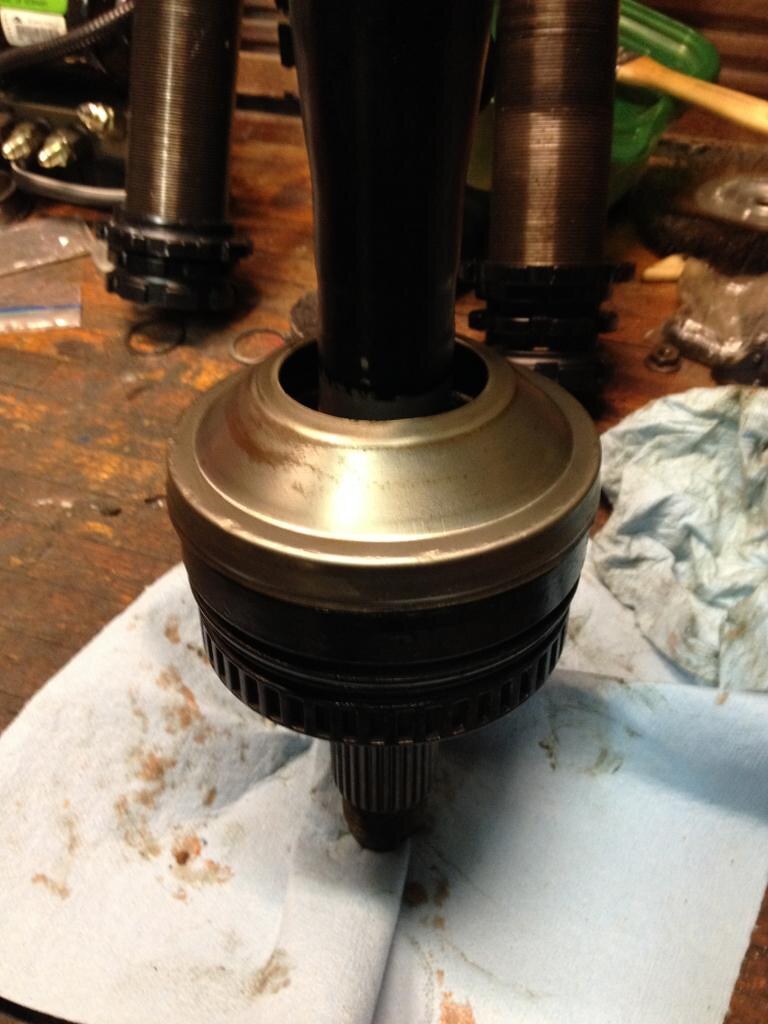
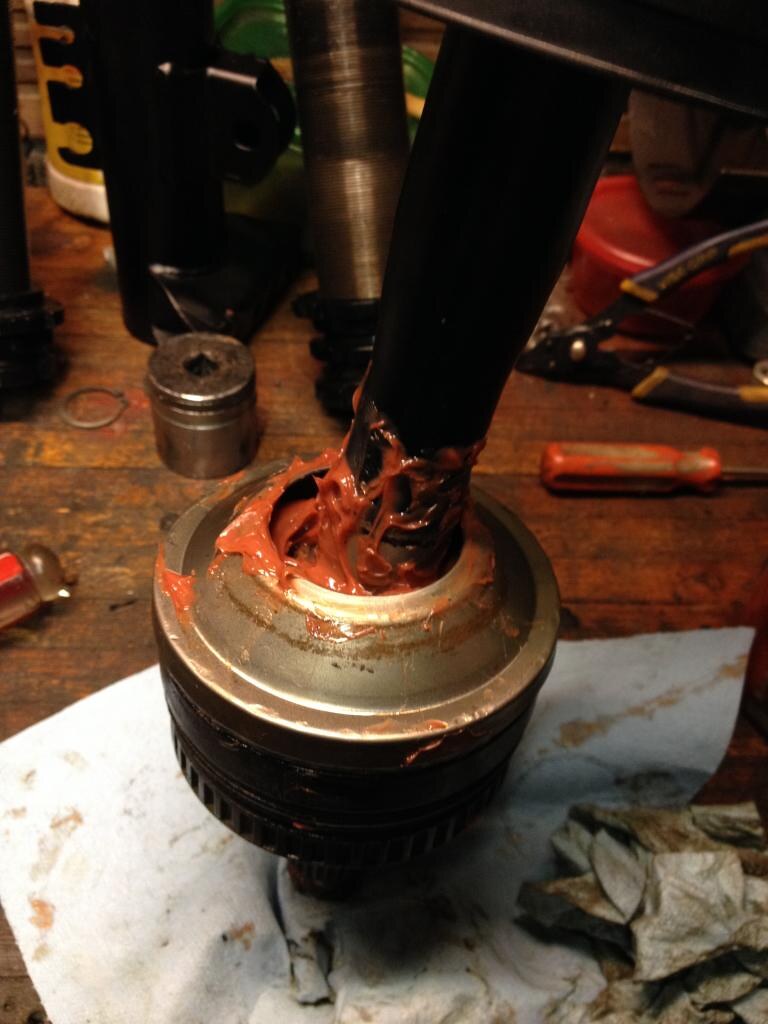
Carefully bring everything into the upward position, separate the retainer cap from the boot and then hammer it down onto the housing.
Recrimp the cap to the housing with a hammer and screwdriver
Pack the joint to the gills in your favorite grease. Redline CV2 is good stuff.
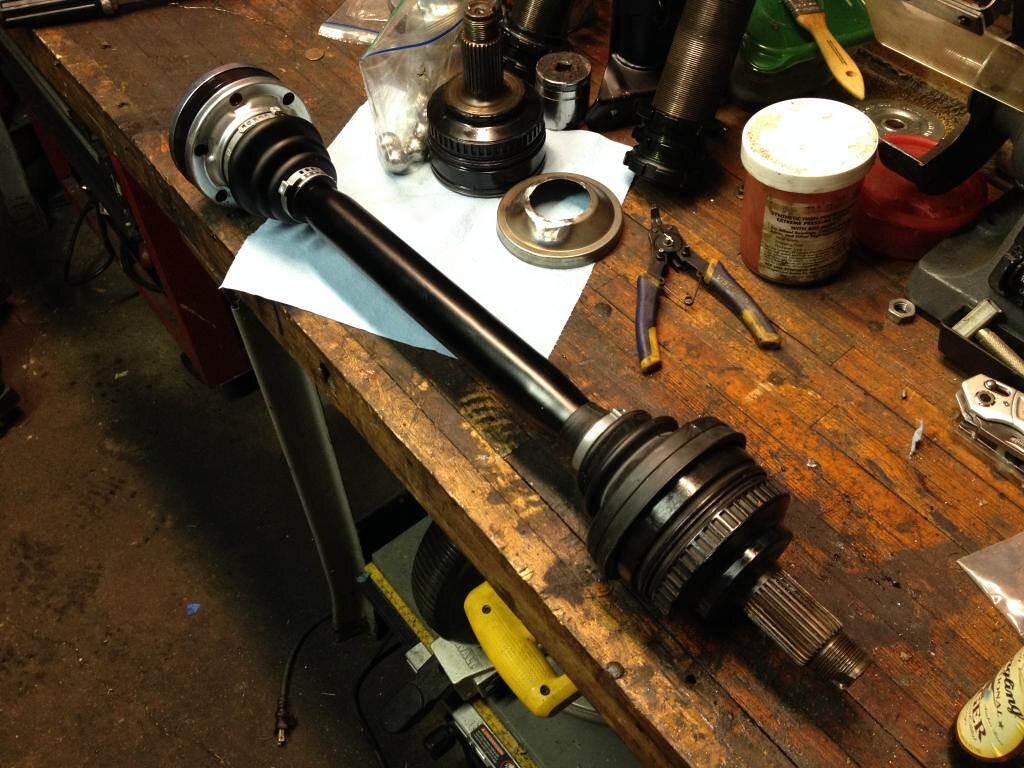
Slide the boot down over the joint, secure your boot clamps, and enjoy your (fully) rebuilt halfshaft.
**As a side note, I will mention that the large oetiker clamp provided with the outer boot kits I bought from pelican parts do not fit after putting everything together, so I will be getting ones that do fit from Napa.
Hope this helps guys, really not as hard or as complicated at this DIY might suggest given the number of pictures but figured more is better than not enough. With some practice, it doesn't really take any more time than doing the inner joints.
- - - Updated - - -
Tedious. And this is how I spend Saturday evenings.
Member
Fantastic write up, thanks for updating the thread and keeping it alive. I saw the first page and was disappointed the pictures were gone. I'm. Glad I continued through till the end
Member
Anyone have any luck with boots and clamps for the outers that clear the control arm?
1998 M3 Sedan - LS3 M12T56 - A bad addiction.
Member
Yes. Just do an Amazon search for 'axle boot clamp tool' . Pick the tool and clamps you like best.
See ya later,
tony
'98 M3, '92 Dinan3, '05 R1100S BCR, '07 R1200S, Aprilia T
Member
Less snark from me, but essentially: Last time I did a rebuild, I used a few different boots because the oetiker clamps were hitting part of the control arm.
I had some rebuilt E36M axles done by a forum member, and it's still slinging grease 2000ish miles later ( I dont drive much because of work). So I'm looking to get a spare set again and have them built and clamped down proper.
Also I'll be trimming part of the control arm so that the buttress doesn't interfere with the clamp swipe path as it makes each revolution.
So I'm back to redline cv2, some 930 inners, agnostic on inner boots, but the outer boots is where I'm being persnickity. If there's a go to on the outer boot, I'm all ears.
And I got more oetiker clamp tools than I can shake a stick at.
EDIT:
So it appears that the CV outer cup is used on quite a few bmw's. The spline count and diameter of the stub portion is the same, I'll suppose the length is as well. If the tone ring can be slipped off the stocker; a comparable diameter cv outer may work. When I rebuild a set, I'll get some junkyard ones to breakdown.
If this works; then the axles themselves can be nearly fully replaced, i.e. 930 inners, new tubing, then to the rzeppa outer. So long as the outer CV joint overall diameter is within the room available, then the length of the cv joint towards the inboard matters less.
Last edited by OKsweetrides; 01-06-2020 at 11:45 PM.
1998 M3 Sedan - LS3 M12T56 - A bad addiction.
Member
Thanks everybody for the posts.
I'm struggling with getting the bearings back into the outer CV joint tonight. Just sharing the frustration. Going to sleep on it.
---------------
*ninja edit
I don't recommend buying the GS-P halfshafts. I purchased a set about a year and a half ago when the subframe was out and I noticed some tightness in my original ones. At the time replacement boots were unavailable so I thought I'd roll the dice on a set of the cheap Chinese replacements.
18 months and about 25 hours of track time later one started making some god awful noise and the other one was about to go as well. I haven't opened up the GS-P shafts, but the watery grease oozing out isn't a good sign. I'd suspect they aren't using steel as hard as the GKN joints, combined with cheap grease they simply can't handle track abuse.
That said I've had a set of GS-P on the front of my 325 wagon for about 30k miles and they are fine so far, so it seems they are adequate for regular grocery getting.
Perhaps I'll have a little more luck with my e36 shafts after a nights sleep.
Last edited by BrianSalo; 09-12-2021 at 12:25 AM. Reason: add information
Member
Went together in about 20 minutes this morning. There is something magical about a little sleep to let the brain digest information.
The magic, as mentioned above, was to limit how much the cage tilts, and load the balls with the joint extended as far as it will reasonably go.
 Posting Permissions


 Reply With Quote


Bookmarks