
 Member
LolOriginally Posted by E34DIYer

87 Zinno Cabrio 98k Barn Find. Build thread http://www.r3vlimited.com/board/showthread.php?t=268987
87 Lachsilber ETA Time Capsule. bought w 125k from 87yo original owner
Cabrio deck lid & hinge struts (w sleeves) now for sale. See the link below for more info
New "made in Europe" seat shocks. PM for details
http://www.bimmerforums.com/forum/sh...ot-Seat-Shocks
Member
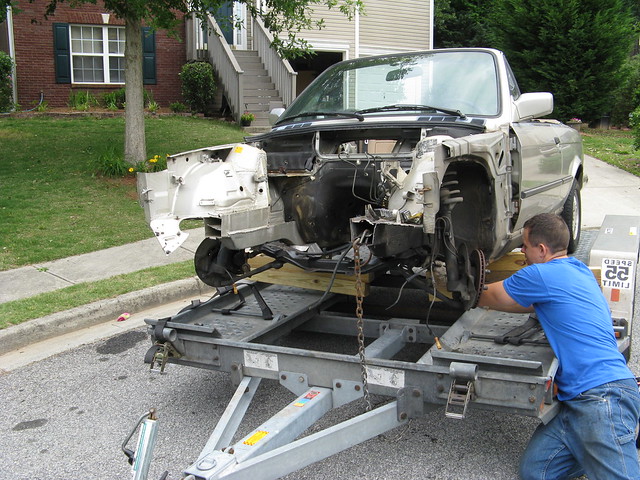
As planned, the original project chassis made its final ride on a U-Haul auto trailer to the scrap metal recycle place with a stop at E34DIYer's place to remove the front suspension and radiator support frame. During all of this E34DIYer managed to work out a deal for another parts car for one of his projects so after dropping off the E30 chassis at the recycle place we made a 140 mile round trip to pick up that car since we had the U-Haul trailer rented for the day. When I got home I removed the carpet shell from the new project car and was delighted to find the interior floor area in almost perfect, rust-free condition. I also connected the battery for the first time and found that all of the electrical stuff functioned normally. The OEM radio and amp even sounded good and the power antenna worked. The instrument panel lights were bright and clear and the on board dash computer worked too. Looking good so far!
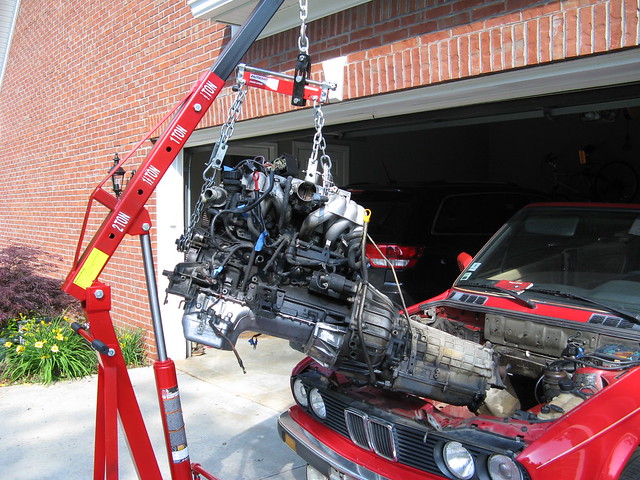
E34DIYer runs a mobile chop shop in front of his house!
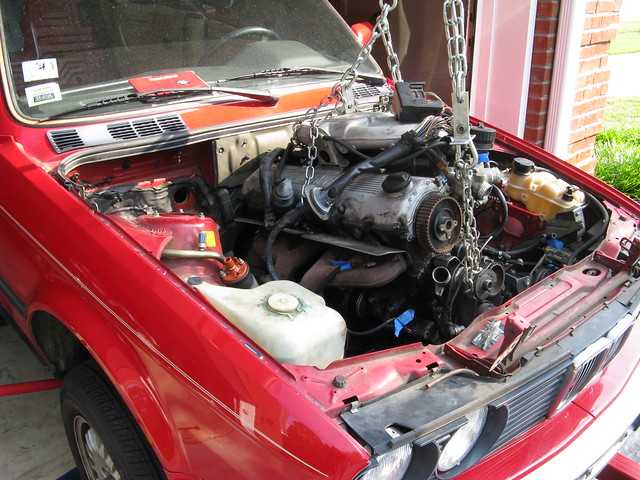
Carpet shell removed Time to start the engine removal process. The timing belt gave out on the previous owner so the valve train and possibly the pistons are damaged. Not a problem for us because we are building a new engine, and we are planning to swap the auto trans for a 5 speed manual. Today I removed the hood and radiator. Fortunately for me the previous owner removed the timing cover, belts and hoses to inspect the old timing belt, making the engine removal easier. We plan to remove the engine and transmission together since the trans is coming out anyway.

Last edited by JimBobs 91E30; 03-25-2016 at 04:56 PM.
Member
I made a checklist and went over everything several times to make sure I disconnected everything. I didn't miss a thing! For me the most difficult part was removing the drive shaft. Supposedly you can disconnect the rear differential flange and center bearing support and it will clear the flange and come out. The trick is to unscrew a locking sleeve in the center where the two half shafts meet to let the rear section slide up on the splines, but I never could get it to slide so I ended up removing the flex coupling (guibo) at the transmission. (Never heard of a "guibo" until I started working on these cars! Just called it a flex coupling). The other tip that really helps is to raise the rear of the car and support on jack stands. It makes the removal angle much better. I also left the engine wiring harness intact and disconnected it from the ECU and pulled the cable through the firewall into the engine bay.
Last edited by JimBobs 91E30; 03-25-2016 at 03:10 PM.
just quiet not antisocial
And here I was looking forward to an m60b30 swap into that other vert chasis.
PM me for info on properly working AC and CEL for your S54 or M54 swapped car.
Member
No way!!
E30 325iC turbo convertible project in progress (updated 12/23/15):
Car fully tuned on completely rebuilt M20 w/forged internals, MLS head gasket
Suspension, brakes, exhaust fully installed
New carpet, custom reupholstered seats installed, door panels painted to match
Custom center console gauge panel installed
Plastic bumper conversion complete, MTech2 front spoiler installed
Rear bumper conversion in progress
Build thread: http://forums.bimmerforums.com/forum...on-engine-swap
Member
We have been slowly progressing so not much to report until now. I installed the ARP cap studs after chasing the threads and then installed the main bearings and caps, using 60 ft/lb torque as specified by ARP. I had placed Plastigauge green in place before installing the caps but when I removed them the Plastigauge had not compressed and I could feel considerable movement in the crank when I pulled up and down on it. All of the caps were completely seated so it is not a matter of the bearings needing to be trimmed. We had previously taken the crank to Brad's Machine Shop in Gainesville where he was supposed to check and magnaflux it. He told us that the crank still met the STD specs. I checked the numbers on the bearings and they were definitely the correct ones for our block and they were STD. Either there is a problem with the bearings or the crank has been turned previously. I do not have the proper gauges so I took it to Slack Auto machine shop in Gainesville for another check. Slack has been in business for a long time and they have a very reputable shop. Anyway, we are waiting for the results to see what is next.
In the meantime I decided to start disassembling the engine that came out of the new project car (the one that had a broken timing belt). I thought I might want to take a look at the crank in that one in case the other one didn't work out. When I disassembled the head I saw an ugly sight. There have been plenty of postings of heads destroyed by broken timing belts, but here is ours. One rocker support was shattered and two others were cracked all the way through. Every piston had struck a valve and there was a heavy layer of varnish inside the top. With the head removed the crank is still difficult to turn with a pull handle. It will be interesting to see what the bottom end looks like.

Last edited by JimBobs 91E30; 03-25-2016 at 03:13 PM.
Member
A quick update on the crankshaft bearing situation. I got a call from Slack's today and they found that the main journals were .010" undersize but the rod journals were std on the original crank that came with our block. On the second crank that I took to them the main journals were standard but the rod journals had been turned .010" under. Since the expensive ACL main bearings had already been installed we decided that if the second crank looks ok after a magnaflux check we would go with it and use undersize rod bearings. So much for the first shop telling us that the crank was standard. I think they must have just checked the cylinder bores and assumed that the crank was standard. Anyway, I bit the bullet and ordered a set of micrometers today so this will not happen again. Hope to hear from Slack's tomorrow or the next day.
Last edited by JimBobs 91E30; 09-28-2014 at 04:48 PM.
Member
I finally picked up the block at Slack Auto today. The crank was magnafluxed, polished, and all journals were checked for size. As perviously stated this is the second crank and the main bearing journals were standard while the rod bearing journals were .010" undersize. Our ACL main bearings are good to go and a plastigauge check shows all clearances within specs. The instructions that came with the ARP main bearing cap studs say to insert the studs finger tight but I found that some of the studs were a little too deep and the nuts would not go all the way on so I re-installed them so that there was 65mm from the base of the stud at the block to the top of the stud. All of the threads were inside the block.
Picture shows the nuts not completely seated on the stud. Especially obvious at the center (bearing #4).
Picture below is with the main bearing cap studs set at 65mm height and nuts torqued to 60 ft/lb as specified by ARP.
As we said before, we had taken the original crankshaft to a local machine shop for a magnaflux check, polish, and sizing, a very routine and common procedure. When we got the crank back we were told that all journals were within STD specs.....but not so!
The machine shop even marked the crankshaft as M R STD (Main, rod standard).
After installing the crankshaft with new ACL main bearings the crank was obviously too loose. I took it to Slack Auto Machine Shop and they gauged it and said that the main journals were .010 undersize. I verified it with my micrometer. Nominal main journal diameter is 2.3622 in. I measured the front main journal at 2.3512 in. for a difference of 0.011 in.

Last edited by JimBobs 91E30; 03-25-2016 at 03:16 PM.
Member
Keep up the good work. Excited to see this come together. Subbed.
Member
OK, I am getting bored waiting on the pistons and cylinder head to arrive so I am working on other stuff specific to the engine bay. I decided to swap the auto pedal box for the manual one. There are some good write-ups so I won't go into all the details but I would like to mention a couple of things I consider necessary to make this easier. Actually it was not as difficult as I had been led to believe. After removing the return springs and clevis pin for the brake pedal there are just 6 13mm bolts holding the assembly in place, four on the firewall and two on top of the box bracket. There are plenty of wires that tend to find themselves in the way but you can move them out of the way without too much trouble. If I did it again I would zip tie them neatly out of the way.
Below is a photo of the lower mounting studs. The other two are directly above. A long extension is really helpful and I did not need a universal socket adapter. Remove the accelerator pedal spring too.
Carefully work the pedal box loose and remove it, being careful not to snag any wires. Notice the difference between the auto and manual pedal assemblies. The manual one is boxed in at the end while the auto one is open. You will not be using the four tabs on the outside of the box, but the two holes you will be using are not visible in this photo. Without a little "adjustment" it will be extremely difficult to install bolts in the original mounting holes.
I removed some metal above the mounting holes with a Dremel tool. This turned an extremely difficult task in to a "piece of cake". It looks to me like you could cut the entire boxed area off beyond the mounting bolt holes (inside box). The tabs will not be used. Since there was room to mount it as is I elected to leave it as is.
Starting to look like a real performance car!!!
One more tip...The four studs that hold the pedal box to the firewall are also the ones that hold the brake vacuum booster on. Since you have the nuts removed anyway you may as well remove the brake fluid reservoir, disconnect the two lines to the brake master cylinder, remove the vacuum line from the booster drum, and pull the assembly out. The plunger and boot from the vacuum booster protrude through the firewall and through the round opening in the pedal box bracket and you probably will not be able to clear the plunger and boot with the vacuum booster still in place. It sure makes it a lot easier.
Last edited by JimBobs 91E30; 03-25-2016 at 03:18 PM.
Member
Is anyone a big fan of cruise control? Why, you might ask? Well, it's like this...On cruise control equipped E30's there is a bracket with a switch on the clutch pedal side which has the sole purpose of turning the cruise control off when the pedal is pressed. My pedal set must have come from a non cruise control car because it does not have this bracket. The bracket is actually separate from the pedal box and is held in place by the main bolt that holds the pedal on. All cars have the wiring. On the automatics the plug is closed all the time with a jumper. I could find or fabricate a bracket but I was thinking of maybe just leaving it with jumper in place all the time. It would still disconnect when the brake is pressed, just not when the clutch is. My other thought is I might just remove the cruise control completely. I do not use my cruise very much on my other vehicles except on long trips on the Interstate and the type of driving I will be doing with this car will not have much need for cruise. Opinions invited.
Member
Cruise control is for the weak. Disable it!
E30 325iC turbo convertible project in progress (updated 12/23/15):
Car fully tuned on completely rebuilt M20 w/forged internals, MLS head gasket
Suspension, brakes, exhaust fully installed
New carpet, custom reupholstered seats installed, door panels painted to match
Custom center console gauge panel installed
Plastic bumper conversion complete, MTech2 front spoiler installed
Rear bumper conversion in progress
Build thread: http://forums.bimmerforums.com/forum...on-engine-swap
Member
If you don't disable the CC then I would recommend going ahead and trying to get the clutch disconnect to function properly otherwise if you brainfart and depress the clutch while you've got the CC engaged it could lead to an engine race condition.
e30 Vert project
"The two loudest sounds a gun owner hears is a bang when he expects a click and a click when he expects a bang"
Recently heard - "The shear number of people who have made me wish there was a hell for them to rot in has forced me to re-examine my atheist beliefs."
Member
Believe it or not I didn't even think of that! That narrows it down to two choices.....All or none. I am leaning toward "none", even if DIY34er did suggest it.. I will probably never use it anyway, and the more excess parts and wiring I can remove, the better. I don't know if this one even works, and I sure don't want to fix it if it doesn't.
Member
Let me know if you delete your entire cruise control setup, I may be interested. One of my long term goals is to get mine working reliably. No idea what is wrong with mine, but spare parts won't hurt the troubleshooting process.
senior LOUNGE theologian
I like cruise control on my car now, it's just an eta cruiser though. My old car was stripped out and I was boy racer(I thought) so I removed it. I didn't miss it on short trips around town but long trips on the highway were tedious. If it works, keep it. If it doesn't and isn't an easy fix, remove it.
Member
Moot point now. Removed. rjohs check PM.
Last edited by JimBobs 91E30; 06-12-2014 at 09:12 AM.
Member
Bimmerheads M20 performance head due to arrive next week. Wiseco pistons are supposedly about 3 weeks out.
E30 325iC turbo convertible project in progress (updated 12/23/15):
Car fully tuned on completely rebuilt M20 w/forged internals, MLS head gasket
Suspension, brakes, exhaust fully installed
New carpet, custom reupholstered seats installed, door panels painted to match
Custom center console gauge panel installed
Plastic bumper conversion complete, MTech2 front spoiler installed
Rear bumper conversion in progress
Build thread: http://forums.bimmerforums.com/forum...on-engine-swap
Member
It is a good time to start replacing air conditioning parts since the lower dash, glove box, and ECU harness are out of the way. Having the seats out and carpet shell removed are also helpful. All the other AC parts, including the compressor, condenser, dryer, pressure switch and expansion valve have been purchased for conversion to R-134a so I decided to go ahead and replace the evaporator too. I purchased the Seltec 488-45021 compressor and mounting bracket upgrade to replace the OEM setup. There are some excellent write-ups on the AC conversion so I will not reinvent the wheel here but I will mention observations particular to my setup.
Removing the evaporator was not difficult. It was mentioned that removing the T-15 torx screw nearest the firewall on the access panel was a real pain, but I used a small torx screwdriver was able to get to it without too much trouble. I did have to locate the screw by feel as I could not see it.
I did find a surprise, though. The system had already been upgraded to R-134a. There was an R-134a sticker on the expansion valve and a "Made In USA" sticker with a date of 12/98 on the evaporator.
I might not have ordered a new evaporator if I had known that it had been upgraded but probably would have replaced everything else. Anyway now I will have a new AC system. The biggest problem I had was removing the larger hose fitting (suction line) from the expansion valve. It turned OK inside the housing but the nut was frozen to the line inside the flange and it was damaged during removal. That means a new expansion valve-to-firewall hose and the best price I can find on them is close to $100. I plan to check with some local AC shops to see how much they would charge to fabricate one for me. Notice the green O-rings on the hose ends. Another sign of the R-134a conversion.
The other surprise I received was what fell out when I removed the evaporator access panel. Looks like a new blower unit is forthcoming.

Last edited by JimBobs 91E30; 03-25-2016 at 03:21 PM.
Member
The squirrel has escaped...
But not before eating his cage! Reckon the PO noticed all the noise and vibration???It had to have taken a while to do that much damage. And we just got rid of two heat/AC boxes!
At least the resistors look good. Oh well, going shopping for another heater core/evaporator box.
Been thinking (I know, dangerous)... would this work??? I could take a strip of aluminum and shape it to cover the ripped out plastic area. Then drill several small holes thru the aluminum and plastic along the edges of the aluminum. Coat the edges with epoxy (JB Weld) and force them together, squeezing some of the epoxy through the drilled holes.. The holes would let some of the epoxy flow through to make a better bond. I had thought about fiberglass but I am concerned that some of the resin would drip through. I am really not keen on removing the entire assembly and replacing it. Think it might work?
Last edited by JimBobs 91E30; 03-25-2016 at 03:22 PM.
Member
Sure it should IMO. It's not a complex shape that you are covering and it doesn't look to have much if any stress applied to it. I'd think a thin sheet of aluminum or plastic if you could find something with the same dimensions (thinking a large plastic mug, etc... cut down to size) and super glued in place will probably last as long as the car. Reason I'd try to find something plastic as well is that you could use any number of cements/glues that'd be easier to deal with than epoxy and probably have a faster set time.
Edit: Maybe something like this

Last edited by braddammit; 06-14-2014 at 04:22 PM.
e30 Vert project
"The two loudest sounds a gun owner hears is a bang when he expects a click and a click when he expects a bang"
Recently heard - "The shear number of people who have made me wish there was a hell for them to rot in has forced me to re-examine my atheist beliefs."
Member
I have a set of exp valve to firewall hoses if that would help ?
87 Zinno Cabrio 98k Barn Find. Build thread http://www.r3vlimited.com/board/showthread.php?t=268987
87 Lachsilber ETA Time Capsule. bought w 125k from 87yo original owner
Cabrio deck lid & hinge struts (w sleeves) now for sale. See the link below for more info
New "made in Europe" seat shocks. PM for details
http://www.bimmerforums.com/forum/sh...ot-Seat-Shocks
Member
Thanks, Jeff. We have a set in VGC from one of DIY34er's multitude of parts cars.
Concerning the blower housing repair, I think I am going with the aluminum because I need a little rigidity. The plastic is somewhat flimsy near the top where the housing was separated by the damage and the aluminum will help keep the shape of the curve.
senior LOUNGE theologian
Was your system still using the serpentine style condenser? My 84 has been swapped too, new pump and everything, but the condenser is still that old design.
Member
I am trying to closely follow the excellent conversion guide found here - http://www.e30tech.com/forum/showthread.php?t=113435 . I ordered p/n 64538391509 as suggested by the author, but after looking at the old condenser, which is still in the car, and the new one, it appears to me that both are the tube and fin style. I am not sure if the one in the car is the original one either. I need to do some more research, as it looks like the parallel design is more suitable according to the article. More confusion.....
The condenser on on top is the one that came in the car, and the new one I ordered (64538391509) is on the bottom.
Well, after some further study and educating myself on automotive air conditioning, I definitely have tube and fin condensers. To make up for the less efficient cooling of R-134a I need the most efficient condenser I can get, which seems to be the parallel style. I haven't been able to locate an exact fit in the parallel yet but I have found some serpentine types which are more efficient than tube and fin and might prove sufficient. Anyone know of a source for parallel condensers that fit the E30?
Last edited by JimBobs 91E30; 03-25-2016 at 03:24 PM.
 Posting Permissions


 Reply With Quote
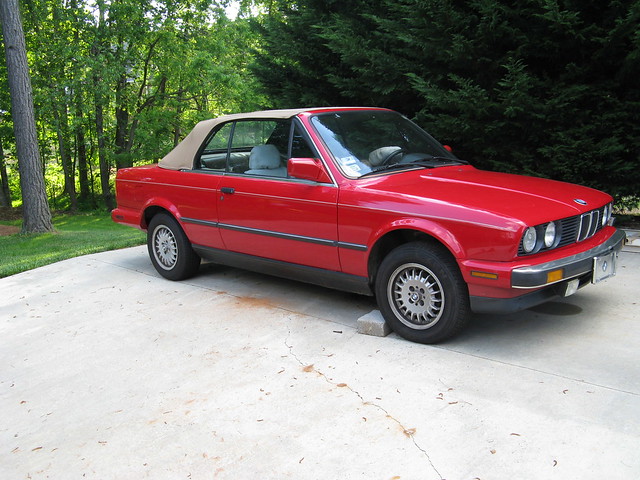


Bookmarks