
 Member
love this thread! keep up the good work.
Member
Nice! I'm amazed that you did your first test fit install by yourself! That's impressive.
Looking forward to seeing you put in the headers without any help now... :P I recall having one person prying on the engine to tilt it (for the drivers side header).
Member
Thanks for the encouragement guys! A little bit at a time. She'll get done eventually
Doh! I hope it's not that cumbersome. It's so cool to actually see it sitting in place, even though I know it's coming back out.Originally Posted by jai5

Tipsy
Member
Keep up the good work! Your attention to detail will pay off in the end.
Member
I finally got back to it today. I'll admit, I got a bit intimidated back in November. After setting the engine in place, I tried to get the headers installed to no avail. For whatever reason, that caused me to hit a bit of a mental wall. But with nearly all of the cool weather behind me and almost no progress, I decided it's time to get over that wall. By the way, looking at the progress in some of the other build threads here really helped to get my ass back in the garage. I look at the fabrication work you guys are turning out with the various turbo installs and custom exhaust systems, etc. and I thought, am I going to let something as trivial as fitting headers side track this build? So, thanks for the motivation.
I don't know if this is the only way to get it done but the drivers header was not going to drop in from above. I removed the valve cover and the bolt securing the engine mount to the frame mount. I then lifted just the drivers side of the block with the engine hoist as high as I could. No go. I then removed the motor mount from the engine block. Still no go from above. I finally gave it one more try from underneath. I stood the header upright and slid it toward the rear from the front of car. Voila! I was able to lift it into place!
For the passenger side, I also raised the engine as high as it would go (just the passenger side of the engine) and removed the engine mount from the block. In this configuration, I was able to drop the header in from above.
Right now they're just loosely hanging from a few bolts with no gaskets but it's a small victory. I ordered the JTR headers in bare metal because I'd figured if I got them already coated, I'd scrape the sh*t out of the coating trying to figure out how to get them fitted. I think this was a wise decision.
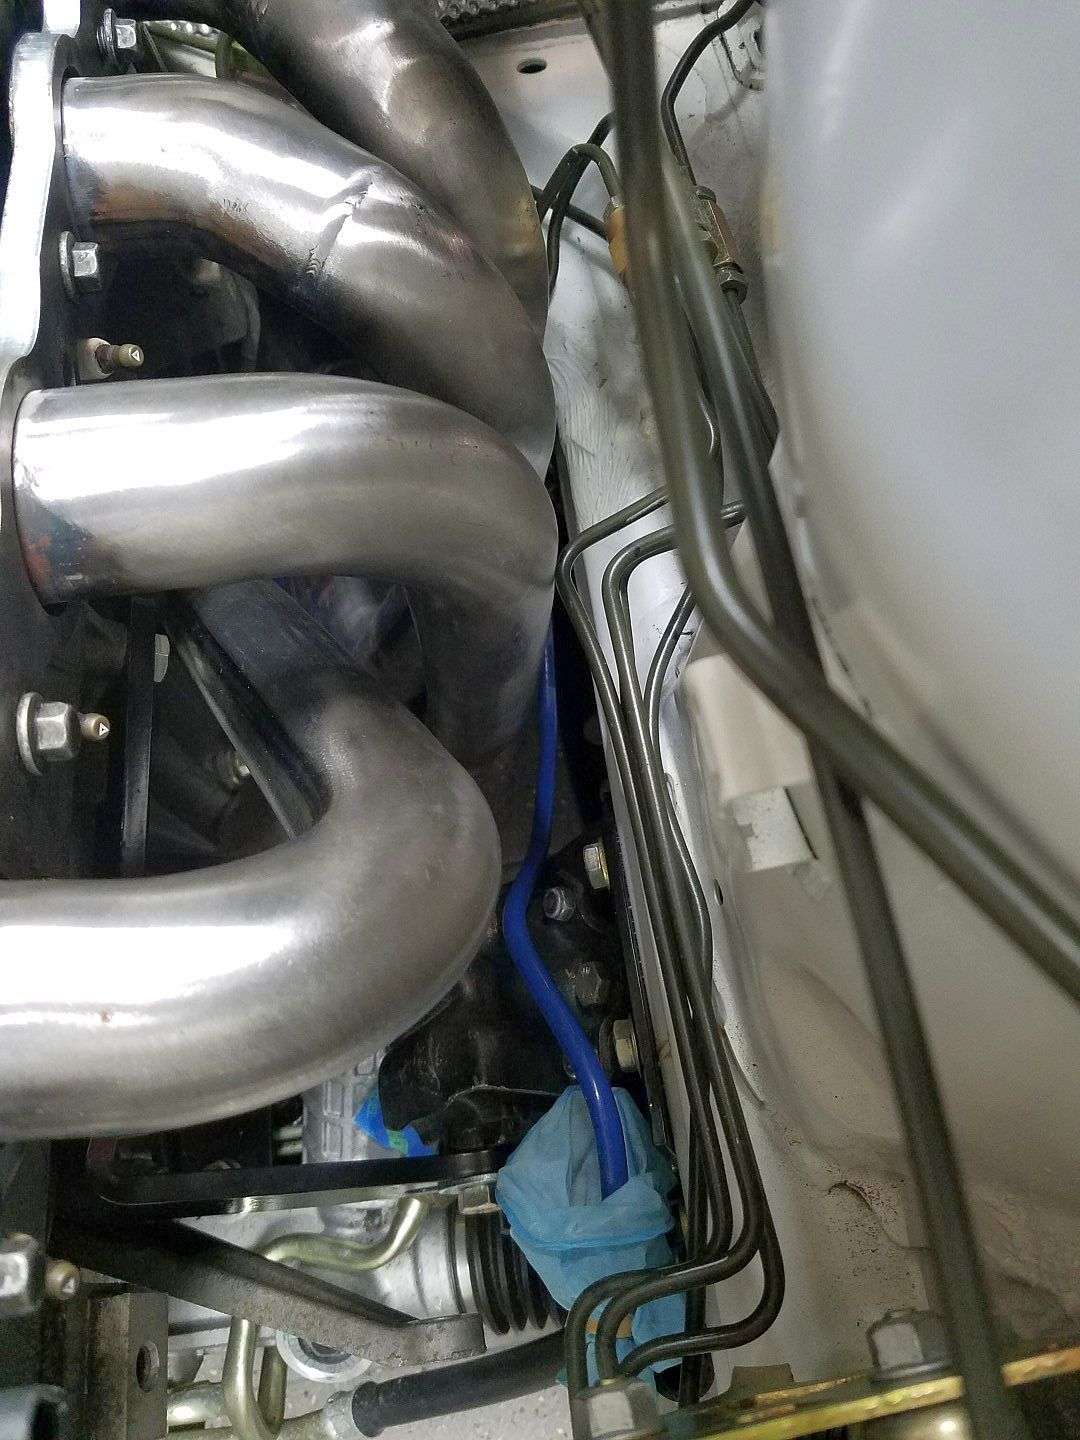
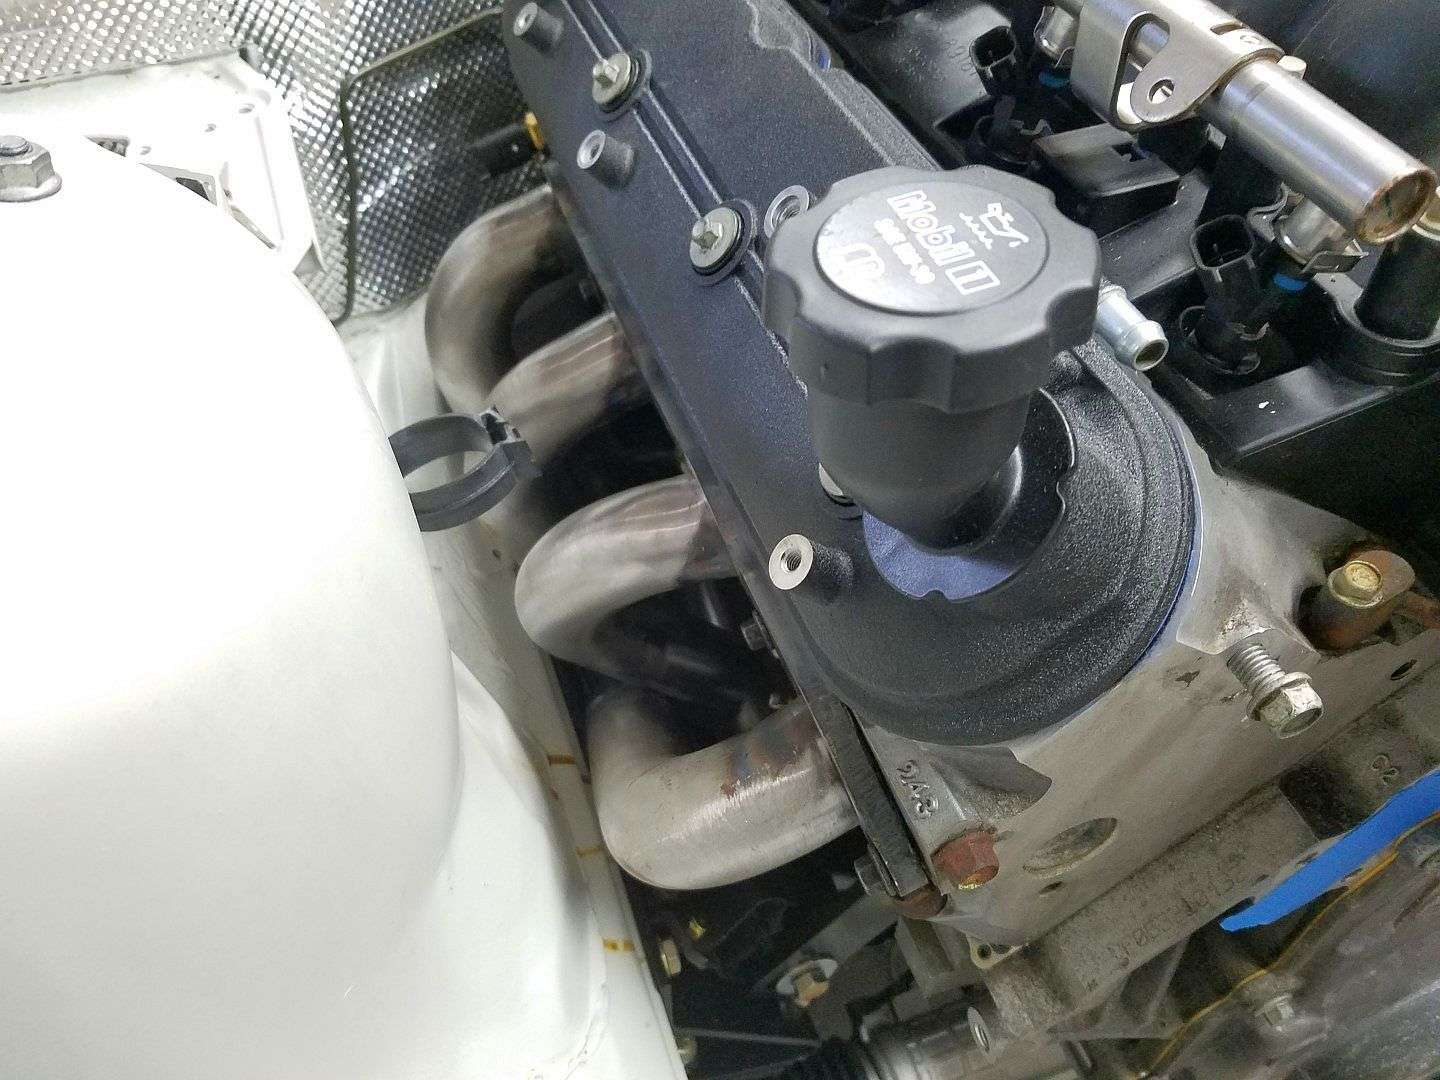
And the test fit is proving useful. One of my brake lines is making contact with a header tube. I can pull the brake line out of the way (and hold them back with a clamp or cable tie), but I'm not sure that's a good idea. I'm thinking I might have to bend-up a new line or two. Also, the drivers header seems to be in contact with the top rear bolt of the motor mount. I'll have to take a closer look at that.
There might be an easier way to get the headers in and out but lifting the engine one side at a time and removing each of the motor mounts is what worked for me.
Tipsy
Drivers Side
Pax Side
Brake line contacting header tube
Last edited by TipsyMcStagger; 03-20-2016 at 08:06 PM.
БМВ Фанат!
Hey Brad, glad to see you back on your project!
Of course all headers are different, but what worked for me was to support the engine on the hoist in its position with both engine mounts unbolted/removed. Then you can easily shift engine from side to side with your hand while sliding the headers into place... Still painful, but was easiest method for me...
- 96 328is 6.0L. (LS1 to LS2 build thread: http://forums.bimmerforums.com/forum...ad.php?2098938)
- 96 328is 5.7L. (LS1 build thread: http://forums.bimmerforums.com/forum....php?t=1289987)
- 95 ///M3 6.0L. (LS2 build thread: http://forums.bimmerforums.com/forum....php?t=1619249)
- 97 ///M3. (e46 Fender Flares/track car build thread: http://forums.bimmerforums.com/forum....php?t=1727098)
- 96 328is (Dual Fuel Pump to Surge Tank thread: http://www.bimmerforums.com/forum/sh...ad.php?1964025)
Member
Thanks Leo. I'll give that a try next time. Like you said, they're all a bit different. I think maybe the drivers header could be dropped in from above on some setups. But I've got the hydroboost which moves the master cylinder somewhat forward. Even with the engine tilted as far as it would go, the header was getting hung up on the MC.
I'm glad I held off on bleeding the brakes. It'll make removing the line that's hitting the header a lot less of a chore. I had a feeling I might need to revisit the brake lines. That's why I left the system dry.
Also, I think I remember reading or being told to leave the starter out until the pax header is installed. I don't see how I can possibly get the starter installed with the header in place. I haven't tried yet, but it looks impossible. Maybe I was told to put the starter in first? Hmmmm. So much info. I'm definitely experiencing data-dump for having dragged this build out for so long.
Tipsy
Member
Glad to see you back at it! I think most of us have hit the wall, you eventually get past it. The attention to detail is impressive. Keep the updates coming!
Member
LOL...thanks. I appreciate the encouraging words but I feel like I'm a hack compared to the work you guys are turning out!
Tipsy
Member
You sir, are far too humble. Now get that beast running! :-)
Member
just read the whole 10 pages.
i'm still piling up parts for my own build, but this is very motivating!
keep up the good work and you'll be on the road in no time.
incredible attention to detail.
and we midwesterners are very envious of your incredible lack of rust.
always trying to make it lighter and faster
^^former build: http://www.bimmerforums.com/forum/sh...-neglected-M3/
current build: http://forums.pelicanparts.com/porsc...car-build.html
instant grams: doktor_b
Member
Thanks! Yeah, I'm feeling excited again and really looking forward to making some progress.
And yes, it's a huge boon to have started with such a clean, rust free car. I think near the beginning I started a "What would you do differently?" thread, hoping to learn from the mistakes of others. As I recall, quite a few responded "I would have started with a nicer car." Even though I'm not in the market for another E36, I constantly peruse CL looking at what's available. I've not come across another in nearly as good a shape as this one. I got lucky.
Tipsy
Member
I was very picky and selected a totally rust free car. My 99 E36 vert was and still is a 69000 mile cream puff. No previous body damage. Original top that will now will need a new rear window.
Having said that I modeled my engine mounts after the prototype JTR mounts. I made my headers after finalizing the motor mounts. 1.75" tubes. Mig not tig welded but in my opinion turned out good. Very time consuming.
No way try as I might to run the tubes the starter will not come out unless you remove the header. Or at least loosen the header and unbolt the engine mount. I suggest new starter and new crank sensor to make life easier.
Member
i still want a ride when this thing is done.
Member
I've replaced a lot of things along the "might as well" principle...you know, things that aren't necessary failed but while I've got it apart, I might as well replace it (entire front suspension, timing chain, oil pump, rear main seal, etc. etc.). I did buy a spare OE used starter bu I didn't replace the crank sensor. Might as well add that to the list
Keep following along. More than happy to give you a ride once she's on the road!
Tipsy
Member
Fifteen months later and it looks like I'm going to redo my brake lines yet again. With the engine and headers in place, the two rear lines are just about up against the rear header tube. Based on the pictures I've looked at, these lines appear to be in roughly the same position as on other builds but I'm guessing the JTR headers are bent quite a bit differently. The other two builds on this site that documented use of the JTR kit are Braap and Jai. Braap positioned his ABS pump near the stock DME position and Jai eliminated ABS. So, I guess I'm a trailblazer with regard to JTR fitment and the ABS pump on the forward frame rail.
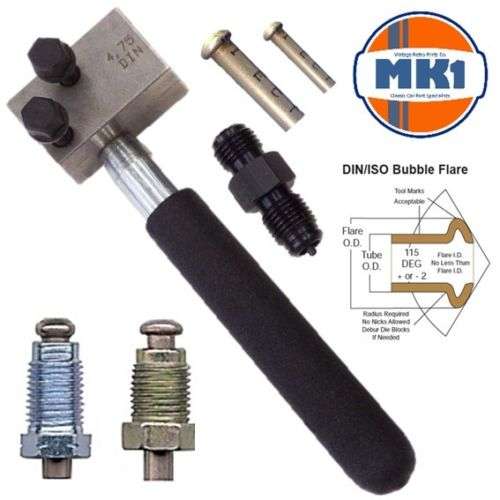
Needless to say I'm not very motivated to tackle this but it has to get done in order to move forward. I'm also going to have to cut the rear lines and splice into them somewhere near the fuel filter/regulator to make this work. Knowing the process of bend, test-fit, repeat, I don't see how I'll ever be able to make one piece lines from wherever I cut, all the way to the ABS pump. As much as I don't like it, I think I'm going to have to have two unions in each of the rear lines. Making on-car flares has been another thing that I've been dreading. But again, I have no choice. The rear lines can't be removed without dropping the entire rear end. I bought a new flaring tool on eBay that came from the UK, for the on-car flares. I hope it works well.
Also, I've decided to switch to Nicopp line this time. I keep reading how much easier it is to work with. So, hopefully this week, I'll get the engine out and get to work on new brake lines, again.
Tipsy
Member
Keep at it buddy, I have always enjoyed reading your thread.
Member
Stupid question; I have the MGW shifter but it's not installed on the trans. I'm going to pull the engine/trans back out of the car soon and I haven't yet enlarged the tunnel opening. Is the goal here simply to make the opening large enough to move the shifter through all the gears? Or did you guys make the opening large enough to physically install and remove the shifter assembly from inside the car? I don't want to make the opening any larger than necessary but just eyeballing it, it looks like the rear two bolts of the shifter mount are back quite a bit past the stock opening.
Thanks.
Tipsy
Last edited by TipsyMcStagger; 06-04-2016 at 07:33 PM.
Member
Wouldn't cut the shifter hole any bigger than necessary. What you need to clearance the shifter hole for is the round part of the shifter that extends into the car indicated below by green. This is normally slightly farther back than the bmw shifter hole.
shiftermgw.png
Cutting this hole large enough so you can take the entire shifter off and out of the top will let a lot of road noise and a TON of heat through into the car unless you can find a way to seal it off (which is why I suggest keeping the hole as small as possible). When I switched shifters I just dropped the trans cross-member to gain access - no big deal.
Nicopp line is great. Easy to flare and it will never rust - just "expensive" compared to coated steel.
96 M3 | Forged LSx | Twin S366 | Injector Dynamics | E85 | AEM Infinity
90 Schwarz 325i
IG : sdobart
Member
Thanks very much for the reply, Sdobart. That's all very helpful.
Tipsy
БМВ Фанат!
+1 on what was said above.
Also, don't forget to clock the orange part to correct orientation so that the shifter is in the middle/oem location. The bolt on top was extremely tight on my MGW...
- 96 328is 6.0L. (LS1 to LS2 build thread: http://forums.bimmerforums.com/forum...ad.php?2098938)
- 96 328is 5.7L. (LS1 build thread: http://forums.bimmerforums.com/forum....php?t=1289987)
- 95 ///M3 6.0L. (LS2 build thread: http://forums.bimmerforums.com/forum....php?t=1619249)
- 97 ///M3. (e46 Fender Flares/track car build thread: http://forums.bimmerforums.com/forum....php?t=1727098)
- 96 328is (Dual Fuel Pump to Surge Tank thread: http://www.bimmerforums.com/forum/sh...ad.php?1964025)
Member
Good info. Thanks Bimerok!
Tipsy
Member
Not a lot of progress to report but I did get the engine removed and the car is now back on four jackstands. Before I pulled the engine, I wanted to be sure that I'd figured out a good system for installing/removing the headers. I also wanted to figure out how to get the starter installed.
Before I go any further I want to say that not only are these build threads a valuable source of information for those who come after; but my thread is a good source of information for me! I honestly couldn't remember if I'd installed the pax side header from below or above but thankfully, I described the process earlier in this thread, so I was able to remind myself how I did it
That said, I figured out how to install both the pax header and the starter. This is a JTR kit so this might no work for others but what worked for me is to lift/tilt the pax side of the engine with the hoist, remove the pax engine mount bracket (the bracket that bolts to the block) and the header can be lowered into place. I tried doing this after first having installed the starter but that was a no go. What worked for me is dropping the header down and then having a buddy hold it aside while I installed and bolted the starter in from underneath. Once the starter was bolted in, the header could then be positioned on the block and bolted in. I have a feeling getting the battery cables attached to the solenoid will be a bear, but I'll cross that bridge when I come to it. And to reiterate, the process for the drivers side header is the same, except on that side, the header gets lifted into position from underneath.
Now that I know how to get the headers in and out, I'm going to bring them in for high-temp coating. I've got to persuade the trans tunnel in one spot with a BFH and then I'll finish lining it with heat barrier. I also have to redo my two rear brake lines. Once that's all done, I can put the engine back in.
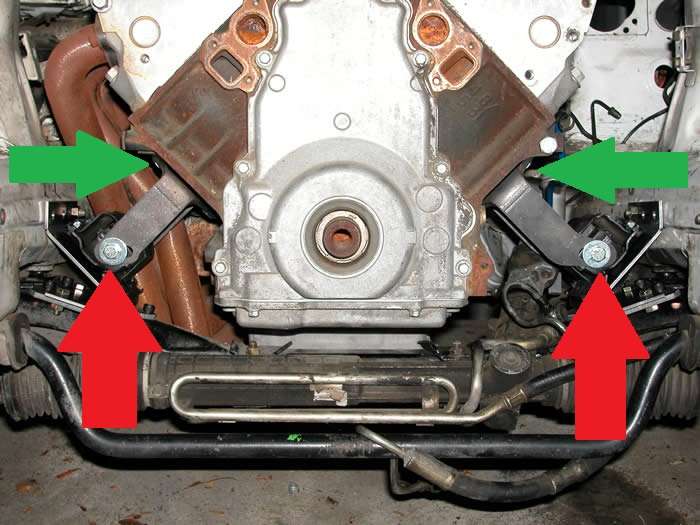
By the way, do you guys use lock washers and/or thread-lock on the four bolts that secure the mount to the block (green arrows below)? The JTR kit just came with bolts and while I like being able to install and remove them with my fingers, I'm a bit concerned about retention once it's all together for good. And what about the bolts that pass through the motor mounts (red arrows below)? Do you use a Nylock or a lock washer on back of those those?
Tipsy
Member
Not sure I'd use a nylock in that application- doubt it would hold up over time due to the heat. Lock washer or lock nut (distorted threads at top) would probably be a better bet.
Member
I've always used a normal style nut with a split lock washer, never had a problem.
 Posting Permissions


 Reply With Quote
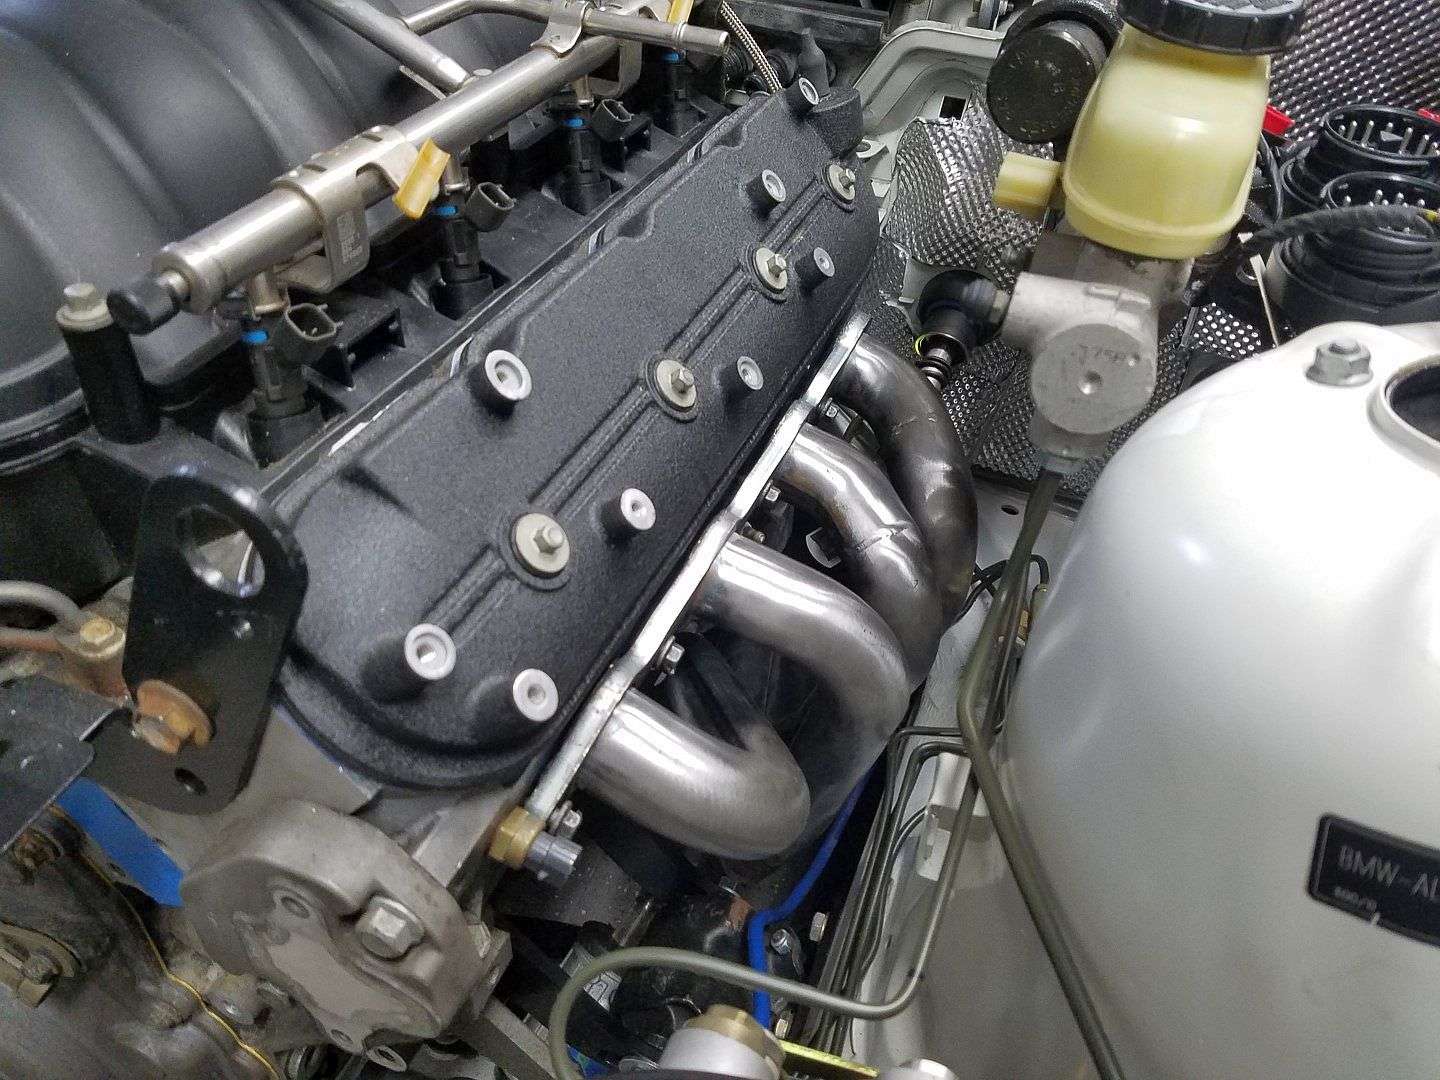
Bookmarks