
 Member
Agreed...I may have to copy that install...imitation is the sincerest form of flattery, eh?
Member
Copy away!Originally Posted by Tim Mc

I've gotten plenty of ideas, inspiration, advice and direction from these build threads and the people who write them. That's what it's all about!
Tipsy
Member
I pressed-in new OE diff bushings into the 3.38 LSD today. I basically used the same homemade press I'd used to remove the old bushings. I bought this diff almost 3 years ago from a guy on CL and know absolutely nothing about its history. The seller claimed he'd bought it on eBay but never installed it in his supposed 600rwhp turbo E36. He did send me a link to the supposed eBay ad at the time, and the diff was drained of fluid (which one would expect if the diff had been shipped) but still, I really don't know anything about its condition.
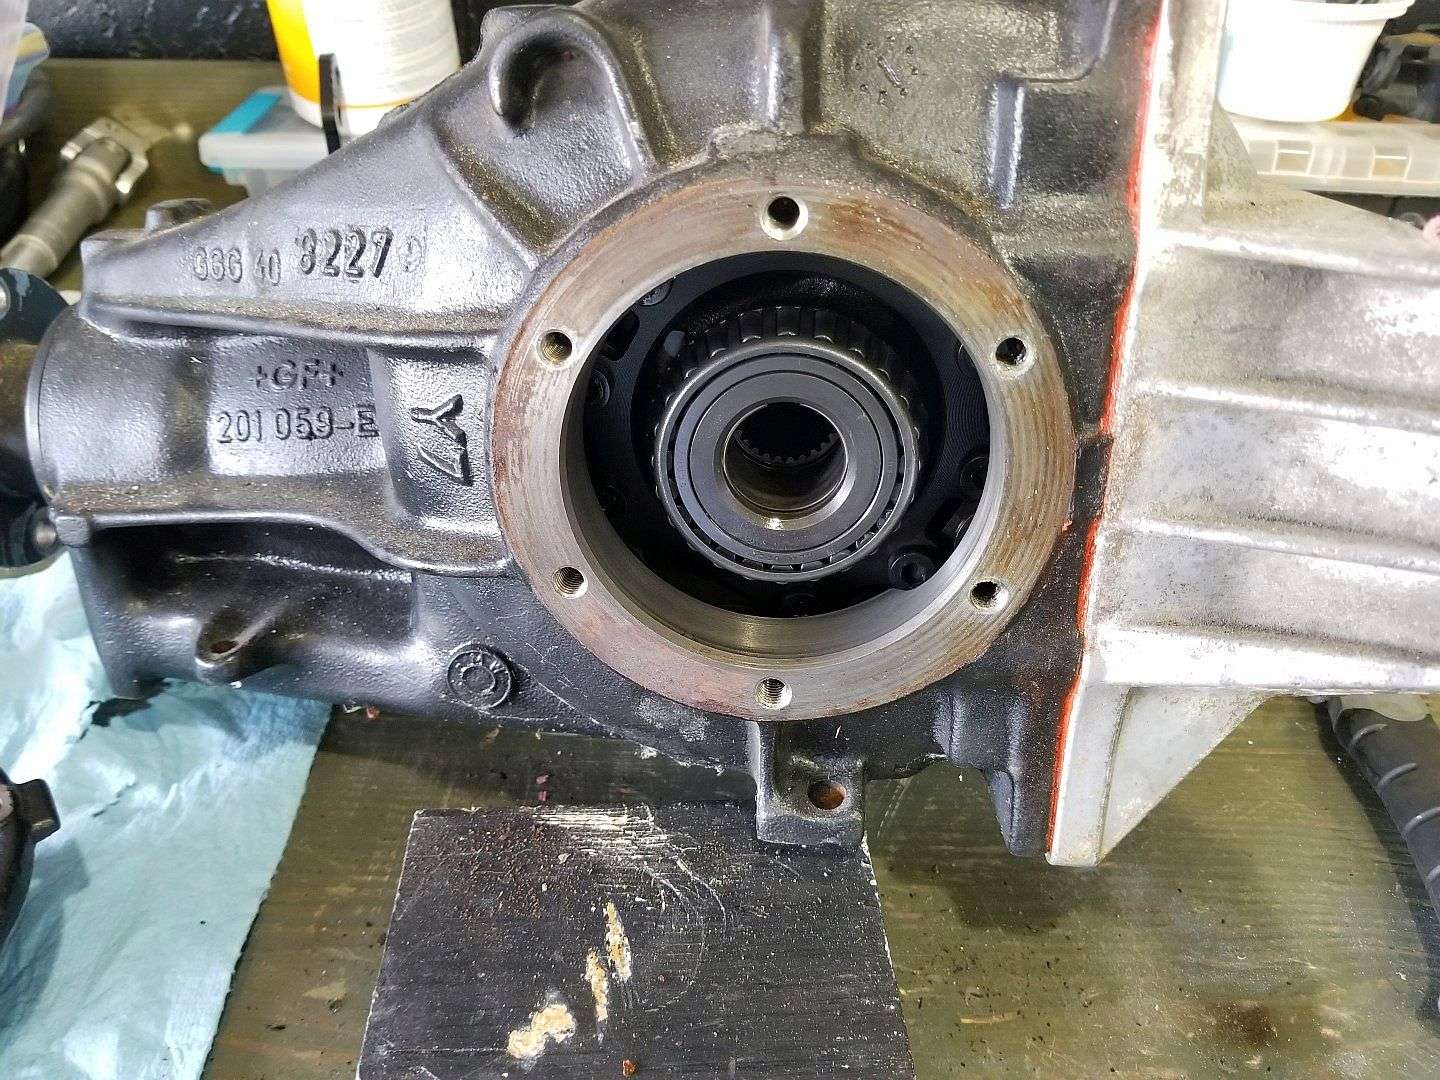
Not knowing anything about it, I figured I might as well replace the output seals before I installed it in the car. I watched a couple of Youtube videos - but I ended up doing something stupid. After the fact, I looked in the Bentley and the book procedure is to simply use a seal removal tool. What I'd seen online was to remove the "flanges" that the seals are pressed-into that are bolted to the housing ("flange" is probably not the proper name for this piece) so the seal could be pressed out and then pressed in. I unbolted and removed the "flange," drove out the old seal and drove the new seal in. Here's where I did something stupid; I wanted to be sure I'd driven the new seal in the proper depth, so I removed the other "flange" to look at the other seal for comparison. If you've ever dissembled a diff (I hadn't) you'll know that the "guts" were now just kind of flopping around inside the case.
After getting both seals pressed in, I ended up having to stand the diff up on its side to get the "flanges" bolted back in place. What I'm concerned about is potentially having bent any of the fins on the speedometer reluctor while the whole thing was flopping around inside the housing. Hopefully, it's okay. Live and learn.
I removed the old diff from the car, popped-out the stock output flanges and popped them into the LSD. The output flanges and axles are different sizes on M and non-M cars (the LSD obviously came from an M car) but the flanges are easily interchangeable between diffs. I then filled the diff with Royal Purple 75W-140 (after running to the store to buy a 14mm hex socket for the drain/fill plugs) and installed the LSD into the car.
I lost about 15 lbs in sweat today wrestling the old diff out and installing the "new" diff. Holy hell this is tough to do by yourself while lying on your back! Especially in 90+ degree heat and 100% humidity. And the fact that my creeper kept falling of the edge of the garage threshold onto my downhill driveway was frustrating as hell. But, it's installed and both tires turn in the same direction
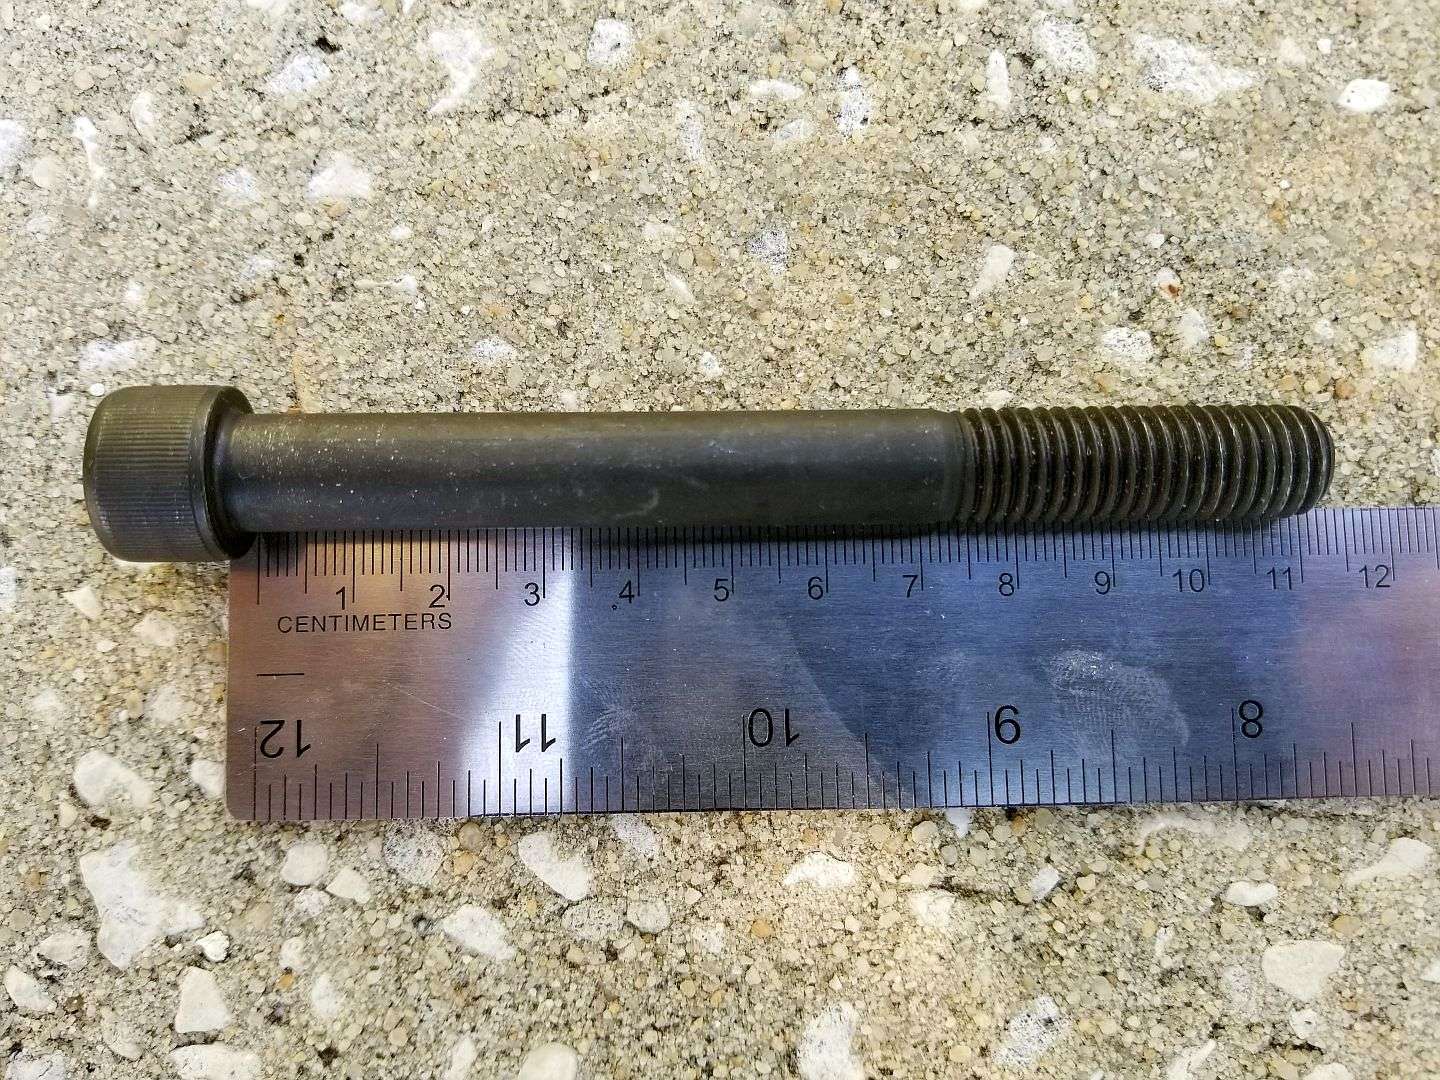
One more thing about this diff; The seller had drilled-out the threads from the front of the diff housing so a Grade 12.9 socket head cap screw could be through-bolted in place of the OE bolt that's threaded into the diff housing. The OE bolt is supposedly susceptible to breaking. I looked through my old email exchange with the seller and he said the 12.9 bolt he'd included with the diff was M14 but it's actually M12. It fits through the OE front diff bushing. The bolt is installed from the rear and secured on the front of the bushing with a washer and a Nyloc. The stock bolt is inserted from the front and threads into the diff housing. I guess this is a somewhat common mod though it seems after drilling the housing, some then tap and thread the larger bolt into the housing, the same as stock.
Tipsy
Replacing Output Seal
"Flange" removed from housing. I then removed the other side, leaving the diff unsupported inside the housing. Dumb!
Grade 12.9 M12 x 110 Front Diff Bolt. I think 100mm length is probably adequate. 110mm seems a bit long
Last edited by TipsyMcStagger; 09-27-2017 at 09:23 PM.
Member
Keep on truckin'! I had to chuckle at the gas pedal coming straight out at you.
Member
Nice work! Right now, my biggest issue is deciding if I want to delete the ABS or not. It will be primarily a track car and occasionally take it to car shows and cruises.
БМВ Фанат!
And how is ABS deletion will help you at the track?
You'll be that "hero" like 99% of others who deleted their ABS thinking they can drive better than the system can, but exactly untill the point when you ruin a $1200 set of new rubber in best case or crash your car (hopefully without touching anyone else's) as not "so best" case.
Deciding delete or not to delete is not your bigest issue. Your biggest issue is that you need a decision for that.
- 96 328is 6.0L. (LS1 to LS2 build thread: http://forums.bimmerforums.com/forum...ad.php?2098938)
- 96 328is 5.7L. (LS1 build thread: http://forums.bimmerforums.com/forum....php?t=1289987)
- 95 ///M3 6.0L. (LS2 build thread: http://forums.bimmerforums.com/forum....php?t=1619249)
- 97 ///M3. (e46 Fender Flares/track car build thread: http://forums.bimmerforums.com/forum....php?t=1727098)
- 96 328is (Dual Fuel Pump to Surge Tank thread: http://www.bimmerforums.com/forum/sh...ad.php?1964025)
Trolling with the truth
Learn threshold braking.
Member
With how my setup is, there's no room for standard headers since I'm running a 4l60e. The headers (or manifolds) will be going forward and then either dining under the the car behind the RF tire or just doing a fender dump. And most of my track time will be on the drag strip. Not as worried about locking up the brakes when you have a 1/4 mile to slow down.
БМВ Фанат!
Ok, that makes all the difference when you talk about drag strip vs a race track.
And BTW I can threashold brake just fine and yet ABS is not going away, because I can threachood brake. It is about the same as saying I'm taking off life jackets when going out on a jetski just because you can swim.
- 96 328is 6.0L. (LS1 to LS2 build thread: http://forums.bimmerforums.com/forum...ad.php?2098938)
- 96 328is 5.7L. (LS1 build thread: http://forums.bimmerforums.com/forum....php?t=1289987)
- 95 ///M3 6.0L. (LS2 build thread: http://forums.bimmerforums.com/forum....php?t=1619249)
- 97 ///M3. (e46 Fender Flares/track car build thread: http://forums.bimmerforums.com/forum....php?t=1727098)
- 96 328is (Dual Fuel Pump to Surge Tank thread: http://www.bimmerforums.com/forum/sh...ad.php?1964025)
Senior Member
Supporting Vendor
100% agreed. This isn't a thing we can "argue" or "debate", it is a proven fact. Deleting ABS on this chassis leads to disastrous results. When an ABS module failed at the 2009 SCCA Solo Nationals it turned our otherwise excellent stopping, perfectly balanced E36 into a tire locking machine. It simple WOULD NOT stop.
BMW (and most car makers) started using the ABS system to dynamically balance the front and rear bias of the braking systems in cars long ago. Without ABS its a hot mess. Don't be a "hero" - you will ruin your braking system without ABS.
Are there still race cars without ABS? Very very few, and they have to give up braking potential and invest a lot of time in balancing the front/rear bias of their car to do without. They will ALWAYS stop worse than a similarly equipped/weight car with ABS.
My TTD prepped BMW 330 above (BBK + ABS) races on track against some cars that don't have ABS. They are lighter and should stop better, but pictures like this one at COTA show why non-ABS cars always have problems - locking tires. He ruined two front tires in the one stop. This BMW's tires wear smooth all the way down to the base rubber - no flat spot potential, ever.
#KeepTheABS
Terry Fair @ Vorshlag Motorsports
Member
I decided I'm just going to build custom headers and try to keep the ABS. From the looks of it, I can try to shove the pump closer to the fender well and have enough room.
Member
There I was, with my car halfway out of the garage, engine hanging from the hoist, working by myself. Lower it a bit, maneuver it a bit, lower it a bit, maneuver it a bit. I got to a spot where I needed to raise the hoist a tad higher. Wouldn't you know it, the damn hoist won't pump higher! So here I am, with the full weight of an engine and trans hanging from the hoist, the car is on jack stands, half in - half out of my garage, and I can't raise the damn hoist!
If you hadn't guessed, the ram was 100% out of fluid. How this thing can sit in one spot in my garage for months on end, have no puddle underneath and yet somehow become depleted of all of its fluid, I have no idea. I'm just glad I got it sorted.
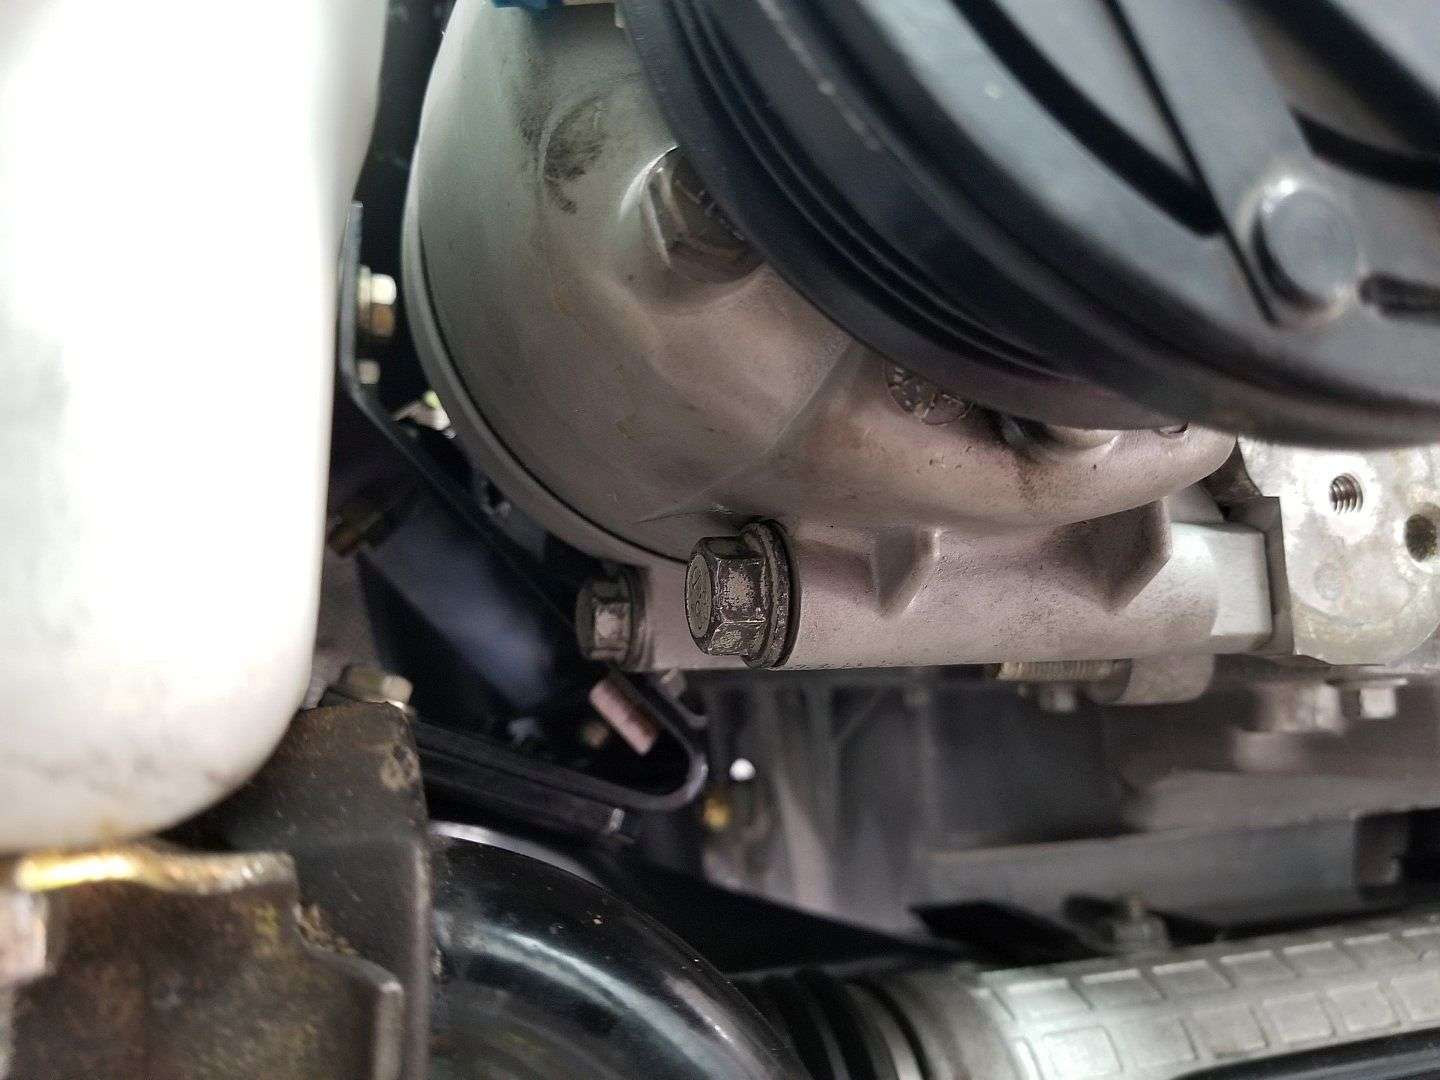
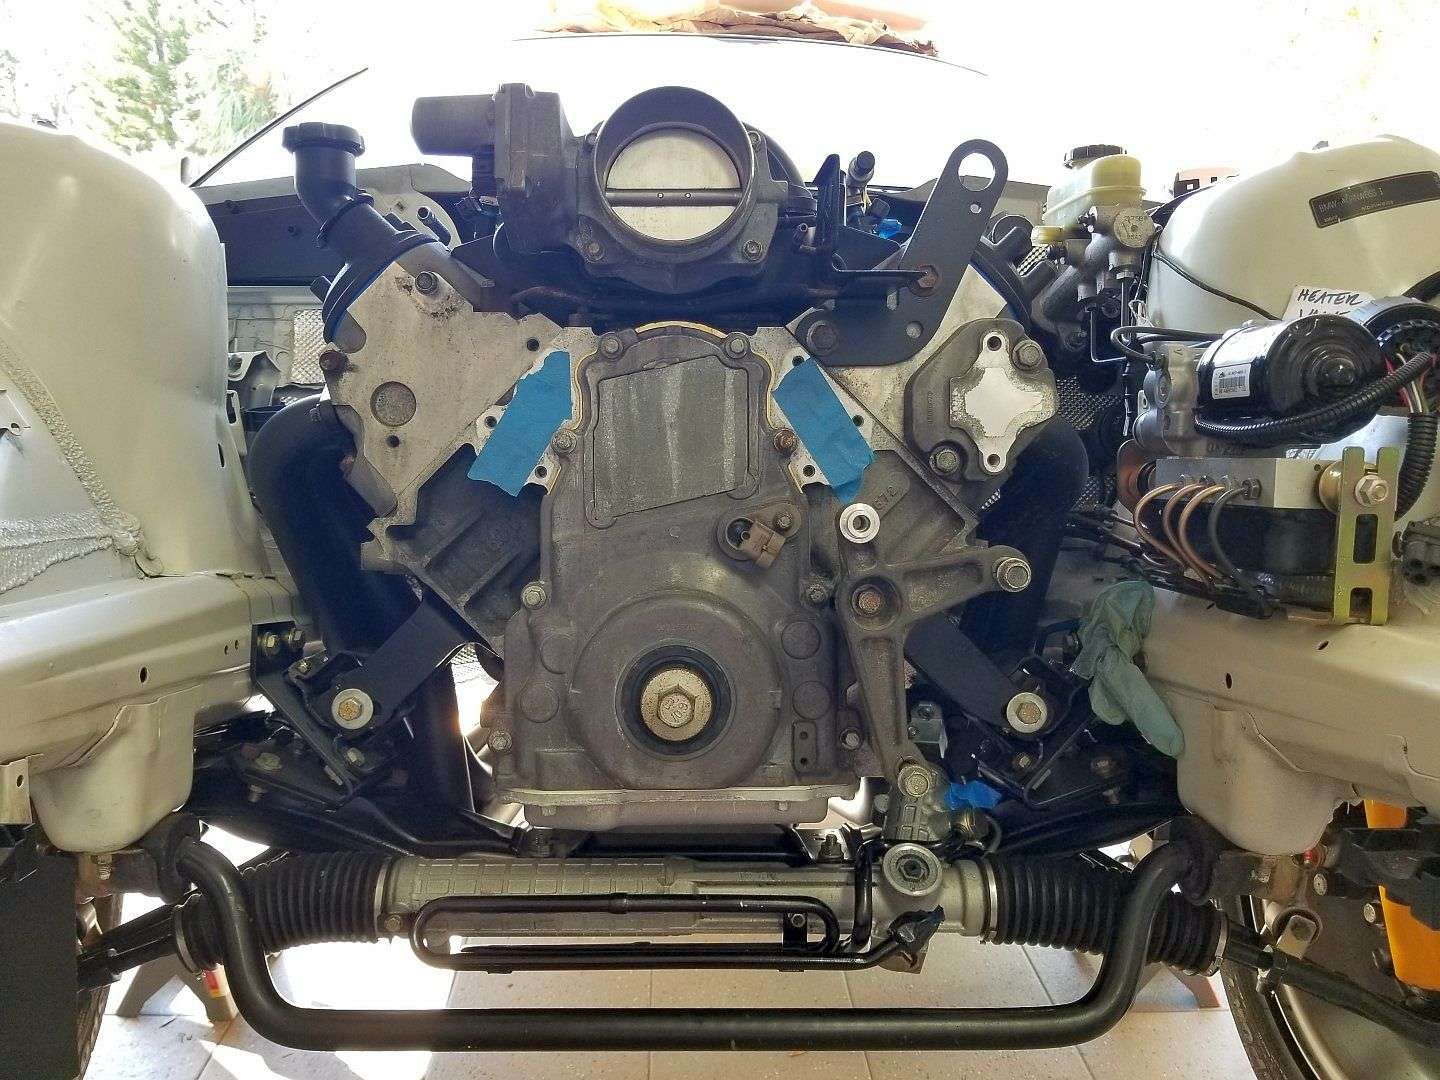
So, the engine is in, the shifter is in, the steering shaft is bolted in place and the headers are in, though just hanging from two bolts on each side with no gasket. I figure I'll have to maneuver the headers as other bits are accomplished, so I didn't bother yet fully bolting them in place.
I had enlarged the shifter opening a few months ago in more-or-less a wag, based on looking at various pictures. Looks like I got it pretty damn close. It's maybe a bit bigger on the drivers side than needed but pretty much spot-on on the back (rear) side, with just under a 1/4 of clearance.
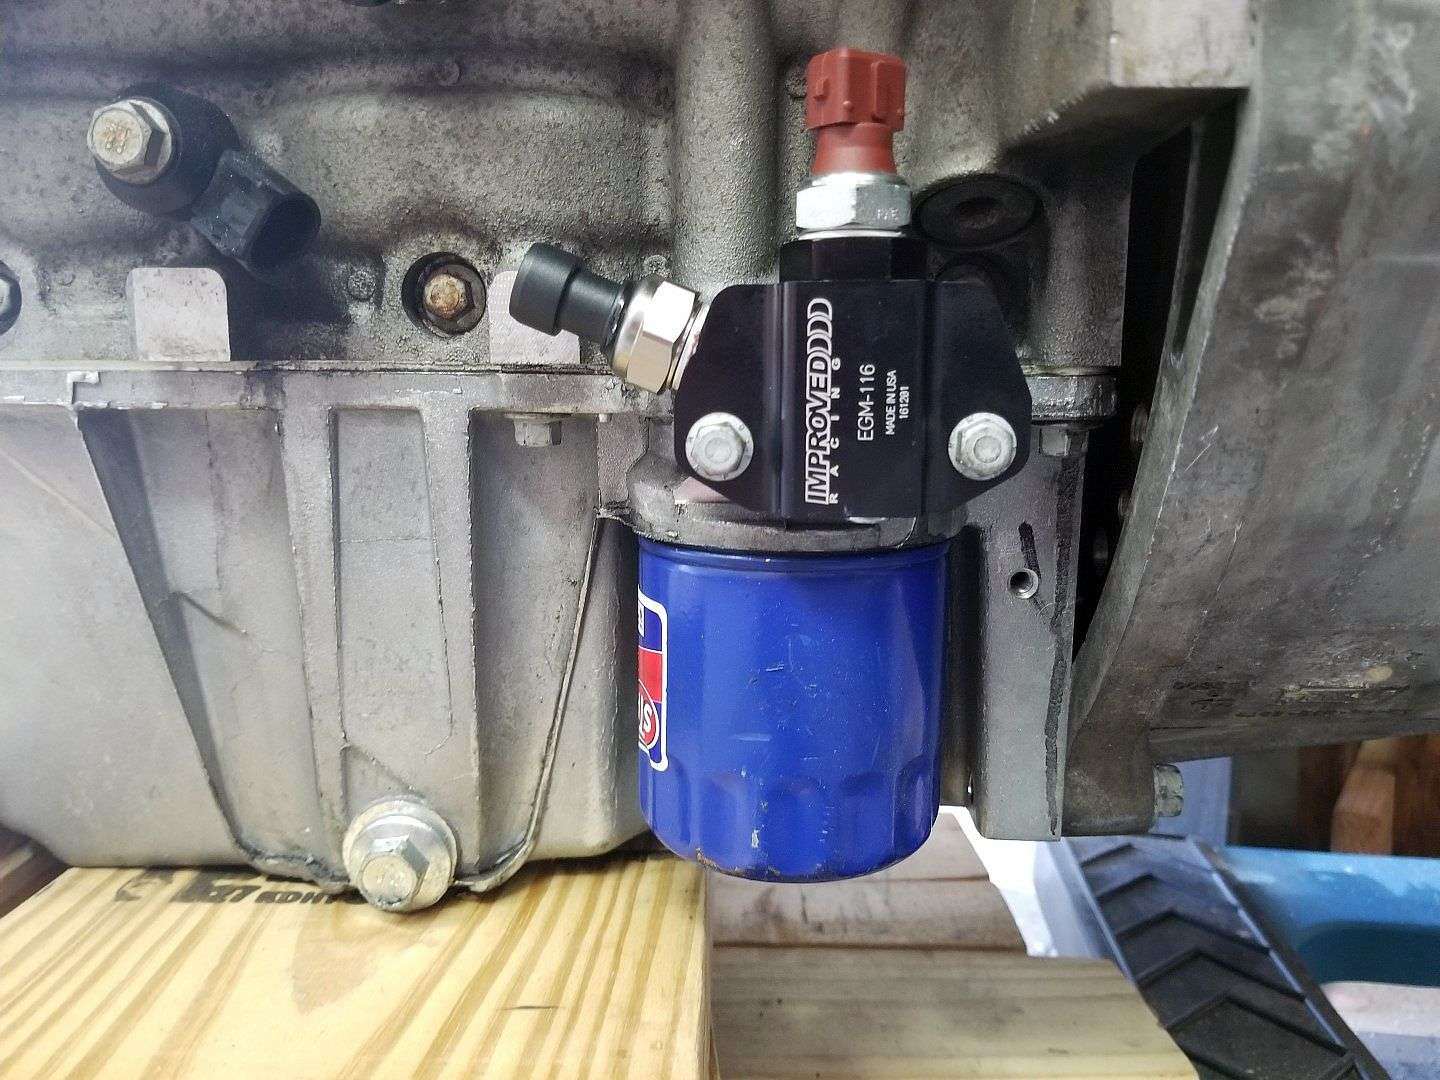
I also installed an Improved Racing oil adapter with a OE sender for the stock oil pressure light and an aftermarket sender for a Pro Sport oil pressure gauge. I'm keeping the OE LS2 sender behind the manifold so I can read PCM reported oil pressure on a scan gauge.
Unless something very unforeseen happens, the engine is not coming back out. The shortened E46 steering shaft seems to clear the header well (it passes through the JTR header). With the exception of the issue with the hoist, things went together pretty well today. There's is definitely a learning curve required to figure out how to fit all of the pieces of the puzzle together.
Tipsy
This is where I was when I could no longer raise the hoist!
MGW Shifter
Back of shifter
Engine, headers and E46 steering shaft installed
Oil pressure senders
Last edited by TipsyMcStagger; 11-03-2017 at 06:13 PM.
БМВ Фанат!
Very nice! Congrats on getting engine in for the final time.
- 96 328is 6.0L. (LS1 to LS2 build thread: http://forums.bimmerforums.com/forum...ad.php?2098938)
- 96 328is 5.7L. (LS1 build thread: http://forums.bimmerforums.com/forum....php?t=1289987)
- 95 ///M3 6.0L. (LS2 build thread: http://forums.bimmerforums.com/forum....php?t=1619249)
- 97 ///M3. (e46 Fender Flares/track car build thread: http://forums.bimmerforums.com/forum....php?t=1727098)
- 96 328is (Dual Fuel Pump to Surge Tank thread: http://www.bimmerforums.com/forum/sh...ad.php?1964025)
Member
Tough spot to get stuck in! Glad you got it sorted out and the motor landed.
Sent from my iPhone using Tapatalk Pro
Member
Looking good...ad some fuel and lighter up! j/k Glad to see the progress and appreciate the images!
Member
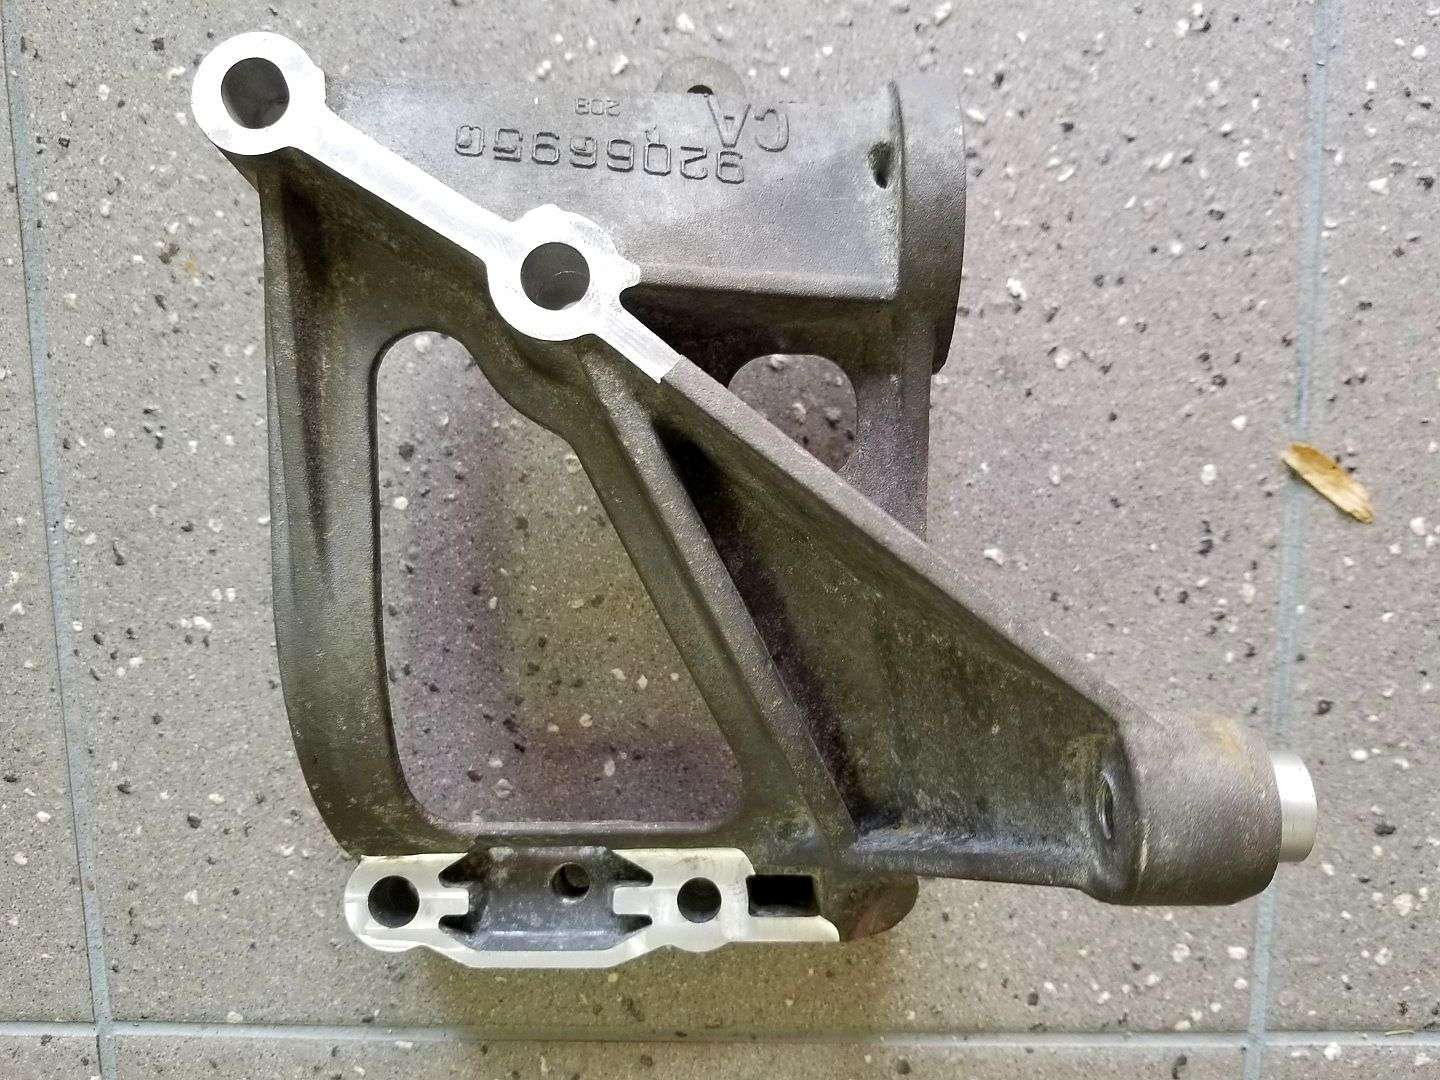
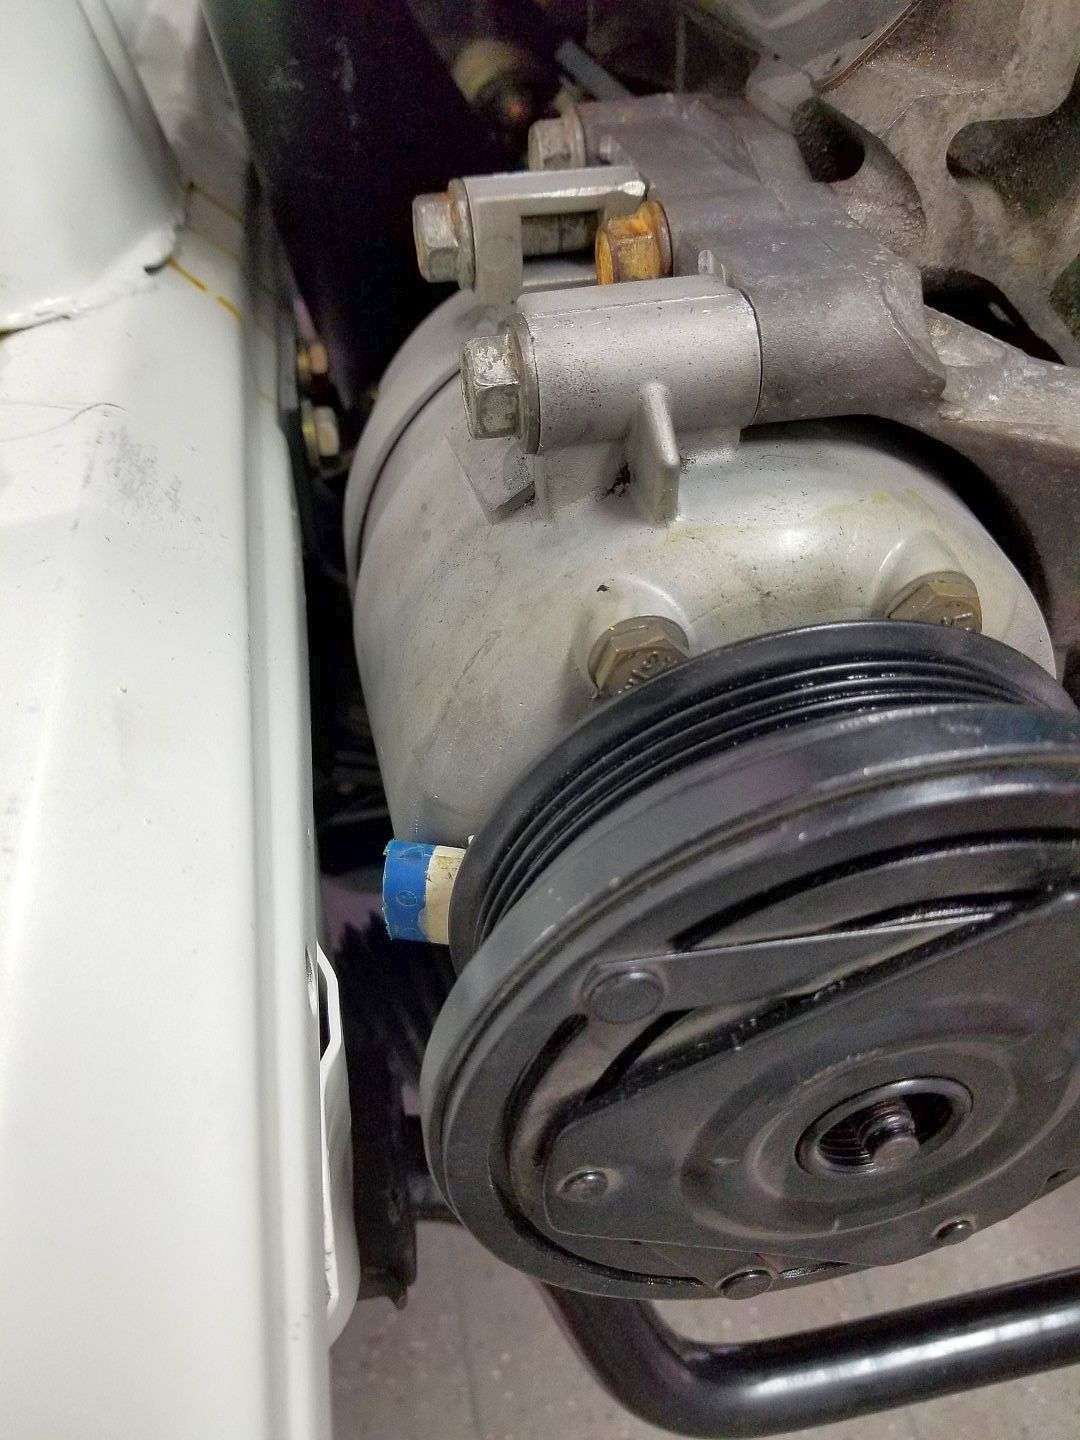
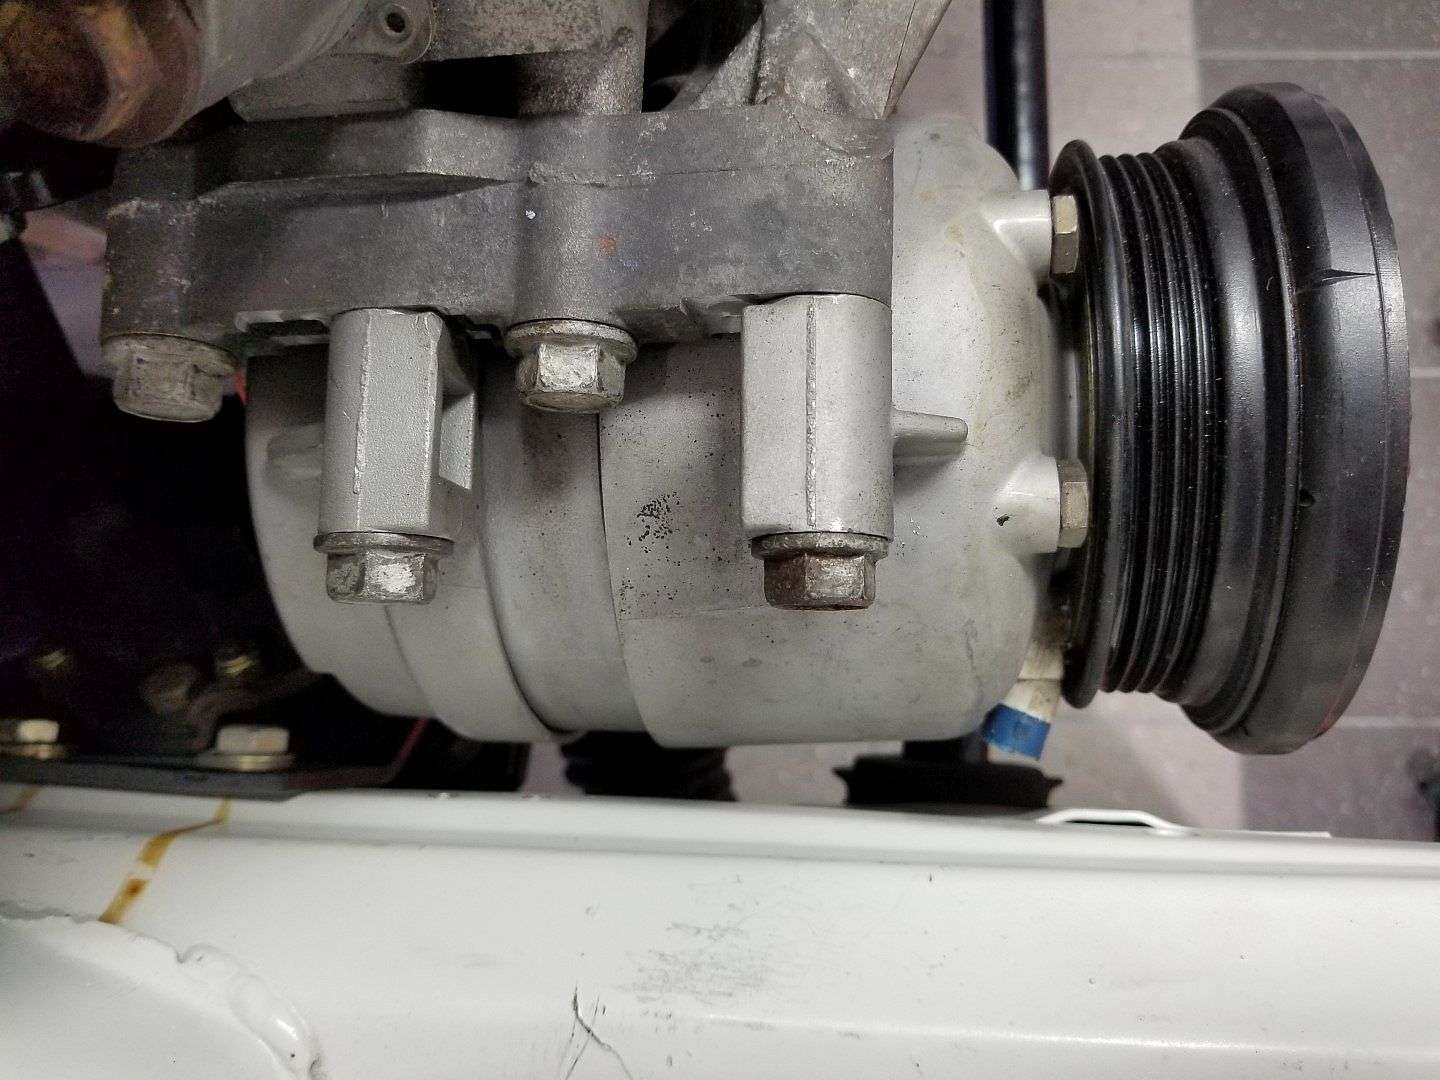
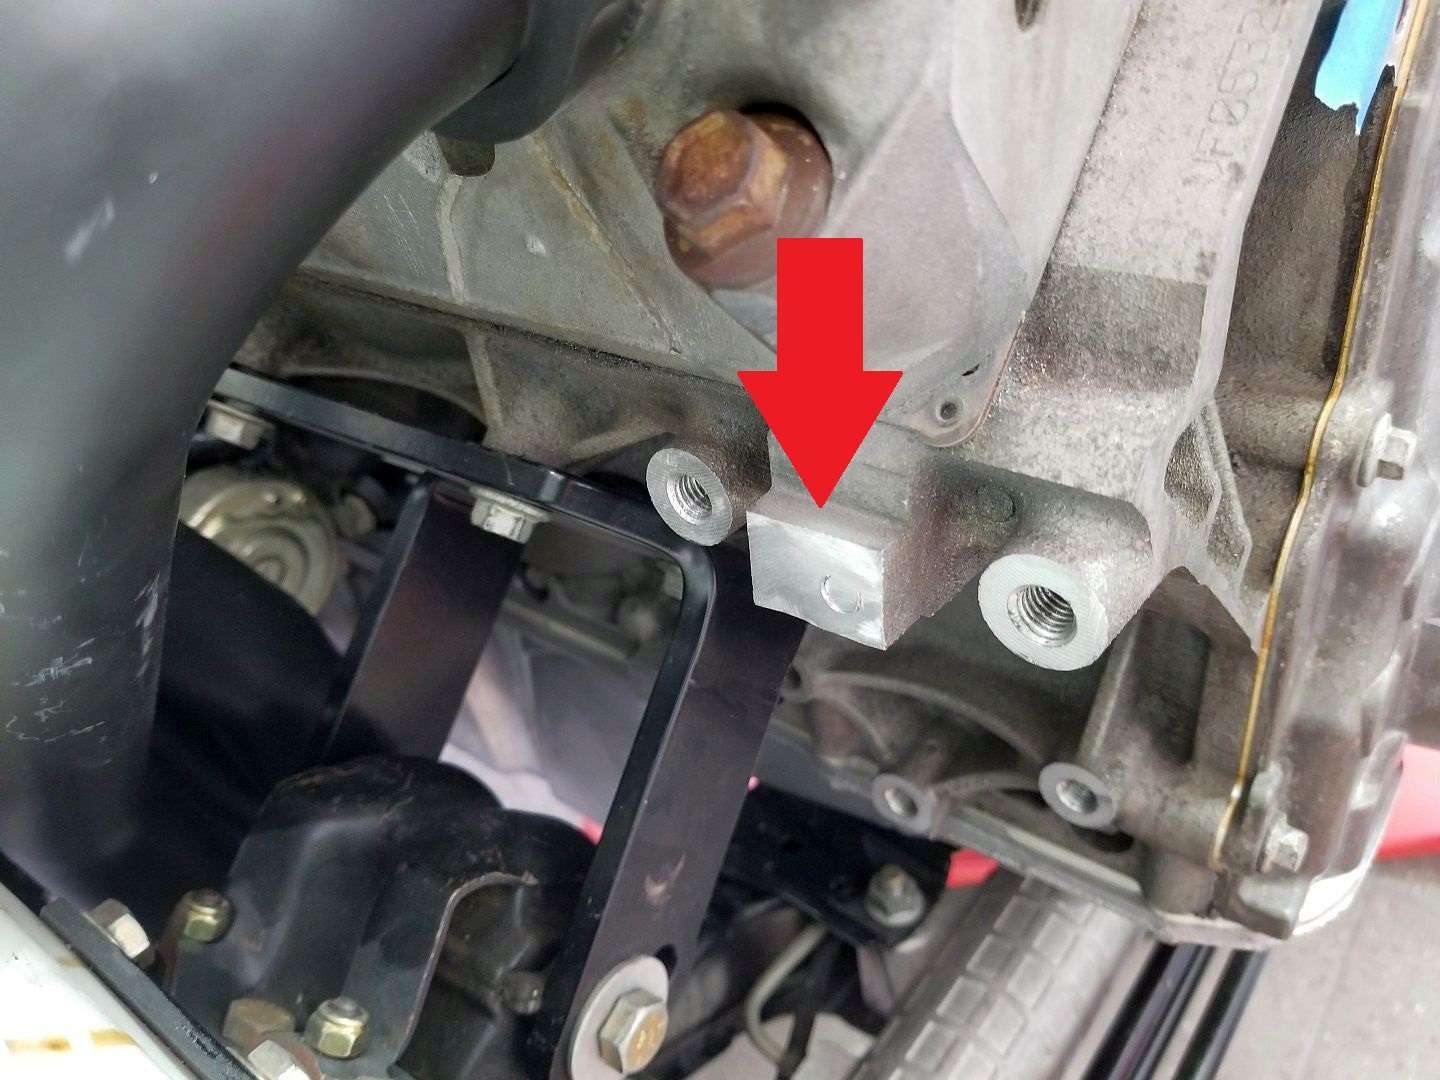
I played around a bit with the A/C compressor today. A while back, I sent the compressor bracket to Mike at JTR. Mike machined-off 1/8" of material from each side of the bracket. This brings the compressor about 1/4" further from the frame rail. I had to grind a little "nub" on the block so the bracket sits flush but that was easy. It looks like I've got just under 1/2" clearance between the compressor and the frame rail, which I think should be okay, even with the rubber motor mounts.
It took some trial and error but ultimately I figured out that the two lower compressor bolts need to be in the compressor before it's placed in the bracket. Otherwise, there's not enough room between the compressor and the frame rail to insert the bolts...or at least the forward most bolt.
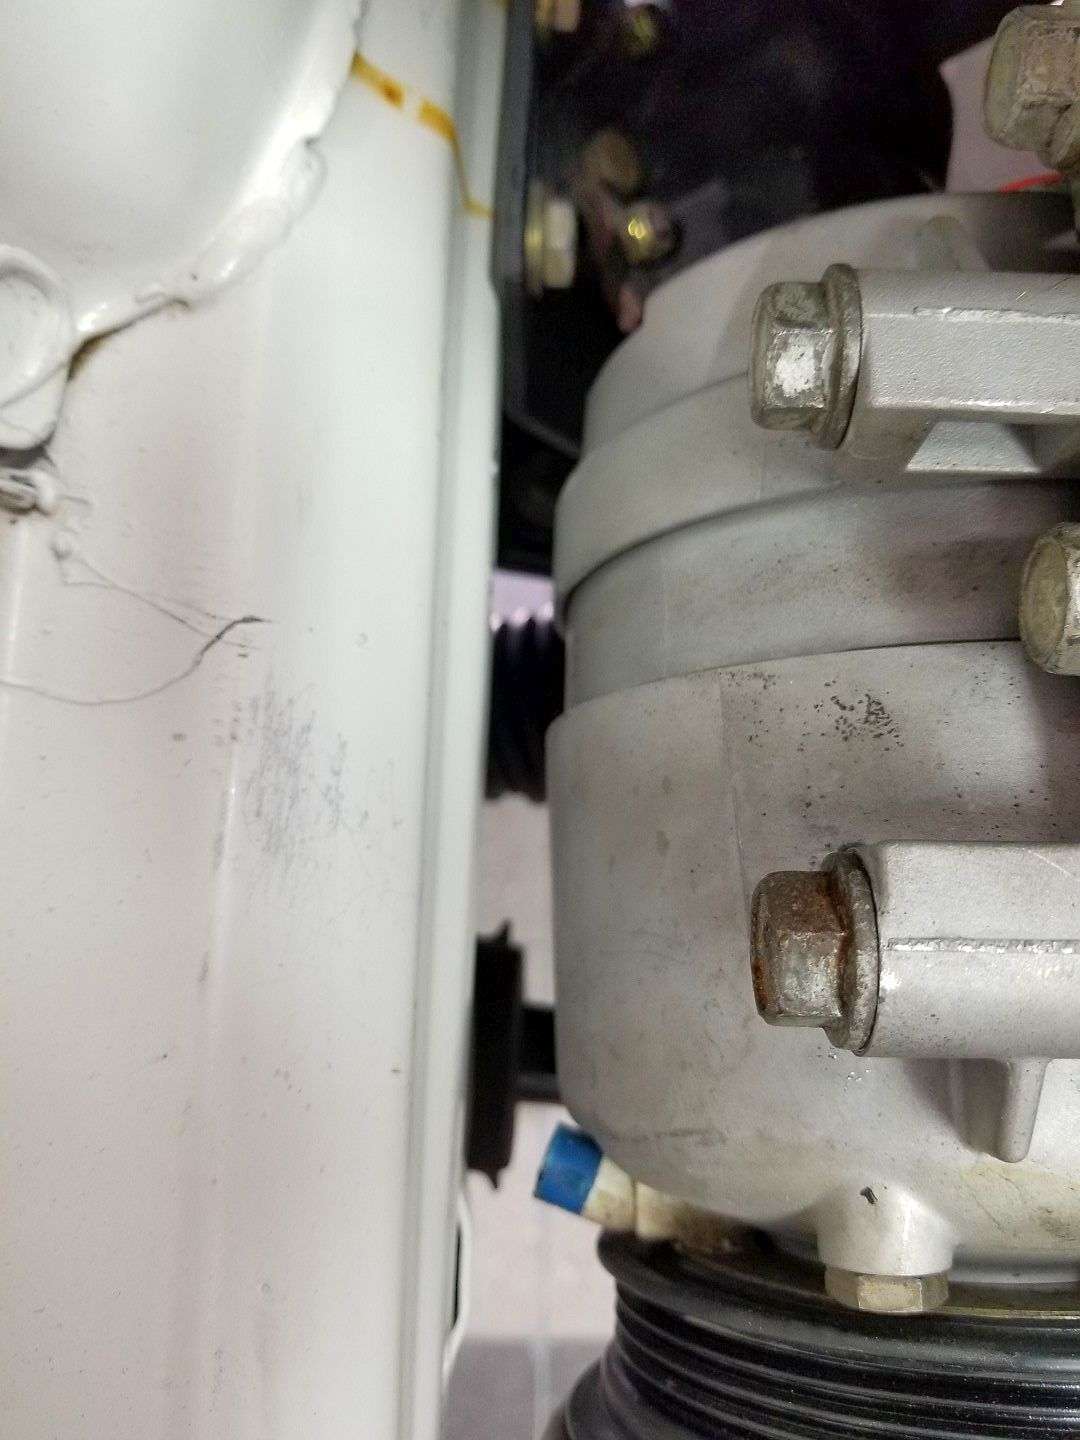
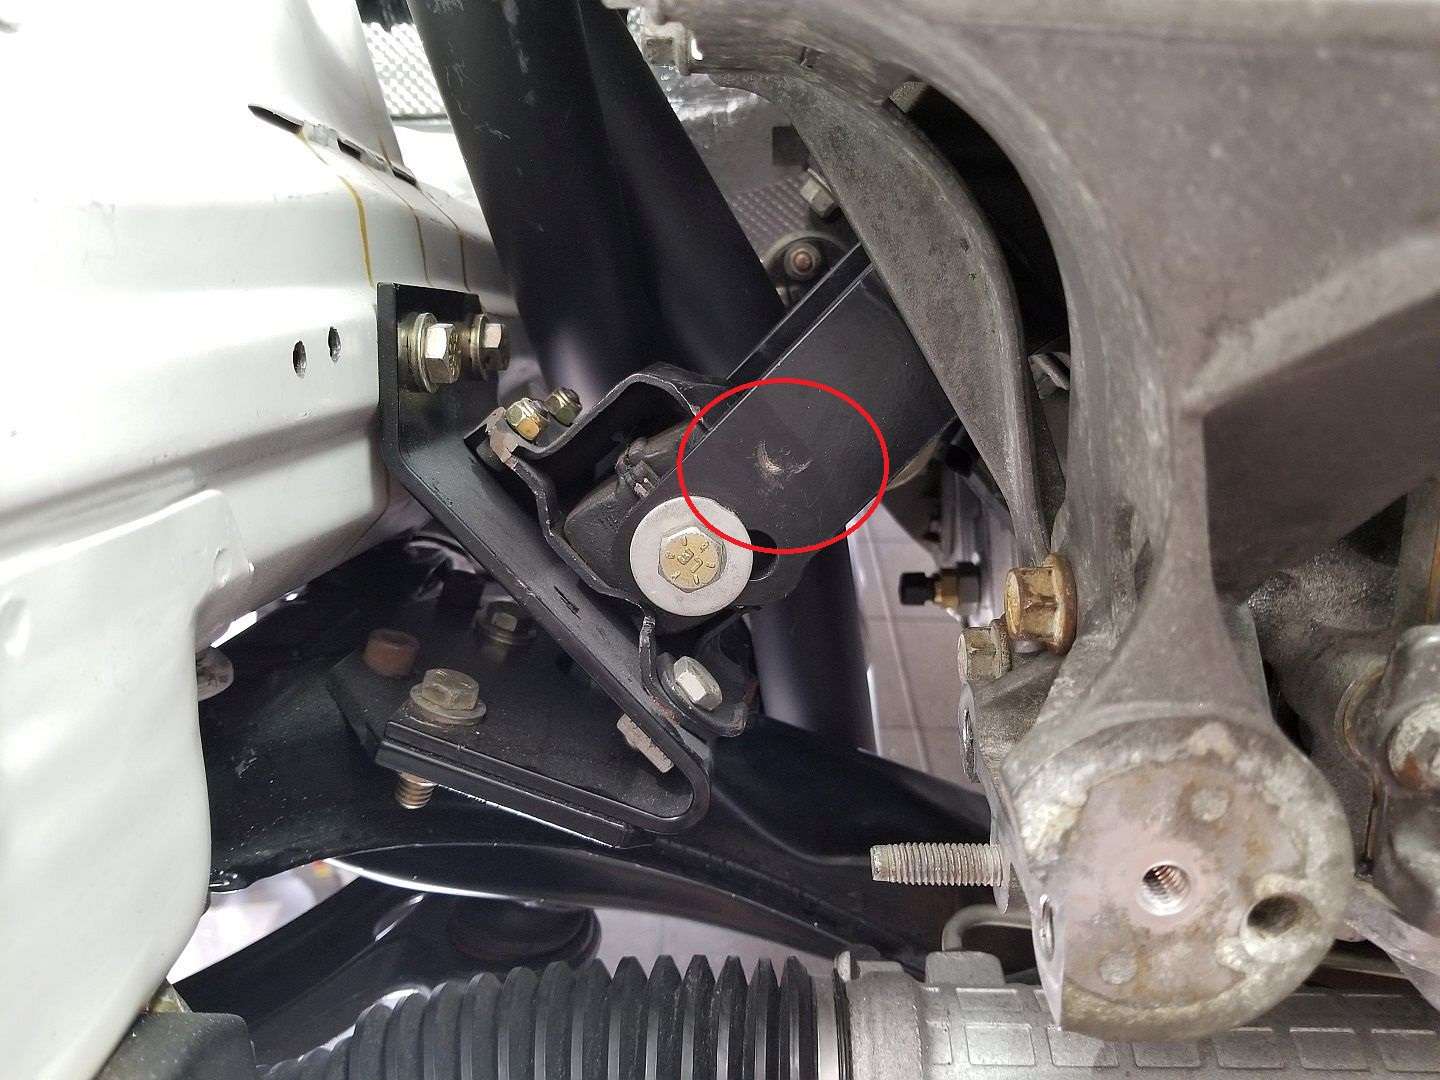
There are a couple of issue, though. I bought this F-Body compressor from a local rebuilder. I hadn't noticed earlier but there is a pressure relief valve on the rear of this compressor that the stock GTO compressor does not have. This PRV is just coming into contact with the motor mount behind it. I'll have to speak with the rebuilder and find out if there's a lower profile PRV available or if the relief valve can be plumbed-in elsewhere in the system.
Also, I think I'm going to have to hard-wire a deconstructed pigtail into the compressor because the electrical connector is pointed right at the frame rail. That should be easy enough to fix.
You can see where the material was removed from the bracket
A few pics of the frame rail clearance
Here's where I had to remove a little material
PRV on the rear on the F-Body compressor. No PRV on the stock GTO compressor
You can see the scuff mark on the mount where the PRV came in contact
Make sure the lower two bolts are in the compressor when you place it in the bracket.
Last edited by TipsyMcStagger; 11-11-2017 at 06:42 PM.
Member
Good idea milling down the mount, that's tight. Whats the center of crank to frame rail measurement? The CTS V drive setup i'm looking at running needs over 12.5"
Member
I just checked. I couldn't take a picture while holding a tape measure and a speed square but my measurement is approximately 13 1/8" from the center of the crank to the passenger frame rail and 13 5/8" to the drivers frame rail...give or take an 1/8th.
Tipsy
Last edited by TipsyMcStagger; 11-11-2017 at 09:18 PM.
Member
thanks for looking, looks like the ctsv would clear your mounts, not too sure how much offset my mounts have.
ctsv.png
Member
Tipsy: great images! I'd heard of the bracket milling-nice to see it in print. I know mine is going to be tighter...
Thanks for posting.
Member
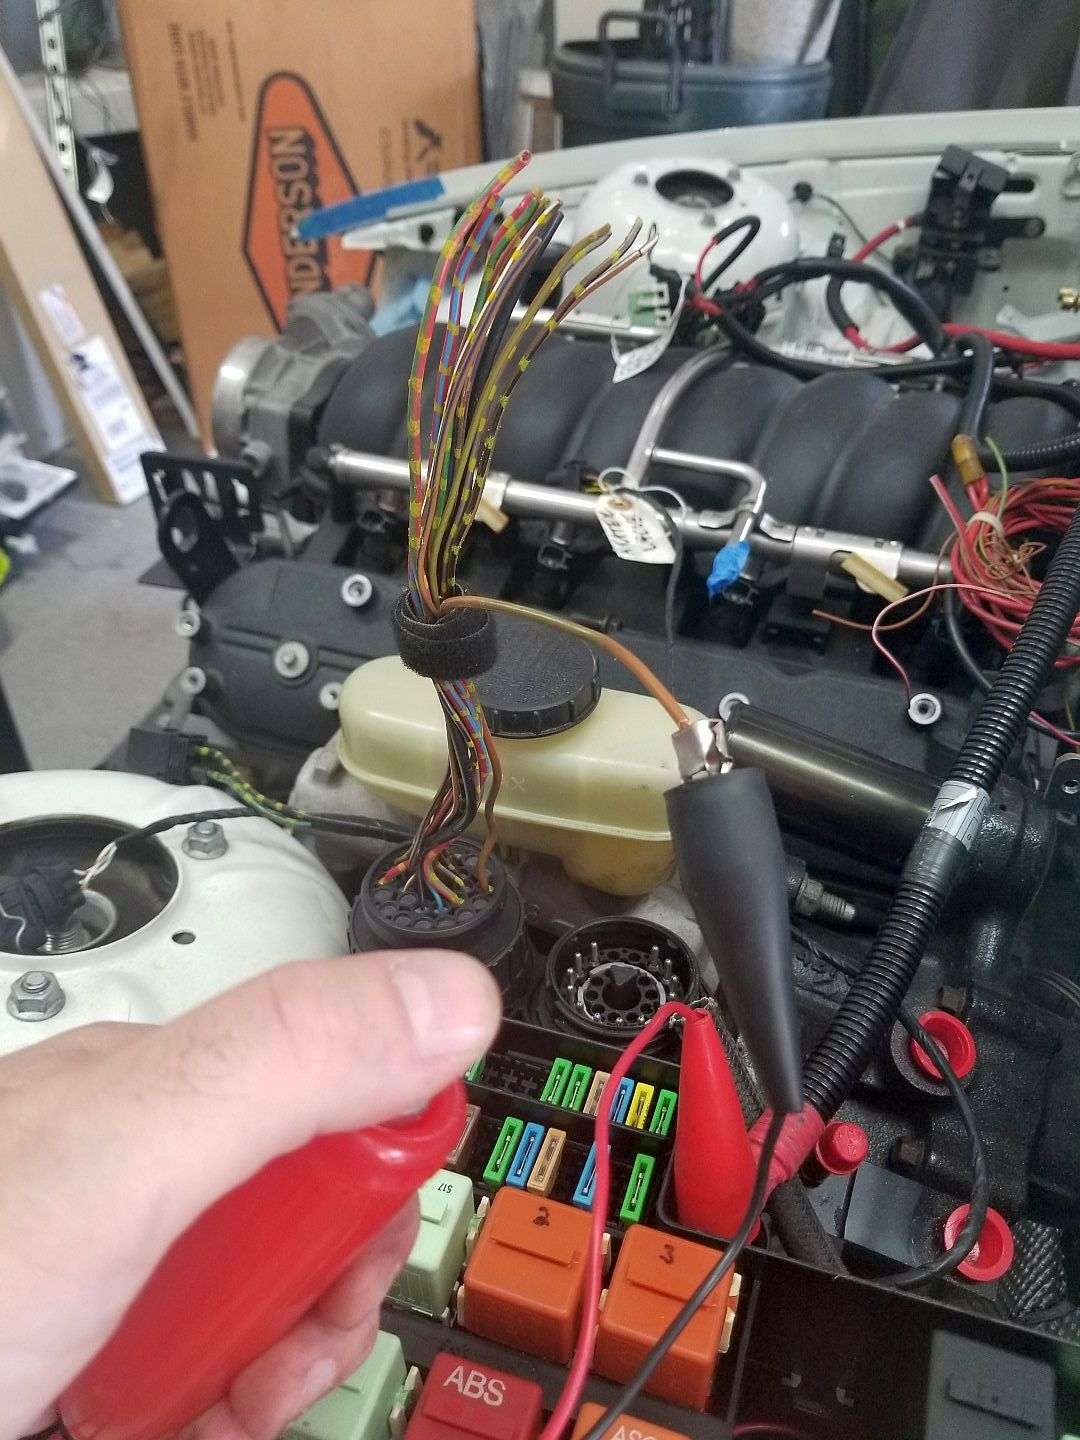
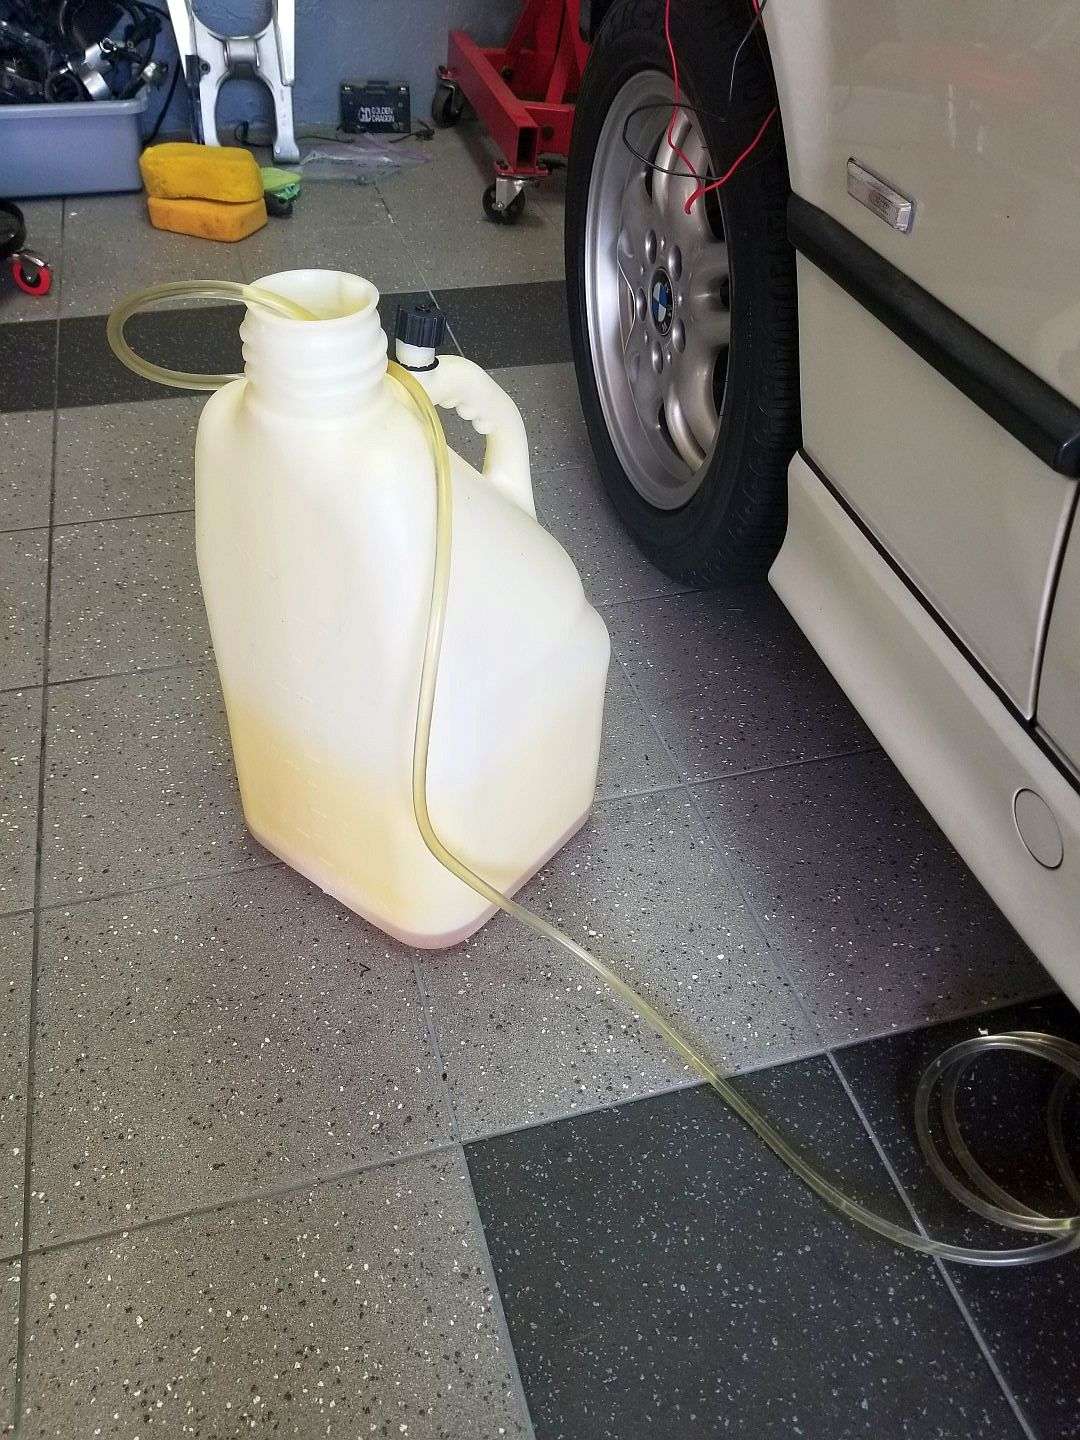
In my best Chris Farley voice "So stupid!" I was simply not paying attention what I was doing and had a bit of a brain fart. I wanted to pump the old fuel out of the tank so I needed to put power to X20-13. I rigged-up a small jumper harness with a remote starter switch to activate the fuel pump. Got it hooked up, hit the switch - nothing. At first, I was connected directly to the battery which was sitting on the garage floor next to the front tire. Then I thought maybe I needed to put power to X0 so I connected the battery in the trunk, jumpered power from the under-hood distribution block to X0 and tried again. Nothing. I'm sitting there scratching my head when I realized what I was doing wrong.
I had the number 20 on the brain (X20) and instead of putting power to X20-13 I was putting power to X20-20! I'll have to trace the schematics and see exactly what pin X20-20 does. I hope putting 12v directly to X20-20 didn't screw anything up.
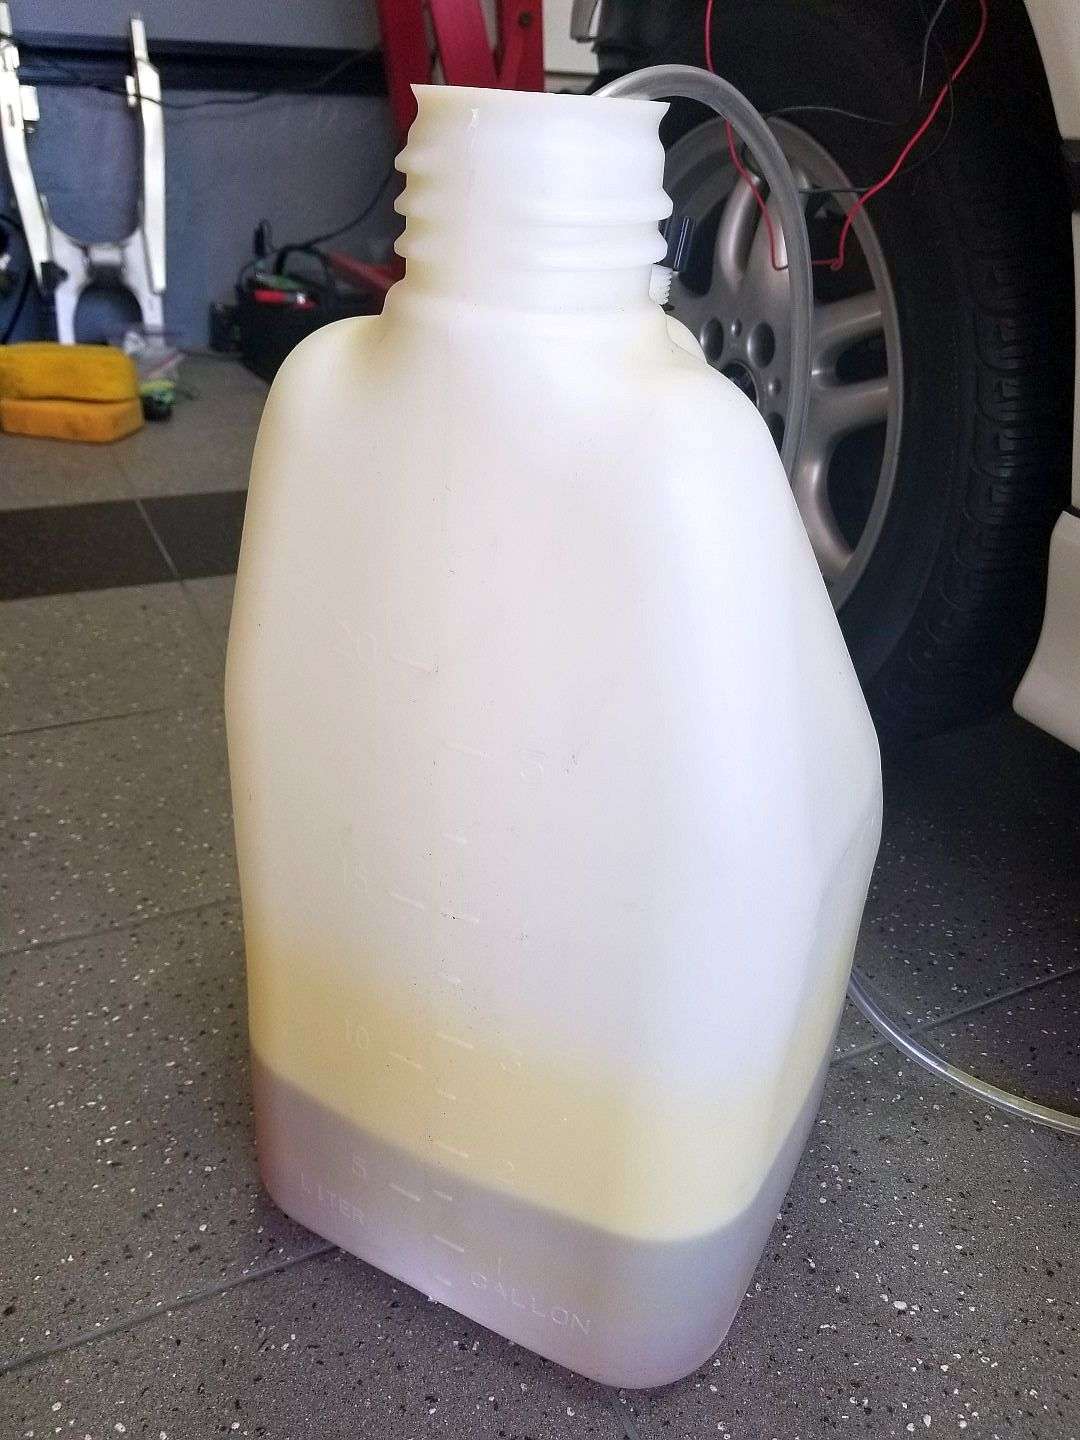
Once I got my head out of my ass, I put power to X20-13 and Voila! I instantly heard the pump come to life. I parked the car so long ago I have no recollection of how much fuel was in the tank. I like to think I was smart enough to run the tank nearly dry but I really can't recall whether I did or not. The instrument cluster is not installed right now, so no fuel gauge to reference. The pump ran strong for a minute or two but then started cavitating and pumping mostly aerated fuel. In the end, I only pumped a little less than two gallons from the tank. Hmmmm.
Have to leave town again tomorrow. Barely touched the car but I wanted to at least do something while I was here.
Switch to activate fuel pump
Fuel Jug
That's all that pumped out
Last edited by TipsyMcStagger; 01-10-2018 at 08:41 AM.
БМВ Фанат!
Brat, if this is the case then you are one of the luckiest people after doing such a mistake, otherwise you would probably have to get a new cluster for your car. The X20 pin 20 goes to the Tachometer signal, and it would probably not like seeing +12v there
Depending on how the car was driven before you parked it, there is most likely more fuel remaining in the driver's side tank. Running the fuel pump into a jug will not activate the venturi transfer pump on the driver's side, so any fuel will remain there.
You can either open the driver's side to see how much fuel remains in that tank and manually evacuate it or technically, you should be able to put the fuel you pumped out back in the car, connect the fuel pump feed line to the fuel return line and run the pump for couple of minutes. That should syphon most of the fuel out of the driver's side over to passenger's. Then run the pump out again... I never tried that, but I think it should work.
- 96 328is 6.0L. (LS1 to LS2 build thread: http://forums.bimmerforums.com/forum...ad.php?2098938)
- 96 328is 5.7L. (LS1 build thread: http://forums.bimmerforums.com/forum....php?t=1289987)
- 95 ///M3 6.0L. (LS2 build thread: http://forums.bimmerforums.com/forum....php?t=1619249)
- 97 ///M3. (e46 Fender Flares/track car build thread: http://forums.bimmerforums.com/forum....php?t=1727098)
- 96 328is (Dual Fuel Pump to Surge Tank thread: http://www.bimmerforums.com/forum/sh...ad.php?1964025)
Member
I took a quick look at the schematic last night and saw the tach signal reference. If that's the only thing X20-20 ties into, then you are correct; I got very lucky not having the cluster in the car.
I always say, I'd rather be lucky than good!
The rear seat is also not in the car. At this point, it sounds like it might be easier to simply open the tank and drop a small pump or siphon in there.
Thanks for the feedback!
Tipsy
Major Lazer
I emptied my fuel tank too this past weekend since the fuel was about 3.5 years old. I used a manual siphon pump. There was ~5 gallons in each of the fuel tank lobes. Took me about 40 minutes in total.
Here is the pump I used in case you are interested. It says not to use with flammable fluids but I'm a rebel I guess.
https://www.homedepot.com/p/Arnold-S...0008/203051321
2003 M5 LSx l 6 Spd Manual l 4.10 LSD
Build Thread
The chassis must always be regarded as a means to an end and never as an end itself
Member

 Posting Permissions


 Reply With Quote
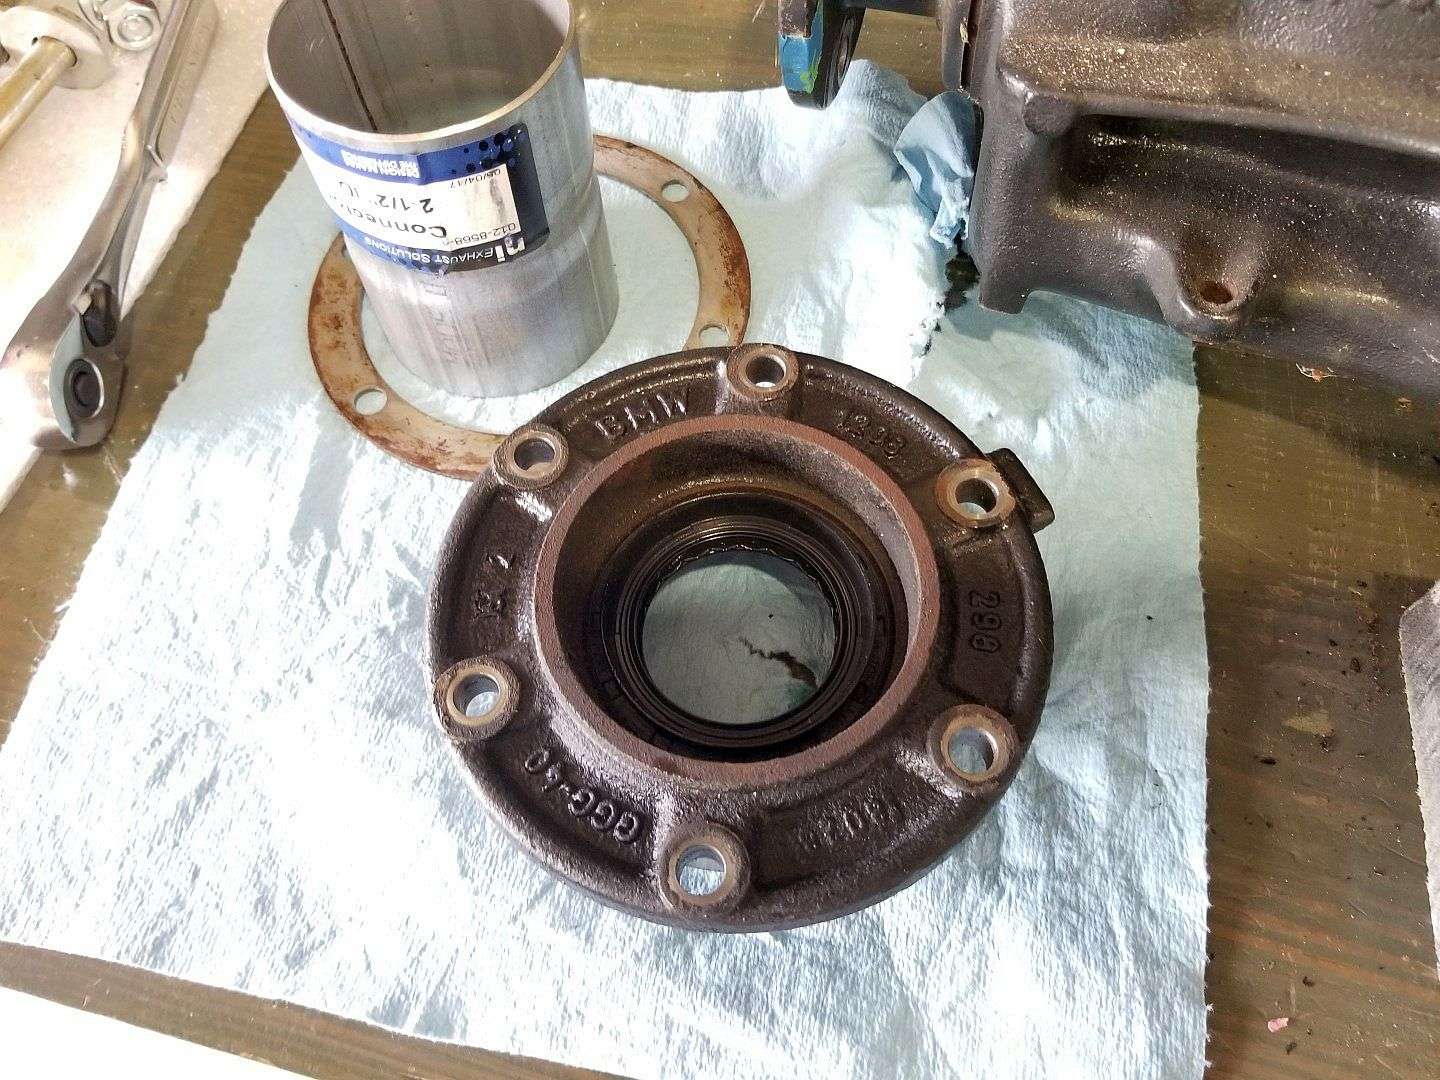


Bookmarks