
 Member
I see! How is that working? Getting any better?
Lol, thats a nice way to keep busy
dirty paws...
So, I have a little time tonight to browse, and I came across this again. Something I'd like to ask is how new is your crankshaft sensor? I had mine go kaput on me last week, and now that I've replaced it I've noticed that my car runs a whole lot better all around. While it doesn't seem normal to me, apprently magnetic sensors like that can get 'tired', as replacing mine has cleared up a lackluster rev to higher rpm's in my car, and simply made it run noticeably better. Shocks me, as I have always experienced sensors like those either working or not, but I will swear that my old one was 'tired' to anyone that will hear it. If yours isn't new, it might be worth the ~$40 or so for a new one, just to see. This is of course if your car is still giving you fits on rev like it was before.Originally Posted by Sankekur

Also, how long are you running it with the ATF you say you put in the crankcase (for cleaning purposes)? Are you giving it a couple hundred miles to do it's thing? Just curious...
Fox
Member
I would like to say yes, when I had the valve covers off and the back cover off to change rear main seal it did look like there were patches where is was getting cleaner, but it is hard to be certain as I haven't been able to do any before after comparisons yet.
Crankshaft sensor is new, probably around a year and a half old. Had a starting issue back when I got the car and it was the crank sensor, which I replaced with a new one from the dealers. So I would hope that it is not giving problems already.
My next step will probably be to look into swapping in a 404 DME to investigate the possibility that it is a DME issue. (would also be interesting to see if it changes anything to the rough idle that the car has)
Yup I put the ATF in the crankcase, the idea is to keep it in around 600 miles, but due to the extent of the problem I push it to double that. The reason behind using ATF is that it comes with some really good detergents so it cleans, but unlike something that is solvent based it clean slowly so you minimize the risk of large pieces coming loose and clogging something that should not be clogged. Additionally ATF also has a really strong film strength (HTFS HPFS I think its called) so even though its really thin it can still adequately prevent metal on metal contact.
dirty paws...
OK cool - I was asking about the ATF because I already knew it needs some time to work. That said, I've never heard that ATF had a particularly good HT/HP rating - but I'll keep it in mind and do some reading. I do know that in smaller amounts it's not going to harm anything - but you definitely don't want to go over about 15% for long - and it's the longer time spans that do the best cleaning. 10 - 15% ATF and about 500 miles is about perfect, and should produce a clean engine in a few changes.
Fox
Member
Not sure how well it will clean in my case with the motor in such a state, but will wait and see. Is due for a oil change now, just waiting for the filter that is on order.
What I can say is that a couple of friends have had some really good results from using ATF in the engine oil, but in their case it quieted down noise lifters. I should also say it is probably a good idea to keep the RPM low when you have ATF in, I try to keep in below 4000rpm
Member
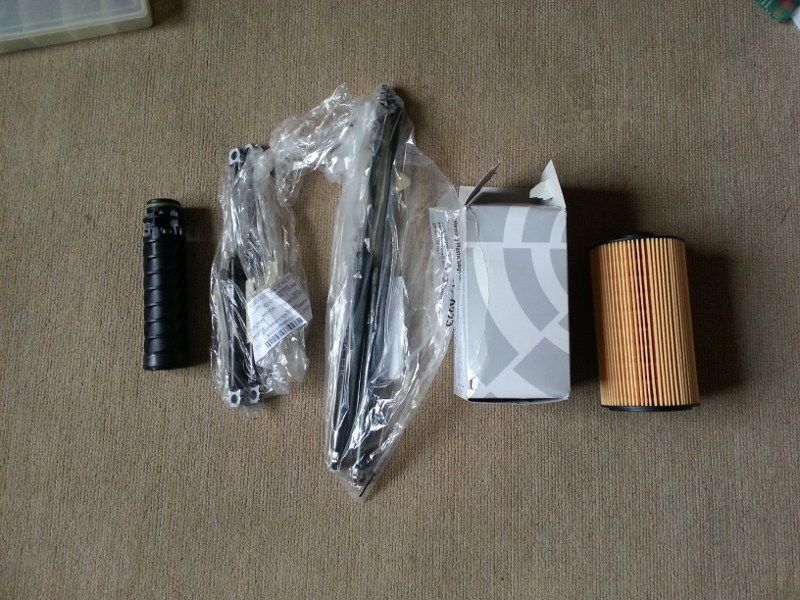
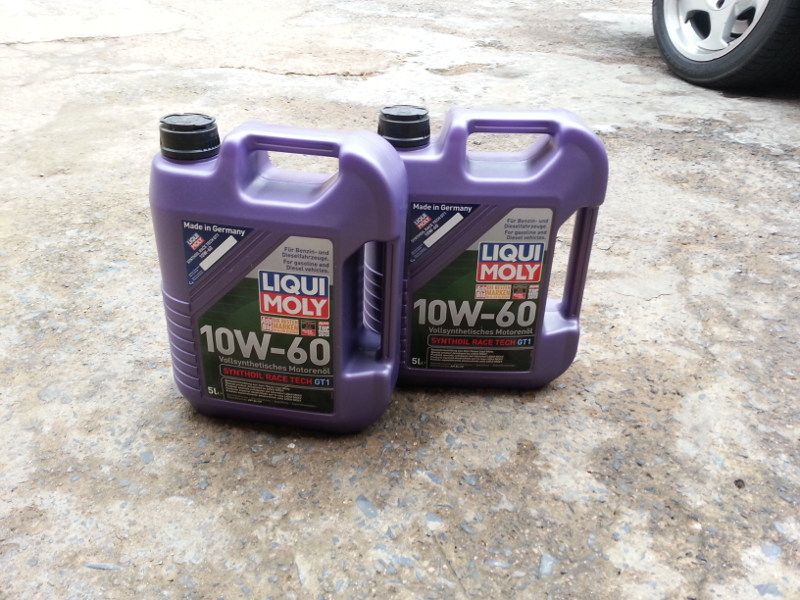
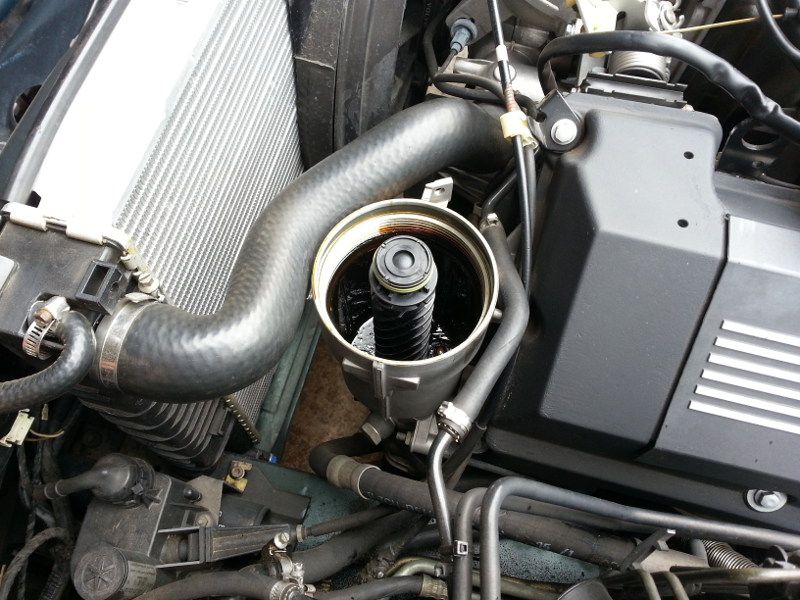
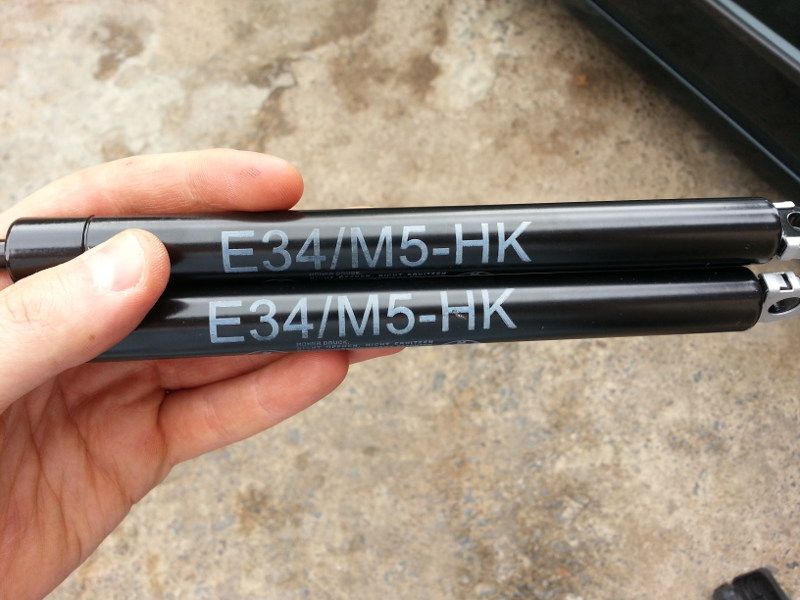
So this weekend was service time yet again.
Got new boot and bonnet shocks and a new oil filter support.
The oil:
Fitted the oil filter support, seeing as someone that worked on the car previously deemed it appropriate to throw the old one away effectively rendering the filter useless:
Fitted the boot and bonnet shocks, went for M5 boot shocks, because racecar:
And the car is now back on stars again:
Thanks for watching
Member
This is the thread to watch for maintenance! I've been following yours as I'm going through mine bit by bit. Keep it going!
Last edited by excelsisba; 10-13-2014 at 03:20 PM.
Member
Thank you.
Member
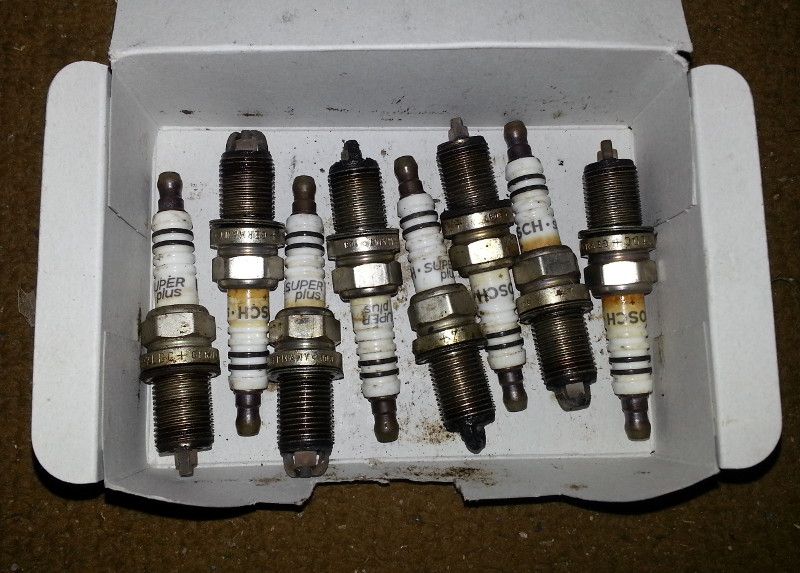
So a while back I had an intermittent hesitation issue, replaced the plugs as they were the oldest part on the ignition and this sorted the issue.
The old plugs:
Only two plugs are in a really bad state and corresponds to the two cylinders that I have previously found the valves to be really carbon'ed up. The rest have burnt really well and show only slight signs of oil contamination.
While I had the plugs out I measured the compression and the results confirmed my suspicions:
Test 1:
1000kPa 850kPa
1000kPa 1100kPa
1075kPa 1050kPa
850kPa 1150kPa
Test 2:
1000kPa 975kPa
1000kPa 1100kPa
1050kPa 1050kPa
775kPa 1150kPa
Also took the car out on a track day with some friends during the end of last year.
Subsequently had to fit new rear pads.
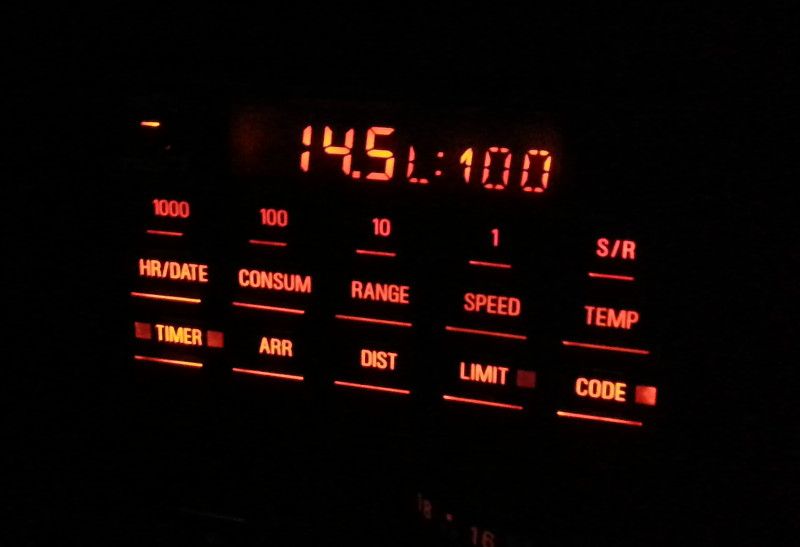
Consumption for the day:
Thanks for watching.
Member
So any updates on the motor side of things?
Member
Nope, nothing yet.
For the moment I am struggling to sort out a really weird starting issue.
Member
Care to elaborate?
I have an issue with my 540i right now, very rarely and only after the car is hot will the car not start, no starter clicking or anything, basically like it's auto inhibitor is activated, so far I have just attached two wires to starter main and solenoid power and if it plays up, I just bridge the wires to start the car, this will do until I pull out the starter and strip and clean it.
I will also be cleaning the trans selector switch as I'll have that apart when I replace the trim cover eventually
Member
I actually had an issue exactly like this on mine, after driven hot and turning the key to attempt to start the car there would be nothing. I found the problem by measuring the voltage on the stater and found that under normal circumstances the voltage would be 12V or around that (battery voltage) however during this no start condition this voltage would be around 7 V doing some more measuring found that the voltage was dropping somewhere on the engine harness. So it would seem that the wiring as cracked or damaged somewhere. My fix for it was just an additional wire that I wired in between the EWS and the starter.
The starting issue that I had here was, if the car stood for a long while like overnight it would start perfectly fine, it would also start fine if tried staring it right after tuning the engine off whether hot or cold, but if you say start it turn it off and leave it for say 5 minutes or more (also didn't matter whether it was hot or cold), it would just crank and crank and only after about 30+ seconds of continuous cranking it would slowly sputter to life gradually idling better.
This issue turned out to be a dodgy injector or injectors that leaked. So once the car has been started the fuel rail would be pressurized, if you turn off and on again it would start fine as not enough pressure (fuel) has leaked out through the injectors leave it for longer and there would be enough time for the injectors to leak enough to flood the cylinder(s) resulting in a lot cranking to get the excess fuel out. However leave it longer and this allows all the pressure to leak out, and fuel in the cylinders to evaporate and leak down to the crank case allowing it to start just fine. Changed injectors and problem was solved, seems really obvious in hindsight, but I struggled with this for a long time.
Not much has happened with this for some time now and even less due to the fact that I moved and don't have space for the car at my place so it is standing elsewhere, so out of sight out of mind and all that. Finally I doing something on it again.
So I am busy doing some suspension work on this one, chief among this is a change of dampers. So as it is most of the time with anything I do nothing is straight forward. Bought new shock, new top mounts, however found that the front dampers don't fit the top mounts. So it turns out that our 540i's here in SA came with a different top to any/everywhere else in the world, and this is a problem as the dampers I got (Bilstein) come from elsewhere in the world. So as is tradition I am busy making a plan to get the shocks and top mounts to work together. In addition to this with everything off and the car raised I also found that the ball joint boots on the lower control arms are stuffed as well, right side is cracked and left is completely destroyed. So some good old fashioned while I am at it/it is open/everything is off sets in as well. The car also needs new front pads as the right inside pad is already so worn that the disc is touching the steel backing.
With this I will leave a couple of pics here for you gawk at or pass judgement on:
And yes that is quite a substantial powersteering leak, and no I don't think I ready to do anything about it.
Thanks for watching, more to follow as things progress (or regress)
Last edited by Sankekur; 10-11-2018 at 04:06 AM.
Member
Update time. My original plan was to change the dampers, but as I was stripping the struts out I found an ever growing list of things in need of attention. As per usual my while I am at it/while it is open/while I am busy set in pretty hard. This is what I found:
-The dust covers on the lower control arm ball joints had cracked on one side and complete disintegrated on the other. The ball joints still felt fine with no play but the damage might already be done so that new boots might just postpone the inevitable by a couple of months.
-Brake pads are due for replacement, with one pad pretty much down to the backing plate.
-Rubber brake hoses starting to crack where the threaded fittings were crimped on.
With this said on to the parts parade.
Front and rear dampers, Bilstein B6's.
Strictly speaking for my setup I actually need the B8's, which are basically identical to the B6's but with a shorter shaft for shorter springs, but getting these kinds of things for an e34 in SA is a bit of a mission.
Ooohh, fancy.
So while I was at it I got new lower and upper control arms and and anti roll bar end links. The arms are Meyle, with the lower being the M5 version. The end links are Swag.
New front and rear top mounts, from the dealers, as they weren't priced too badly and no proper alternatives are available.
As previously posted e34's in particular 540i's in SA came with different top mounts from the rest of the world. So I had the ID of the top mounts reamed out so the studs could fit.

I also had the machine shop make up a couple of tapered washers (spacers?)
These fit over the studs on the dampers that for some reason has a taper on the end.
This allows the top mount that has a flat bottom to sit properly on the taper on the damper.
I also got a set of braided brake hoses to replace the cracking rubber hoses
Also on the side of the brakes even though the discs are pretty much fine I got this:
Thank you for watching, more to come.
Member
Excellent work sir. I just found this thread today, and am glad to see you still have the car and are working on it.
Oxford is my favorite e34 color, and the black leder interior on yours looks amazing. Most of the oxford cars here in the states came with tan interiors, which does not age or wear very well. I also enjoy the birds eye maple too!
Looking forward to more!
Sent from my iPhone using Tapatalk
 Member
Is joy a weird emotion to feel reading this thread? Bringing this car back from the dead was one of the best things I’ve read all day! Keep up the good work.
O o
/¯____________________________ ______________
| BLAAAAAAAAAAAAAAAAAAAHHHHHHHH! !!!!
\_¯¯¯¯¯¯¯¯¯¯¯¯¯¯¯¯¯¯¯¯¯¯¯¯¯¯¯¯ ¯¯¯¯¯¯¯¯¯¯¯¯¯¯
Member
Thank you, I am glad you came across it and found it of interest. I took a bit of a hiatus from the car and posting on forums in general (also apologies to everyone else following this thread). I made some big changes in my life, chief among them buying and moing into my own place so this took up (and is still taking) a lot of my time.
It most certainly is not. Thank you I appreciate the kind words, I am also glad I was able to supply you some good reading, and I appreciate you taking the time.
Some cleaning related updates.
So the front struts completely stripped.
First gave the hubs a good clean.
Then cleaned up the rest of the struts including the rest of the parts that make up the complete struts:
I also made up a special to fasten the nut that locks the damper into the strut.
How the tool fits onto the nut of the damper.
And the completed tool.
Thank you for watching.
Member
Gave the wheel arches a bit of a clean.
Removed the upper and lower control arms.
And fitted the new control arms
The brake hose on the one side is missing as at the time this was done it was sent off as a sample to get the braided hoses made up.
Thanks for watching.
Member
BMW CCA Member
I really like the attention to detail, especially in areas where most wouldn't bother because it's not seen without removing something. How is that motor doing 4 years later?
95 540i6 M Sport - 95 525it S52/OBD2 - 433k E36 328i5 - X5D that hit a pothole - IG: @justinmurray95
Member
Thank I appreciate it. Well it is still running, no fireworks, but also doesn't give me the feeling that is is going to pack up at any moment. I have also acquired a spare engine for when I finally get round to rebuilding the motor.
I reassembled the struts
In the end my special tool did not work as it should have, or at least as I though it would. I though of a couple of other plans but ended up resorting to brute force, this type of brute force:
Also notice the slight gap between the spring pad and the spring:
Ideally I would have needed B8's instead of B6's on these springs.
Fitted the struts and the new brake hoses.
Brakes fitted and bled.
Car back on the ground again, and in need of a clean :mmm:
Thank you for watching.
Addicted to Golf
Here's what I did on my 95 540i/6 (With engine oil sludge issue): Did an oil change with 3-4 quarts of ATF and the rest some sort of detergent motor oil. Ran for one hour. Did an immediate oil change with one quart of ATF and the rest, a good detergent motor oil. Ran the car that way for 1,200 miles. Repeated the step a total of four times. At that point had to change the other valve cover gasket. Voila - No more sludge. Now I'm using Liqui Moly motor oil. Hope this helps.
USC Ralph - Long Beach, CA USA
1989 E34 White 525i (M20) 310,000m (Sold)
1993 E34 Black 525i (M50) 308,955m
1995 E34 Calypso Red 540i/6 (M60) 201,254m
1993 E34 Black 525iT (M50) 138,500m
Member
Thank you for the input I appreciate it.
Removed the rear wheels to start with the rear suspension:
Getting the band back together, four throwing stars to go on when the work is done:
Cleaned the mounting surfaces:
Gave the wheel arches a quick clean:
Stripped out the rear seat to be able to remove the rear struts:
And removed the rear struts:
That's all for now, thanks for watching.
Member
Sorry updates have been a bit on the slow side as I had a couple of other things to sort out and finish up, but things should pick up pace again. Here is some track day action from 2017 to tide you over for now.
Thanks for watching.
Member
Removed the trailing arms.
https://drive.google.com/uc?id=1oKqq...gIPVDvY2PN3QaM
https://drive.google.com/uc?id=1hPjn...AApFimurTI9DoY
Fought the diff out.
https://drive.google.com/uc?id=17ZvN...a7fZ4Kd2oBCP3r
https://drive.google.com/uc?id=14ulU...O9sOqz4mpGC09u
Gave the trailing arms a clean
https://drive.google.com/uc?id=1ggZA...rwb_gPCl0dBIcA
https://drive.google.com/uc?id=1RE56...Rm7Utn2ELe_LaK
https://drive.google.com/uc?id=16jMC...GZTY4-42T5Sy8W
Some more parts, braided hoses for the rear brakes, the two rear and one front bushes for the diff, powerflex poly trailing arm bushes, subframe bushes, bumpstops, rear anti-roll bar bushes and end links and rear pitman arms.
https://drive.google.com/uc?id=1ANms...z3TOHfNTWl_QML
Thank you for watching.
Member
With the diff out and it being pretty nasty from oil leaking though this would be the perfect time to change all the seals. "While it is out" "While I am busy" "While its open"
So the starting point a pretty nasty diff. (Its a 3.15 LS for those interested)
https://drive.google.com/uc?id=1ufnm...cYhUYg-6DZElO_
Gave it a clean
https://drive.google.com/uc?id=1SbxM...4aR4Yfvx_1DNDq
https://drive.google.com/uc?id=1jNgw...AHT--VTA0zXuie
The parts for the diff. The shaft seals and o-rings for the output flanges, shaft seal for the input flange, new spring clips to hold the output flanges in, seal for the input flange CV, o-ring for the speed sensor, gasket for the back cover and crush washers for the drain and fill plugs.
https://drive.google.com/uc?id=1tVeL...qA1N5tLhAyTxra
Removed the rear mount so its easier to clean the back cover.
https://drive.google.com/uc?id=1Zpqc...CtMWxvoE9huSdd
Drain the oil
https://drive.google.com/uc?id=1ecPy...D-Ik6qKnnWquIP
https://drive.google.com/uc?id=1R1go...4L57KiQyCy8pJ0
Pulled out the output flanges
https://drive.google.com/uc?id=1yRTA...iwSTn0ZlkBiV3H
https://drive.google.com/uc?id=1IAXG...L5ZH9PuJulGVcJ
https://drive.google.com/uc?id=1aSbT...-DLvES8kBU8J-J
Cleaned the removed parts
https://drive.google.com/uc?id=1dWAA...-wz9pfc0kyX892
https://drive.google.com/uc?id=13IsY...v7DxsIrhWkrnnh
The moved the side plate that holds the shaft seal and acts as the outer for the output race.
https://drive.google.com/uc?id=1vgAM...0G8AA3ifPNiXHz
https://drive.google.com/uc?id=1aJZk...5-Byn5wcgwLsQ6
Bearing surface
https://drive.google.com/uc?id=1pAI3...SaWUNV9QygETww
Cleaned and seals removed
https://drive.google.com/uc?id=1HDVD...k9rvaf-GFr-_nG
Thanks for watching.
 Posting Permissions


 Reply With Quote


Bookmarks