
 Sim Simma
Moderator
Sim Simma
Moderator
I like the little rubber(?) vent flap doors. Mimics the OE BMW design used on later models
The lower left area looks to have an opening for the expansion tank return line. Since you have relocated your expansion tank you may want to consider covering that opening. It's small but it'll pull some air through there
Going into my TENTH YEAR of providing high quality reproduction BMW fabrics!
PRICE CUT on ALL FABRICS
Offering the best prices on the best quality reproduction fabrics!
 1of1 SG/DBO Twinscrew
They are rubber, yes.Originally Posted by BimmerBreaker

The hole in the lower left is for the -10AN fittings/lines for the oil cooler to pass through. I'm nervous the hole is either too small or not going to work as arrived, but that's the problem with one off projects bought years apart. My original radiator was an actual FB memory today from 8 years ago. The cooler was added I think 5-6 years ago.
- 1of1 rebuild (build thread) -
- Wanted Car items - FS: PnP aftermarket alarm details -
- Coupe Custom Subwoofer box - FS: Z3 Coupe LED 3rd brake lights -My Website for DIY content and parts: Double Bee Garage
1of1 SG/DBO Twinscrew
The weekend's while the kids were napping Saturday project:
I'm itching to start this but trying not to "get into it" until the parts car is out of my driveway so that it doesn't sit there until next spring, but I didn't have time to dig into it this weekend so I tinkered. I'll likely be swapping the AFR and boost from as pictured as I just threw them in to see what they looked like.
I also started cleaning the workbench off and found the 3D printed "high mount" for the rearview mirror I decided to throw in Sunday but didnt snap a photo yet
- 1of1 rebuild (build thread) -
- Wanted Car items - FS: PnP aftermarket alarm details -
- Coupe Custom Subwoofer box - FS: Z3 Coupe LED 3rd brake lights -My Website for DIY content and parts: Double Bee Garage
1of1 SG/DBO Twinscrew
So I got to start going over the ESTS tonight, took off the IC lines to make it easier to go through put on caps and then found a slightly unsettling discovery (at least to my unfamiliarity with an Opcon roots blower, but did have an Toyota Eaton TRD SC before) that my pulley and my rotors are not direct connected?
I already emailed Randy but I don't think this is normal? I can spin my pulley and the rotors don't turn, or I can spin my rotors and the pulley doesnt turn. Rotors spin together as expected.
That doesn't make sense to me as they should be direct 1 for 1?
Looking at the Kenne Bell graphics online seems to show direct drive, no weird "clutch" which leads me to believe a broken shaft somewhere.
I hadnt planned to send the unit off the KB for an overhaul yet but it looks like my plans might be changing.
Beauty picture because everyone likes pictures.

- 1of1 rebuild (build thread) -
- Wanted Car items - FS: PnP aftermarket alarm details -
- Coupe Custom Subwoofer box - FS: Z3 Coupe LED 3rd brake lights -My Website for DIY content and parts: Double Bee Garage
1of1 SG/DBO Twinscrew
We'll good news is the ESTS guys think I just need to torque the bolt/ pulley and everything should be fine as there is a friction ring that connects the two so it's likely just oily and loose
- 1of1 rebuild (build thread) -
- Wanted Car items - FS: PnP aftermarket alarm details -
- Coupe Custom Subwoofer box - FS: Z3 Coupe LED 3rd brake lights -My Website for DIY content and parts: Double Bee Garage
1of1 SG/DBO Twinscrew
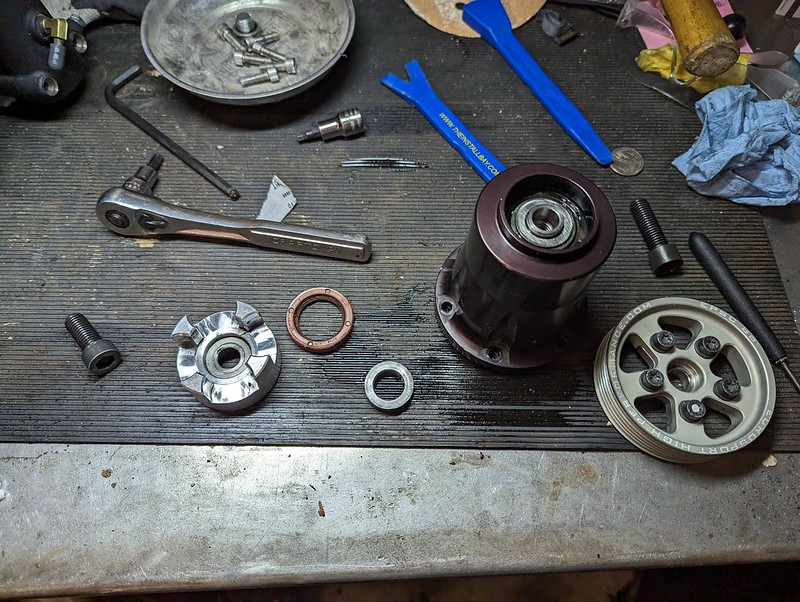
I located my issue! And it looks to be a simple fix! The inboard snout coupling to the rotor pack looks to be that same friction fit (terrible design) that the pulley is "fit" with on the front. Both are bolted into the snout shaft supported by what looks like a double ball bearing.
Snout pulley seal: Elring 28x40x7, this was easy for anyone that has swapped a pulley, but now its on the internet.
Inboard snout shaft bearing: Number pending! I'll snag a photo and PN later.
Flex spider coupling: KTR GS24
I'll likely replace the flex coupling and replace the snout seal and put on some new RTV and sealer up and send it for now. I had not planned to rebuild at this time and everything else sounds/looks fine.
NO snout!
The (removed) LOOSE culprit!
Flex spider coupling:
Snout seal:
Snout seal pulled:
Disassembled to see if I saw anything else of concern (you can see I pulled off that friction spacer Tank posted that link about):
Glad this seems to be a simple fix.... I can sleep well again.
- 1of1 rebuild (build thread) -
- Wanted Car items - FS: PnP aftermarket alarm details -
- Coupe Custom Subwoofer box - FS: Z3 Coupe LED 3rd brake lights -My Website for DIY content and parts: Double Bee Garage
Member
Love the updates Rob. I was toying around with getting a Zionsville unit for some time, especially after my cooling system exploded on me, destroying everything. I was debating, that or making my own shroud.
This supercharger is so so cool. Truly an "icing on the cake" for an already super special m coupe. This is a great, unique route that'll be a complete game changer. We should switch keys at schuh this year to compare
1of1 SG/DBO Twinscrew
When I did my cooling S50B32 retrofit with the known that I would boost one day, I decided to remove as much plastic as possible. Zionsville was the only good fit known option, while pricy I'll never have to worry about it again. Buy once cry once is a lot of what I consider when building this car.
I had always intended to do a custom turbo with a 500/500 minimum goal. But with the young kids and owning both a roots SC and twinscroll turbo Audi as a daily since the original plans were decided along with the ESTS kit popping up the plans changed slightly. Still boost, but the insta torque is more fun IMO and the 500/500 number in a street car is excessive.
My SQ5 is a TS turbo with around 400/400 all wheel and at 1200lbs more is still very fun to drive. The S4 roots SC before that was around 375/375 all wheel and still 5-700lb heavier than the coupe and a complete BLAST but just too small for the growing fam.
The significantly less fabrication for install and "plug and play" aspect won out for the ESTS.
- 1of1 rebuild (build thread) -
- Wanted Car items - FS: PnP aftermarket alarm details -
- Coupe Custom Subwoofer box - FS: Z3 Coupe LED 3rd brake lights -My Website for DIY content and parts: Double Bee Garage
1of1 SG/DBO Twinscrew
Well, I told myself I wasn't going to the ESTS until I got RID of the parts car but seems a little harder than expected the "CASH FOR JUNK CARS" doesn't include shells... I may just have to go rent a flat bed and tow it to a scrap metal yard.
So I lied to myself and the shell sits, but the ESTS beings!
I apparently did a bad job of documenting photos other than a few random photos of the fuel pump fitting into the parts car assembly since I can do that before breaking my tank open and had a bit of time when the kids and wife were in bed. I'll get some progress photos before it gets put in.
I need to source a fuel pump sock that fits this fitting, or will replace it completely as the "standard" one I got for the GSS324 has a gigantic opening. There are two listed on Radium Engineering that show a 19mm inlet size, but don't have the same shape as the original Z3 so I want to see if they round/centered sock arrangement will work in our tank before ordering.
But lets me honest, you're not here for fuel pump stuff, so here is the beginning of our ESTS journey.
How it started:
How it ended:
I need to go dig through Randy's photo archives for the space WRT the oil block as I think I need to rearrange all my connections to fit under the charger as it currently sits I believe the VANOS feed is too high. I have a Rally road extension with a real oil pressure sender and the idiot light on it, and then this unknown block that came with the filter of my previous parts car I believe.
I need to order some hardware too as the ESTS oil block didn't come with a bolt and the VAC fitting adapter bolt is too long, but I had a McMaster-Carr order pending anyway for the "sight glass oil level indicator" for the nose oil.
So the ESTS "airbox" is trimmed and fitted to the Z3 chassis, I plan to reapply some sort of heat retarding to the engine side as the original stuff on there is definitely deteriorated and ugly looking.
I threw on the Radium Engineering PCV to AN fitting as well to throw a cap on it.
Biggest speedbump so far is Zionsville completely botched by shroud and is about an inch and a quarter too small. I expected to have to do some minor fitting to my oil cooler lines but this has no hope of working. I emailed them yesterday but we'll see what their recovery action is.
- 1of1 rebuild (build thread) -
- Wanted Car items - FS: PnP aftermarket alarm details -
- Coupe Custom Subwoofer box - FS: Z3 Coupe LED 3rd brake lights -My Website for DIY content and parts: Double Bee Garage
Member
Love following this thread - such an incredible transformation.
Where did you get the carbon fiber heat shield for the intake? You make it?
Cooper
'00 Alpine III M Roadster (2017-Present)
'02 Topaz 3.0 (2009-2020)
'97 Montreal 1.9 (2005-2009)
1of1 SG/DBO Twinscrew
Thanks!
The heat shield was part of the original Euorsport package for the E36 chassis. Remarkably with a little bit of Dremel work it works on the Z3 chassis
- 1of1 rebuild (build thread) -
- Wanted Car items - FS: PnP aftermarket alarm details -
- Coupe Custom Subwoofer box - FS: Z3 Coupe LED 3rd brake lights -My Website for DIY content and parts: Double Bee Garage
1of1 SG/DBO Twinscrew
Had a little free time last night so I start to see what was needed for the A/W heat exchanger.
The E36 ESTS brackets of course don't fit, but that was expected.
The pusher fan has no hopes of fitting with the AWHE, but that was expected.
I plan to mount the expansion tank/reservoir as seen in some of Randy Forbes's photos, but this again was also expected.
I have some ideas maximize air flow I plan to implement, and am getting more parts orders together. I think I'll rough out the new HE mounting brackets, 3D CAD them and have a buddy 3D print then have them sent out to Send cut Send, or just print the template and plasma myself depending on their pricing.
I'm a little happy and a little sad that the HE is black anodized, maybe on V2 of the ESTS I will get a new silver one made
Tucked in behind the lower grille, I might actually have to ditch my front plate and run "dirty"
Top down view, no hope for that pusher fan
Reservoir tank tucked in there
And a new (specific) tool showed up for later in the project (on the right), Vibrant hose shears

- 1of1 rebuild (build thread) -
- Wanted Car items - FS: PnP aftermarket alarm details -
- Coupe Custom Subwoofer box - FS: Z3 Coupe LED 3rd brake lights -My Website for DIY content and parts: Double Bee Garage
Grumpy
BMW CCA Member
I don't know if you noticed, but a recent addition to Randy's barn of obsolete machine tools, sitting right next to the transmission bench, is a 1930-ish Niagara folding brake
/.randy
1of1 SG/DBO Twinscrew
I hadn't noticed. There's a lot to see in there.
Finger brake? to make a box? My "in floor press" SWAG offroad finger brake can only do 19" which isn't enough for the shroud correction.
I also sent you a Facebook Messenger for the tranmission parts I'm targeting to get confirmation they are correct and necessary before pulling the trigger with Bimmerbum. I keep forgetting to send it via text, but its also the list for $420 (obsolete pricing) minus the fluid here: https://www.mforum.net/forum/e90-m3-...ual-conversion
- 1of1 rebuild (build thread) -
- Wanted Car items - FS: PnP aftermarket alarm details -
- Coupe Custom Subwoofer box - FS: Z3 Coupe LED 3rd brake lights -My Website for DIY content and parts: Double Bee Garage
Grumpy
BMW CCA Member
Unfortunately it's not a finger brake. It's original purpose was to have a custom form installed to be used for production runs. But it can do simple straight bends up to 30".
Oh. Facebook. I guess I"ll have to log in when I get to the office. Das employer requires me to monitor industry chatter there. I don't. I'm probably the only person in the world who's boss is upset because I don't use facebook enough on company time.
Screenshot_20211225_160356.png
Last edited by rf900rkw; 02-01-2023 at 09:48 AM.
/.randy
1of1 SG/DBO Twinscrew
Had a stressful day at work yesterday, so after everyone else went to bed, I went to the sanctuary.
Nose of the SC is back on with a fresh flex coupling and shaft seal. Bolts are all torqued up, or well mostly. A Kenne Bell diagram Tanks95 shared stated the M12 bolts should be 75ftlb. I set my wrench to that but chickened out somewhere north of 59ftlb they require for the M10 bolts. I was flexing stuff too much for my comfort. If they back out again maybe I'll go full torque but for now they are closenuff.
I also redid my oil cooler lines with the needed 90* fittings for the SC oil cooler block in lieu of my old 135* going over the alternator. Those are uneventful so I didnt take any photos of them but here's the nose reassembled.
I also ordered a bunch of odds and ends from McMaster-Carr this morning
Randy is working on my 6 speed
And I took Monday off to do some extra work after the nutso Friday.
- 1of1 rebuild (build thread) -
- Wanted Car items - FS: PnP aftermarket alarm details -
- Coupe Custom Subwoofer box - FS: Z3 Coupe LED 3rd brake lights -My Website for DIY content and parts: Double Bee Garage
Grumpy
BMW CCA Member
To add to the pron, NAKED transmission.
Back half ready for the center case. But first, must clean.
IMG_20230206_201316452.jpg
/.randy
Member
Good job
Sim Simma
Moderator
Is that "non-serviceable" 420G?
Going into my TENTH YEAR of providing high quality reproduction BMW fabrics!
PRICE CUT on ALL FABRICS
Offering the best prices on the best quality reproduction fabrics!
Grumpy
BMW CCA Member
Nearly non-servicable. Yep. No parts, no tools, no instructions. No problem.
Doing shifter pins is a little more involved than on a ZF
pin-bore.jpg
Last edited by rf900rkw; 02-07-2023 at 05:29 PM.
/.randy
1of1 SG/DBO Twinscrew
Odds and ends sorted over the weekend and Monday but due to sicknesses in the household less productive then we hoped for.
I started mocking up the reservoir in the crash bar. I expect this to work with proper spacing aft of a flush mount due to fitting angles and the bumper support/shocks clearance. However, I am a little concerned with cantilevered weight when full of coolant. I may rig up a centered "L" bracket to help support the weight but will depend on final offset from when installed permanent.
My McMaster Carr order showed up Tuesday so I should have the needed materials to finish the IC plumbing install.
Only photo I have to share is this one which you can see the initial fitting of the reservoir and pilot holes drilled and the -12AN line hanging from the driver side which is the only evidence I have of mounting the circ pump in it's final location on the Motion Motorsports support brace.

- 1of1 rebuild (build thread) -
- Wanted Car items - FS: PnP aftermarket alarm details -
- Coupe Custom Subwoofer box - FS: Z3 Coupe LED 3rd brake lights -My Website for DIY content and parts: Double Bee Garage
1of1 SG/DBO Twinscrew
More unexciting odds and ends worked on last night.
The McMaster-Carr showed up so I got to install the "sight glass" for the SC nose oil level.
The correct fastener for the oil distro block got swapped out for the VAC fastener which was too long, and realized I ordered 1/8 in lieu of 1/4" THK aluminum for the HE mounts which I'll need to fix before I can get those made up.
For the Eurosport install:
Modified the oil dipstick tube, capped the PCV/cyclone separator drain as I'm deleting the separator for a catch can setup
Trimmed the starter stud for clearance
Trimmed the O2 sensor mounts off the fuel rail and flexed the supply and return connection piping as required to clear the back of the charger
Mounted the MAF wiring converter/extension mount
Removed the deleted upper idler pulley not used in the ESTS setup
I also found out my tensioner is the one already used in the ESTS kit, so I have a spare of that now.
I also start to wrap the first of two intercooler lines in thermal wrap to keep some of the engine bay heat out.
And since this task was annoying I took photos of it too.
Started to rearrange my oil distro adapters for the VANOS, oil pressure, oil temp, and oil idiot light. Unfortunately my RallyRoad adapter threads in and points the port DIRECT up, which means I either need order a remote mount kit with a 90* fitting as the sender will not fit as oriented OR I'm going to fit a "spacer" with a second crush washer sandwich to see if it will get the port oriented down, but I expect it won't be enough before I run out of comfort in loss of thread engagement.
I also ordered another dump of parts from Bimmerbum (of course) for odds and ends that need replacing (throttle & CC bowden cables, PS reservoir, etc. etc.) which needs to show up before the charger will get installed.
In an attempt to "put a list together to check off"
Still on the to-do list for the charger install:
Install injectors and fuel rail on charger
Mount heat exchanger (new materials needed (again))
Mount reservoir
Call Zionsville with shroud issues
Re-wrap heat shield with new materials
Wrap second IC line in the engine bay with thermal wrap
Intercooler wiring
Boost gauge plumbing/wiring
Oil pressure sender re-install solution - ordered 2/13
Catch can location finalization
Ducting solution for heat exchanger
DME swap/read/flash/EWS alignment
Bimmerworld motor mount install
Figure out SC nose vent line
Fuel pump install
Reservoir plug for unused water level sender (not present in Z3 harness vs. E36)
Cascade projects to follow:
Exhaust-
Headers (at coating)
Midpipe fab w/ high flow CAT
AFR probe wiring/install
Supersprint inlet modified to v-bands
RaceTCS install
I'm waiting to install this AFTER I get the ESTS in and running to limit trouble shooting as its a bit intimidating to cut injector wiring and tap ABS wiring.
Randy Forbes kit install
Diff work to swap tone ring, swap in a 3 clutch LSD carrier and keep my 3.23 gears
(And rebuild the leftover parts into a 3 clutch 3.46 diff for Marty)
If there is time before Schuh:
Rebuild front calipers with Bimmerworld SS pistons and fresh paint
Still to order/purchase:
Fittings and lines for catch can when location is finalized
Valve for reservoir vent line
Coolant
stud diff mount conversion kit
Exhaust gaskets for merge to header flanges
Fuel pump inlet sock
I'm expecting another belt too due to my underdrive pulleys
Last edited by robb1887; 02-14-2023 at 07:44 AM.
- 1of1 rebuild (build thread) -
- Wanted Car items - FS: PnP aftermarket alarm details -
- Coupe Custom Subwoofer box - FS: Z3 Coupe LED 3rd brake lights -My Website for DIY content and parts: Double Bee Garage
Member
"Started to rearrange my oil distro adapters for the VANOS, oil pressure, oil temp, and oil idiot light. Unfortunately my RallyRoad adapter threads in and points the port DIRECT up, which means I either need order a remote mount kit with a 90* fitting as the sender will not fit as oriented OR I'm going to fit a "spacer" with a second crush washer sandwich to see if it will get the port oriented down, but I expect it won't be enough before I run out of comfort in loss of thread engagement"/Quote
I don't know if this will help you or not, but this is how I did mine when I added the oil pressure gauge.
Screenshot_20230212_181149_Gallery.jpg
Screenshot_20230212_181212_Gallery.jpg
Screenshot_20230212_181230_Gallery.jpg
Screenshot_20230212_181255_Gallery.jpg
1of1 SG/DBO Twinscrew
Thanks for the photos Indiana.
I have the same adapter, my problem is the 1/8npt port on my adapter points directly up. Just where the thread is in the filter and the flat the port is in doesn't work for me.
A spacer washer and second crush turned it towards the engine and didn't help the situation so I order an 18" hose like yours with the 90* end and the female port on the other to mount somewhere remote.
- 1of1 rebuild (build thread) -
- Wanted Car items - FS: PnP aftermarket alarm details -
- Coupe Custom Subwoofer box - FS: Z3 Coupe LED 3rd brake lights -My Website for DIY content and parts: Double Bee Garage
1of1 SG/DBO Twinscrew
With the roady chassis going to scrap yesterday I took the opportunity to open up it's gas tank to see what exactly we had to deal with for clearances within the tank for a fuel filter inlet sock.
Looks like I'll be ordering that Radium Engineering HF inlet sock they make that's 55mm max diameter and sending it.
Also ordered the oil sender relocation kit from Extreme PSI as it had the correct bends and was the best price. I couldn't justify some of the costs some of the vendors had the tiny lines listed at. A local hydralic shop could likely make a one piece hose for the costs they wanted with the adapters and fittings, but takes time for me to go order/spec it in lieu of just showing up at my door, so I'm trying the ExtremePSI first.
I'm just happy the chassis/shell is gone so I can focus on the ESTS now and not have that on the back of my mind. The weather yesterday couldnt have been better and beside a little smoke and small fires from the Plasma cutter the cutting went easy enough. Next time the shell is getting holes cut for slings and going directly on the trailer as total scrap weight was only 700lbs, sans windshield/frame as I didnt think they'd take it.
Last edited by robb1887; 02-14-2023 at 07:07 AM.
- 1of1 rebuild (build thread) -
- Wanted Car items - FS: PnP aftermarket alarm details -
- Coupe Custom Subwoofer box - FS: Z3 Coupe LED 3rd brake lights -My Website for DIY content and parts: Double Bee Garage
 Posting Permissions


 Reply With Quote


Bookmarks