
 Member
Instructions on replacing the top are almost non existant on here. I replaced the top on my 94 325 project car so I took some pics and made some notes. It is actually pretty simple. It takes a lot of time though. If everything goes smooth and you get a very early start....its possible to do it in one day. Plan on 2 days just to be safe. Remove it one day and install it the next. The hardest part of the whole process is removing and replacing the 5 rivets on each side. Other than that its pretty straight forward.
I am removing the original top on a 94 vert with a semi auto top. The older OEM tops had pockets on the sides. These pockets had strings attached similar to the "dog ear" strings. These wont be needed with your new top. Mine were purple so it was easy to tell them apart from the black "dog ear" strings.
The Top:
I got my top on Ebay from Diamondmall. I got the one with the plastic pieces already installed. I paid $329 and that included free shipping. The top I got did NOT have a zippered rear window. It was sewn in. I figure in most cases the rear window has lasted well over 10 years. As long as you are carefull you shouldn't need to replace it so the sewn in one makes sense. Diamondmall did not offer an option for a dark tint window but I'm betting they would if you contacted them. The quality and fitment of this top was excellent. The rear window had the factory piping around it even though it was not zippered in. I was very impressed. It shipped out about 2 days after I placed my order. I have heard great reviews about Diamondmall and Tops Online.
Tools:
Very few tools are needed for this. The rivet gun is the one that most people have trouble with. I used an old rivet gun my dad had for years and it worked great. Nothing fancy. One thing you will need is some kind of adapter. Several rivets need to be installed in a very very narrow space and the head of the rivet gun will not fit easily if it fits at all. Some have used the little screw on top of an old spark plug. I cut off the end of some 1/4" copper tubing I had. About 1/4" long is all you need. In fact anything longer might not allow the gun to grab onto the rivet. Slide the adapter onto the rivet then push the rivet into the gun. The rivets I used were ok. A tiny bit longer would have probably worked better. Make sure they are aluminum and NOT steel rivets. Here's my tool list.
Scissors
1/4" drill bit
Phillips screw driver
Rivet gun
Center punch or an awl for punching out the rivets after drilling the head off.
Torx style screw drivers
Double sided tape or high temp contact cement
Aluminum pop rivets (minimum of 10 so get 15 or 20) I used 3/16" (5mm) thick and 1/4" (6mm) long
3mm Allen wrench for semi auto tops
Needle nose pliers
Hammer
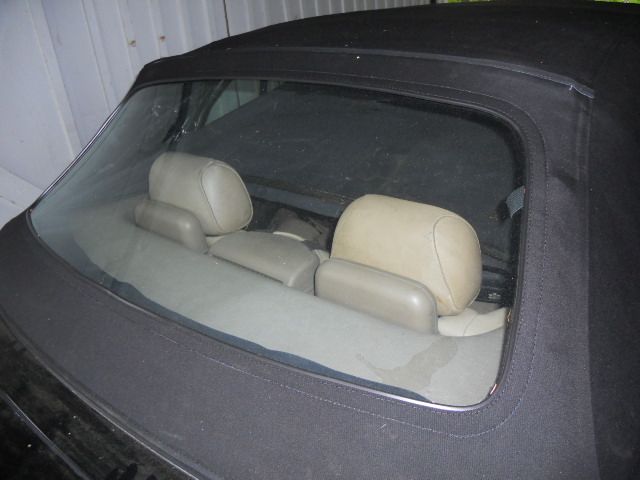
Removing the old top:
You can start at either end but I started at the front and worked my way back. Before you start you need to remove the plastic header inside the car. In a semi auto top its held on with pinch clips. Start by removing the allen screw from the handle. You'll probably have to push it out of the handle once its completely unthreaded. Once the handle is off you can remove the round collar that covers the shaft. Now pull down on the header and it should pop right off. Don't lose those 4 metal clips. On a fully auto top the header is held up with a metal pin on each side. The pin goes through a white plastic piece that is glued to the header. Be VERY gentle pulling that pin out. Dont break the white plastic piece. Once the pins are out you can drop the header down.
The rest of my instructions are for a semi auto top. As far as I can see...the only difference between doing a semi auto top and a fully auto top is the string for the relief pockets. The replacement top is the same top for both. In any case the difference between the two cant be very much.
Disengage all the motors and tilt the front of the top up. This will allow the top to go slack. If you are working on a fully auto top it saves a bit of time to raise the front of the top iwth the motors before you disengage them. If you aren't replacing the headliner then pull the headliner off each bow. The rear bow at the top of the window should have several screws or clips holding the headliner on. Check each bow for any clips or screws and pull the headliner down. Let it hang.
Fold back the rubber gasket to reveal the screws that hold the front onto the front bow. Remove the phillps head screws and put them in a baggie. On each end of the gasket is a metal plate. Wrap some tape around the gasket to hold this plate in place so it doesn't get lost. Now pull the corner of the gasket off and let the whole gasket swing down.
Start at the center of the top and fold back the plastic strip. When you get to the corner you'll have to pull the top forward a bit to get it off the corner
The next thing you will notice is the tension cable that runs the length of the top. It goes into a clip. Bend the clip up and slide the cable out of the clip. Leave it in the roof for now.
Now remove the cloth tab. It should be held on with a torx screw. Replace the screw and washer after its removed so you don't lose it or forget which one goes where.
At this point I moved to the back. Its very similar to the front. Fold up the tension bow and fold back the gasket to reveal the phillips head screws. Remove the screws. The very last screw on each end has a plastic washer/spacer under the gasket. Remove those two spacers and put everything in a baggy. Now remove the gasket and set it somewhere safe. You will see a rubber U shaped tube that runs the width of the tension bow. There is a flap of material at the bottom of the window that is attached to it. Pull the tube off and separate it from the material.
Now its on to the rivets. Its not as bad as some make it sound. Get a 1/4" bit. Make it a new one. Pull out the gasket from the rear window. You will see 3 rivets behind the gasket. Look very close and you'll see 2 more on the very bottom. You can pull the gasket out past the top three and drill the heads off but you'll have to drill the bottom 2 out in order to get the gasket completely off. There is a plate inserted into the gasket and the bottom 2 rivets go through the plate. To drill them all out its a good idea to fold the top back so you are drilling "down" into the rivets. You don't have to drill the entire rivet out. Just drill the heads off. Once they are out you can use a punch to push the rest of the rivet out.
NOTE: Once they are drilled out you can remove the curved plate that holds that gasket to the car. make sure you keep track of which plate goes on which side of the car. Tape and a marker is good...I just laid them down on the back floor on the side they go to.
Now fold back the plastic tabs to reveal the relief pocket string and springs. Mine was purple so it was easy to spot. I remvoed the entire spring
On the corner of the tension bow you will see a strap that is held in place with a small rivet. Drill the rivet out and make a note of how the strap feeds and wraps around the corner
Now you can fold back the top starting at the tension bow. Cut any remaining tabs and leave them in place. They will be very usefull for reference when you get ready to install the new top. Once you have the tabs cut and the top is loose you can remove the cloth strips on bows 2 and 3 and above the window. The top should lift right off.
At this point you shoud have the new top unpacked and ready. You will need some adhesive to attach the cloth strips to the bows. I used double sided tape from the hardware store. The stuff I used is fairly heavy duty. Its made by IPG. Its about 2" wide and its kind of vinyl unlike scotch tape. You can also use contact cement but it MUST be high temp. If it doesn't say high temp on the container then don't use it. It will not stand up to the summer heat. The tape I used is wide enough to be cut lengthwise.
So its time to put on that new top. start at the base of the C Pillar. Attach one side into the pocket in the top then move to the other side and stretch the top so you can get the C Pillar into the other pocket. I had to fold the back half of the top a few times to finally get it postioned so it would stretch enough.
If you haven't removed the tabs you cut off you should do that now.
Start at the tension bow. Fold the plastic tabs over and into place. Grab those screws and replace the gasket. Dont forget to put those 2 plastic washer/spacers back under the last screw on each side. They go under the gasket so the screw goes through the gasket then through the spacer. It helps to have an awl or something pointed so you can line up the holes in the gasket and the plastic tabs and the tension bow. It also helps to have someone hold the gasket in place. If you have trouble holding it and getting that center screw in then you can set one of the screws into the corner. Now you can go to the center and get started. Once they are all in place you can feed the tension cable through the sides of the top and into that metal tab. It could be hard to feed through so I used a short length of tubing to open up the sleeve the cable goes through. Now go to the front of the top and replace the screws holding it in place. Don't forget those metal plates that you wrapped in tape.
Now its time to replace the window gaskets and those rivets. Start at the top and work your way down. It might help to have someone hold the top so you can push down hard. If you make a mistake and the rivet doesn't snap off correctly you'lll be left with a tab sticking out of the middle of the rivet. If that happens just use a dremel tool with a giriding wheel to grind it off.
Now reattach all those tabs/straps. Dont forget the one on the corner of the tension bow that wraps around it. Secure that one with a new rivet. Dont forget the washers or your strap will pull off the rivets.
Believe it or not you are almost done. Take your double sided tape and cut it to length. I found it was easier to use 3 shorter pieces instead of 1 long one. Its much easier to handle. If you look at the cloth straps you'll see that one is shorter than the other. The short one goes on first. Start at bow 2. Lay the tape onto the side of the bow and wrap the shorter cloth strip over it. Move along the bow and do the same with the other 2 pieces. Now do the same for the other cloth strip so it wraps over the shorter strip. Repeat this for bow 3 then move to the rear window. The cloth strip on that is only attached in the center. Not the entire length of the bow.
Raise the tension bow to verticle. Pull out the cloth strip that is on the bottom of the window. Pull it up and over the metal strip and use that U shaped tube to hold it in place. Use a razor blade to trim off any excess material.
Once the cloth strips are installed you can put the headliner back in place. Now replace the header and the handle. Pull the top closed and let it sit in the sun for a few days. As tempting as it might be to try it out you really need to let it stretch. Once its stretched you can lower the top into storage, rengage the motors and do the sync procedure. The top will pull downto the windshield very very hard the first time until it stretches. Don't freak out when you see how hard it is to pull down.........
CONGRATULATIONS!!!! YOU'RE DONE!!!!!
Last edited by flyfishvt; 05-26-2013 at 10:10 AM.
Bleed your cooling system http://forums.bimmerforums.com/forum....php?t=1709482The ULTIMATE OEM Alarm/Keyless thread http://forums.bimmerforums.com/forum....php?t=1792200
Super Warantee Voider
Let's see some after pics! I applaud you for doing what I am so terrified of trying. But I really need to do this now because the top is really coming apart.
Great write-up. Sticky this mods!
Member
If you can do any work on these cars you can swap the top. The good news is that by the time you're done removing the old one you'll have a very good idea how the new one goes on without even looking at my instructions. The reason I didn't put up a lot of pics of the install part of this is because its really pretty easy. You've swapped control arms? Struts? Removed your exhaust?......then this is no biggie.
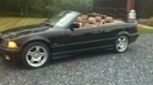
The top I got was great. No wrinkles in fact no issues at all. I couldn't be happier.
Afte pics
Last edited by flyfishvt; 05-26-2013 at 06:35 AM.
Bleed your cooling system http://forums.bimmerforums.com/forum....php?t=1709482The ULTIMATE OEM Alarm/Keyless thread http://forums.bimmerforums.com/forum....php?t=1792200
Super Warantee Voider
Fly, I've done the 5-speed swap, vanos, control arms, head rebuild, the entire interior and yet there's something intimidating about this top. I can't quite wrap my head around it. Bolts and wrenches I'm good to go. This seems different. But I will definitely do it by summer's end. I have a hard top if I royally screw it up.
Member
I think the reason its intimidating is you're thinking "what if I really screw it up?" All I can tell you is the new top fit easily and perfectly. No adjustments of any kind were needed. Like I said before....the removal process is the best teacher you have. If you just hack away at the old top to get it off then you'll have no idea how the new one should go on. If you take your time removing the old one and pay attention then the install of the new one is cake.
Bleed your cooling system http://forums.bimmerforums.com/forum....php?t=1709482The ULTIMATE OEM Alarm/Keyless thread http://forums.bimmerforums.com/forum....php?t=1792200
Member
I think I can, I think I can, I really can do it! I will have to order my new top this summer. My top has started coming apart, the fabric is a little faded, but the threads and seams are where I am having problems. I want to thank you for your write up. This really looks good.
Member
This should be stickied.
A job I will undoubtedly have to do, sooner or later.
E36 M3
Member
My top is the orginal top, she made it 18 years. Except for the seams where it is coming apart it still looks pretty good. I might try to resew the seams by hand before I replace the top. Maybe I should just replace it....
Member
My mind is telling me no but my eyes are telling me yess!! great write up. also terrified of this jobhopefully tackle this in the summer as well
Member
You're in the same boat as I am. I took it to a highly-recommended shop and they basically told me that I could hand sew the seam but it would eventually put stress on the other seams. Basically it could buy me some time, but they suggested that if I wanted to keep the car (which I do) a new top was in order. Let me guess, it's the rearmost seam above the bow/ rear window?Originally Posted by toplessinokc

E36 M3
Member
That is the seam that is giving me trouble. Also the piping around the rear window has broken in half too.
Brosama Friendladen
Im also scared, but I also have a hardtop. Ive done a headjob, done my coilovers more times than i can count, all other maintenance, but this still has me worried.
That top is BEAUTIFUL. Must be really nice. Where did you get it? My tops still in ok condition, but id looove to have a fresh top.
Member
diamondmall on ebay like he said - I thought topsonline was the place though. I'm psyching up to do the job. I'll take some pics if I get the chance, to add to the DIY top section. Anything helps.
E36 M3
BMW NCCCCA Member #485873
Hey was that blue car at bimmerfest? Lowered on bags,?
Member
Thanks again for the write up. I have a new top on order. You hit the nail on the head when you said fear of screwing up is the big fear. I too have changed engines, trannys, shocks and struts, etc. and yet am fearful of messing this up.
Thanks again. Sam
Member
Hey, bought my e36 2 weeks ago everything is fine but the vert top has a rip, I am going to replace and it does sound intimidating but I just wanna know what are all the parts you need to order online and if there is a video of this somewhere online, thanks in advance
Member
Also where I could get the parts thanks
Last edited by Wolfpack209; 10-17-2013 at 11:57 AM.
Member
You didn't read any of this thread did you? All the answers are in the first few paragraphs. There's lots of videos on YouTube but they are crap
Bleed your cooling system http://forums.bimmerforums.com/forum....php?t=1709482The ULTIMATE OEM Alarm/Keyless thread http://forums.bimmerforums.com/forum....php?t=1792200
Member
I read it but I want to make sure I order everything before I get started and get stuck half way through the job and have to wait for other parts
Member
Thank You very much. Great write up. I see that you did not replaced the tension straps. I believe I will have to replace mine as they have a lot of slack. Any recommendation on those? Also, you mentioned the tension cables at the beginning but not at the end. Did you disconnect them completely or just threaded the front end thru the new top keeping the back attached? Thanks again buddy. You gave me the final push to try this on my own!
Member
Replacing tension straps is always a good idea. I did not do that in this case because the top works fine and this was a flip that I picked up for almost nothing. I'm trying to keep the expenses low. There are plenty of tension strap fixes that don't require replacing them. They are all well documented. You absolutely have to reattach the tension cables. I didn't go into a lot of detail on the reassembly because to be honest.....once you get the old top off its pretty obvious what the installation procedure should be.
Bleed your cooling system http://forums.bimmerforums.com/forum....php?t=1709482The ULTIMATE OEM Alarm/Keyless thread http://forums.bimmerforums.com/forum....php?t=1792200
Member
flyfishvt,
Great thread! I just have a question on exactly which top you used. I went to Diamond Mall's eBay store and they list several e36 tops. The reason I am asking is that you say it really fit well. I seen one complete kit on there I am considering: http://www.ebay.com/itm/BMW-E36-318-...item4171eb953f
Then here is one from a different supplier on eBay: http://www.ebay.com/itm/281310597768...84.m1423.l2649
Thanks for your advise.
Buildmaster v2.1
Everyone remember that the OEM tops were continuously and quickly assembled and installed by 45y/o part time converyor belt working mothers with household school education and no technical knowledge whatsoever
Less intimidating now?
Member
Installed new top on my wife's 96' 328ic (from EZon) and tension straps. Appreciated all the good information on the site. Wasn't hard just some of the confusion that goes with doing something for the first time.
Member
Thanks, FlyFisher. Great thread. Let's see... $1,650 to have the shop do it... $400 to do it myself. What to do, what to do???
Its all apart in the garage now anyway, I'm re-doing the headliner in my hardtop, replacing all speakers and re-covering the back seat arm rests panels. All new to me (like so many others, if it requires a wrench I'm right at home. Fabric on the other hand... isn't that what the girls (yuck!!!) learned to work with in Home EC?/// snork... snork....). I may as well do the top while I have my upholstery hat on. Never too late to learn a new trick. I second the "this needs a sticky" proposal.
 Posting Permissions


 Reply With Quote


Bookmarks