
 Member
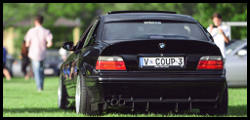
adjusted exhaust(it moved after new rubbers settled) and rotated the wheels today, so i decided id give the lips a polish while they were off.
now the car needs another wash

Member
needs some different Tyres like togo r888s or something
"Lamborghini, the tractor maker, wanted to figure out why his Ferrari's clutch kept crapping out (PITA, cost a lot of money). He complained to Ferrari, and Enzo didn't do anything. Lamborghini discovered it was the same, much cheaper clutch used in his tractors. The rest is history..."
Member
i would if the weather around here could make up its mind :p maybe when summer comes back around
Member
so today i decided to have a play with the rear guards, being such a nice day. the drivers side was fair average, after my guard rolling back when the simmons were on, i then tried to unflare the edge so it looked somewhat similar to the passenger side, which resuted in some wavy abortion. and i was a little eager with the bfh when i needed more inner clearance for meaty tyres, and ended up making dents on the flare area.
so out with the air tools and such, sanded down the whole flare, and tried tapping in some of the high spots and flattening out the edge. will do more tomorrow, then bog and smooth.
while i was waiting for primer to dry, i cast my eye over the passenger side.
now heres the story on the passenger side. when i bought the car, i was aware that it had been repaired previously, and there was a light crack up the center of the guard, where obviously a poor bog job had started to show its face. it wasnt too bad, so i bought the car and didnt look back.
knowing it was there, its always been on the list of things to eventually fix. over time its slowly gotten worse, i had to do a small repair when i originally rolled the guards and cracked bog and some shitty spot welding.
ive never looked forward to knocking the bog out to see what lay beneath, but today was the day.
first round, not too bad. only some light surface rust, one hole(fair sure it was just super thin where theyd welded, and i pushed it in while grinding away). some of the welds were cracked, but nothing ultimately terrible.
after attacking the welds with a die grinder to remove the surface rust and embedded bog, i managed to make the one hole bigger, and make another out of some thin metal/crack.
some surface rust on the inner panel where theyve hit it with a tool and left it bare. ill treat this before i weld my holes up
threw some tape over the hole so no rain gets in overnight(optimistic!!) and some crc over the bare metal. i'll have at it tomorrow some more
so its not anywhere near as bad as i was expecting, but still not awesome. the whole guard has at least 2mm of bog on it id say, and needs to be completely taken back before i get the car painted properly(another thing on the list), so for now i'll weld up the holes and cracks, rebog it, blend it in with whats already there and throw some paint on it.
somewhat relieved, as its always been in the back of my mind what was under there, now i can sleep easy lol.
Member
photo dump. todays been a long day. woke up and the sky was grey, it was cold, general shitty no good for painting/bog/panelwork weather. but i perservered, seeing as i need the car for work tomorrow!!
so this is how i parked the car today, because the garage is in a perpetual state of being organised, and no cars fit in there.
while my dad welded up the nightmare on the passenger side, i kept at the drivers side guard. bit of bog, high fill, primer and some black paint and its done.
still need to clean off some overspray, but that can be done tomorrow night or sometime this week.
and back to the passenger side, dads finished the welding, so i hit it with the grinder to bring everything down below the bog line, and make sure there were no extra holes to fill. the metal was super thin around all the previous grinding work so was fun for dad chasing it all
then i started on the bog. luckily this guard flare wasnt as munted as the other side, so bog was mainly filling the hole and getting a rough bodyline back
after what seemed like forever sanding and applying more bog, i got it to a reasonable shape. its definitely not perfect, but itll do for now.
oh, one of the rubber strips i installed a month or so back, got melted with the welding, so ill install one of my spares this week sometime. good thing theyre cheap!!
now im just waiting for the paint to dry a bit more then ill go out and wash the bog dust off and im done!!
what a silly silly idea i had yesterday with a screwdriver in my hand...
Member
Been there done that on another car, every little thing you touch just gets worse and worse and nekminnit you're painting the car when all you originally wanted to do was roll the guards hahaha
Member
haha yeh, it certainly can snowball. the dude who did my wheels is going to help me paint the whole car when i feel like it(ie. when i have money to burn).
for now ive wrapped it in a matte grey vinyl for the hell of it!
moer pics in here http://forums.bimmerforums.com/forum...-That-s-a-Wrap!
Member
photodump

such is life
Love the Bathurst photos!
Car looks great. I'm a big fan of the matte grey
License Revoked
i like the chunkier tires
Last edited by zxfbhdfgh; 09-28-2014 at 10:46 AM.
Member
so im finally home from a 2 week holiday, took the e36 upto qld to catch up with friends there and on the way, was an awesome trip!!
did roughly 5000km
used roughly 500l/$800 in fuel
things that failed:
-broken bonnet cable(middle one between the 2 latches, was on its way out anyway) happened on the first day!
-left hand HID intermittent on startup(pretty sure its bad/dirty connection, as it started playing up when rad hose popped)
-hesitation/bogging after ~2hrs of driving(mixed highway/town/traffic), seems heat related as it fixes itself after more highway cruising or parking for 10mins or so, and only happened on hot days. will check codes tomorrow, see if anything shows up.
the bonnet cable would have broken regardless, the hid i should have fixed already, the hesitation is the only real bad thing, and isnt directly related to the drive, so im super happy with how the car went.
ive got an absolutel stackload of pics to go through, so for now i think ill just dump a bunch now, and maybe some more later on.
so first day was the drive to canberra, stopped in cooma for some lunch
then met up with a mate in canberra
sunday we took the car to the German Auto Display, was a great day, met some more people, looked at some mad cars, got sunburnt, relaxed!
got there nice and early, so got to see some of the cars rolling in.
^was fitted with chrome/billet stuff everywhere
this thing turned heads as it rolled in. some of you would have seen it going around facebook and the likes with a 6/71 hangin out the bonnet. in current form, he said its around 700hp from memory
obligatory gogomobile pic
boat car didnt sink
some of bmw section
some of vw section
rolling back to sydney with some of the people i met there
some of the areas i stopped along the way, usually for lunch or breakfast
funky laundromat in port macquarie
seagulls are everywhere, always, relentless
went to bathurst, see here http://forums.justcommodores.com.au/...eum-visit.html (shouldnt need to login/make an account to view pics)
moore park beach in qld, one of the places i grew up, i do miss it
and some pics of the car that i took today

 @cblock406
Love your e36. Thanks for always posting!
CBlock
such is life
You didn't stay in Bathurst for the race this weekend?
Member
Nah, wish I could've, but had to be back for work. Next year maybeOriginally Posted by Dat Aus

Member
so i replaced the fuel pump last week, picked up some response/power doing that, so it definitely needed it. next is to put the old pump into the passenger side to eliminate starving through corners with low fuel.
fairly sure this was the original 20yo pump
also replaced the bonnet cables with 2 new bmw cables, also needed doing. cleaned the latches while i was at it.
gave it a wash today, havent really given it a wash since being on holidays. its still not clean, but its better than before.

Member
some supercharger progress!!
finished cutting and positioning the outlet, and got it welded, along with a vband clamp for the inlet.
threw some paint on it last night(weather was awesome)
so much more clearance now, drain fitting should fit a lot better too!
so i started playing with the inlet piping, needed to cut it on an angle to clear the strut tower, and wanted to get it closer in to the charger.
might need to trim the alternator air duct to get it to swing around a bit more, but thats just a bit of plastic :p
pretty happy with position, should clear everything but need to bolt it all on the car and test fit again. shame its raining today
and a random engine bay shot from the other day

Member
more work today, finished rebuilding my spare vanos unit. now just need to install it
threw one of the silicon joiners and pipe on the supercharger, just to see where it sits now, looks to be in a decent spot. intercooler piping should be fairly easy by the looks.
then i decided to try and work out positioning for rubber stud mounts for the plenum. the one i got with the "kit" was only supported by the plastic trumpets and inlet hose. its not heavy, but vibrations over time will crack the trumpets, and theyre not cheap to replace. so as with most of the other stuff, i want to over engineer and make sure it wont fail on me, by using the existing bracket for the heavy cast factory plenum.
couple of pics to show the differences between the 2. this is a spare i had from when i was building the carbon intake(ill finish that oneday :p)
so to work out the positioning, i placed the plenum on the ground, marked out its location, and bent some alloy to get the bolt hole location, and marked it to replicate. i then put the new plenum down, and worked out where it would land.
then i grabbed some scrap alloy, and shaped it to fit where it needed to. i'll drill and tap holes once the blocks are welded on and i can double check position ON the car.
the IACV hose had to go, so i'll add another hose fitting for that, also need to add air temp sensor and pcv fitting.

Member
so next project in between doing a billion other things, carbon foglight duct for charger intake
so this is the vision. these can be bought as a pair for a cool $599us, i only need the passenger side and they arent even the same shape as the foglight hole.
so i have a bunch of carbon fibre cloth and epoxy lying around from the airbox project. ill be trying to use scrap bits before cutting any of the good stuff off.
lets build one shall we.
take a mould of spare foglight to get shape
not bad. couple bits of tape got embedded under resin, but cut out easily enough. bog will fix any problems, but theyre on the edge and wont be seen.
shape the inlet with foam
couple layers of fibreglass over that(should have taped it more, as it ate through and left the glass wrinked)
bam, thats the basic shape. bog and sand this to get it smooth and curvy
cut a hole in the base piece, and once the inlet is shaped how i want, i'll cover it in release wax and glass into the base piece to create the plug mould for carbon fibre to get laid into
its probably a long winded process, but so far its working how id planned(mostly :p)
Member
inlet hasnt progressed, been busy ordering parts
one of which turned up today. OEM side door mouldings.
i bought ebay copies not long after i first got the car, and they never fit correctly. eventually they started to bow with heat, many times did they pop off when i opened the door.
i finally decided to bite the bullet and go genuine. the difference in quality is amazing, theyre much heavier than the ebay jobs, everything feels more solid.
before: you can see the bow, drivers side the rear section bowed out aswell.
and after: theyre textured instead of smooth, i also swapped over my ///M Clubsport badges :p
random pic
going to repaint my alpinas, and throw some fresh tyres on, the bbs are almost due for tyres, so ill take them off and repolish.
Member
tyres monday, still need to fix center caps and get locks

Member
woop woop!! wheels are on, theyre no rf's but i like!! gotta love a meaty tyre
of course after a super sunny day, the skies had to open up on me, so went back to work and fitted them
will get the caps sorted out for them next year i think
i'll get this bumper aligned properly oneday!!
will organise some decent pics in the near future
Ultimate Driving Machine
Just a couple of photos from last night of Hakhawks E36

Member
so bit of work on the duct this weekend.
got the plug to a point i was happy with and threw on some paint and release wax
zip tied the plug to the front piece, best way i could think of to keep it tight in position but not be permanent
2 layers of fibreglass
had to cut the plug a bit, because there were a few high spots that stoppped it slipping off, but got it out
now i just need to fill some holes, pinholes, smooth out the high spots and get it all neat and itll be ready to wax for carbon intake!!
also, did a quick measure yesterday, the inlet will be ~3.8" diameter once i cut the final piece shorter(its long to allow for excess that i can cut off). plenty enough for the 3.5" charger inlet me thinks.
Member
Car is looking clean. I like what I see
There are no bad questions, just impatient people with answers
Member
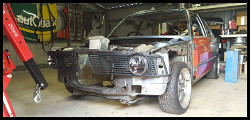
so to start the new year off, i decided to pull the engine apart!!
namely i decided it was time to install the dual pickup oil pump and sump(with supercharger drain fitting) to the car.
so to remove sump, its either engine out, or subframe out and support engine. old holden driveshafts are good for something!! i removed the entire front suspension at the same time, it was easier, and allowed me to install the helper springs for the front coilovers ive had sitting around for at least 6 months
straight into it, had to swing power steering pump out the way, move all the power steering lines, as one goes under the sump and others just get in the way.
so heres the new sump vs old sump. new one has much better baffling(less oil splashing up onto crank and slowing it down), narrower oil holding area and 2 sump plugs(means ive gotta remember to buy a spare crush washer every oil change!!)
the old baffle gets to stay gone, free weight savings!!
and new pump in, had to change a bracket on one of the main caps, so had a sneak peek at the bearings, and they look fine. loctited the oil pump nut on again, as they are known to come loose
you can see the big pickup tube at the back, and the small hose is the return for the front of the pump pickup(cant see the mesh, its hidden behind sunlight)
had to purchase a new dipstick and tube, as theyre different lengths
put it all back together, my modified power steering lines still clear the sump nicely, front drain will get oil all over the swaybar every change
and thats all the pics i have, tomorrow ive gotta spin the coilovers down a touch to compensate for the helper springs, and have a play with a few other things while its in the air, maybe do some more intercooler piping mockup
but i filled her up, threw some power steering fluid in(need to finish bleeding that tomorrow), and she runs fine, no scary noises. will take it for a rap tomorrow arvo hopefully.
one step closer to booooost!!
and alst but not least, happy new year to everyone, expect more updates and pics through out the year! aiming for supercharger installed by april ish
 Posting Permissions


 Reply With Quote


Bookmarks