
 Member
Super!!
Love what you are doing. Makes me want to SC my v12
Member
the wheels were painted yesterday, and he sent me some pics!!
first some words from him about the work he did, absolutely cant wait to pick them up next saturday and begin assembly
ok, some pics. you'll have to wait another week or 2 for proper pics of the colourtook about 5 hours, took my time...
also a little on what i did to the wheels... after red scotch brite'ing all the bare metal i ended up machine sanding the spoke faces with 320 grit discs to get out any marks and scratches. then after i set up all the stuff i wiped down all the metal with gun wash thinners.
the light gray primer is 1k etch primer that i over thinned with normal reducer to use as a wet on wet. wet rubbed the center caps with 800 grit (prep washed) then gave them a coat of adhesion promoter to guarantee the base color to stick. then sprayed color and rubbed out any bits of junk in hte color before putting the last coat on. then cleared everything. also full 10 minute flash off between coats or clear.
the black is 40% black 2k and %60 matting agent (or there abouts), then 2:1 with hardener and 20% thinners. think i put 3 coats of the black as after i put in the matting stuff it had no strength/coverage. took a fair couple full wet coats to cover. matter of fact when i thought i was done i went and inspected them only to find the etch primer peeking through at me in certain places. so i had to mix more and give it another coat. hopefully by monday it will have dulled off a bit more. i left it to dry naturally, no bake cycle. paint jobs always look better if you let them sweat on their own instead of force drying.

Member
Almost done

Member
wow! alot of work, but they look sick!
Member
had my mate take some decent photos. tyres will go on this week sometime

Member
Omg I'm getting antsy in my pantsy! Mount them already!
Member
haha, tell me about it!! ordered tyres today, theyll be here in a day or 2, then theyll be mounted and installedOriginally Posted by 3MPowered

Member
I was skeptical about your colour choice until I saw the finished product.... Holy crap! get those things mounted and snap some pics! The colour is awesome!
Member
get the call that my tyres are in, and my sister did me a huge favor and drove the wheels over to the tyre shop to get fitted, and i picked them up after work!!
threw one coat of wheel wax on when i got home, will do another 2-3 on the weekend.
no light to get decent photos, so you'll all have to wait!!
front fitment is pretty much as i expected. would still be nice to bring it in ~5-10mm, but that aint gonna happen without more camber

Member
Would like to see a day time picture of these on the car
1996 328i (m52B28US) OBD1 euro ZF 5spd. 3.23LSD conversion / Chem. PnP Head/ DINAN stg.2 CHIP/ VAC race valves/ S52 cams/ A/C delete/ fan delete/ Washer Fluid resv delete/ ARP head studs/ Cometic 140MLS / VAC Solid Engine/trans Mounts/ CAI / 2.5"Borla race exahaust/ NGK R spark plugs, M50 Mani, S50 Oil Res, Riot Racing HFTB, SAMCO Hoses, JBR FW, X-Brace, Mtech Front Bumper, RE RSMs, stoptech SS lines, Bilstein sports, H&R Race Springs, S52 Reinforcement plates, Kosei K1 w/ bridgestone RE960as, Brembo/stoptech slotted rotors, M3 Trailing arms, M3 Calipers, M3 Axles, ACS strut brace, weight reduction.
http://mbuild.blogspot.com/
fixitfaster
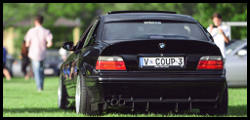
damn, looks pretty good in the teaser photos
"There are bold drivers and there are old drivers, but there are no bold, old drivers."
Member
some daytime photos that in no way show what this colour is capable of, seeing as it was overcast all friggin day
and got my stickers, not sure if im going to put them on yet, i do like the clean face, but id also like to have them looking as original as i could

Member
You took the tints off? good move, looks much cleaner
any more pics of the rear fitment?
Member
the window tint? nah, only that one rear quarter window has no tint, because of the cars previous life, the rest are all different aswell(back window is bubbling like crazy now). its something i plan to rectify, by removing it all and installing something a touch more "legal". but i really think the lighter look will work better than all dark.
took this pic yesterday, fitment is pretty much the same as my 17x9 style 5s in the rear, the tyre sidewall isnt as square though, considering dropping the back a touch too.
- - - Updated - - -
some more shitty iphone photos, this is just before sunset, overexposed, under, whatever im no photographer!!

Member
What tire sizes are you running?
Member
245/40/17 all round
Member
Are your fenders pulled or anything? This is my rf's with 245/40/17 all around
Member
rears are rolled, if theres a pull, its very small. fronts are untouched.
what width/offset are yours? those tyres hang out from the wheel further than mine. you might need some more negative camber too, my rear is ~3deg, front is ~3.5deg
Member
17x8.5 et 13 all around. Yours?
Member
mine are 17x9 et19.
throw on a smaller tyre and dial in some camber up front
- - - Updated - - -
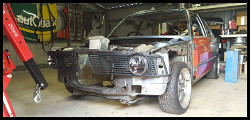
so today i finally did something ive been wanting to do for a while, blanking plates for the brake duct holes. i havent run the actual ducts in ages, because theyre a pain to get located properly, and the frequency of which i remove the bumper makes reinstalling them tedious work. thirdly, i wont be able to use the ducts once the supercharger goes on, due to the intercooler piping.
so with that, i dug out my foglight blanking panels from the old bumper and set to work butchering them
end result:
sits about where the blank sits in the foglight hole, looks neat
ill smooth the cut edge off when it all gets repainted. yes, the lower splitters paint is peeling badly, cheers to the douche who painted the front bumper(yes he charged me for it too!!)
and its held in with good old cable ties and a few holes. easiest mounting solution, and easy to remove/replace if i need to take them off(like for repainting)
ive ordered another set of blanks, because once the charger goes in, fogs will come out and left side will be used for an air intake duct.
Member
I love this car. YOu need some slicks on that racer.
Member
haha, would be nice. ive had slicks on it twice before, but the weather cant make up its mind at the best of times around here, and seeing i drive it everyday, slicks just dont play nice in a heavy downpour.
either the bbs or the alpinas i think will end up as track wheels, so theyll get slicks eventually
Member
I find the BBS should have the slicks.
I also will be running to sets :P
Member
so for the last couple years(probably really since i threw coilovers on the car), ive been chasing a weird clunk in the rear left, only over certain bumps in the road, not always the same ones, and not always as consistent. i put it down to incorrectly valved shocks, which i then ended up changing, noise remained, finally rebushed the whole rear end when i did the diff swap, thatll do it!!!! nope... i fished around behind panels, under seats, etc, could not find it for the life of me.
decided to throw the car on stands yesterday and have another poke around, everything was fine, then i started banging on things, and made my way to the left side fuel tank. badabing!! tap that and it went clunk.
turns out the foam? pads on the straps holding the tank up on that side had worn, so it was able to move 3-4mm up and down. im guessing the "clunk" volume and inconsistensy was caused by the amount of fuel in the tank.
so, after a few minutes scrounging in the shed, i found an old rubber floor mat to cut up and place where the foam pads are.
seems to have fixed it, something i never looked at after all this time, so simple, so easy.
random shot of wheel(tried to get some of the sparkly in the sun, but didnt really work) yep, it also needs another wash
aaaaaaand FISHBOWL!!! pulled the window tint off because the rear window bubbling was annoying me, that and the gash in the drivers side tint. i need to clean the left over glue residue off, and will eventually get it retinted.

Member
typical long weekend, want to do stuff, weather goes to crap!!
had to do oil change today, was planning on swapping oil filter housing and test fitting charger, but cbf with the rain.
so i just did the oil, in the driveway, because no shed space(still reorganising it all)
tied the bonnet half way up, and used dads 1ltr oil bottle(would love to find a steel funnel for it), seeing as the rain was being consistently annoying
dont tell penrite i use nulon in their bottle
had a workmate mix some paint for me the yesterday, so i could de-speckle my mirrors. bastard thinks hes funny :p
trying out bmw 668 jet black, see if its the same colour as the car.
made the mistake of attempting to paint today, after the first coat, it decided to pour down and the temp dropped a lot. paint decided to go foggy, so last coat i hit it with the heatgun before and after. worst case, ill have to redo it. dont think i'll worry about any clearcoat for now.
also threw some paint on the foglight covers, and removed the foglights from the bumper

 Posting Permissions


 Reply With Quote


Bookmarks