
 Member
Thoughtful redesign on the bracket.
WTB: E36 ZKW Headlights, ACS Rear Diffuser,E36 M mudflaps front + rear
Member
today i played with the charger bracket, drilled and tapped the final hole needed for a pulley, ran a drill bit through each hole to remove some burrs, then i worked on the bracket ive decided to add to hopefully stop any forward/backwards flex in the alloy(essentially nicked the idea from the vf engineering setup for e36). bent the bar, notched the ends to suit, then welded it up.
i still need to smooth off some of the visible welds, mainly coz i suck at welding :p but the penetration is there, and thats the main thing.
its probably overkill, but id rather overkill than spitting a belt.
instagram pic because lazy

Member
today was the day i put the charger (mostly) back together.
gave everything a final clean and installed the gears into the gearcase
new cover seal on, and front covber bolted back in place. bearings slid in nicely this time, hopefully they wont come apart if i have to pull the cover off again.
machined up a small spacer/washer to hold the pulley in place. it was previously held with some random crush washers on the back side, and a grubby looking washer on the front. i made damn sure everything lines up(which it seems to), so hopefully when it goes on i wont have to worry about shredding belts
speaking of belts, its all gonna be nice and close. worst case i need to get some smaller diameter pulleys. ignore the bottom area of belt on alt pulley, was just where i pulled it tight, but top area in front of oil filter housing is roughly where itll go to waterpump.
it doesnt look like much space between bracket and charger outlet, but theres plenty enough. i may need to rotate it around some more to clear strut tower, but earlier test fit says i should be fine. also, you'll notice the "mostly" back together of the charger, its missing the impeller, left that off incase i need to pull anything apart again before it goes in, save any damage.
top down everything looks right, think ill sort out some sort of clamp to hold the oil line to the bar, make it a bit neater. need to get one more bolt for the comp housing brackets.

senior LOUNGE creator
That looks like some serious belt wrap. Good work
If liberty means anything at all, it means the right to tell people what they do not want to hear.
― George Orwell
Member
parts are slowly trickling in for the power steering res move, just waiting on the cooler now. ive been trying to get some help about what to replace to get my vanos system running properly, with no luck. so i decided to bite the bullet and just repair/replace everything.
first off is the vanos unit itself, seeing as its a decent job, and i need the car running, i ordered a spare unit to build. it arrived today
it was advertised as working fine, but i might as well rebuild it before installing, be silly not to. it seems most vanos units look like this, with corrosion/whatever around the boltsmine looks very much the same, as did other ones on ebay. i'll be cleaning the housing and covers up.
and im glad i stripped it down. some of the orings were hard, the rest were getting there. one of the bolt holes was actually partly stripped. i retapped it, and willl run a longer bolt in that hole. the rest of the holes had varying amounts of corrosion/crap in them, so ran the tap through them all. unfortunately 2 bolts snapped, but being off the motor will be much easier to remove.
the seal kit is on its way, and some of the orings wont be here til end of feb, along with a new accumulator for it aswell.
Last edited by hakhawk; 01-31-2014 at 05:11 AM.
Finger is on the button
Argh, can't see the dropbox hosted images... dammit
Member
strange, problem on your end? theyre working for me. try a couple refreshes maybe, coz all the pics are hosted on dropbox
Finger is on the button
Yea its the govt. blocking it, no worries ill look at it at home.Originally Posted by hakhawk

Member
more work while i wait for parts to arrive
stripped both my dual pickup oil pumps to rebuild into one. you may wonder why i have 2 pumps, well that would be because the first one arrived broken, due to a lack of packaging materials. the second took 12 months to receive as a replacement(but at least it actually arrived)
i degreased the sump finally and worked out where i'll be getting the drain bung welded on for the supercharger
then i bolted the charger brackets and such together again for a (hopefully) final floor test fit after painting everything. it all looks good, fits together properly, pulleys all look to line up nicely.

Member
not much happening, still waiting on parts.
got the oil pump rebuilt, feels good, will have to wait til its on to find out if it works :S
yesterday was quiet at work, so i decided it was time to sort out the wiring nightmare behind the glovebox(mainly because itll make my life easier when i setup the piggyback ecu which will reside in that area aswell)
before/midway. i pretty much just had everything bundled up in there, nothing was organised as id had it apart multiple times to do different things, and always rushed it back together
after, not perfect, but much more manageable
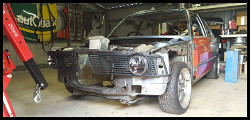
and my intercooler arrived earlier in the week. i had to have a play with it and make sure itd fit as its ****ing huge!!
bumper removed and cooler tied up with speaker wire. so much for subtle
clears the bumper(just). itll get a mist of black to hide it a bit, but its most noticable through the kidney grilles, seeing as itll sit so close to them
need to remove the aircon condenser bracket for more angle, then itll sit in nicer
overall im happy, and now need to make up some mounts to be welded to it
Member
got my power steering cooler today, so i spent the afternoon hooking up the cooler and relocated res, and ditching the old setup.
i didnt want to butcher the oem return hose "just in case" i have to revert it back, so i picked up a 318 return line from the wreckers to modify, which i didnt get a picture of, but its just a typical steel line, but without the "cooling" loop in it that the m3 has.
i bolted the cooler to the existing engine oil cooler, which by my calculations should clear the intercooler when it goes on(i may have to bend the bottom of the radiator to clear the hoses a bit more worst case)
the hoses are tied together with protective extra hose and cable ties, i'll sort out p clamps once i know its permanent.
and now theres so much more space for cooler piping under the plenum. needs a damn good clean though, stupid leaky old hoses

Last edited by hakhawk; 02-14-2014 at 04:17 AM.
Member
so today was fun, started rebuilding the vanos unit, and managed to stuff a couple seals in the process, so now i need to wait for new seals to come in before finishing that
so i gave up on that for now, and made up the brackets for the intercooler.
modified aircon condenser bracket bolted back on, top rubber grommet got in the way, which i hadnt anticipated, oh well.
little bit of space between oil/steering cooler and intercooler, ill make sure hoses dont rub the core.
thats some decent angle, and i need ALL of it to fit this thing!! notice i added some cardboard, because last time i bent some of the fins, need to straighten them back out once its done.
top brackets done, with rubber bushes to hopefully reduce chances of fatigue on the cooler due to the suspension stiffness. i need to trim some of the radiator cowl off to make it fit now, but only a couple small areas. bolts are m6, but i can go bigger if i need
lower brackets, again with the rubber bushes, m8 bolts on these ones
and another front shot, i'll get the brackets tacked with the cooler in place on the car, double check bumper clearances, then get them welded completely.

Member
so, after an agonizing 4 months wait, my inner barrels arrived. NOTE: dont use concept-wheels.be unless you're willing to put up with little/slow communication and a LONG wait time.
so what to do? bolt a couple together and test fit on car, to make sure i got my measurements right
rear looks good
front pokes a touch, calculations say it should be about the same as the alpinas
yep, im happy. now to decide on colour and get them coated!!
- - - Updated - - -
so, after an agonizing 4 months wait, my inner barrels arrived. NOTE: dont use concept-wheels.be unless you're willing to put up with little/slow communication and a LONG wait time.
so what to do? bolt a couple together and test fit on car, to make sure i got my measurements right
rear looks good
front pokes a touch, calculations say it should be about the same as the alpinas
yep, im happy. now to decide on colour and get them coated!!

Member
Looks good.
Whats the price for custom barrels?
Member
they were about 100euro each, plus postage. look to be well made, just wish they didnt take so long to get to me
Member
Here we go, first test run using mates quadcopter, gimbal and go pro.
Helpful.
BMW CCA Member
Buildmaster v2.1
Lolled at the end. A mate of mine does quadcopter videography as well. Cool shots!
Member
With the new wheels will there be stretch?
Last edited by Fatandre; 03-02-2014 at 08:35 AM.
Member
Cheers guys, aiming for 245s all round on new tyres, so no stretch. Should look similar to what the alpinas did
Member
got this message rom my mate today, whats everyones thoughts o colour choice? im leaning towards the ssangyong oneheres some possible wheel colors. if the sun comes out before you pick it up ill take some more pics. left to right weve got ssangyong premium wine code WAC. color features crystal red, and lilac pearl mixed with jet black. (my pic of the liter). then Lexus premium brown aka tigers eye mica code 4t2 which has yellow and red pearl mixed with other solid tinters to make the amber brown color. then bmw demask code B03, which has the standard red pearl in it, also looks nice.... these colors really bang out in the sun(oh and if your wondering ive cut a piece of a trashed 200sx bumper for a test panel)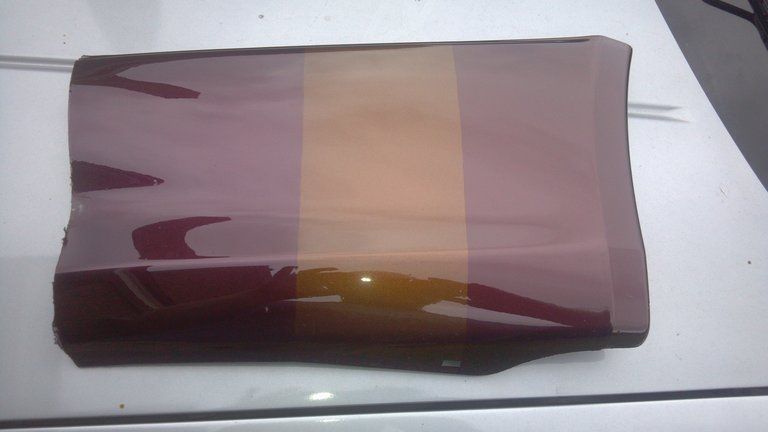
Member
seeing as colour is 99% chosen, i need to get these things ready for paint.
~3/4 of the way done. tomorrow i should get the rest stripped
had to throw a lip and barrel on one of the completed centers. glad i dont need to strip the center caps.

Member
What colour did you end up going with? Why not stick to silver? either way I'm looking forward to seeing them finished up and mounted.
Member
think i'll keep everyone guessing the next next couple weeks :p i still need to see the colour in person yet!!
most people go silver or white on rf's, with a few going black and charcoal. ive done white black and charcoal wheels, and wasnt fussed on silver.
Member
centers and inner barrels are at painters, hes planning to paint this saturday, and i'l pick up next saturday.
got my sump back today, now with -10an fitting for supercharger drain. still waiting on new dipstick and tube to arrive before i can install it along with the dual oil pump and new filter housing.
and got my bolts the other day for the wheels, just went stainless.
and ill be ordering some half height caps as soon as spinfab have them ready to order
 Posting Permissions


 Reply With Quote
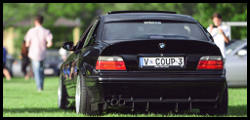


Bookmarks