
 Member
wow nice this build is coming out great!
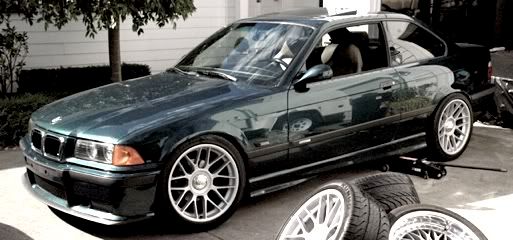
1996 328i (m52B28US) OBD1 euro ZF 5spd. 3.23LSD conversion / Chem. PnP Head/ DINAN stg.2 CHIP/ VAC race valves/ S52 cams/ A/C delete/ fan delete/ Washer Fluid resv delete/ ARP head studs/ Cometic 140MLS / VAC Solid Engine/trans Mounts/ CAI / 2.5"Borla race exahaust/ NGK R spark plugs, M50 Mani, S50 Oil Res, Riot Racing HFTB, SAMCO Hoses, JBR FW, X-Brace, Mtech Front Bumper, RE RSMs, stoptech SS lines, Bilstein sports, H&R Race Springs, S52 Reinforcement plates, Kosei K1 w/ bridgestone RE960as, Brembo/stoptech slotted rotors, M3 Trailing arms, M3 Calipers, M3 Axles, ACS strut brace, weight reduction.
http://mbuild.blogspot.com/
Member
not much happening, waiting for barrels for wheels, and needing more money to buy more things.
yesterday i installed the "modified" ve washer bottle. couple brackets and some massaging of the reo bar and it fit like a glove
the ve filler neck will be replaced with an oem bmw filler that goes on the radiator shroud when i buy the bits. for now it fits rather snug where it is.
today while waiting for new front tyres to be fitted, i finally pressed out the shafts in the supercharger in prep for a clean up and new bearings. popped another bearing in the process too, so lucky im replacing them. lets hope i get it right the first time, coz im not pulling it apart again!!
the things 9 years old, and still looks near perfect inside. its either been rebuilt at some stage or is just in that good condition
and i put the mini lathe to use machining down the drain fitting to fit nicer. it comes with a basic barbed hose fitting and some rather squishy hose, but i want to change it for an fittings, mainly for the hell of it. not sure if its going to clear the chassis rail yet though.
the nut used to go down to the end of the tapered section, and the whole thing was about 1cm longer, which i cut down and re-tapped. the finish looks like shit because i hit it with the wire wheel to get rid of the left over blue anodizing. i dislike blue fittings.

Helpful.
BMW CCA Member
Member
so oil coolers going well, washer bottle hasnt leaked, car is running great.
got some more parts in yesterday.
this is an oil restrictor for in the head, at high rpms, oil builds up under the rocker cover, taking too long to drain back to the sump, so dumps into the intake manifold. this reduces the size of one of the oil galleries and fixes this. this will go in next year when i measure the valve lifter clearances as the rocker cover has to come off to do it. bolt is to aid installation
then i decided to finally bite the bullet and buy an m3 chassis brace. it was a toss up between this one and an aftermarket one, i decided to go stock, seeing as near everything else is oem. non m3 got just a single bar at the back going between each chassis rail. this one links the rails to the kframe.
took me all of about half an hour to install it. had to add 4x nutserts to the kframe, which i'll double check next time i have the car jacked up.
i sacrifice a bit of ground clearance with it, but not being slammed these days means ill rarely scrape it on anything. it sits a tad lower than the swaybar, and higher than the exhaust

Member
God yes, that X brace and washers are so clean. I <3 it mang!
Member
This thread is brilliant. Very well thought out. But I hate to say it but your BBS setup looks way better than the Alpina setup
There are no bad questions, just impatient people with answers
Member
^cheers. the alpinas being white were a bit out there for the rest of the car, though id put them on again without hesitation! m getting a bit bored of looking at the bbs being all black. hopefully get the barrels for my bbs rf in the next week or so.
with nothing much else to do this fine christmas day, i ventured down the shed to see how the supercharger case was doing in the parts washer(which i threw in last weekend).
hmm, well that didnt go as planned. no more pretty blue vortech logo on the id plate
oh well, grind some rivets down, and remove it. less conspicuous that way!! the plate did hide some imperfections on the casting, but once painted it shouldnt be too bad.
all 3 pieces cleaned, and some rough edges and dags cleaned up. im working friday, so ill grab some supplies, and possibly lay some paint down on the weekend.

Member
last night i ended up drilling some more holes for mounting the charger to the bracket. wasnt over happy with it being held on with only 3 bolts on one end. so now theres 6 that will hold it in place. one will link to a steel bar to hopefully reduce/stop any forward/back flex
then i thought i might have a play with where it sits in the engine bay, to see if my oil drain will clear the chassis, and where the outlet needs to be clocked at.
as is, this wont work. i have a 90deg fitting on the way, once thats here ill see if i can shorten the extension enough. if not, i'll just revert back to regular hose.
oil lines were in the way, so i undid the holder keeping them on the rail. there should be enough slack to move them down to the side of the rail later on. the outlet should clear nicely here, hose will run down around under the rail to the intercooler, so as long as it clears the radiator hose, i should be able to leave it as is.
and this will be the fun bit, the inlet area. not much space between compressor housing and strut tower, so hopefully i can mould an inlet with some of it coming over the top of the charger. will need to check bonnet clearances.

Member
so i did a final clean and masked up the charger today
and now its black
i used vht barrel paint, see how it goes. it wont fully cure until the charger is run and it gets hot, but i think with summer kicking in and it sitting in the shed(ie. oven), it might bake pretty well before then!!
im happy with how it came out, couple runs and rough spots, but theyre in areas you wont see once its on the car.
i'll let it sit for a week or so, then start assembling it
Member
Ive been watching this for awhile and its comming along great! will have to organise a meetup to see this thing!
Member
Car looks great!
PM me if you needE46Touringparts
Member
most definately!! think we'll need to get all the s50 guys together sometime. seems to be a few around melb these daysOriginally Posted by BLAKE AuST
 cheers!
Member
Love it.
One thing I was wondering.
Does the charger generate much heat? How is it compared lets say to a turbo regarding heat production?
Member
cheers! im really not sure to be honest, this is my first charger build. i wouldnt expect them to produce as much heat as a turbo, seeing as theres no hot exhaust gases, but spinning gears would have to get pretty warm id expect, they run like 40,000rpm or something crazy
HARDMOTORSPORT.COM
great looking wrong hand drive e36!!!
Member
^cheers!
so yesterday i ended up pressing the bearings on the the gear shafts, and installed the seals in the cases.
then my right angle -10 fitting came in today, so as soon as i got home i snuck into the shed to play with the fittings. in an earlier pic you could see there wasnt much space between the strut tower and the fitting, i shrunk the fitting down some more, did some minor clearancing to the charger case, and now hopefully itll clear. wont know until i test fit again, but it looks good
and a shitty video i upped to instagram. yep, it looks rough as guts, but once i throw a fresh lick of paint around the area i marked, and paint the blue shit, itll look neater. and hey, if it doesnt leak, ill call it a success. if it doesnt clear, ill resort back to the basic fitting and hose
https://www.facebook.com/photo.php?v=10152142633080505
Last edited by hakhawk; 12-30-2013 at 04:43 AM.
Member
Isn't painting the charger going to entrap more heat?
There are no bad questions, just impatient people with answers
Member
id say it might, but vf sell their vortech kits painted or powdercoated(not sure which), so i dont think its going to do it any harm.
today was a silly day at work that ended up with me having quite a few hours of spare time, so i finished wiring up my patch harness for the piggyback ecu and double checked that everything was wired to where it was meant to be. the only thing im not 100% sure on is the injectors, seeing as the way the previous owner had it wired(from what i can see of the left over bits of wire) is completely different to what the instructions say(which i was supplied by the ecu manufacturer).
so i've wired it as per instructions and will have to see what happens when i start the car.
i still find having a hard copy is sometimes easier than looking at it on a computer screen(you can see my scribbles trying to work out how it was originally wired)
midway through testing
and all done. still need to secure and cover the socket side, but will leave that until i know everything works. hopefully i have enough slack in the wires to allow everything to connect and be hidden inside the ecu cubbyhole. piggyback ecu wont fit in there(tried), so will have to run it in behind the glovebox, with the wiring through a grommet.

Last edited by hakhawk; 01-06-2014 at 04:23 AM.
Member
Love it!
Member
Are e36's cheap in Australia?
1994 325is - s50/zf trans/TRM chip/s52 headers/21.5lb injctrs/3.5 HFM/M3 brakes/billy sports/hr springs/reinforced subframe/camber plates/adj ctrl arms/3.15 LSD
2004 Volvo s40 T5 - Daily
2000 GMC k2500 5.7 - 33's/frame off resto'd
1989 Chevrolet k2500 5.7 rclb
Member
not overly, unless theyre stuffed
Member
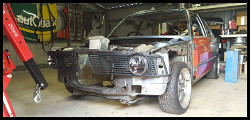
so yesterday i replaced the tie rod ends and rack ends, because i knew there was some play on the left hand side last time it was in the air, but last few weeks its been feeling worse on the highway, so i bit the bullet.
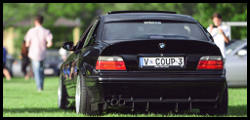
silly driveway means front splitter almost kisses the ground
can see my modifid washer bottle in this pic, still holding strong
yes, thats me swinging a spanner, also barefoot, because slivers of metal on the shed floor do wonders for the soles of your feet!!
interesting, it has rack spacers to stop the tyres hitting the inner arches on full lock. i thought only m3's got these
all done, reused the original boots because they were perfect, just a touch dirty
while i had the wheels off, i decided to have a look behind the guard liners to see if i could squeeze the charcoal canister in there, to make more space for charger piping.
turns out i could!!
cut off some of the bracket that gets in the way(which probably actually didnt)
extend fuel vapor and vaccum lines, theres an access hole near the chassis rail where the brake sensor lines and such go, worked perfect.
i had to make a angled spacer to kick the top of the canister back a bit, since the bracket is angled, i just cut down and filed down the face of a aluminum fitting i had lying around, no pics.
guard liner back on, tyre just touches on full lock, i'll hit the plastic with a heatgun ad try and push it in a touch further sometime.
plenty of space for piping now, just need to move that power steering res.
and then i washed it during the test drive

Member
this is how an M3 should be, not dragging on the ground unlike some. Sweet build
Member
^cheers
today i tested the piggyback ecu test loom. first i checked signal to each injector, as the injector wires were the only thing i wasnt sure on. the previous owner had wired them in a completely different setup to the instructions i was given by the ecu manufacturer.
the outputs worked as per instructions, so i was happy to start it up and see if it ran, which it did. bit rough, but not wrong. real test will be when it gets tuned i guess.
everything seems to read alright, adjusting timing and fuel trim seems to work.
then later today i cranked the mini lathe up again and made up some spacers for the charger bracket and idler pulleys. ignore the offset hole in the big one, me being slack, not using a small enough pilot drill, it kicked off center. not a big concern seeing as its just a spacer. the ends are flat, which is the main thing.

Member
moving the power steering res to clear piping, now bolted to the strut tower(new res and spare bracket) where washer bottle bracket was. just waiting on a cooler and some hose/fittings to plumb it up and try it out.
looks factory enough to me!
and today i received my new charger bracket and comp housing clamps from my mate today. i need to drill one hole, and clean up the edges and such.
this bracket has identical mounting locations to the original one, but has less excess material, venting for the alternator and looks a hell of a lot nicer.
compressor housing clamps i had made because it only came with 2, and i wanted a third. additional hole is to get maximum clamping surface depending on bolt hole locations. i had 4 made
bottom spacer needs some more machining, not much, but ill probably do it anyway. better safe than sorry
and the one im sure everyone was waiting on, the test fit. just on the oil filter housing and blower, but it all fits.

 Posting Permissions


 Reply With Quote


Bookmarks