
 Member
a mate was concerned that one of my ps hoses was touching, turns out it was, so i adjusted the hoses this morning, the hose was touching the sump, and had already roughed up the surface from the short runtime last night
and while the front was off, i had a quick play with some cooler piping, got a couple bits to get welded together, means hopefully less work next mockup session. pipe im touching wont be welded, want to sort that one out later after some thinking.
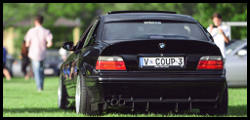
havent had a "through the gates" shot for a while

Member
took the car for another drive, oil pump and such are nice, steering wheels like one tooth out of whack at the rack, but has always been a touch off. might be enough now to spin the steering wheel around one tooth. no biggie really.
everything else is peaches, so have a couple pics
and a shitty insta video
http://instagram.com/p/xbjpMjjz09/
Last edited by hakhawk; 01-14-2015 at 02:54 AM.
Member
so probably the last update for about a month, been getting some things welded
part of the cooler piping, ive left one piece off for now, ill get that welded on the car, along with the rest.
part of the charger intake, need to add bypass valve pipe and catch can fitting, again, need to position when on the car
and im making the best of the plenum i got with the "kit". it originally had no lower mount points, so was relying on the silicon hose and plastic trumpets to support it. ive had mounts welded on, just need to tap a thread once its bolted on. one mount was in the position of the IACV hose, so have moved that, it should allow me to use the original hose aswell
and had the holes in this plate welded up, will tap this for the oem intake air temp sensor.
thats about it, expect updates mid february
Member
more parts arrived for boost prep

Member
so this weekends mission is to install my rebuilt vanos unit and the group n oil restrictor.
sneaking past the e21 to get to work
didnt take many pics, too busy working
this little nut and bolt was the hardest part of the day, its a 4mm hex on the vanos gear shaft and a 7mm nut. snap the hex off the shaft and its more work involved. correct tools and no problems for me today
old vanos unit succesfully removed, bit grubby under there, cleaned that up best i could before continuing.
fairly sure the vanos wasnt holding timing because pretty much all the seals are shot. the piston literally fell out of its hole after i removed the unit. id say the oil was just gushing past the seal with the high pressures the vanos works at.
light drizzles of rain were persistent today, glad it wasnt overly windy!!
a picture of the elusive oil pump driver, if you drop this while removing the vanos unit, it pretty much drops into the timing cover and cant be removed without pulling a bunch of shit off.
all bolted back on, rocker cover is sitting there for the night, tomorrow ill clean up and paint the bolts, and install new seals
new oil accumulator for the vanos and hardline, had to cut the old line, the flare nut would NOT budge. unsure if the old accumulator was bunk or not, but decided to replace anyway.
no pics of the oil restrictor install, but this is what it looks like. does what it says on the box, restricts the amount of oil getting into the cam tray at high rpm, which generally ends up in the plenum.
to install it requires removing a bung on the side of the head, removing a cam cap and one stud, then inserting it into a hole between the 2 studs.
tomorrow ill clean up and reinstall the rocker cover and coils and such, mark some points on the charger plenum that need ot be drilled and tapped, and do anything else i can think needs test fitting/devising while the plenum is off.
Member
finished off today, all works better than it used to, still need to make sure solenoids are working properly, and probably replace them and the pressure valve for the hell of it.
wire brushed and threw some paint on the rocker cover bolts, when i installed it, i wire wheeled them and didnt think about them rusting. oops
while they were drying, i played with the supercharger plenum, marked out and drill/tapped the lower rubber bush holes. need to get a 45deg hose for intercooler piping, the straight aint gonna fit!!
looked at another possible routing for piping, this might give more clearance than between swaybar and rackboot. either way shes gonna be a tight fit
good thing it was tapped a decent amount, finished it off with an adjustable spanner(ps. the pipe thats in the way, lines up nicely where i wanted it to use the original rubber IACV hose, yay!)
the chunks of alloy werent welded in the exact spot i wanted them, so the steel bracket will need some finessing to keep me satisfied, but otherwise, good job me at ligning it all up!!
bolts were dry, time to install new rubber orings, 20 of the bastards!! (yes the vice needs a clean)
and all back together again, started up and ran with no problems, successfull weekend is successful. need to clean the plastic trumpets and rubber intake boots(and most of the engine bay infact, somuchdust)
then i decided to start stripping the plenum of the old paint, since its almost ready for fresh stuff
got about this far before remembering how nasty paint stripper is when it hits you as a fine mist from the wirebrush
long sleeve shirt and some rubber gloves and im back at it
end result
fancy bay shot. looks much nicer than the manky old vanos unit
built by rolls royce...

Member
plenum is done. bolted on the bypass valve and air temp sensor to check final fitment. also made an extension for the air temp sensor so i dont need to cut the stock wires(its on bottom of the stock plenum)
heres what it looked like when i got it
and now. certainly not perfect, but a damn sight better i think
walbro fuel pump setup in stock basket, ready to go.

Member
so catch can stuffs today.
needed a 3/4 to an12 fitting for the rocker cover, couldve bought one, but i had a couple bulkhead fittings from the carbon aribox lying around. bit of time on the lathe and bam, one fitting. (hole in the side is threaded to secure the fitting, so theres no fatigue to the rocker cover piping/hose)
finally decided on a location for the can itself, was hoping to put it on passenger side, but its getting a bit cramped over there, so i relocated the diagnostic plug and used its bracket to bolt the catch can to. hoses will route against scuttle panel and down to rocker cover and intake. access to the drain is nice and easy, no need for an extension hose
oh and yesterday i installed the second fuel pump in the passenger side to stop starvation in corners when the tank gets low. no pics.
Last edited by hakhawk; 03-15-2015 at 02:51 AM.
Member
so this weekend is test fit/piping mockup/fiddling with all the little things to make it all work before final test run and eventually tuning
installed lines for catch can, removed the old oil/air separator completely. when supercharger goes on, will just need to shorten the outlet hose and add a straight fitting.
mounts came in pretty damn close. i can either add some washers as spacers or just bend the bracket up.
plenty of clearance for the bypass valve(notice i changed the hose fitting to a 90deg, it was bugging me)
time to start messing with intercooler piping
one of the universal pipes to plenum, so close. easy fix
otherwise, fairly easy. second joiner is there because the pipe passing up near the power steering pump will be affixed to the engine.
outlet to cooler is nice and easy.
inlet is simple, 45deg elbow from pod to the 180deg bend i had on the charger via silicon joiner. will make a bracket to bolt this to the chassis. weld in MAF sensor fitting. probably not the ideal lcoation, but theres nowhere else, and i figure where it is on the stock airbox cant be much better
overall shot of the piping
bumper fits
need to make short pipe for the 90deg hose from bypass valve to intake. will probably be fun getting the hose on when its all done. catch can fitting will be about half way down the bend facing backwards.
had to do some clearancing of the sheet metal for the drain fitting. if i have any dramas with this, ill switch back to regular hose and fitting
my ford falcon radiator hose still just hits the pulley. once a belt is added, it will be worse. looks like ill use my short piece of alloy pipe in there afterall
and finally onto the shots everyone actually wants to see
tomorrow ill finish off the bypass valve pipe, double check fitment/position fo the others, make some brackets, then start messing around with working out belt length
Member
Wow, this is some awesome work! Have been eagerly anticipating the results!
1999 Euro ///M3 - S50B32
Member
cheers dude, not too much longer now
so today i did a lot of small bits and pieces, plumbing in hoses for bypasa valve, map sensor to the ecu, etc. just one less thing to do when its time to bolt it on for good.
i sorted out the hose end for the bypass valve, i'll get this welded this week along with the cooler piping
cut up a couple old belts and bolted them together to work out new belt length. i'll take it to work and find a matching length belt in one piece
bolting it together allowed me to put it on the car and put tension on it. all the pulleys look to line up nicely
also threw on the mechanical tensioner, since the hydraulic ones seem to not like superchargers. from what i could find, this seems to be inside the margins for tensioner. i'll probably grab a couple belts either side of the length just to be sure
sorted out oil drain hose for the charger and put fittings on. gotta love left over braided hose. had to cut one of the old power steering reservoir mounts to clear the silicon hose for the plenum. gave it a buzz down after picture, so no sharp edges
these are the 2 main intercooler pipes that need welding. once welded ill retest, but using the hump hoses gives me a bit of wiggle room anyway
and the intake side of things, bypass valve, catch can fitting, and maf sensor. bottom hose will also get a mounting bracket, so the pod isnt swinging in the breeze.
and car back together with catch can plumbed in. will be interesting to see how much blow by it gets, seeing as i have the group n oil restrictor in place now

Member
so i had all the piping welded this week, and leak tested it today. everything went as expected, no leaks at any of the welds or the intercooler.
only problem was the end cap not staying on the silicon hose at higher pressures, but its not flanged, and the supercharger wont be producing that much boost
so i decided to clean, deburr and paint everything!!
natures spray booth
pipes are all black now, some of them will get stone chipped, but its just paint.
intercooler painted black, only a light coat on the fins/cores, just enough to make them not look silver, using SP139 gm satin black, VHT's recommended paint for radiators
didnt bother painting the back side fins/core, itll never be seen
and yesterday i threw some wrinkle black on the intake pipes and fitted the maf sensor
oh, and the other day i fitted the impeller onto the supercharger. have been putting this off until i knew the compressor housing and everything was 100% as i wanted it so as not to risk damaging it during trial fitting
next weekend is hopefully the test fire/drive around the block. if all goes well, itll get booked in for tuning in the coming weeks.
Member
let start with the best bit
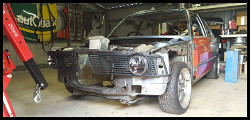
ok, so as you may have gathered, i bolted it all on and turned the key today. the day wasnt without its hiccups though. piping took some manouvering to fit, copped a few scratches. the belt i got was too long, so had the old man go on a parts run for me and grabbed a shorter belt. i'll probably get one another 5mm longer though.
the worst of it, was my pulley spacings being off by a decent amount. had to space the charger pulley and 2 idlers out
this was how the belt sat after the first run :|
after. it didnt spit the belt after a test drive, so ill call that good, but keep an eye on it.
happy with how the piping and everything has come out. could do with some more room in places but ah well.
ended up getting a 45deg elbow for the pod, kick it up a bit higher, less chance of water ingestion.
bumper fits after some fine tuning of the reo bar around the pod filter area.
tomorrow i check for leaks and such, pull it all back off and organise tuning for the next week or 2(need to arrange around getting time off work too).
but its safe to say im stoked with the outcome and cant wait to bolt it on for good!!
Last edited by hakhawk; 04-18-2015 at 05:24 AM.
Member
Yes! Can't wait to see some driving videos of this!
Now to come to Sydney and make a kit for my car haha
1999 Euro ///M3 - S50B32
Member
loving this! what ecu are you running again? not sure which software your using to tune it. 3.0lt yeah?
Member
will be calling up tuners tomorrow to organise a day for tuning, so videos will follow soon enough!! im doing another trip to qld towards end of june, stopping at a mates in sydney for a day or so, might need to organise a meet upOriginally Posted by Das1391

using the moristech prosequential piggyback. see how it goes, some praise it, other dont. yep, 3ltr
Member
very impressed mate! a friend of mine actually filmed you driving down the freeway! haha
Who did you get to do the tuning?
Last edited by BLAKE AuST; 04-28-2015 at 07:06 AM.
Member
Haha mad, need to get the video for me!! Was it morning or arvo?
I had efi dynamics tune it for me
Member
Awesome mate! Those are some good numbers. How much boost are you running? Any more videos of it in action?
1999 Euro ///M3 - S50B32
Member
Hits just shy of 10psi at 7000, yet to get more videos, been having too much fun!!
Member
Are you feeling a massive change in responsiveness and acceleration? From the very beginning or at a certain point in the rev range?
1999 Euro ///M3 - S50B32
RWD fan
Nice work.
Hope the belts hold up okay.
Member
checking it near every day, have a spare in the boot just in case lol. hasnt budged since i shimmed it, and its see 7k plenty of times since the tune. id say if it was gonna throw the belt it would have by now
RWD fan
Yeah I'd say you're right. I remember when the harmonic balancer crapped itself on my brother's falcon ute. He came to me with a funny noise and have a drive belt, lol.
Guess you'd be just about done now?
Member
so much has happened in the alst few months, so i'll just leave this here for now

 Posting Permissions


 Reply With Quote


Bookmarks