
 Member
Please let me know if it is ok to piggbyback this thread or if I should start a new. I am having similar issues. I have retimed 3 or 4 times now with no avail. I feel like it might be a combination of the camblocks not being 100% flat and the shite jigs for the trigger wheels not being precise. I am really at whits end and really tired of taking it apart. It is VERY responsive to throttle it just can't find an idle, I assume because of the vanos being offline. I am thinking about just adjusting the trigger wheels, I just am not sure how to interpret the information I have attached to do so.
Thanks
Chris
timing issue 39 m62tu2.pdfm62tu timing issues.JPG
Member
I see I have not posted my results. In my case, I checked values:
STAT_NW_B1_FL1_EINH
STAT_NW_B1_FL2_EINH
STAT_NW_B1_FL3_EINH
STAT_NW_B1_FL4_EINH
STAT_NW_B2_FL1_EINH
STAT_NW_B2_FL2_EINH
STAT_NW_B2_FL3_EINH
STAT_NW_B2_FL4_EINH
On both trigger whels (STAT(us)_N(ocken)W(elle)_B(ank)1/2_FL(anke)1/2/3/4 I noticed a strange thing. Values of 3 FLanke's were OK and in tolerance and one was off. After disassembling the cover I just went and checked the trigger wheels and both were bent on one of the edges. This caused the problem. Replaced the trigger wheels with new ones and everything was OK then.
Martin Voigts
BMW cars indy and locksmith
1997 E36 318iS Sierrarot
2012 Ford Mondeo
Member
I had these exact same codes: P0011 and P0021, which came up after timing the M62TU on my 2004 Range Rover HSE. I used the German Auto Solutions Tool kit and Beisan systems Vanos refurb kit and refurbed both Vanos transmissions. The engine got a completely new primary and secondary timing chain, tensioner, and guide setup and I used German parts (Genuine BMW, Ina, Iwisketten).
What caused the codes for me was the following:
- A misalignment of the upper timing case covers due to improper installation on my part: I did not use the profile gasket tool (BMW part # 83300493364) and it is essential. The best way to ensure the upper timing covers are aligned is: fit the upper timing case covers, and loosely thread the bolts, do not snug yet. Install valve covers without gaskets but with BMW tool (83300493364) installed. Install 4 valve cover nuts (with rubber seals and metal washers) on the four nut locations closest to the front 3 bolts. Do not screw down the front 3 bolts though. Torque the valve covers nuts to 10nm. Then, using a large prybar, find a place on the side of the chassis to pry down on the valve covers, thus pushing the upper timing covers down. When visually confirmed that the upper timing covers are as flush as you can get to the cylinder heads, torque the upper timing cover bolts down to 15nm. You must have a helper for this and ensure that your helper does not let loose on the prybar, otherwise your upper timing covers will not be flush and it will throw off the camshaft position senors' alignment to the impulse wheels and trigger the codes again.
- I used aftermarket upper timing case cover gaskets which were tougher (and thus harder to compress) than the Genuine BMW gaskets: this was not ideal as you want a soft, compressible rubber. USE GENUINE BMW upper timing case rubber gaskets because they are softer and more compressible. It may be that there was just a difference in the batch, but the Victor Reinz gaskets I used seemed harder and less compressible than the soft Genuine BMW upper timing case cover gaskets.
- When timing the engine, I should have done bank 2 (CYL 5-8; driver's side on LHD cars) FIRST, and then bank 1 (CYL 1-4; passenger's side on LHD cars), because bank 1 has the tensioner which takes up the slack.
- As a precaution, I also just replaced the impulse wheels with brand new units, even though the old ones looked straight and not bent.
When I retimed it and compressed the upper timing case covers down adequately, it started up perfectly with both VANOS systems working right and no codes. I've started and stopped it multiple times, driven it and it's perfectly fine. Also, one quick note: previously, when I did have the codes P0011 and P0021, the VANOS shut down almost after a few seconds and the engine sounded horrible, with Bank 2 (CYL 5-8, driver's side) sounding like it had an exhaust leak, but it did not. After redoing the above work, it is so much quieter and silky smooth.
Prior to doing all this, I had attempted to delay or advance the impulse wheel per the suggestions here, which reduced the cam positions relative to each other but the codes still appeared when sitting at idle. Only retiming the engine (all I needed to do was remove the upper timing covers and valve covers {lower timing cover, water pump and belts stayed on}) and compressing the upper timing covers down properly fixed the issue.
So thanks to all of you for your helpful comments on this thread; which helped us steer our approach. It took me and my wife about 4 times timing this engine before we wisened up to getting the BMW profile gasket tool 83300493364 to properly compress down those upper timing covers. Also, when using the German Auto Solutions M62TU timing kit, it was absolutely perfect timing with cam positions within 0.2 of each other. The M62TU on my 160,000 mile Range Rover is infinitely smoother than on my identical other Range Rover with only 116,000 miles. I'll be doing that one next.
Here are some shots of my rebuild. It took us about 3 months and we took nearly everything apart, cleaned, painted, and replaced a bunch of parts. All the ABDS accessories (including alternator, water pump, power steering pump and A/C compressor was replaced). All gaskets except head were replaced.
We also used the VHT High Heat Engine Enamel and Wrinkle Plus products to paint the upper timing covers and valve covers. We're using the German Auto Solutions 1.2 bar coolant cap (lower pressure) and an aftermarket oil fill cap.
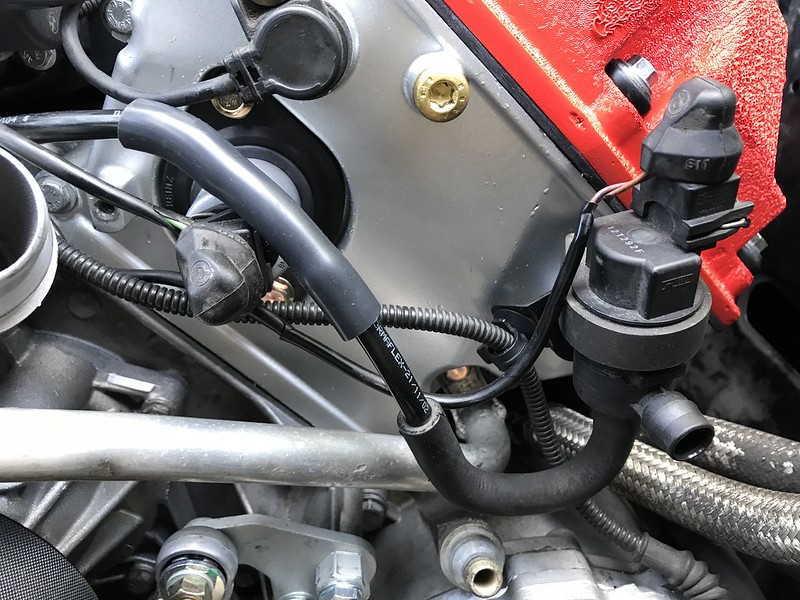
I'll continue work on making my M62 better. I plan to rewire a few of the engine wiring harness sections, namely the leads going out to the Vanos solenoids, CPS sensors, and fuel purge valve solenoid with new wiring and heat protective wiring loom (something from DEI).
I'm also interested in whether it's possible to trick the electronic thermostat to open up at 80 degrees versus 90.
2004 Range Rover M62 HSE 4.4L V8 All new Timing Chain components by M J R, on Flickr
2004 Range Rover M62 HSE 4.4L V8 Fuel Vapor Solenoid with Silicone Hose Repair Splice by M J R, on Flickr
2004 Range Rover M62 HSE 4.4L V8 Secondary Air Injection System Installed with New Silicone Hose by M J R, on Flickr
2004 Range Rover M62 HSE 4.4L V8 Crankshaft Pulley (Painted with new fasteners) by M J R, on Flickr
2004 Range Rover M62 HSE 4.4L V8 New Primary and Secondary Timing Chains Installed with New Guides and Tensioners by M J R, on Flickr
Last edited by mjrgroup; 06-20-2019 at 05:32 PM.
1991 BMW 850i / V12 5.0L [M70] / ZF4HP24 E/H
Member
Great post mjrgroup, thank you. My 540iT looks a lot like the pictures of your Range Rover right now, all the way down to the black plastic garbage bags to cover up things when not working on it!
I don't have the special BMW tool to compress the UTC gaskets but have read some creative methods to do so and hope they work. My understanding is the UTCs need to be exactly flush with the tops of the heads so that is what I will shoot for.
Glad to hear you got through it and your engine is running so smoothly now. Very inspiring. Nice work!
Member
Originally Posted by In awe

Thanks for this thread, everyone.
I was getting the cam over advance code after timing chain/vanos rebuild and after lifting the valve covers, the plate holes definitely didn't line up with the Cam sensor holes.
I pinned the crank and the cams lined up so I loosened and moved the plates to align with the sensor holes. Here are the pictures...Is this what you guys mean? That hole is as aligned with the sensor as it can be.
Would love to know before wrapping this up!
TIA,
Brian
IMG-4993.jpg
Last edited by BRMiller; 06-15-2022 at 08:35 PM.
Artifically Aspirated
Moderator
BRMiller, that’s the wrong hole. See the screw just above the sensor hole in your pic? Take the screw out, that’s the hole to use.
Member
Oh! So, it's the hole where the torx screw is... That makes more sense!
Thanks for your response, Jim!
Last edited by BRMiller; 06-16-2022 at 08:11 AM.
Member
I'm about to attempt my fourth attempt at solving my p0011 and p0021 over advanced codes.
I could have sworn I got it right this last time. I had the crank pinned, and the cam blocks attached and seated on the surface of the head. When I take the cam blocks off bank 1, it turns clockwise a bit but I assumed it would be okay considering that when the crankshaft turns, it will put tension on the chain and align everything again. Would that assumption be correct?
Any tips for this next attempt? Should I clock the timing plates a bit to the left (counter-clockwise/retard) before tightening the plates? I read in this thread the magic number is .062" (1mm)... not sure what that equates to in degrees but seems like a such a TINY rotation to the left.
My Foxwell says that the reference number for the "ignition timing advance for #1 cylinder is 64,63.5 and my value at idle is between 6 and 10.5. I'm not sure how to read that information though; are my values too low/ too close? And by retarding the plate, would I get values closer to 64? Attached is a picture of the graph at idle...
TIA for any feedback on this.
Brian
timing advance.jpg
Last edited by BRMiller; 07-07-2022 at 05:35 PM. Reason: picture didn't attach.
Artifically Aspirated
Moderator
Yes, the bank 1 intake will turn, that normal.
No attached pic.
Member
Thanks for that confirmation, Jim. I added the photo to the post above for your reference.
Member
I made a couple adjustments to the timing plates by rotating them clockwise by about a millimeter+ but still getting the overadvanced codes.
Thinking I may have the issue that MJR had in his post above. My upper timing covers are actually REALLY close to flush with the head if not totally flush though.
See pics (of bank one) from what I did yesterday; do I need to retard the plates even more??
1 Bank 1 pinned.jpg2 Bank 1 before.jpg3 Bank 1 after.jpg
Last edited by BRMiller; 07-09-2022 at 11:02 AM.
Member
Here is bank two:
4 Bank 2 pinned.jpg5 Bank 2 before.jpg6 Bank 2 after.jpg
Last edited by BRMiller; 07-09-2022 at 11:23 AM.
Artifically Aspirated
Moderator
Are your timing tools from a reputable place or from eBay? Mine are from Koch.
Another thing you need to make sure is that the Cam lock blocks remain in contact with the back surface of the heads when your timing it.
For the style of lock blocks you are using (I have the same) I made a tool that holds the blocks down.
If you are truly over advanced you need to rotate the trigger wheel CCW.
Member
The kit is from eBay but I havent been using the plate tools since finding this thread. The time before last, I used the holes to align the plate holes and then clocked them 1 mm ccw this last time.
I will say it was slightly smoother upon startup yesterday vs the time before.
Artifically Aspirated
Moderator
Some of the eBay cam lock blocks have been know to have the wrong slot angle where they fit on the back of the cams.
A while ago I posted what the angles should be.
IIRC the intake and exhaust cuts are slightly different. I could check mine if you want.
Member
Thanks, Jim. You dont have to. Id assume the holes in the upper timing covers would be a safe bet for on time?
I clocked it a little more ccw and it ran surprisingly smooth at startup but still threw over advanced codes.
So I clocked it ccw more thinking I couldnt be far off and it ended up running way worse.
Could it be bad cam sensors? Or is it not actually over advanced, but rather too retarded?
Artifically Aspirated
Moderator
I was talking about the position of the cams not being set correctly because the cam lock blocks are not correct.
Bad cam sensors or vanos solenoids would give you different codes.
Member
Omg so the cam blocks, where the cam square gets inserted, may not be perfectly perpendicular to the surface of the head!?
Artifically Aspirated
Moderator
Here are the cam blocks that came with my $400 Koch timing kit. I bought the kit used from a friend that sold his E39 years ago.
Check to see if your angles are the same.
BB4E53E8-2979-4EFC-B7A2-5BD296A4C34E.jpeg
505CF7B1-11AA-4DD5-B8D4-62721721B0EE.jpeg
And these are the “tools” I made to hold the cam blocks down so they won’t try to lift off the back of the heads while timing the engine.
They screw into the rear spark plug hole.
53BADDB9-E919-434F-BBED-568B26F8D85B.jpeg
Last edited by JimLev; 07-10-2022 at 11:03 AM. Reason: Fix typos
Member
It looks like these cam blocks are indeed incorrect compared to your Koch blocks. Even 1+ degree off on E 1-4
Ebay Cam Blocks.jpg
Artifically Aspirated
Moderator
That pretty close. The trigger wheels need to be off my 5° or more to generate a code.
Member
Should I try to advance the wheel past the hole in the cover?
At this point, I have retarded it three times for a total of 5-10mm from the hole and I received an over advanced code each time I retarded it.
I wonder if there was an error in the chain tension during the initial timing procedure. Perhaps, I should make sure the guide is holding the chain tight before readjusting the wheel.
Last edited by BRMiller; 07-10-2022 at 02:31 PM.
Artifically Aspirated
Moderator
Both sides of the chain shouldn’t have slack in it.
The drivers side should be TIGHT!
When you retarded the trigger wheel you were turning it CCW, looking at it from the front of the engine, right?
Are you positive none of the tabs on the trigger wheels are bent?
Member
Yes, sir. Ccw from the front. Trigger wheels looked straight.
I watched your timing video on another thread and thinking back, I may have pulled the tensioner before installing the trigger wheels. Will report back soon.
Thanks again for your time, Jim.
Member
Well, no luck eliminating the code. The x5 runs great but still shows over advanced/bank performance.
Could it be anything else!? The vanos solenoids, the sensors??
Gah
 Posting Permissions


 Reply With Quote


Bookmarks