

 БМВ Фанат!
Since I was doing my dual pump install, I decided to do a little how-to write up on the way I have mine configured as it is a little different from the "typical" set up for 1996+ cars and I think it is easy, way less expensive, and without a need to convert to 1995 or earlier fuel pumps. It also does NOT require any drilling or fitting installs onto the pump.
I'm also aware of readily available kits, but for one; I don't want to convert to 95 or older style fuel pumps, which require me to buy 2 new pumps and secondly, it is easy and cheaper to use one 96+ pump without too much of an effort.
My car is 1996 what used to be 328is. Currently 357is with LS1 swap (which is irrelevant for this write up).
Parts that I used (excluding optional switch):
1 OEM 1996+ fuel pump.
3.5 feet of fuel injection hose. EDIT 3/15/2013: Used original siphon tube and 16" of corrugated line instead. See post 19
1 brass male to male barb hose connector.
1 brass barb male to female thread adapter (used as a hose holder only).
1 hose clamp.
1 steel zip tie.
1 Relay.
1 fuse with fuse holder.
wires for connecting the electrical.
To briefly explain the way my set up will work:
- The driver's side 96+ style pump will receive the return line from the engine.
- The driver's side 96+ style pump will transfer fuel to the passenger side tank.
- The passenger side 96+ style pump will feed the engine as it used to in OEM setup.
Initially I followed the dual pump instructions available on the web that tells you to rotate the fuel level sender located on the fuel pump to be used on the driver's side, but after trying so, I was unable to fully seat the fuel pump on the driver's side. So I ended up rotating the level sender to its original position. So please ignore the rotated sender on some of the pictures. (Still need to fill up to ensure the accuracy of the gauge). EDIT 3/15/2013: After another attempt, I was able to insert the fuel pump with rotated float. It took some patience inserting the rubber gasket for the pump assembly.
On to the explanation and pics.
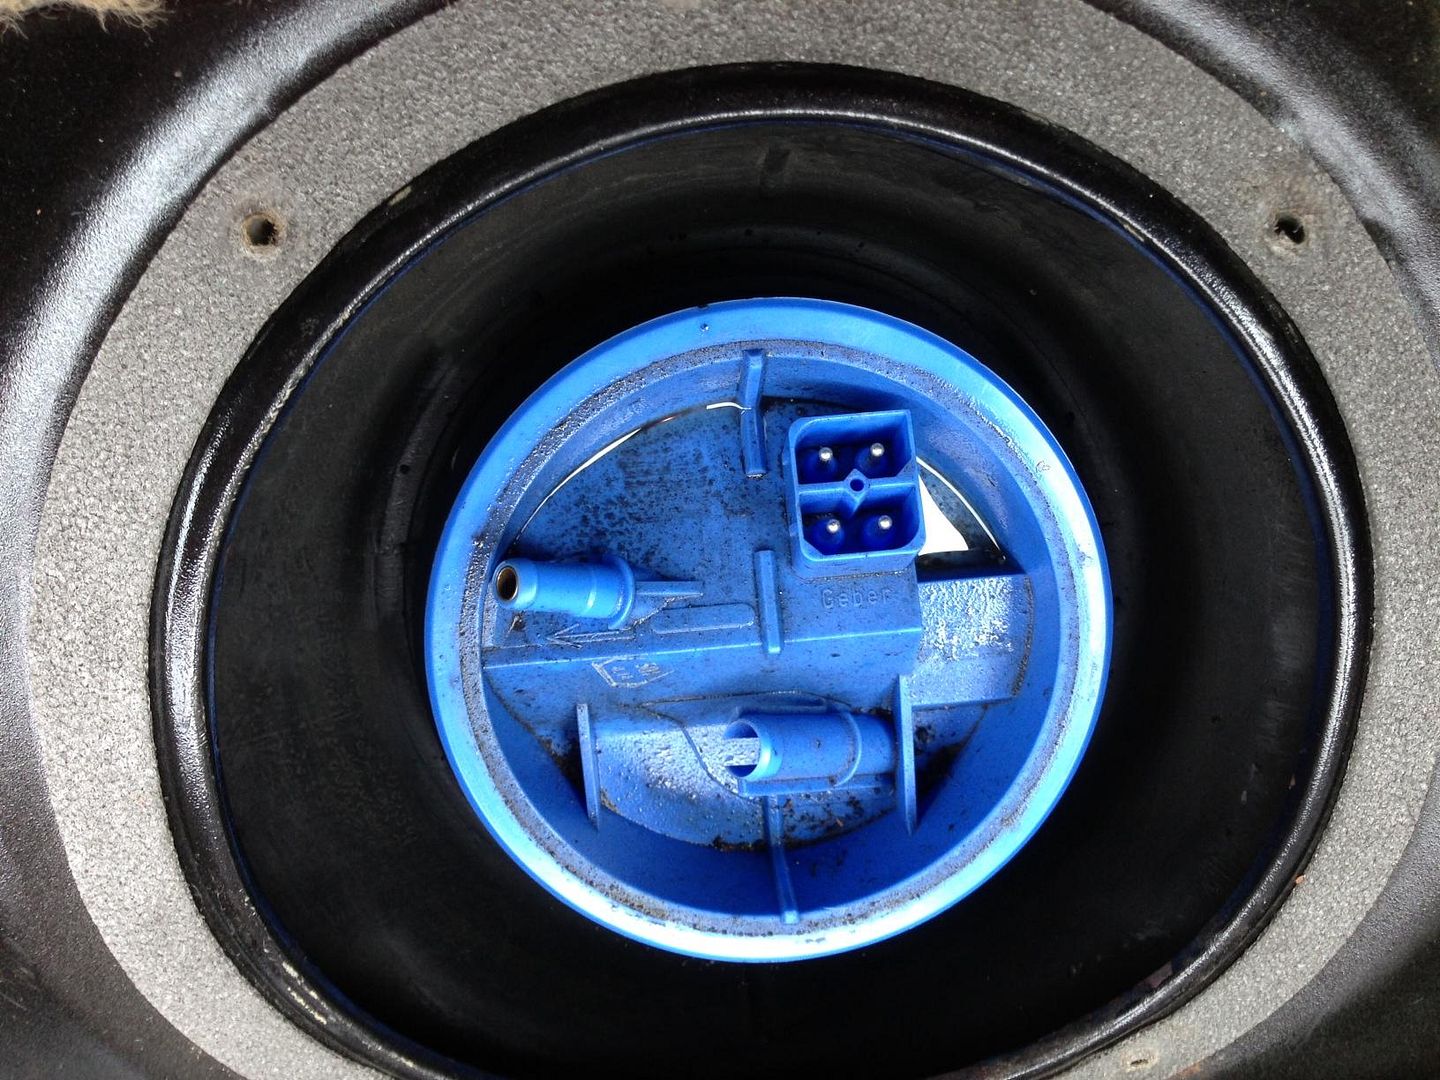
Since 1996+ style fuel pump does not have inlet for return fuel line, I made a simple modification and disconnected the short fuel line that goes from the actual pump to the output nipple on the housing.
Now what used to be out put nipple on the fuel pump housing will be used as a return nipple.
A separate hose is connected onto the actual fuel pump and will be routed inside the fuel tank for transferring fuel.
On the picture above you can see the 96+ style fuel pump that will go to the driver's side. The hose that is connected to what used to be output nipple on the pump housing, now routes the return fuel right onto the fuel pump's intake sock. I used the stainless steel zip tie to hold the hose in that position so the return fuel is directed right at the pump intake.
Below few more views of it.
Top of the 96+ style fuel pump:
The original siphon system that was in the tank and activated by the return fuel through the sending unit is removed from the fuel tank:
OEM Sending unit on driver's side:
Sending unit removed and siphon disconnected from it:
Below you can see the siphon transfer hose going into the fuel accumulator on the passenger side:
Here you can see what the whole siphon system looks like removed from the fuel tank:
Now to replace the transfer hose, I used ~2.5 to 3 feet of fuel injection hose and feed it inside the fuel tank. The end on the driver's side receives the male to male barb hose connector that will connect to the short piece of hose coming off the fuel pump (can be seen on the picture earlier above). It is used for easy connect/disconnect when the pump needs removal.
EDIT 3/15/2013: Used the original transfer hose from the siphon. See post 19 for updates.
The other end of the hose will receive the barb to thread adapter on the passenger side to hold the transfer hose in place in the fuel accumulator. Visual below:
Male to Male connector on one end of the hose:
Barb to thread (holder hose connector):
Fuel transfer hose routed in the fuel tank:
"Holder" barb connector installed close-up:
The pump on the driver's side currently oriented in such a way that the intake sock is in lateral orientation and extending toward the driver's side of the tank. Again, I have not tested the accuracy of the fuel level sender yet as I just completed everything last night.
The wiring part is also pretty straight forward. Although there are few ways of doing this, I went with the one that I felt was most isolated circuit and with a separate on/off switch for the transfer pump. The on/off switch is a leftover from my other idea, but I still kept it in this set up and can turn on/off the transfer pump separately.
For the wring I used a relay and a 15A fuse. This resembles the stock fuel pump set up. I installed the relay and a fuse in the trunk using the mounts that were initially used for the OEM CD Changer.
I took +12v directly from the battery up to the relay.
From Relay it goes to the 15amp fuse and to the second fuel pump.
The +12v from the original fuel pump is used as a trigger for the relay.
The ground for the relay trigger is where I installed the euro fog light switch and wired it as an on/off switch for the second pump.
The relay and fuse in the trunk are on passenger side. Using mount from OEM CD Changer:
US and Euro fog light switch side by side:
Euro switch installed:
Fixed the light bulb while I was there:
Now I can't wait for the first track day to test everything out. I'm pretty sure it will solve the dreaded fuel starvation issue in the long sweepers and I would be able to let the fuel level fall well below half of the tank.
Hope it helps someone looking to do a dual fuel pump set up and an alternative way for 1996+ e36s.
UPDATE: 3/15/2013: Some more details about latest set up are in post 19.
Also filled up the tank with updated set up (rotated fload) so far the level seems to be working correctly. Will continue to monitor...
Last edited by bimerok; 03-15-2013 at 08:06 PM.
- 96 328is 6.0L. (LS1 to LS2 build thread: http://forums.bimmerforums.com/forum...ad.php?2098938)
- 96 328is 5.7L. (LS1 build thread: http://forums.bimmerforums.com/forum....php?t=1289987)
- 95 ///M3 6.0L. (LS2 build thread: http://forums.bimmerforums.com/forum....php?t=1619249)
- 97 ///M3. (e46 Fender Flares/track car build thread: http://forums.bimmerforums.com/forum....php?t=1727098)
- 96 328is (Dual Fuel Pump to Surge Tank thread: http://www.bimmerforums.com/forum/sh...ad.php?1964025)
Member
That's a good move. I suspect that part of the problem is that in high-g turns, some of the return fuel on the passenger side simply misses that little sump, because gravity is pointing 45+ degrees away from where it should be.Originally Posted by bimerok

Member
Nice job there.
Did you clamp the 'holder' onto the hose in the passenger tank? What keeps it in place?
Doug
'97 M3/4
Member
awesome job
you know we are doing mine next week
Somebody stole my sig.
Member
Leo,
Nice solution and thanks for the through documentation. Kudo's on using proper fuel injection hose clamps too!
One word of advice... did you use R9 fuel injection hose or R10? R9 isn't rated for submersion in gasoline. R10 is. (More from Gates on Submersible Fuel Line Hose Here). R10 is harder to find in the autoparts store as a result.
The R9 will soften and eventually peel/crumble when immersed in gasoline. I just pulled my passenger side pump to replace a 9" section of local autoparts store R9 (SAE J30R9) fuel injection hose that I was temporarily using to connect the pump to the fuel hat. The original plastic fuel tube failed at a previous track event and this was my short term fix.
It had been in the tank 6 months and had very noticeably soften after that short a period of time. It had lost most of its original stiffness and I'm sure would have failed within a year. Gas had permeated the hose completely and even after completely drying out, you can smell the gas coming out of the hose 2 weeks later.
For peace of mind.. double check your receipt just to make sure.
Last edited by Maynor; 03-03-2013 at 10:02 PM. Reason: Gas smell comment
John
E36 LS3
Member
You, Sir, are a gentleman and a scholar. Thank you!
I like how you kept it simple and simply beefed up the existing factory fuel transfer logic.
I guess the guys that sell the 'kits' are going to be none to happy about this.
Eagerly awaiting your feedback after a track session on low fuel.
Last edited by mrf; 03-03-2013 at 10:15 PM.
БМВ Фанат!
Doug, it is tight fit and is held by itself. There is no pressure so nothing should happen to it.
Yes, in exchange for doing my front and rear diff bushings
John, as always thanks for looking out! This is why I love this forum and one of the reasons I do DIY's. I like the input on things that I don't know, missed, or things that can be improved upon.
You can see I have learned from your input in the past on the proper FI hose clamps
The question I have; was your in-tank hose used for high pressure or low pressure like it would be in my case? Just curious to see if it would be big worry for me since the hose is not under high pressure while used for the transfer duty...
Meanwhile I will be looking for possible workarounds on the R9 hose as R10 seems to be pricy... I could always limit the amount I need by using fuel metal tubing for the most part and R10 pieces on the ends to save some on the cost...
Last edited by bimerok; 03-04-2013 at 10:13 AM.
- 96 328is 6.0L. (LS1 to LS2 build thread: http://forums.bimmerforums.com/forum...ad.php?2098938)
- 96 328is 5.7L. (LS1 build thread: http://forums.bimmerforums.com/forum....php?t=1289987)
- 95 ///M3 6.0L. (LS2 build thread: http://forums.bimmerforums.com/forum....php?t=1619249)
- 97 ///M3. (e46 Fender Flares/track car build thread: http://forums.bimmerforums.com/forum....php?t=1727098)
- 96 328is (Dual Fuel Pump to Surge Tank thread: http://www.bimmerforums.com/forum/sh...ad.php?1964025)
Member
LOL on the fuel hose clamp comment. That was me? I forget sometimes.
As far as the R9, I don't think low pressure vs. high matters. My understanding is the outer lining isn't treated for immersion and will soften/fail eventually. My hose certainly spent plenty of time just soaking in gas (no pressure) over the winter when I wasn't running it and exhibited the symptoms on Gates site.
Maybe there's a way to modify the old plastic BMW siphon tube to minimize the amount of R10 you'll need to buy? Its not cheap for sure... The siphon tube won't flow as much as he 5/16" but it doesn't need to since its only filling the passenger tank, not supplying the engine.
John
Last edited by Maynor; 03-04-2013 at 10:36 AM.
John
E36 LS3
Member
The fuel clamp was me!
http://forums.bimmerforums.com/forum...php?p=19833832
We're all from Philly, so it's all the same! lol
Doug
'97 M3/4
Member
BMW CCA Member
So this thread was got me inspired to do this upgrade, so some questions....
I read above about the fuel hose issue ( submersible). How does the BW kit handle this? In that kit, is the transfer hose external to the tank or internal? Just found the Turner kit and their cross over pipe is external. I imagine that BW is external also, just want to verify.
I found r10 hose but is $25 per foot and you can really one get it in 1 ft lengths. So I was thinking that maybe i might be able to reuse the hard siphon hose in the middle and use short pieces of r10.
Lastly, I have seen where people have modified the 96+ pump to create a proper return nipple. can anyone describe that, or have pics?
Thanks
Brian
Last edited by lightingflash; 03-07-2013 at 10:49 AM.
БМВ Фанат!
Sorry Doug, I remember it was someone from philly area... It was about 2.5 years ago
The kits that are sold are basically 2 new 1995 and older style pumps. These pumps had output nipple and a nipple for return. So the crossover would run externally in that case.
However, I really didn't want to buy 2 new <1995 pumps especially since I already had extra 96+ pump at hand. Also, I'm not a big fan of drilling the pump hat and putting fittings there.
Right now, it looks like I will be going with the route of re-using the siphon plastic tube (also suggested by Maynor). I will either use the small amount of R10 hose currently available for $19.95/ft on the web, or use the corrugated style line, similar to what was connecting pump with the hat. That is available in 3 different lengths with the longer one for $12.95/16in.
Luckily, the transfer line is going to be low pressure line, so there are quite a few options with connections.
I will post an update once I re-do something and/or have a chance to test out the system.
Last edited by bimerok; 03-07-2013 at 02:46 PM.
- 96 328is 6.0L. (LS1 to LS2 build thread: http://forums.bimmerforums.com/forum...ad.php?2098938)
- 96 328is 5.7L. (LS1 build thread: http://forums.bimmerforums.com/forum....php?t=1289987)
- 95 ///M3 6.0L. (LS2 build thread: http://forums.bimmerforums.com/forum....php?t=1619249)
- 97 ///M3. (e46 Fender Flares/track car build thread: http://forums.bimmerforums.com/forum....php?t=1727098)
- 96 328is (Dual Fuel Pump to Surge Tank thread: http://www.bimmerforums.com/forum/sh...ad.php?1964025)
Member
BMW CCA Member
I am in the same boat as you. Have one 96+ pump in the car and another one for $40.
Please update once you change up. Interested in what you end up with.
If anyone else can descibe how they modified the 96+pump for a return, I would like to see that, so I can weigh the options.
Thanks
Member
BMW E36 M3 Expert
@OP: Very ingenious solution, nicely done.
Re getting an accurate fuel level: as I recall you will have to make a fix to avoid wildly inaccurate readings. Have a read of this, http://www.pumpkininc.com/content/doc/guide/ag-8.pdf (pp 14-16) and see how the author (Andrew E Kalman) modded the driver side pump's float arm. Even though I used the "conventional" external fuel transfer line, I found it necessary to do this. It's very fiddly to get the DS pump with its rotated float arm back in the tank properly, but it does work. I did mine back in 2003, so some of the details have faded in my memory, but I do remember this.
Neil
96 M3 - dual fuel pump
Last edited by NeilM; 03-11-2013 at 04:08 PM. Reason: Clarifications
БМВ Фанат!
I did see the write up in the link. However when I rotated the float, there was no way for the pump to seat properly with the rubber seal. It would just not go in. In order for it to seat, rubber seal needs to go on the tank first and lock on the groove, then pump. With float rotated this was not possible. Maybe <95 pumps slightly narrower.
I'm hoping to play with it some more tomorrow while modifying the hoses.
- 96 328is 6.0L. (LS1 to LS2 build thread: http://forums.bimmerforums.com/forum...ad.php?2098938)
- 96 328is 5.7L. (LS1 build thread: http://forums.bimmerforums.com/forum....php?t=1289987)
- 95 ///M3 6.0L. (LS2 build thread: http://forums.bimmerforums.com/forum....php?t=1619249)
- 97 ///M3. (e46 Fender Flares/track car build thread: http://forums.bimmerforums.com/forum....php?t=1727098)
- 96 328is (Dual Fuel Pump to Surge Tank thread: http://www.bimmerforums.com/forum/sh...ad.php?1964025)
Member
I broke the resistor in the fuel level sensor on two pre-95 pumps doing that. Sucks.
БМВ Фанат!
But were you able to insert the pump with roteated float at the end or did you end up rotating float back?
- 96 328is 6.0L. (LS1 to LS2 build thread: http://forums.bimmerforums.com/forum...ad.php?2098938)
- 96 328is 5.7L. (LS1 build thread: http://forums.bimmerforums.com/forum....php?t=1289987)
- 95 ///M3 6.0L. (LS2 build thread: http://forums.bimmerforums.com/forum....php?t=1619249)
- 97 ///M3. (e46 Fender Flares/track car build thread: http://forums.bimmerforums.com/forum....php?t=1727098)
- 96 328is (Dual Fuel Pump to Surge Tank thread: http://www.bimmerforums.com/forum/sh...ad.php?1964025)
Member
Yes, I rotated the float as per http://www.pumpkininc.com/content/doc/guide/ag-8.pdf
Member
BMW E36 M3 Expert
The trick is to first insert the reoriented float arm and seat the pump without its ring seal. Omitting the seal allows just enough extra wiggle room to get everything oriented correctly. Then lift up the pump a couple of inches, pass the seal over it, seat the seal while still keeping the pump elevated, and finally lower the pump into place on the seal. This does work, but it's one of those "and with your third hand..." things.
Recalling having done this alone at the time, and with the added joy of being scrunched up in the back of the car breathing gas fumes from the tank, I'm glad that I haven't had to revisit that pump installation since 2003!
Neil
БМВ Фанат!
So I was able to play with my dual pump set up today and modify it slightly. The biggest achievement was getting rid of R9 fuel hose and reusing the original siphon transfer hose along with some corrugated line instead.
Here is the picture of 16" corrugated hose that I bought (bough 2 - one for my self and one to do the same on my cousin's car).
One end will go onto the second fuel pump, replacing the R9 fuel hose that I used initially. The other end will connect to the original siphon transfer hose that can be seen below
Next picture showing the hose connected to the fuel pump. The trick to get the corrugated line onto the pump is to put the end of the hose in a cup with hot water instead of using heat gun and it will slide right on!
The other end is getting the brass adapter from Home Depot which will connect it to the siphon transfer tube.
Now everything is ready to go back in to the fuel tank.
I also put few update notes in the first post and referenced to this post as well.
I gave another try to inserting the fuel pump with rotated float and finally succeeded!!! Filled up the tank and the gauge seems to be reading correctly so far. Very happy.
Thanks guys for giving me the tips and feedback. Now the only thing that's left is to test everything out on the track. Will report as soon as I get a chance to do that.
- 96 328is 6.0L. (LS1 to LS2 build thread: http://forums.bimmerforums.com/forum...ad.php?2098938)
- 96 328is 5.7L. (LS1 build thread: http://forums.bimmerforums.com/forum....php?t=1289987)
- 95 ///M3 6.0L. (LS2 build thread: http://forums.bimmerforums.com/forum....php?t=1619249)
- 97 ///M3. (e46 Fender Flares/track car build thread: http://forums.bimmerforums.com/forum....php?t=1727098)
- 96 328is (Dual Fuel Pump to Surge Tank thread: http://www.bimmerforums.com/forum/sh...ad.php?1964025)
Member
MUCH better idea than the way I tried it.
I'll be at NJMP shaking down the new fuel pump setup this Sunday.... you might as well come down and try this updated mod as well.
John
John
E36 LS3
БМВ Фанат!
Unfortunately I won't be ready yet. Still need to replace my diff bushings. The front one is original and finally rotted and cracked. I'm afraid it will brake my diff bolt if I track it that way. Luckily the bushing have arrived, just need to install them.
It looks like I'm running few weeks behind on prepping the car this season.
- 96 328is 6.0L. (LS1 to LS2 build thread: http://forums.bimmerforums.com/forum...ad.php?2098938)
- 96 328is 5.7L. (LS1 build thread: http://forums.bimmerforums.com/forum....php?t=1289987)
- 95 ///M3 6.0L. (LS2 build thread: http://forums.bimmerforums.com/forum....php?t=1619249)
- 97 ///M3. (e46 Fender Flares/track car build thread: http://forums.bimmerforums.com/forum....php?t=1727098)
- 96 328is (Dual Fuel Pump to Surge Tank thread: http://www.bimmerforums.com/forum/sh...ad.php?1964025)
Member
BMW CCA Member
Where did you find the corrugated tubing?
БМВ Фанат!
summitracing or directly from atlinc
- 96 328is 6.0L. (LS1 to LS2 build thread: http://forums.bimmerforums.com/forum...ad.php?2098938)
- 96 328is 5.7L. (LS1 build thread: http://forums.bimmerforums.com/forum....php?t=1289987)
- 95 ///M3 6.0L. (LS2 build thread: http://forums.bimmerforums.com/forum....php?t=1619249)
- 97 ///M3. (e46 Fender Flares/track car build thread: http://forums.bimmerforums.com/forum....php?t=1727098)
- 96 328is (Dual Fuel Pump to Surge Tank thread: http://www.bimmerforums.com/forum/sh...ad.php?1964025)
Member
Interesting tip. Thanks.
bimerok, why did you go with the corrugated tubing instead of a small section of fuel injection hose?
What are the specs on that corrugated tubing? Pressure rating, resistance to chemicals etc.
Member
Can't speak for Bimerok but here's one reason why:
From: http://www.racetronix.biz/itemdesc.a...FT-150&eq=&Tp=FEATURES:
- Made of high-tech plastic
- Superior to all types of natural and synthetic rubber hoses (including SAE 30R7/9/10)
- Highly resistant to solvents / chemicals in modern pump and race gas
- Ethanol (E-10 / E-85) compatible
- Corrugated construction allows for tight bend radiuses and resistance to kinking
- Isolates / reduces noise which is a byproduct of pump pulsations
- High-flow capacity
- Mandatory for all modern cars and trucks which no longer use rubber components in their fuel system
Modern fuel systems no longer use rubber components because of their incompatibility with modern enhanced pump gas which contains ethanol and other solvents such as toluene, xylene and MTBE. Unlike these flex tubes, rubber hose will break down very quickly when exposed to these types of fluids. This will allow vapors to leach into the atmosphere and cause the hose to swell and burst. Rubber particles may also contaminate a modern fuel system causing jet pumps, siphon pumps, check valves, regulators, diverters and injectors to fail. When replacing a fuel pump in a new fuel system, it is imperative that a new fuel tube be used. Racetronix uses fuel tubes in all of its late-model fuel pump assemblies to guarantee compatibly and reliability with the factory fuel system.
John
E36 LS3
 Posting Permissions


 Reply With Quote


Bookmarks