

 Member
Man I am planning the same thing with the fiberglass molds on my e21 that I'm getting ready to start building. Though for me more as a cheaper replacement piece when I bang it up drifting. (which I'm sure I'm going to do.) Subscribed for sure.
Member
Mind=Blown. This thread is nuts, truly some fantastic work. Subscribed for future updates.
Member
Is it your plan to run without a radiator fan?
Member
did you build a sealed duct in front of radiator?
Member
Not yet but that is in the plan. And I will be retaining the fan.Originally Posted by sstecker

Lots of uplifting progress has occurred the past couple of days. I say uplifting because usually when a project gets to this point things have the opportunity to go awry. That hasn't happened yet.
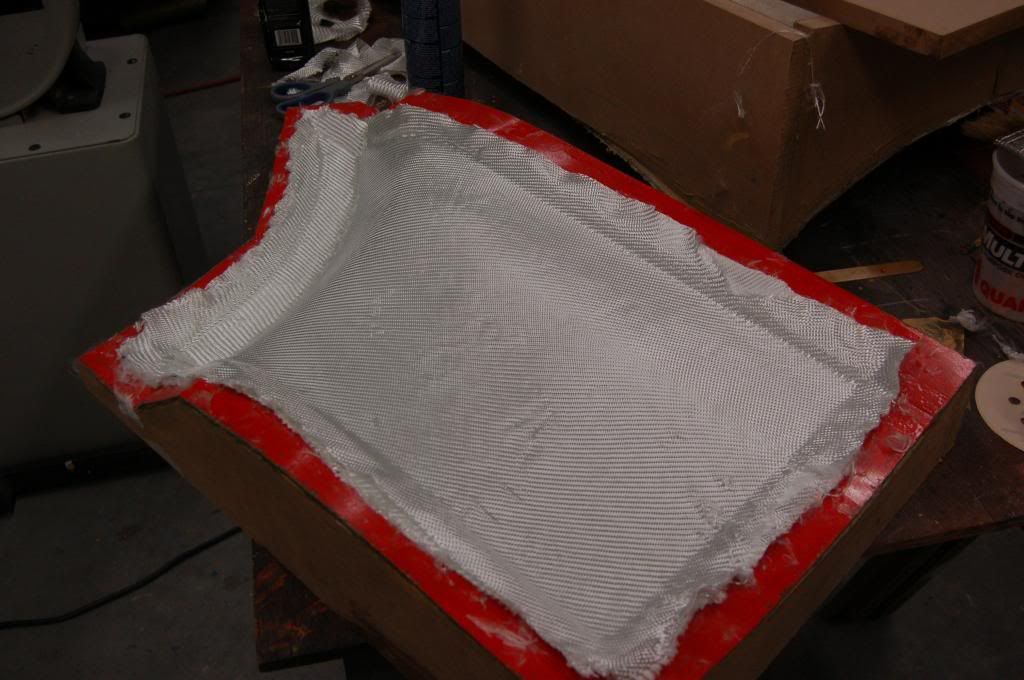
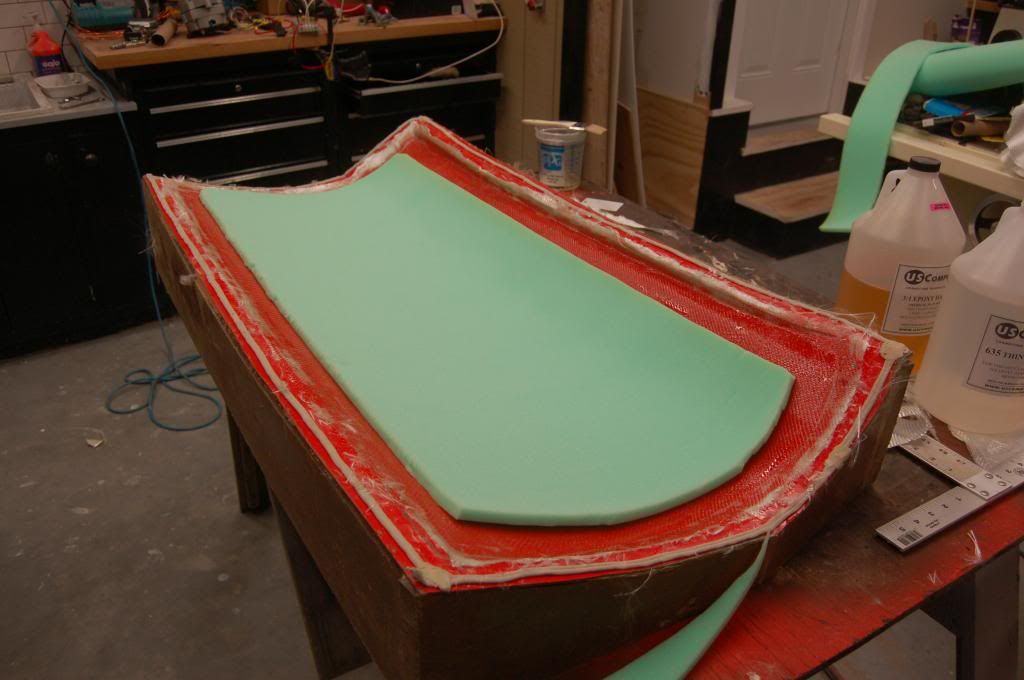
I started making the final parts with the two molds that are finished. The front quarter panels are just 4 layers of woven fiberglass. The four layers are set into the waxed and chemically treated mold dry (held in place with spray adhesive). I then wetted out the glass with epoxy resin.
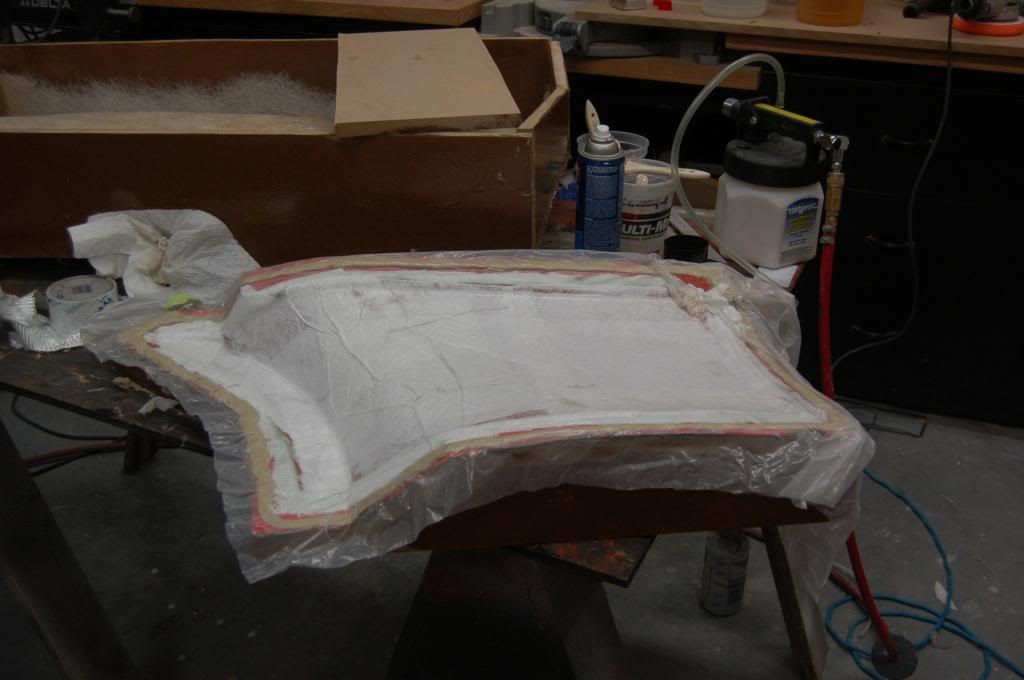
Here the 4 layers are completely wetted out. At this point I start adding the vacuum bagging materials.
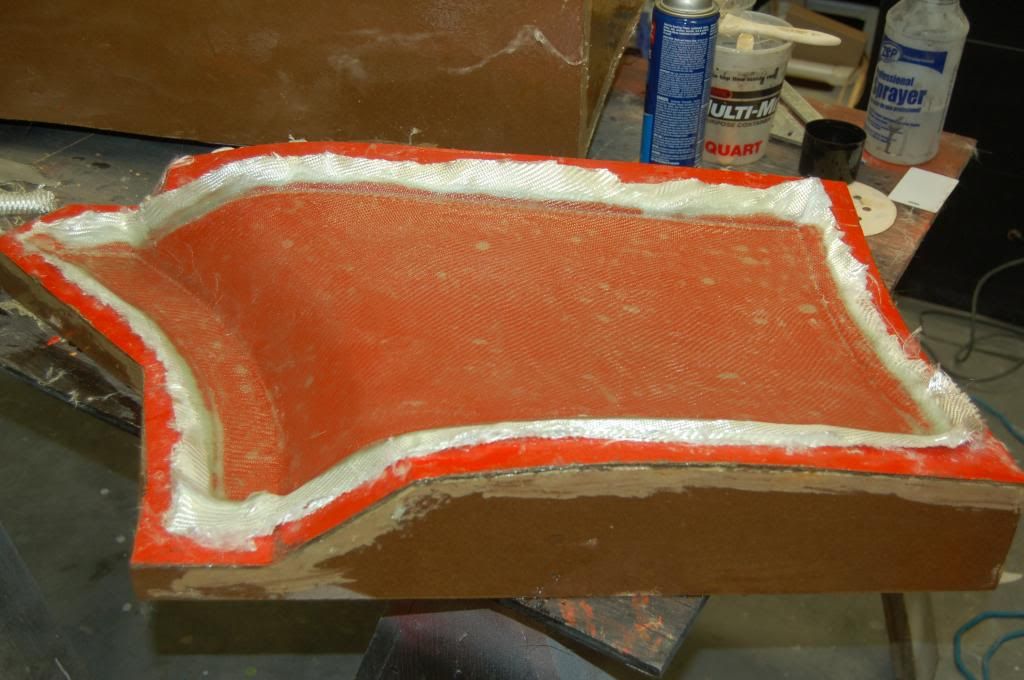
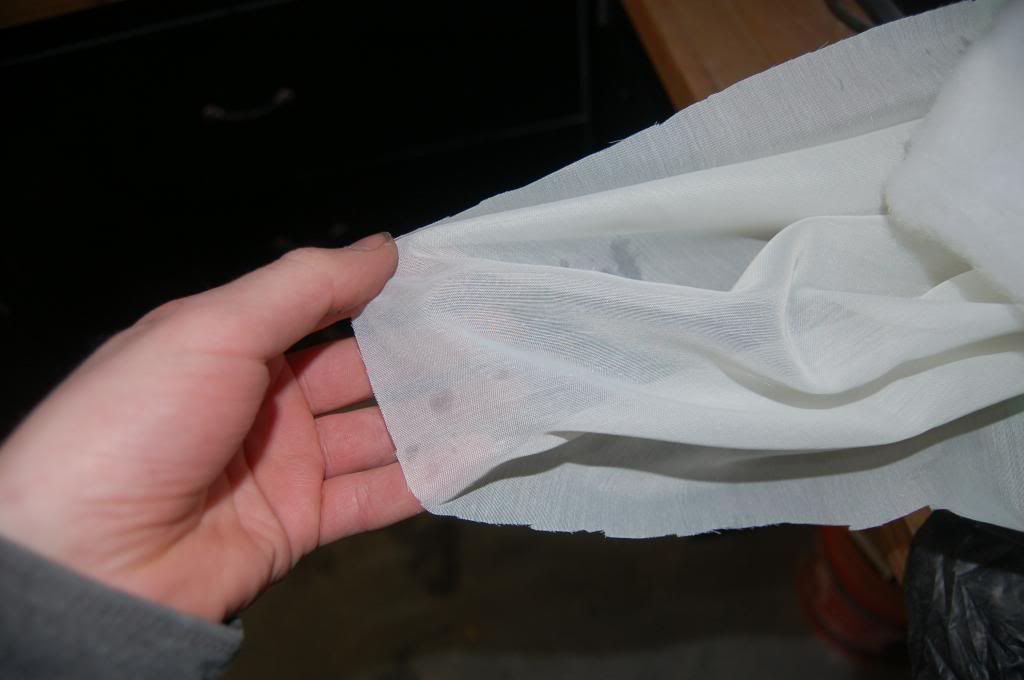
Most of the vacuum bagging supplies (release fabric and breather fabric) are available from Joann Fabrics apart from the bagging film itself, which is 1 mil painter's plastic from Home Depot. The one item that you can't really find locally is the gummy tape that adheres the bag to the mold and creates an air-tight seal. In these pictures I'm using plumber's putty as the seal. It works but it's difficult to use and is not ideal. I will be ordering some proper sealing tape first thing tomorrow.
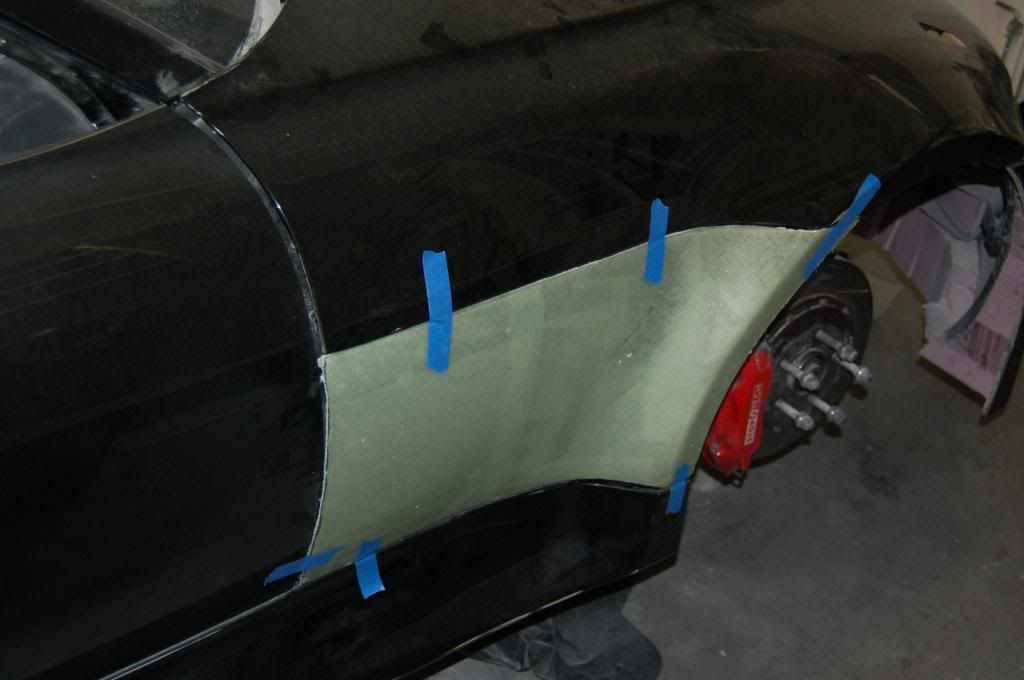
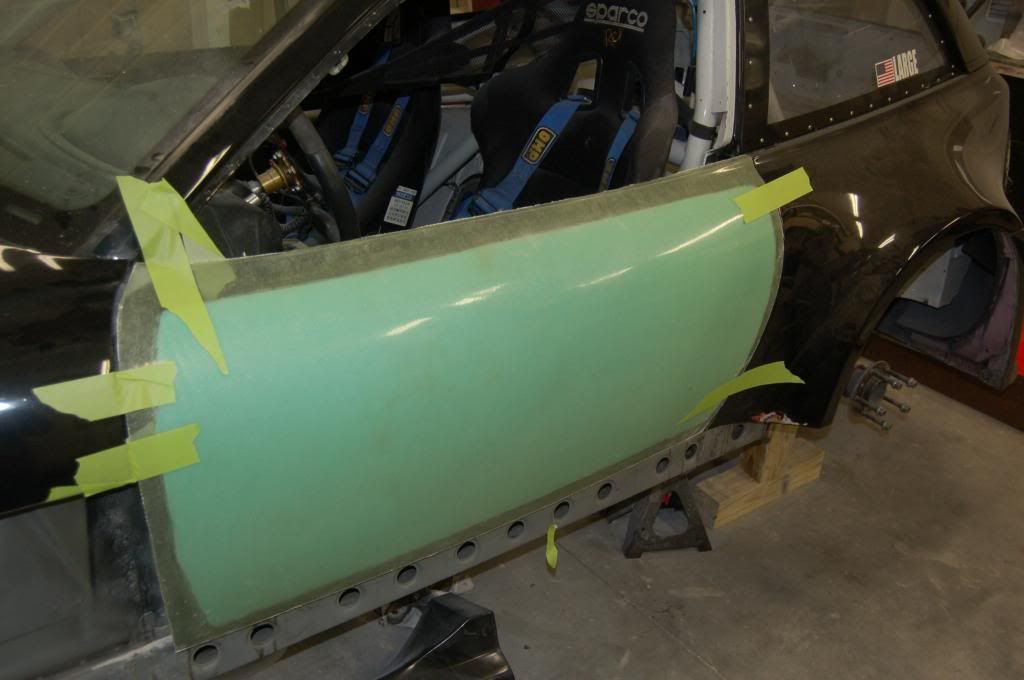
The vacuum is being created by a vacuum brake bleeder, which relies on a venturi device and an air compressor. I'm also going to be getting a proper vacuum pump because my air compressor is cycling too often and I'm concerned about it burning up the motor. After curing, the part is popped out of the mold and trimmed. The epoxy can take up to several weeks to reach full hardness, so i'm storing the trimmed parts on the molds. Here's a picture of the front quarter panel taped in place on the car.
The door receives similar treatment although I'm placing a 1/2 inch foam core (also available from Joann fabrics) cut about an inch shy of the edge.
The old doors weighed about 20 pounds. These new doors are probably going to end up being around 8 or 9 pounds after hardware and paint. Quick question... What do you guys think about me using aero latches as door latches? Do you think it would give race track tech stewards heartburn?
Quick note on the supplies:
Here's what i'm using as release fabric. It's just a mesh (I believe it's polyester):
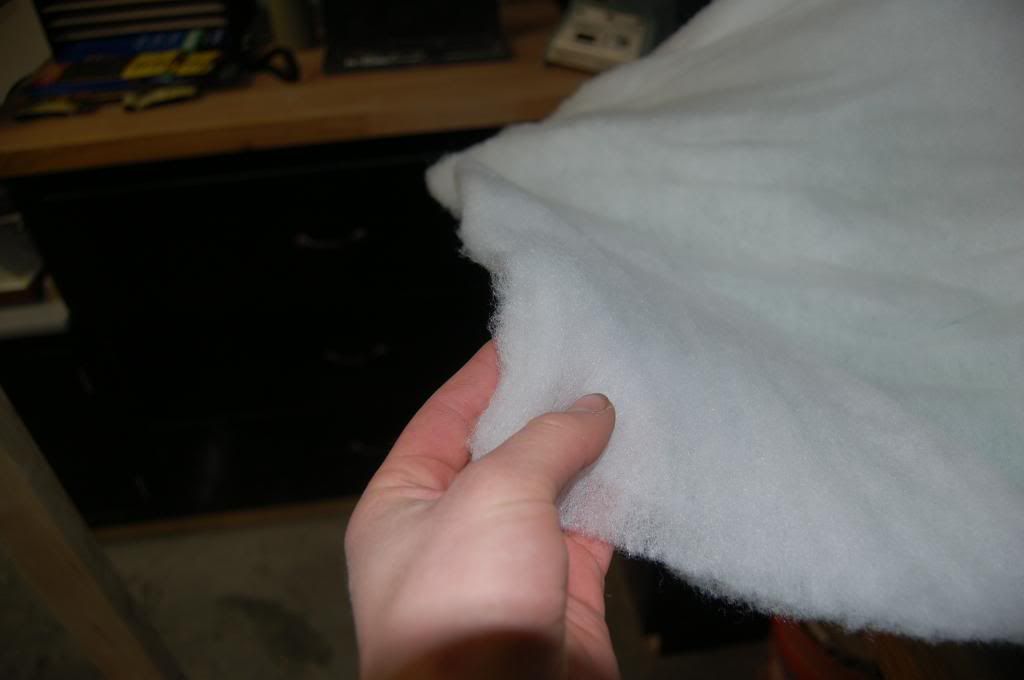
The breather is polyester batting.
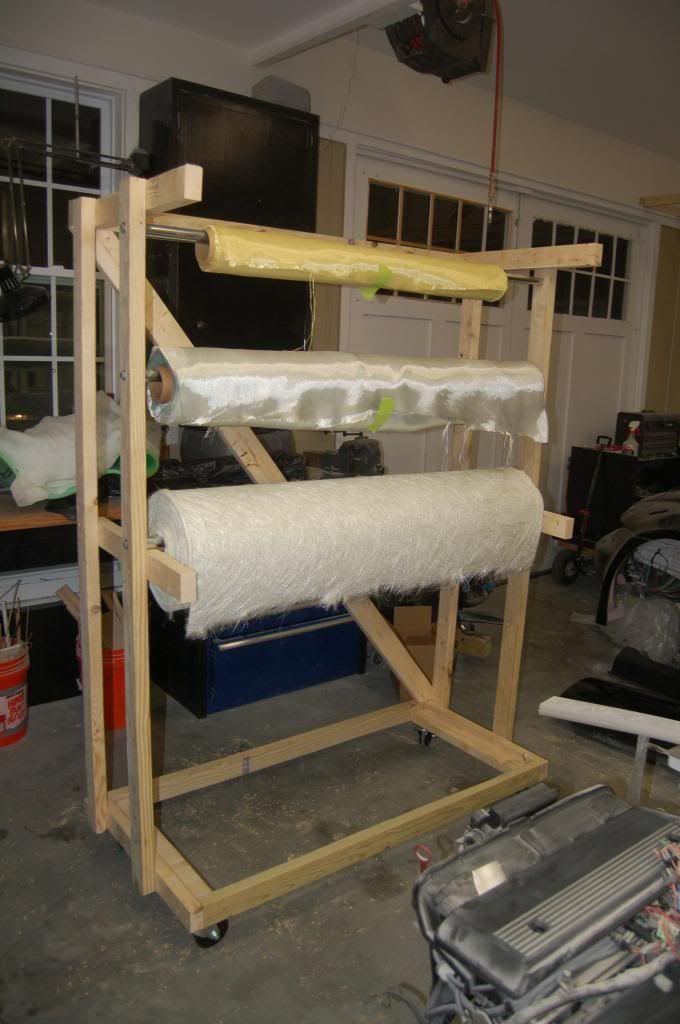
And I made this cart to hold all of my fiberglass so I can easily roll out and cut my pieces. Definitely a time saver... and much better on your expensive materials.
That's all for now. Next I just have to make all the molds. My dad is coming down next weekend and I think we're going to do the hood mold
At this point, the project has gone from a relatively comfortable 1 man job to a relatively difficult 2 man job. Lugging these molds around is tough to say the least. Later, then.
______________________________
Nick Large
Member
You sir are an inspiration. I will be making front fenders for my E36 coupe by following yours and these guys' methods/practices:
https://www.youtube.com/watch?v=UgKvDw1E60E
Question: When you vacuum bag the doors with the 1/2 foam, how thick does the foam end up once the vacuum is removed and the resin is cured?
Last edited by jakermac; 03-10-2013 at 10:21 PM.
Member
why no gelcoat?
Member
Thanks very much for the link. It is very instructive. Dirty job, but clean process. ;-)
1969 2002 racecar + 1989 e30 M3 racecar
Member
Nick,
Why do you wet the cloth in the mold? Does the spray adhesive give you any weird effects? Do you have problems getting full wetting to the mold side of the cloth? I've always wetted on the table, and then placed the pieces into the mold - thus, no spray adhesive and you can see whether you've completely wetted the cloth. Also, placing the wet cloth seems easier than placing dry cloth, especially on stiffer cloths (e.g., carbon).
This is a great project. . . and an amazingly huge amount of work!
Member
Thanks, man. Resin infusion is the way to go. Definitely cleaner. The foam compresses to about 1/4 inch. The only problem with it compressing so much is the fact that those wrinkles in the glass form on the inside. It's not a huge deal but it definitely doesn't look professional. I think a more expensive foam from a composites company that is 1/4 inch to start with would give better results.
Epoxy compatible gelcoat is difficult to find and expensive when you can find it. I knew from the beginning that I would be painting these parts and could use a surfacing primer to fine tune their shape and fill the weave. Gelcoat is good for when you know the part coming out of the mold looks exactly like you want it to.
Pre-wetting seems extra messy. I haven't had any problems wetting out the cloth in the mold so long as it looks wet. I can add a little extra resin and let it be soaked up by the breather fabric in areas where there may be severe angles. The spray adhesive (regular spray adhesive from 3M available from the hardware store) has no adverse effects on the resin. I keep the adhesive application light. I even apply adhesive between the layers of cloth and haven't experienced any issues. One thing about the spray adhesive though is that once you set it in place you can't slide the cloth around. You have to lift it up and re-position it to get air bubbles out. It definitely would be a lot easier with two people, even on smaller parts like the quarter panels.
I forgot to mention that from now on I will be vacuum bagging during the mold-making process as well. It's so cheap and so effective there really isn't any reason not to, especially on molds like the ones I'm going to have to make for the rear quarter panels which will have several 90 degree angles.
______________________________
Nick Large
Member
Would recommend a better foam. It's expensive but the result is actually much better. You'll want to get some before you start the hood.
Honestly even a white foam would be a little easier to work with. Save that stuff for making furniture
2000 M Coupe
[Always in progress !!!]
Member
Haha will do. No sense penny pinching with the core material after all this work!
Nick
______________________________
Nick Large
Member
Dude, I understand, trust me.
I think you can use a few different core materials for the hood. Just 1/4 white foam works well. It's cheap, but it has a large cell size. You can use divinycell foam cut thin. If you look at stuff from MA shaw, he uses that in the hood. But the E36 and E46 hoods are really flat. Our Z3 hood has much more contour so I would recommend honeycomb aramid. It's expensive, you'll need 200-300 bucks of it for the hood. But it's really flexible and light. It's easy to work with too compared to foam.
You're really doing great!!!
Also when you and your pop make the mold for the hood made some strategic holes in the mold so you can use compressed air to help release the part. Usually something that large doesn't like to come out from the edges. In addition you can damage the part or the mold. Plug the holes with some wax and cover it from the inside with a small round piece of tape.
2000 M Coupe
[Always in progress !!!]
Member
Awesome work Nick! VERY impressed by your skills. Can't wait to see the finished product.
Josh
2011 NASA GTS3 National Champion
2012 NASA GTS3 National Champion
Member
If you decide to use Divinycell, narrow strips laid abutting side by side conform better to a 3D curvature than a single, continuous sheet, and you don't need a continuous sheet since the fibers have high strength in that lateral direction. Also, I've never made a hood, but I've made a few bicycle farings (it looks like an aerodynamic egg, 4ft high, 6ft or 12ft long depending on whether it is a single or a tandem, 3ft wide). A majority of it was supported by 2" ribs with a Divinycell core. I bet you could do some similar ribbing to support a hood shape.
+1 Also, use water instead of air. On big parts, air tends to find a leak path and just bypass the part. Water is better at floating the part out.
Member
Cool, I've never used water. My experience with big molds is on glider parts and we used quite a few small air ports to pop the pieces out.
Yeah, divinycell cell is stiff. I guess there is a thermally formable type but I've never used it. Like I said the E36 hood for example is really flat so I can see a large thin sheet work well during bagging, but on the Z3 I can't see it conforming to the contours properly.
Nick, keep at it !!! Looks great !!!
2000 M Coupe
[Always in progress !!!]
Red Racer
I can say with certainty that TC's carbon Z3 hood used 1/4" hex-cell. But it's a dry carbon.
Your project is making me want to either fix my carbon hood, or mold a new one. Good luck.
Member
I've seen that the stiffer foam cores are able to be formed with heat. I'm going to be using this stuff: http://www.fibreglast.com/product/Vi...y_01022_A/Foam
...which specifically mentions thermoforming in the product description.
I'm going to be making an inner skin for the driver's side door. I feel like the door is a little too flimsy and may be too easily punctured by rocks, rubber, and car parts, especially in a side impact situation. I'm going to model the structure after the ALMS M3s that Rahal Letterman ran last year. They had foam cores that offered quite a bit of side impact protection. Mine will be a little less substantial since I have NASCAR bars. I'll keep you up to date as that progresses. Passenger door will just be a skin.
Good suggestion on the mold release holes. When you guys do your composites work are you using PVA mold release? I've found that I only needed 2 applications of wax and the PVA release and the parts pop out with no problem. The water is a good idea since the dried PVA dissolves in water.
Thanks for the encouragement. Lots more work to do but I can see things coming together.
______________________________
Nick Large
Member
The finish on your molds looks good and also the shapes you've been making are somewhat flat so you don't need to use PVA. That being said your molds are new and also you don't really care about the finish ie. all the parts are being painted so there is no reason not to put PVA on top of your wax, it's just overkill but will allow more protection to the mold. So if you have it, I would just use it anyway.
Sometimes when you use PVA you get fisheyes in the part or it will puddle into corners. In addition it's just one more thing to do so you only tend to use it when the molds are new or when the shape dictates the use of it.
Yes that foam is the same as Divinyl just not brand name. And yes some of the versions of it have an additive so its thermally formable. I guess you just use some kevlar gloves and a heat gun to bend it.
You can try to use the Lantor Soric or aeromat that someone else suggested. You can pretty much get that anywhere.
2000 M Coupe
[Always in progress !!!]
Member
You could add a layer of Kevlar to the doors too if you are worried about puncture resistance
Member
That will make it bullet proof too !
Doors are tough. A couple inches of foam will make it REALLY stiff. Just a word of warning the impact foam that they use in NASCAR, ALMS, etc. etc. is expensive if you choose to use it. Personally any dense foam will do the job.
2000 M Coupe
[Always in progress !!!]
Member
Yeah I'm thinking I'm going to use 4 lb density expanding polyurethane foam. Build up about 4 inches then carve out a pocket for the NASCAR bars. I actually have a roll of Kevlar-49 (not ballistics grade kevlar... just being pedantic), though I am going to be making the fender liners out of 2 layers of that stuff.
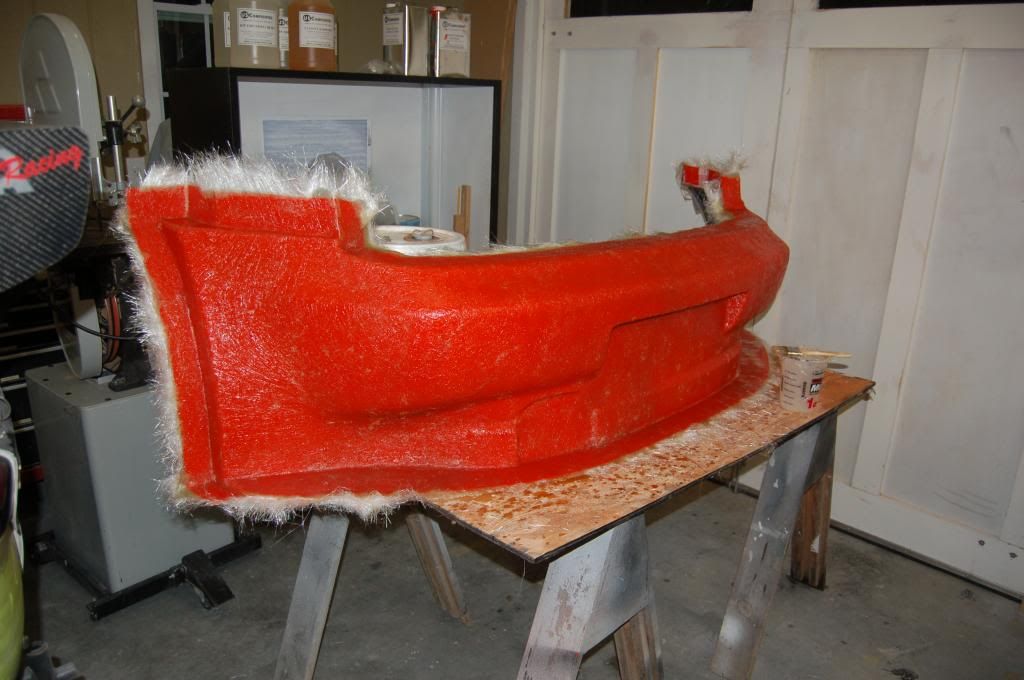
My dad and I ended up working on the rear bumper mold. It takes forever. I know your're supposed to build up all the layers at once but it is physically impossible. I'm doing a layer a day until I reach 5. I think that should be stiff enough to not have to use too much supplemental stiffening.
The search for good wheels goes on. Though I think I may have come across something promising in the form of Weld Racing S71s (in black, obviously). I'm going to call them tomorrow and see what I can find out. Attractive price for a custom forged wheel; not bad looking either. I've always been a fan of the more open, 5 spoke designs.
______________________________
Nick Large
Member
So when are you going to start producing these for those of us who have been drooling over this thread for the past 2 months?
How much wider is the body compared to stock? I've been able to squeeze a 265 up front with pretty much 0 clearance to the strut and to the hood at full compression. This is with a 18x9.5" wheel with an effective offset of +30mm. A 285 would be pretty awesome, and you'd need less than an extra inch of widebody to get it to fit correctly. It will be nice to have more inner clearance due to the massive tire, though.
If you're retaining the stock trailing arms, it is an easy square fitment on a non-M.
If this were my project, I would just buy a set of 18x10.5 apex arc-8s, sort out the offsets with spacers, and call it a day. The wheels are cheap and durable, and they look pretty awesome on these coupes.
Last edited by LAWLence; 03-18-2013 at 02:17 AM.
Member
Or 18x11 EC-7s.
Member
I forgot about the new sizes! I wonder how they look on a coupe.
 Posting Permissions


 Reply With Quote


Bookmarks