

 Member
At the end of last season, my Dad was driving the car at a DE when the oil pump let go. Unfortunately it seized the motor, although I haven't had a chance to dig into it to assess the extent of the damage.
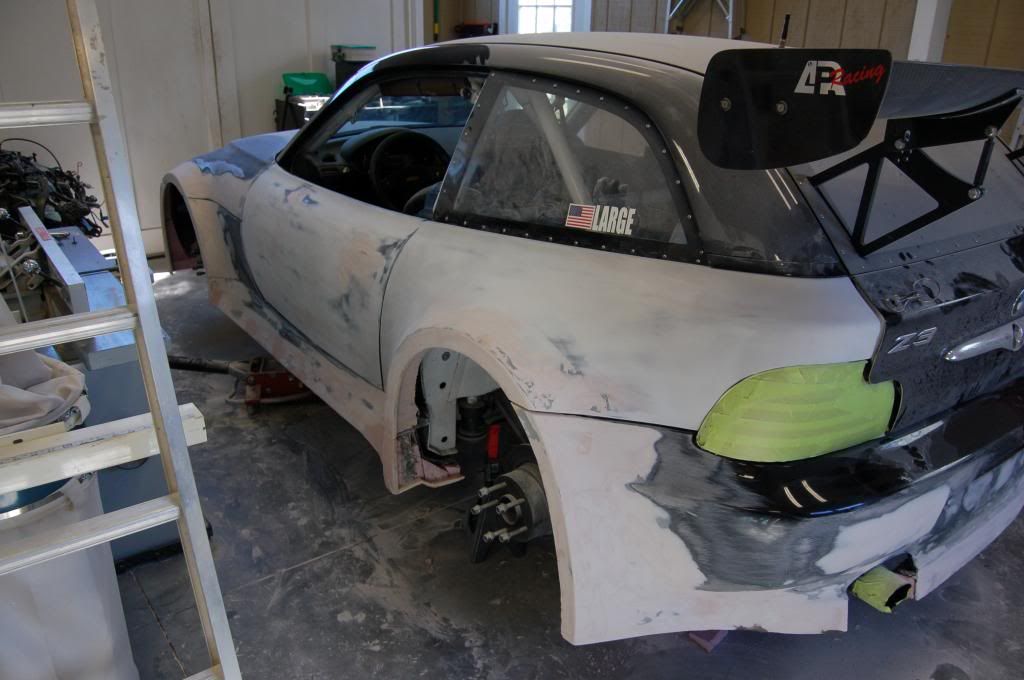
In any case, my Dad and I decided to go ahead and swap in an S54 to make it the M coupe that everyone thought it always was. (Big thanks to Bimmerworld for handling the swap). Putting in an S54 of course bumps us from DM to CM, which is outrageously competitive. I decided that the first step for us to step up our game would be to do a widebody. I have some experience in composites so I decided to do all the work myself (Plus, the body kits out there for Z3s are frankly a bit too.... interesting)
I am doing the body in three stages:
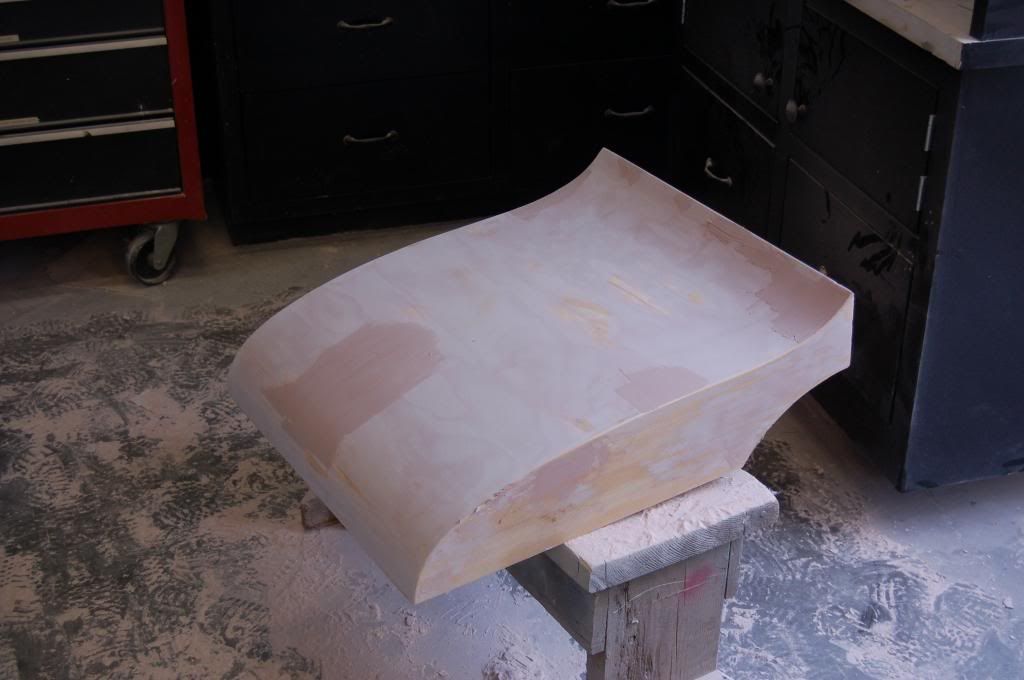
1. Shaping the dies, which will be in the shape of the final car, out of foam and plastic body filler. These dies will NEVER see any action on track. so I don't want anyone to tell me the Bondo will crack and fall out.
2. Making fiberglass molds off the dies.
3. Making the final parts out of fiberglass and mounting them to the chassis. It is my goal to mount the final pieces to the car in a manner that allows them to be removed with basic tools. The front/rear bumpers and hood must be removed using NO tools. The body panels must also be lightweight, and the hood must be able to evacuate the air passing through the radiator effectively despite the engine remaining in the stock location (more pictures of that process are to come).
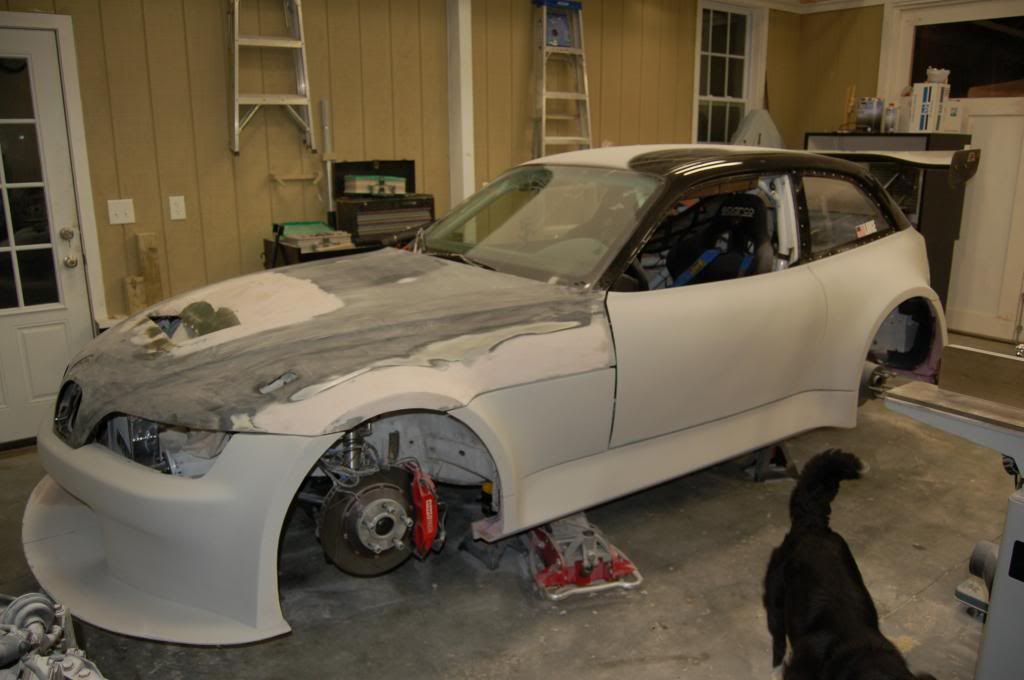
Bear with me while I sort through these photos and post them over the next couple of days. At the time of this writing, I am about 85% of the way through shaping the dies, and have already invested a couple hundred hours into the project.
The whole project is expected to cost around $2000 for materials (my labor is obviously free to me). The $2000 budget should be sufficient to do a whole body plus an extra bumper or two.
This has been quite the adventure, but by taking my time and using the right tools and materials, it is going very well, and I expect to be finished by the end of February (Pending).
Please enjoy, criticize, and ask as many questions as you like!
Nick
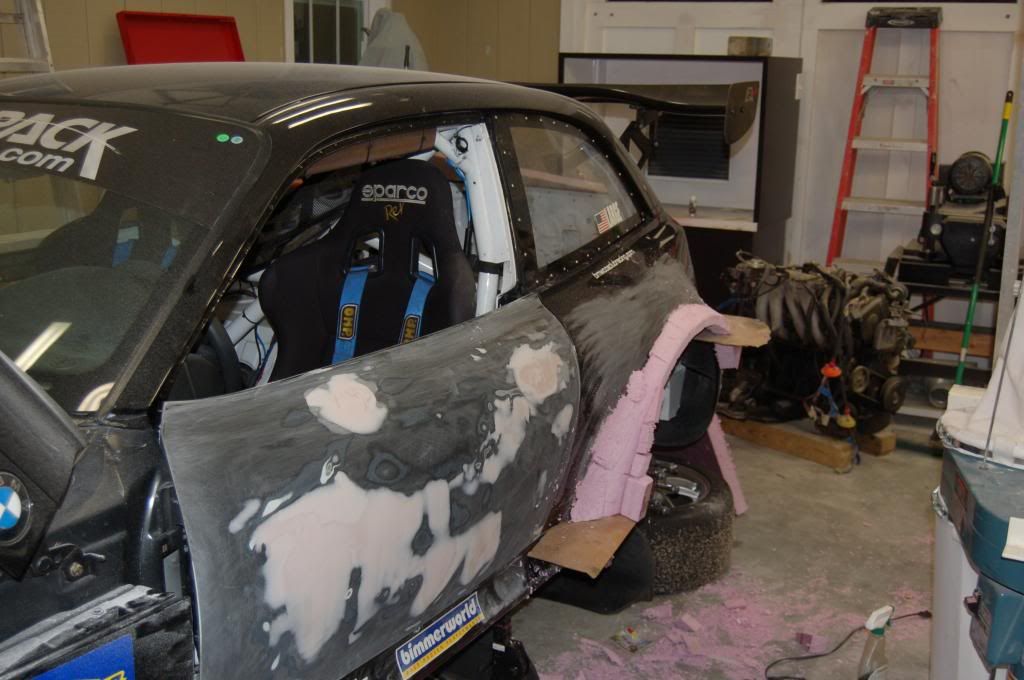
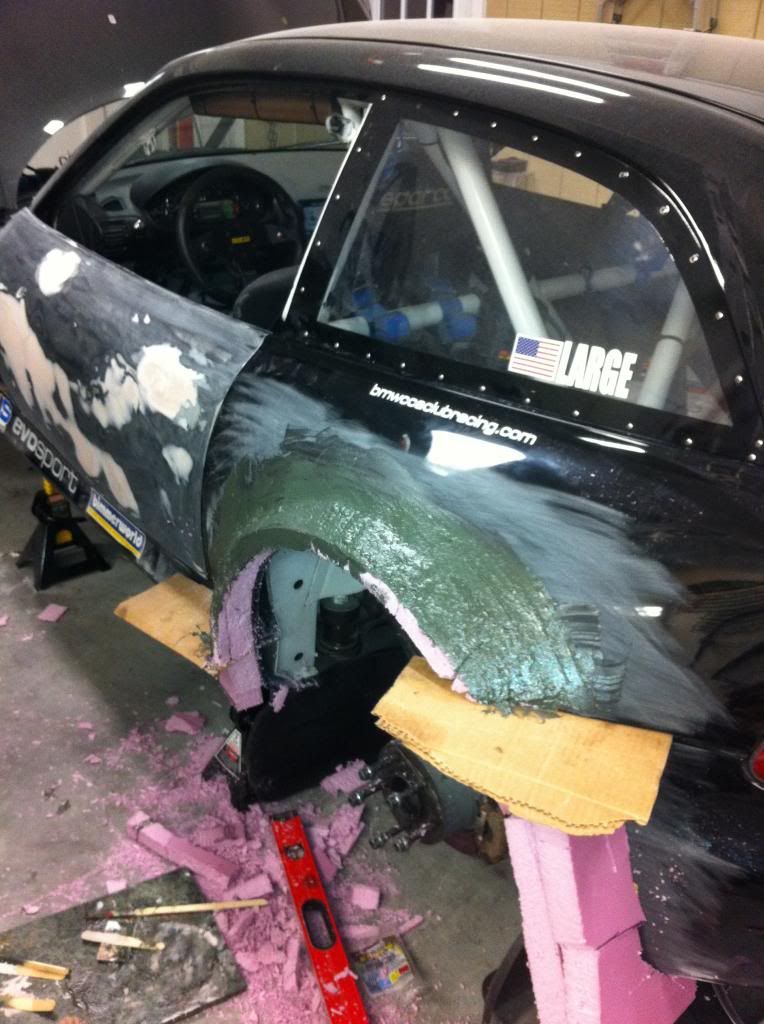
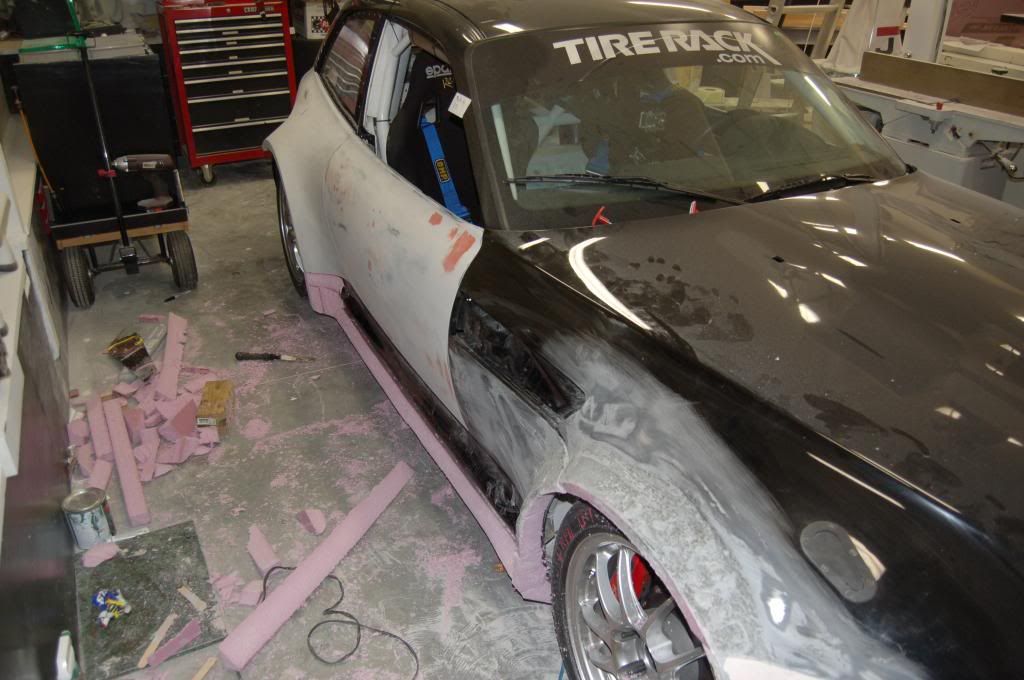
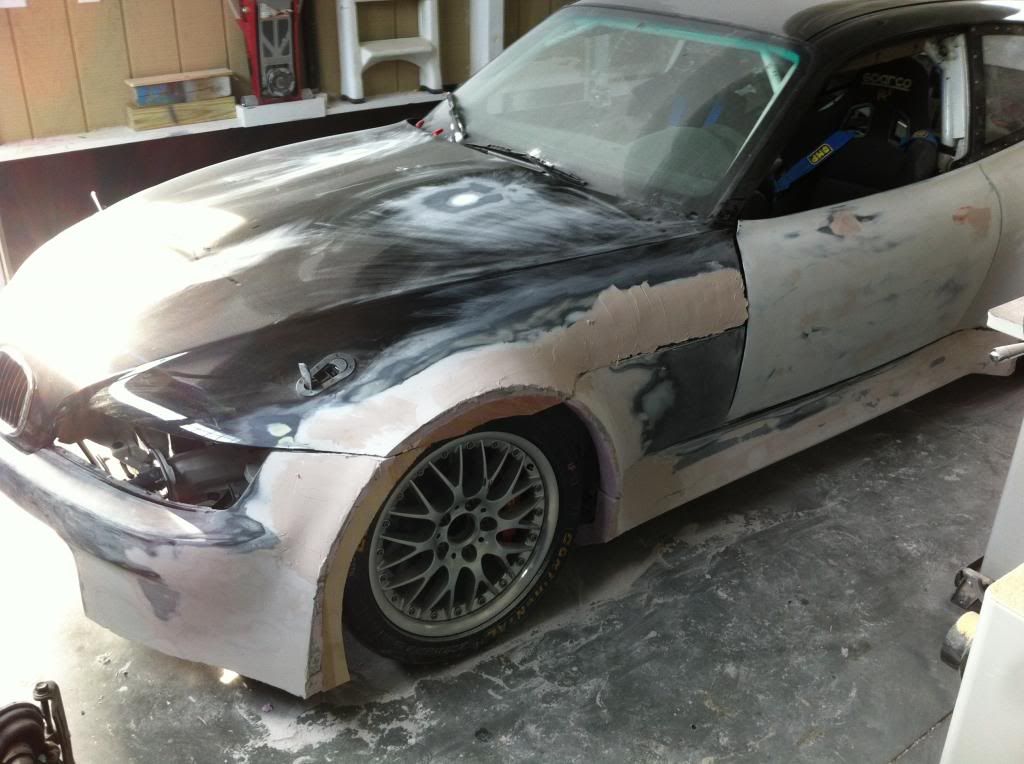
The doors needed some straightening and filler. In this photo I have begun the process of building out the width of the rear quarter panels with foam. I add a fiberglass reinforced plastic filler to solidify the joint between the foam and the original body and to begin the process of blending the two together.
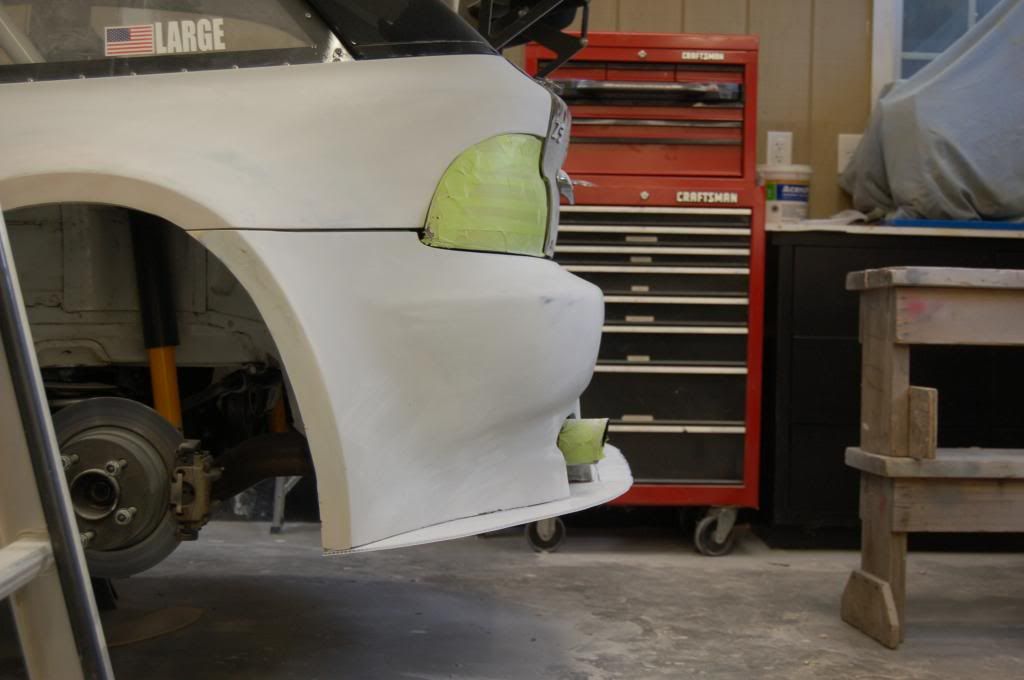
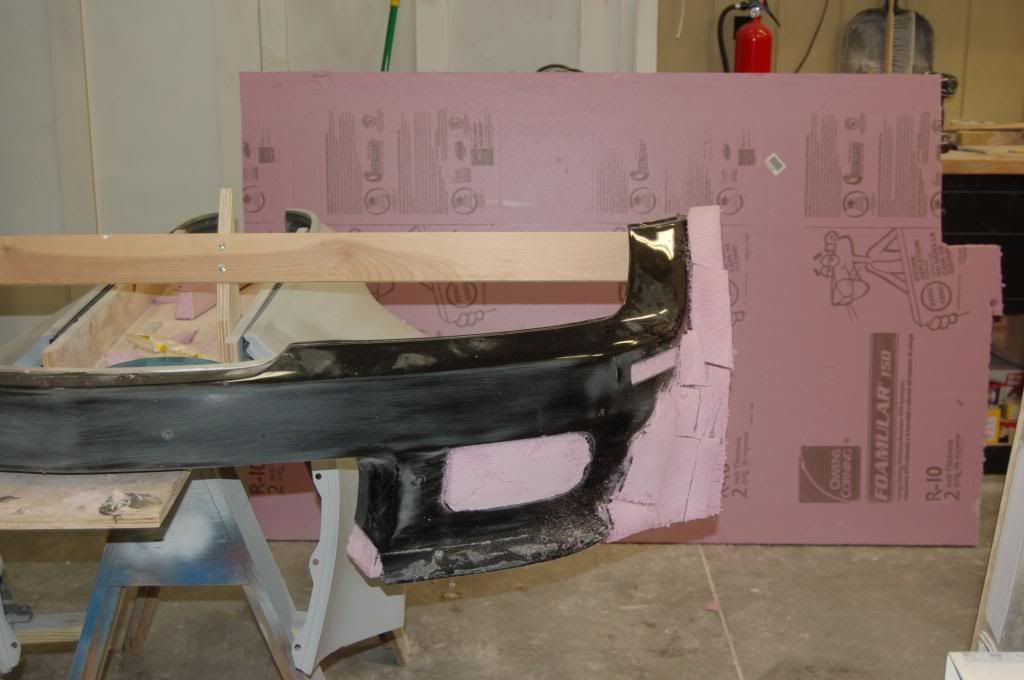
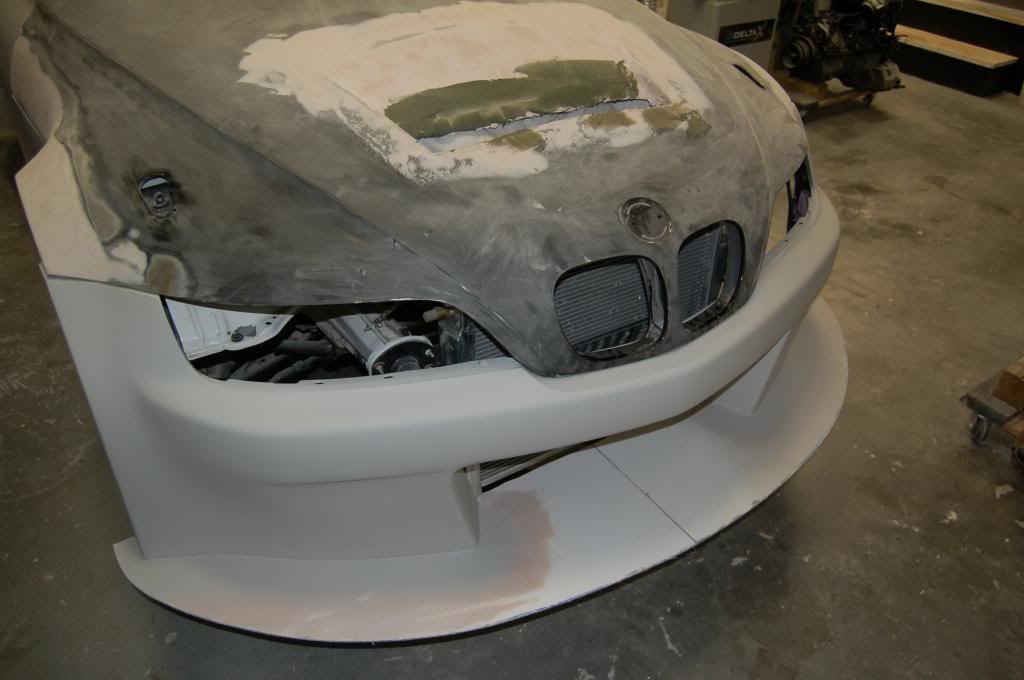
Working on the front bumper. Adding width and adding depth. I am filling in the brake ducts now and will eventually cut them out of the final product. Makes it much easier to make in fiberglass when you don't have many holes and angles to worry about.
Matching the shape of the rocker panels with the rest of the car. The Z3s clamshell hood makes life a little more difficult.
The application of foam looks like a bit of a cluster bomb. I could have been a bit more careful or even used expanding liquid foam, but the end result is the same, albeit this method required a bit more bondo work.
Can everyone see the photos?
Last edited by Calaway16; 01-14-2013 at 03:41 PM. Reason: Automerged Doublepost
______________________________
Nick Large
Member
BMW CCA Member
(Yes pics work)
So you are doing the above work as the male plug? Make the female then pull the fiberglass parts?
Do the same for the roof? There's a lot of sheet metal in the roof that is now redundant with the cage.
Are you going to open up the backside and top of the wheel wells for ventilation and lift reduction?
- Ian
2000 M Coupe, stripped and DE prepped
46mm wheel bearing socket for rent - $30 deposit + $10 fee. PM for details.
Member
Speaking from experience, stop what you are doing and fit the front tires!
My car is a widebody and I had to drastically change the shape of the well.
Of course I'm using a DOT 285 on a 10" wheel.
2000 M Coupe
[Always in progress !!!]
Member
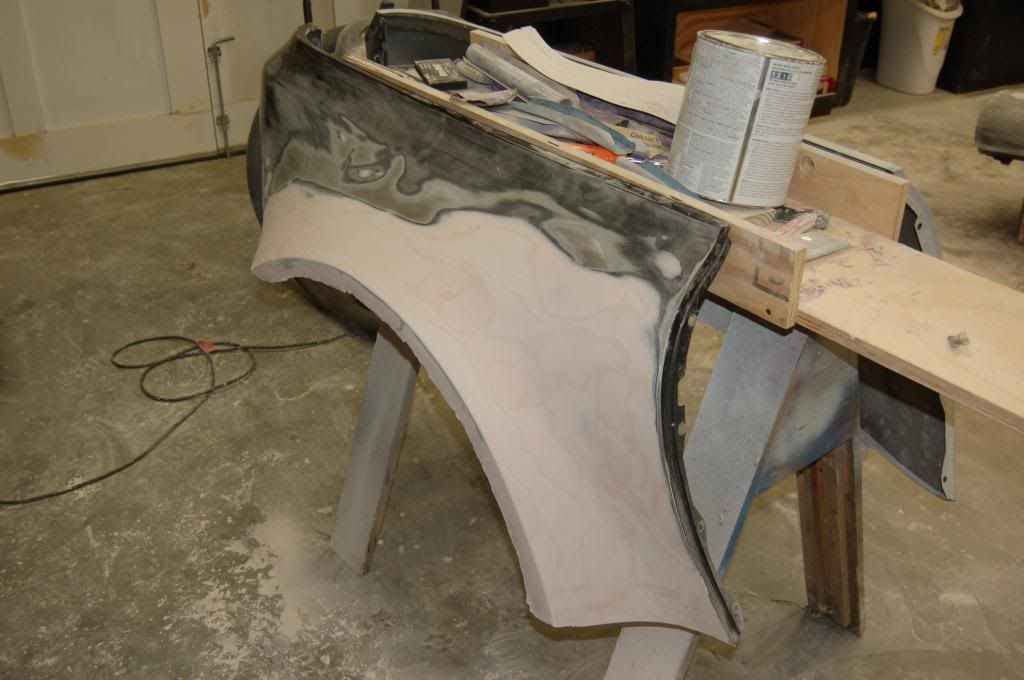
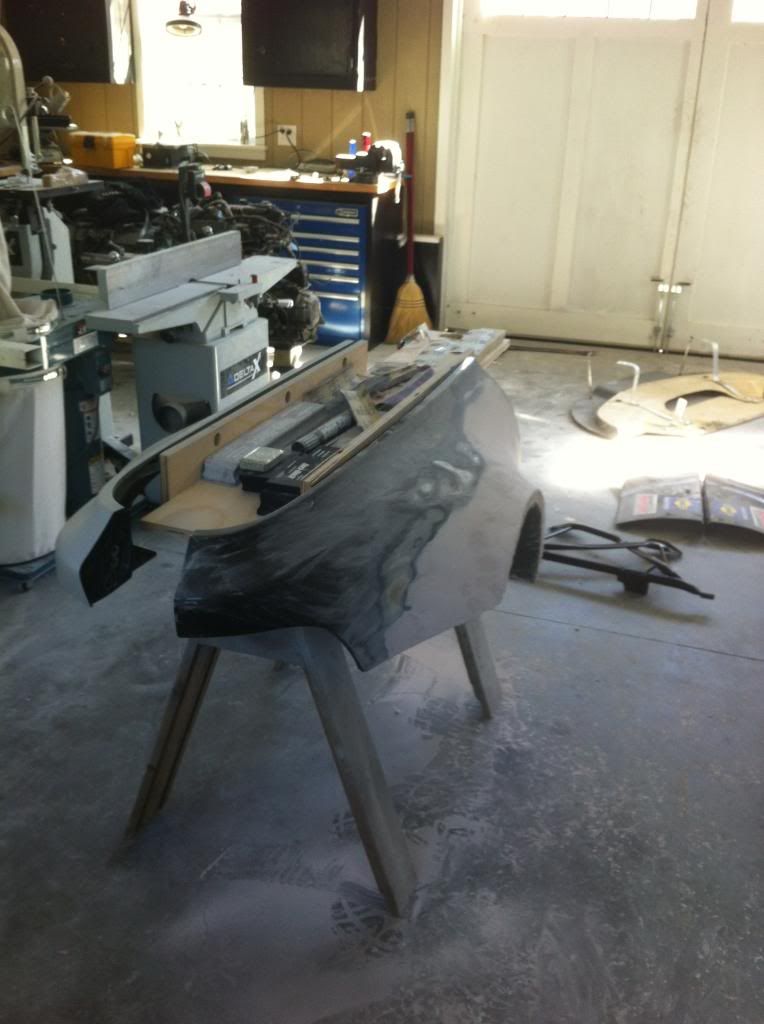
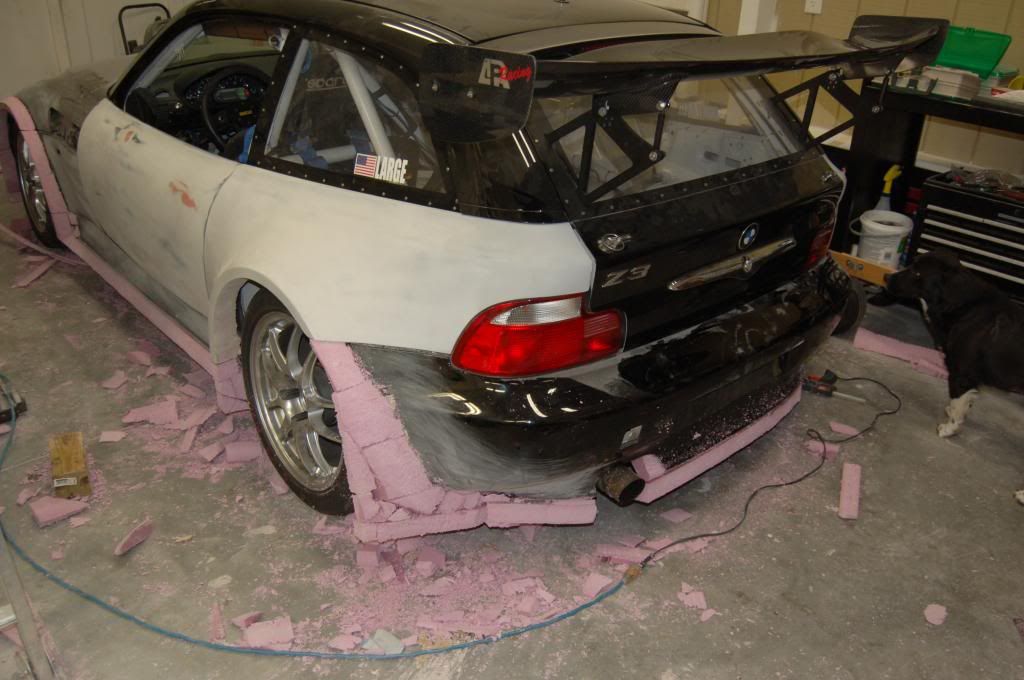
These are the male plugs or dies. I will make molds off of these and then use the molds to make the actual parts.Originally Posted by osborni

The roof must stay OE according to BMWCCA rules.
I will be adding vents once the actual parts are made. I'm going to keep them in the rear bumper and the front quarter panels only. I have to make my own fender liners so I will be shaping those to exhaust the air out of the wheel wells.
You bring up an excellent point about the sheet metal in the front wheel wells. I will be interested to see what I have to do. I will more than likely have to work with custom wheels and offsets. I took some measurements with the wheels I have now and have a preliminary estimation on my fitment and offset options. And because I have to make my own fender liners the shape of the wheel well is ultimately up to me. Thanks!Speaking from experience, stop what you are doing and fit the front tires!
My car is a widebody and I had to drastically change the shape of the well.
Of course I'm using a DOT 285 on a 10" wheel.
Here are some more pictures:
______________________________
Nick Large
Uber Fuh Raze
Designer & Fabricator
Supporting Vendor
Wow, pretty wild project. One tip from an aesthetics standpoint, take a look at the RWB 911s and how the flares integrate/flow into the body at the bottom compared to some others. You'll see that there is a slight taper and radius inward back toward the body when viewed from front or back, compared to others where the flaring continues straight down. It makes for a much more natural and aesthetically pleasing integration.
Best of luck, I've been following a gentleman undertaking a similar venture on the restoration/rebuilding of his original Alpina 2k2 widebody box-flared race car.
Last edited by MotionMotorsport; 01-14-2013 at 09:57 PM.
Exclusive: E36/46/Z3 Underpanels - GT/A Adjustable Splitters - Race Seat Mounts
Facebook for special NEWS and OFFERS- Motion Motorsport LLC
Instagram for GIVEAWAYS and CONTESTS- @MotionMotorsport
"By enthusiasts, for enthusiasts. Quality components for the street and track."
Member
Nice going Nick. I think it's going to look great. The S54 is also going to be a nice little upgrade...Can't wait to see the car on track.
Member
Thanks, everybody.
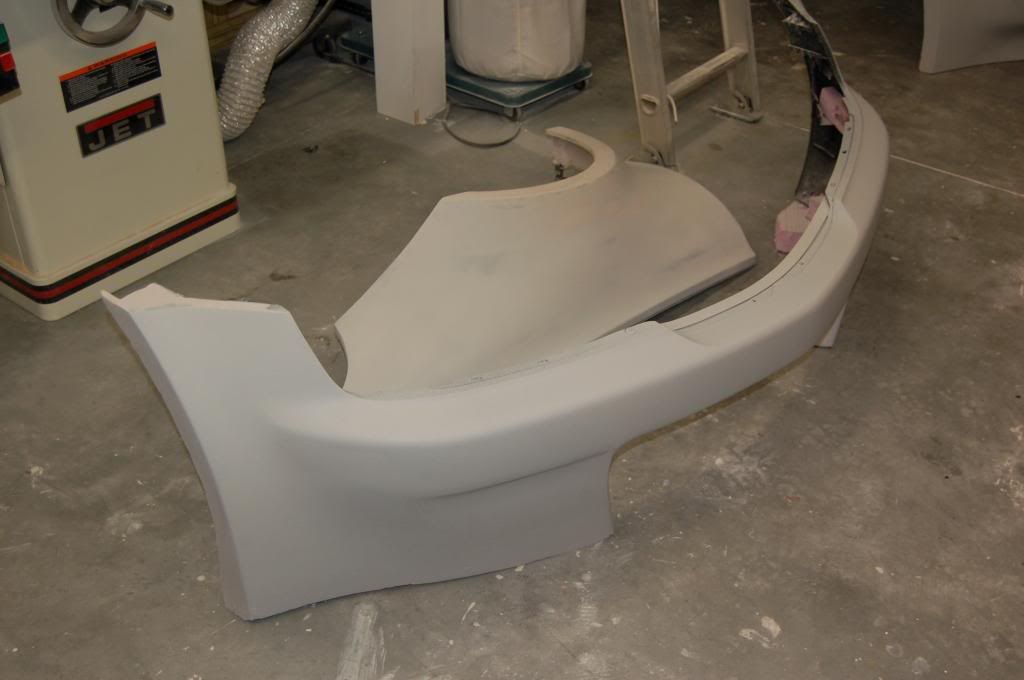
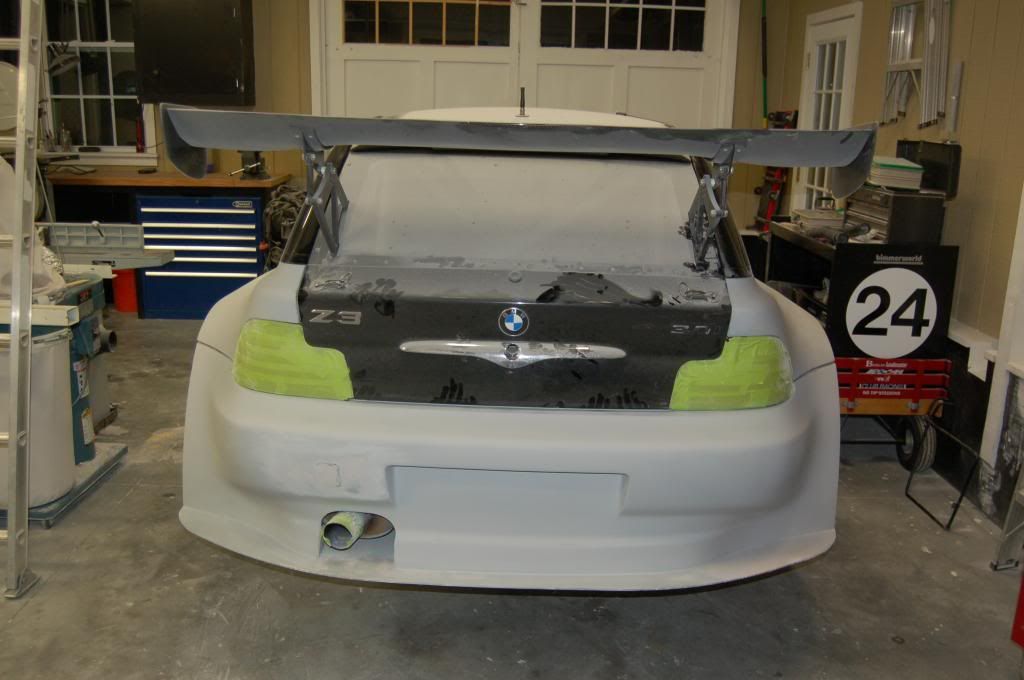
I have a front splitter and rear undertray planned hence the square ends. These photos should clear things up:
I'm using a filler primer that is essentially sprayable polyester filler. It is easy to sand and allows me to see high and low spots after sanding with a block.
I mocked up the splitter using some sign board. I only shaped the front and ended up cutting quite a bit off after taking this photo. The splitter will more than likely be made of kevlar and carbon fiber, though for budget reasons I may do two layers of kevlar on the bottom and fiberglass on the top. Both materials will require some sort of core for stiffness. The final piece will extend further under the engine to take advantage of the allowances in the rules.
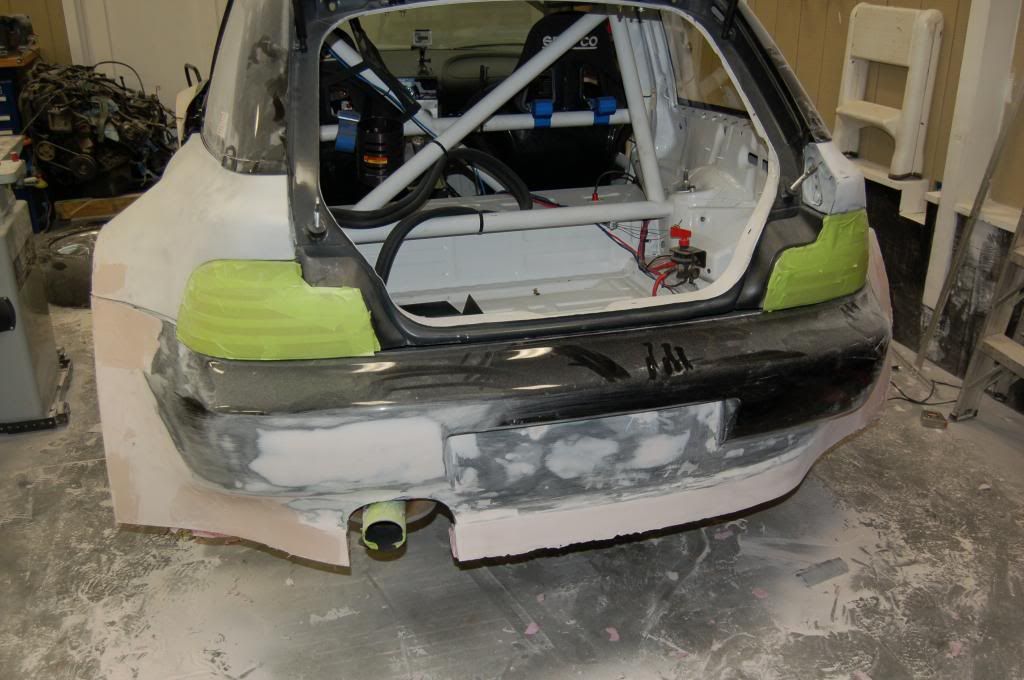
Here is the rear undertray. It's also mocked up out of sign board and will be made of composites.
It's set at an incline and will curl up at the front so air doesn't get caught behind it. I would love to run a full diffuser but since BMWCCA Mod class rules don't allow a flat bottom, a full diffuser with tunnels and the whole nine yards isn't really going to do much other than look cool. This rear undertray will act as enough of a diffuser in any case.
Last edited by Calaway16; 01-15-2013 at 10:14 AM.
______________________________
Nick Large
Member
Looks like a LOT of good work going on!! You have a great eye for things. The body looks very uniform side to side from the pictures.
I am surprised you decided to use that foam. When i have used it in the past it was very hard to sand and extremely messy. My garage looked similar to yours!!
I also never new you could remove the rear quarters on that car. That makes life easy!!!
I will watch for updates, what size wheels/tires are you planning on running?
Great job!!!
Member
This is going to look awesome once it's done!
Member
Looking good. If you spend some time making quality molds you could probably make some extra parts to sell. That's what I've done with the 911's I race and it helps pay for all the entry fees and tires (shipping is a pain though).
Member
The work looks great. It's too bad we don't know each other else I would have coached you a little bit with the front body work.
From experience if you use a tire wider than lets say a 260 and a wheel wider than about 9.5 inches you'll get rubbing only when the wheel is turned. Rubs both on the back of the bumper and front of the fender. Each of which I widened by about 2 inches. I mean it's significantly wider. It honestly threw me for a loop because I had run that wheel before, just a different tire and front shock. So the combination of a different brand tire with a different profile plus a front shock that effectively added a little more scrub made a huge net difference in tire clearance.
You won't have this problem if you use a narrow tire. I'm using an Enkie NT03 18x10 with a 25mm offset and 285/30 BFG R-1 which are really wide. Probably 5 mm or so wider then the Hoosier.
Also what rear tire and wheel are you going to use? Why did you flare it out so much? You are going to run something narrower then 320 right? I use the same tire on the rear and it easily fits inside the stock bodywork with around 10MM of clearance to the inside, this is with coil overs. So you would only need to make the fender 35MM or so wider.
Great luck with the project.
I would recommend getting your wheels and tires now. You are sort of doing things in reverse. You should get those fitted first and build your bodywork around them. Also fit the wheels and tires before you make your molds. It is much easier to change your plugs now then change your molds later.
Great luck. I don't know if you are a composites guy but would recommend spending a lot of time on your molds. Laying the stuff up is actually easy.
2000 M Coupe
[Always in progress !!!]
Member
Looking good! I'll be following this for sure.
(Have you cross-posted this in the Z3 section?)
I love TOKYO
Incredible work, subscribed!
Senior Member
BMW CCA Member
Member
Supporting Vendor
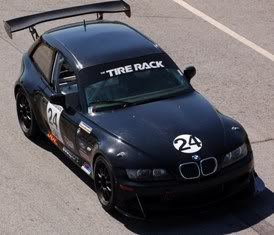
Very nice work indeed. Would love to see it painted
Member
Now that is starting to look proper!!
Maybe a tad too wide for my taste, but still not over done.
It seems sometimes once guys start modify their cars they just don't know when to stop.
It's in that process that all taste/class goes out the window.
A little restraint goes a long way.
Member
first let me say that Im amazed at the OP skill set and mojo......fantastic...and Im a coupe owner as well.
That being said I had mentioned to him the look of the flares on early 911 rsr cars..pre 74...they are very organic w/ no sharp edges....cosmetically very sexy. So..Im just mentioning this becaUSE YOU bring up a similiar point......
i always felt the factory couldve made the rear flares much more integral w/ the hatch , bumper etc......kinda like how wide 911 flares are
....and RWB as well.
Member
Haha that foam is a living nightmare. I definitely would recommend investing in the liquid expanding foam to anyone looking to do this. With this pink home insulation I had to use a hot glue gun at minimum heat and a cheese-grater-like rasp to get the initial shaping done. In the end, I could have gotten away with a lot less bondo had I put the time into the foam cores.
I've measured and mounted and measured some more with the wheels that I have. Based on what I can tell, the wheels will fit and turn without problem. That being said, the steering will have to be limited. But since this is a race car, that is something I can get away with.
I'm going to be running a square tire setup, so the rears will require some spacing out. I have something else special in the works for the rear end. I'm keeping that on the DL for the time being as I am still in the process of designing.
That might be an option. Unfortunately, i'm not sure what demand there is for full race Z3 coupe parts. I haven't really thought about this being streetable at all. You'd have to live in some place without speed bumps, potholes, roundabouts, cul-de-sacs, etc... In any case, I plan on investing a significant amount of work into the molds since this is racing, and contact happens.
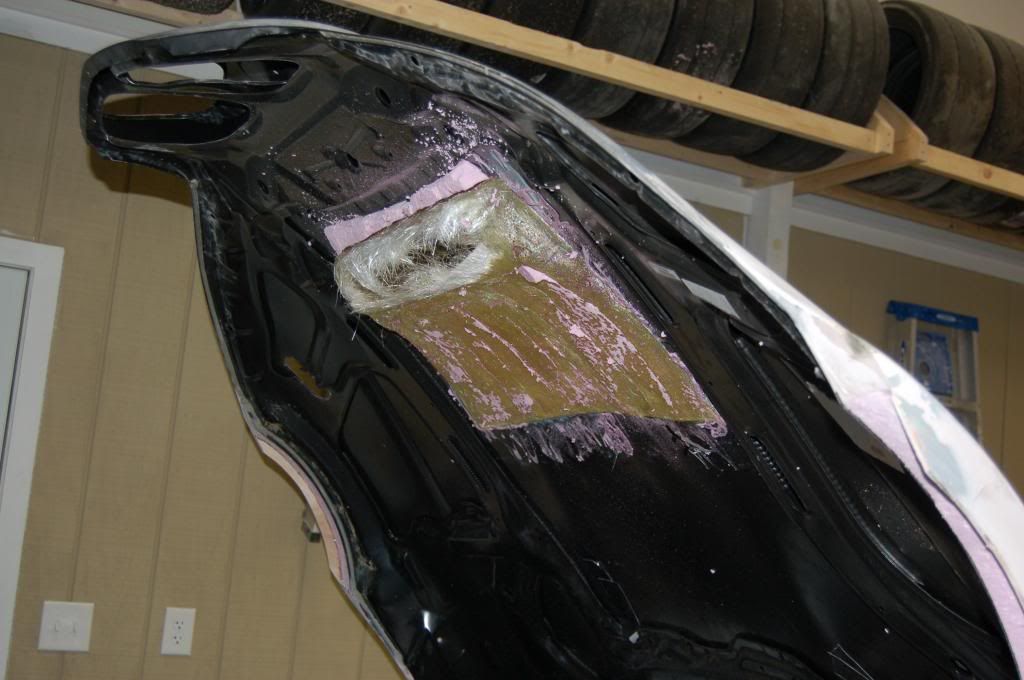
More photos, with some work on the hood:
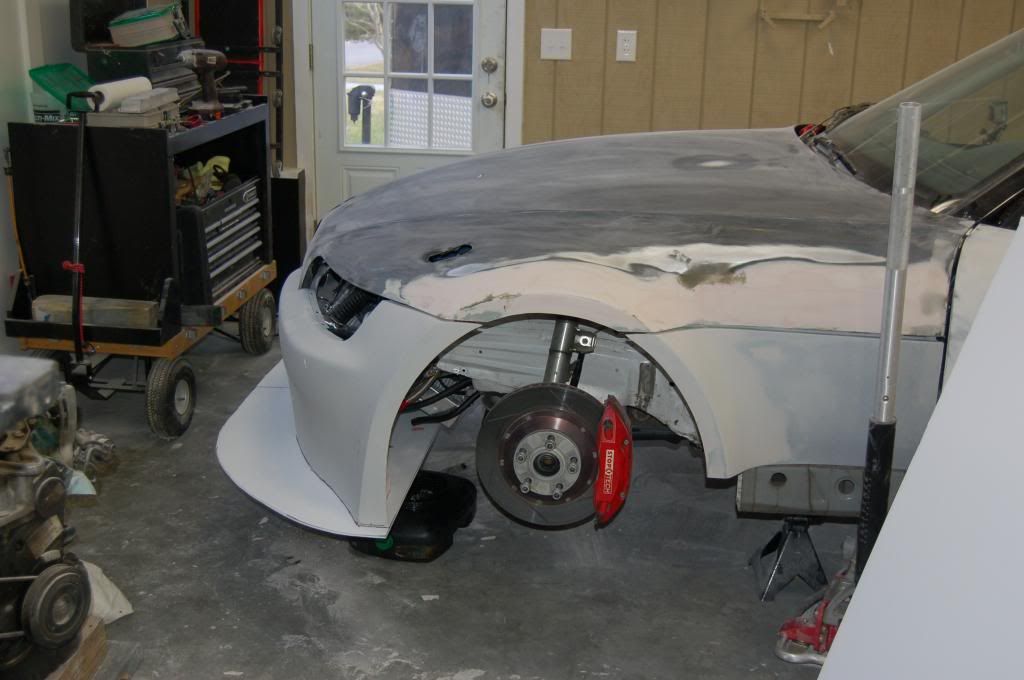
Some fiberglass formed overtop the foam from the previous picture to start the shape of the hood vent I stripped the foam after the glass had hardened so I could close the hood to work on the union between the rad vent and the hood.
Here's the radiator vent. It gets bolted in place behind the radiator and forces the air out through the hood vent. I really wish I could have done a larger vent, but the radiator is mounted as far forward as it can be and the engine is as far back as it can be without reworking the firewall. In any case, this setup is more than likely going to be more effective than my previous setup, where the radiator seemed starved for air flow.
Another coat of primer over the body sans the hood. Ready for more block sanding to get that laser straight finish.
Last edited by Calaway16; 01-15-2013 at 05:18 PM.
______________________________
Nick Large
Compact advocate
Very cool project you have going on! This should be inspiring to a lot of people to do their own one-off widebody or fender flare setups.
That pink insulation board is kind of a pain to work with. We had pink dust ALL over the garage after using this for mockups.
Past Builds:
S54 E36 Compact Build|Thread|IG|@_goldfinger|
Current Fleet:
Z4 M Coupe - Black Sapphire Metallic over Black
soon to be broke member
License Revoked
There's a lot of sheet metal in the roof that is now redundant with the cage.
Is a terrific slouch
that looks awesome man! The meat you will be able to fit under there is going to be unreal
I'm a ROLEX wear'N
Diamond ring wear'N
KISS steal'n
WHEELIN DEAL'N
Limousine RIDE'N
JET PLANE FLY'N , SON OF A GUN!
And I'm havin a hard time holdin these alligators down!!!!!!
WHOOOOOO!!!!!!
Member
Exactly! It's a very rewarding process. But you are correct about the pink board. Definitely wouldn't go that route again.
More Pictures. Spending most of my time on the hood right now. I'll block sand the rest of the body when I have a moment. I'm going to be cutting brake ducts into the front bumper after the parts are made.
The radiator is on bespoke mounts and will have a screen in front. The oil cooler is going to be mounted at the bottom, close to the splitter and in front of the radiator. Not much room to play around with.
By the way, i'm going to be having an inventory blowout here soon. I'm selling all my old wheels and usable tires.
WHEELS:
I have a square set of SSR type F's in black (17x9"), one set of staggered SSR Type F's in black (17x8 F, 17x9 R), one set of Type 42's (came with the car), and one set of Enkei PF-01s (17x9)
TIRES:
Hoosier rains (never been used) two 2254/45-17, two 245/40-17
Hoosier R6s (a dozen or so heat cycles, each) eight 245/40-17
The bidding will start at $1,000,000 for the lot
But seriously, i'll come up with some prices soon.
Nick
______________________________
Nick Large
 Posting Permissions


 Reply With Quote


 Build Thread and Travel Log


Bookmarks