
 Member
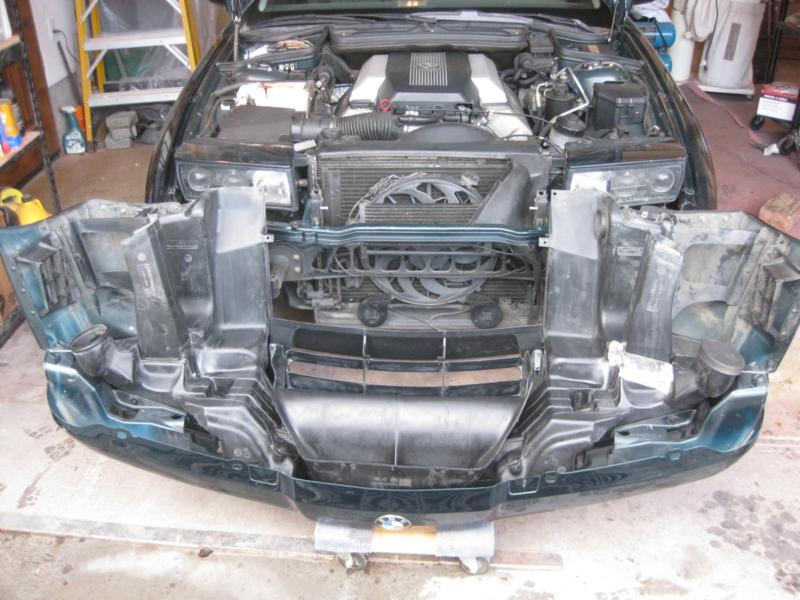
The bumper has been written up before. Here's my version where I investigate whether it is better to disassemble the nose in place or remove/install the entire assembly as a unit. I also fuss over a splitter repair.
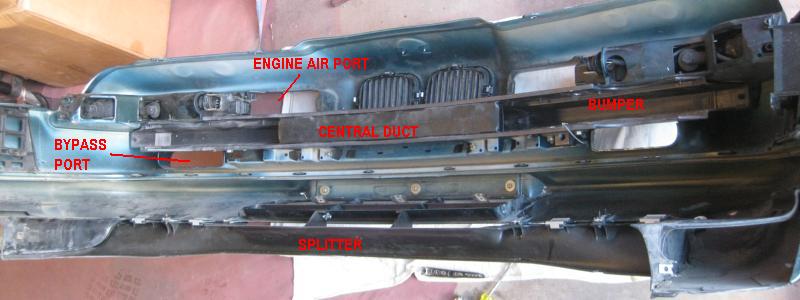
In previous nose jobs, I had been (dis)assembling the front end in-place, piece-by-piece. It occurred to me that the result has not been satisfactory. This prompted an investigation into removing and installing the entire front nose as a complete unit. There are three approaches: Pull the bumper cover, pull the cover + steel bumper, pull the cover + bumper + air ducts.
Removal sequence
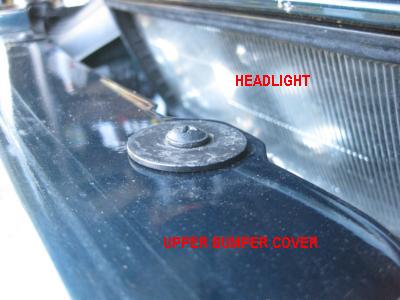
Remove upper bumper cover screws, 4 places.
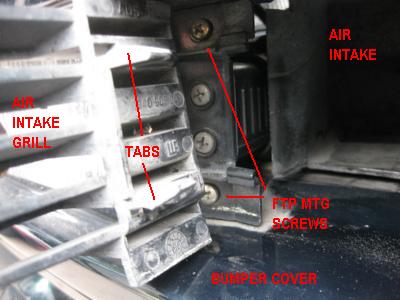
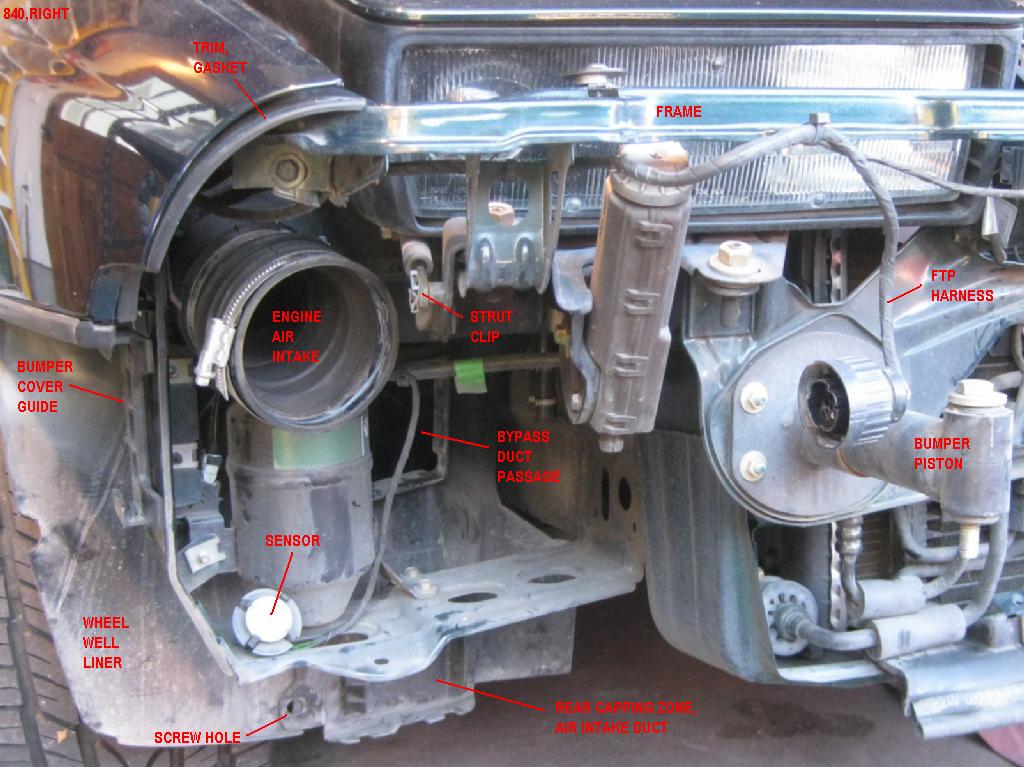
Remove the grill in front of the engine air intake duct. This is to gain access to the Flash To Pass (FTP) mounting screws. USE EXTREME CAUTION when releasing the grill's mounting tabs both ends, else you buy a new grill.
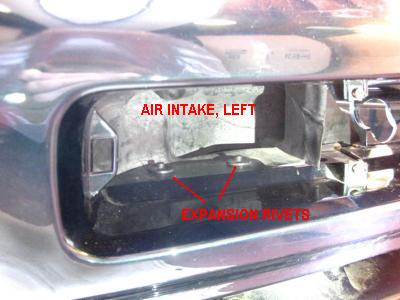
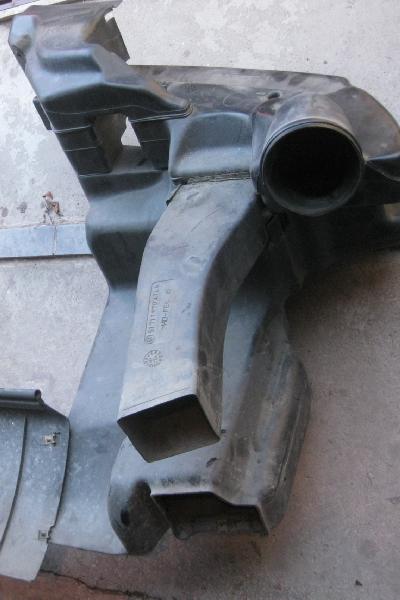
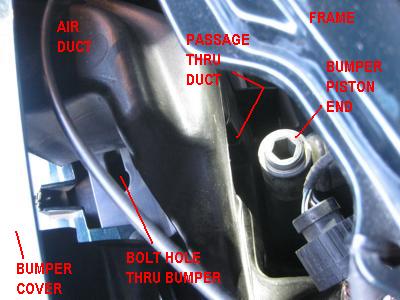
Removing the air intake grill reveals two rivets. These connect together the cover, the steel bumper and the intake air plenum. Do not remove these if pulling the nose as a complete unit.
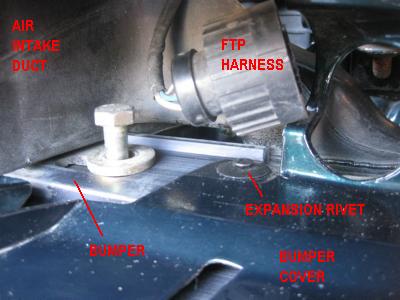
Remove the FTP, disconnecting from the harness. This will expose two additional rivets per side. These rivets attach the bumper cover to the bumper. Although they have nothing to do with the internal air duct plenum, they would need to be removed (due to a mechanical interference with the plenum) if you wanted to pull the bumper cover or cover+bumper, leaving the air plenum behind. Do not remove these if pulling the nose as a complete unit.
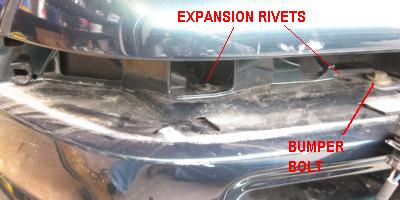
If removing the bumper or the complete nose assembly, remove the bumper bolt. Mine was a non-metric 5/8in.
Left side
Right side
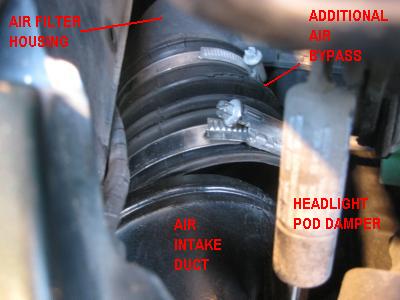
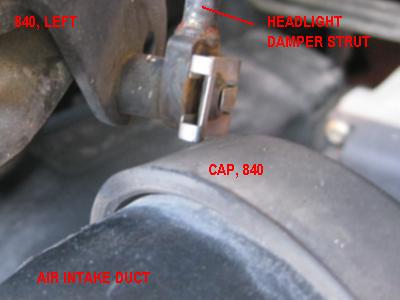
Disconnect the bellows that links the air duct with the air filter housing(s). To get a hand in there, especially during the install sequence, the headlight pod damper strut was disconnected (along with two bolts on the pod trailing edge) and the pod pushed back away.
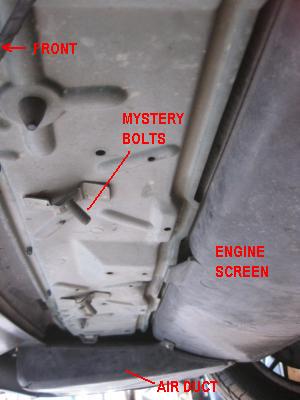
On the underside, remove the belly pan aka engine screen. BTW can anyone tell me what I'm missing?
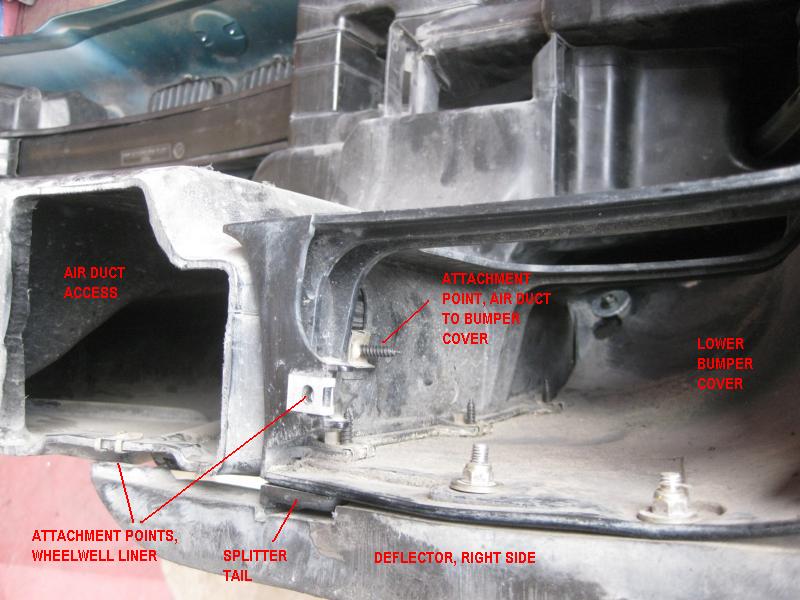
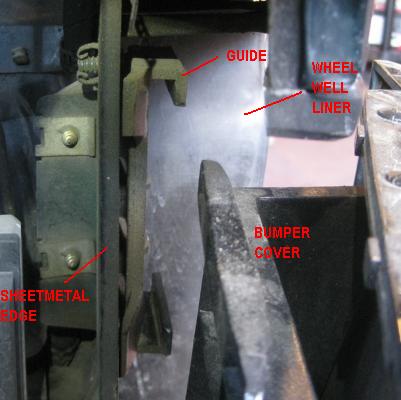
Skipping ahead to grab a visual, remove 2 screws that attach the wheelwell liner to the nose assembly. If you are removing the nose as a complete unit, you're done. Pull it.
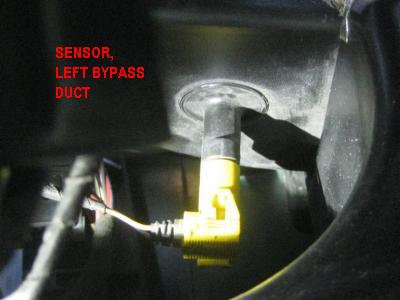
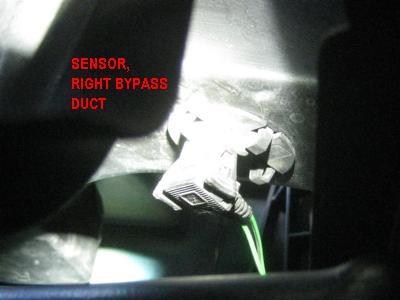
{ed: If the air plenums are coming out, after 8-inches, remove the sensors in the bypass ducts.} If you are leaving the air plenum behind then, before pulling, you will need to get past the liner, into the air duct to unscrew the duct from the lower cover.
Damage Control
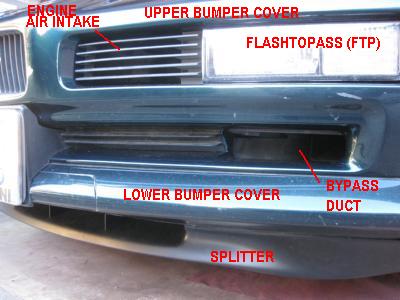
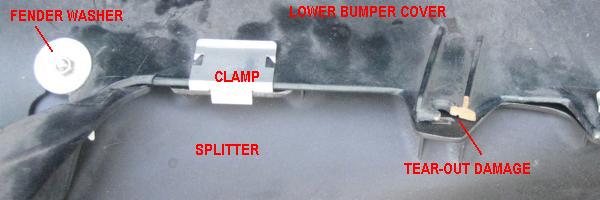
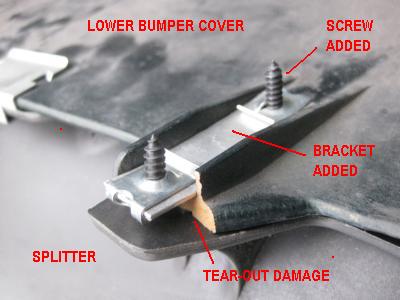
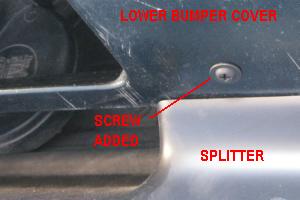
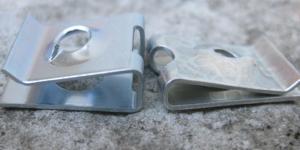
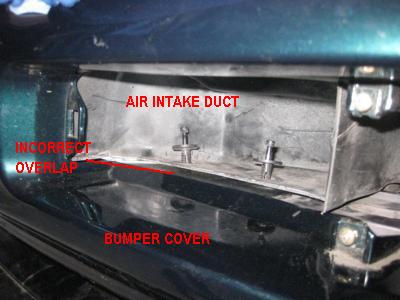
The original splitter got torn off in an apocalyptic parking lot encounter. Thinking that this could re-ocurr, the attachment method was changed by adding a bracket and moving the attachment point further in from the edge. I used a body clip around the bracket, but a thicker clip could be used to grab the entire stack of splitter, cover, duct and bracket.
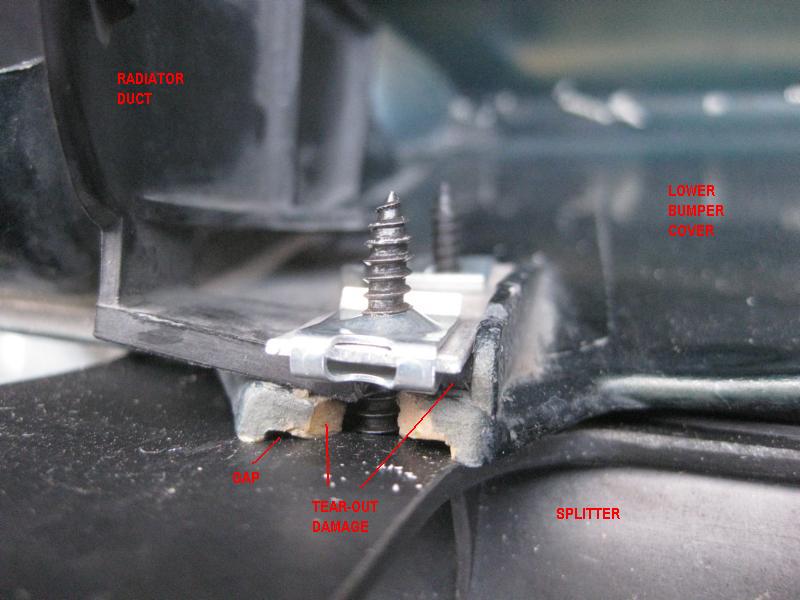
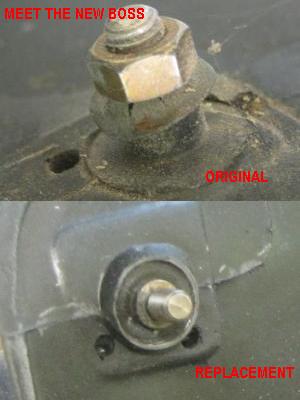
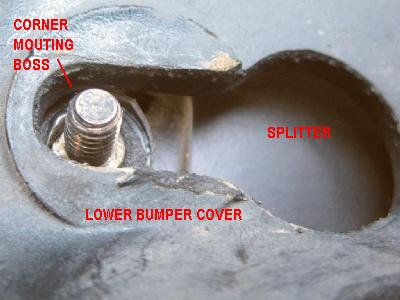
The splitter corner attachment boss was more robust on the replacement splitter. This required the receiving hole in the bumper cover to be enlarged and a fender washer installed.
{ed: Headzup. As the narrow end of the key hole/slot is enlarged to accomodate the thicker boss, you will need a washer sized precisely to cover the new edges of the slot yet still fit through the big end of the key hole. Otherwise you will not be able to install and remove the splitter from the outside while the nose assembly is installed. My decision was to go with a really big fender washer and so I will need to pull the entire nose to service the splitter.}
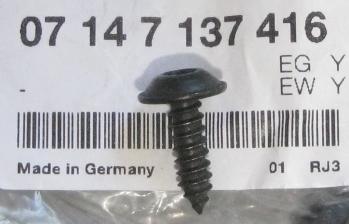
Useful hardware
Note: This screw has star drive. I used it in the radiator duct grill.
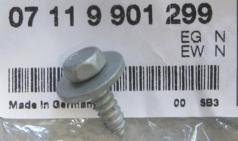
Useless hardware
Too short to reach through material and grab U-nuts.
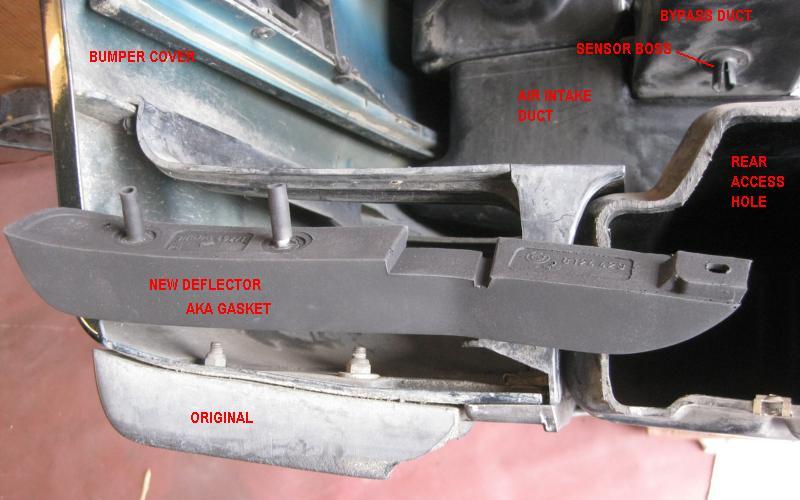
The original deflector (aka gasket) also lost the battle with the parking lot curbs.
Last edited by Hyper; 03-29-2020 at 08:40 AM. Reason: Pic link repair, again
Member
Great info thanks
Member
wow you're quick.
Assembly and Installation tips
If you are assembling in-place, get your central air duct installed between the left and right plenums, then install the bumper or bumper+cover.
If you are installing as a complete unit, place one side plenum into the cover+bumper, taking note of the overlap for both the air intake and the central duct. The 2 expansion rivets behind the FTP will need to be temporarily vacated in order to slide the plenums into the bumper. Thats the interference mentioned earlier. The 2 expansion rivets in the air intake are what sandwich the plenum in place between the bumper and cover.
On the other side, insert the air plenum into the central duct and push both into place.
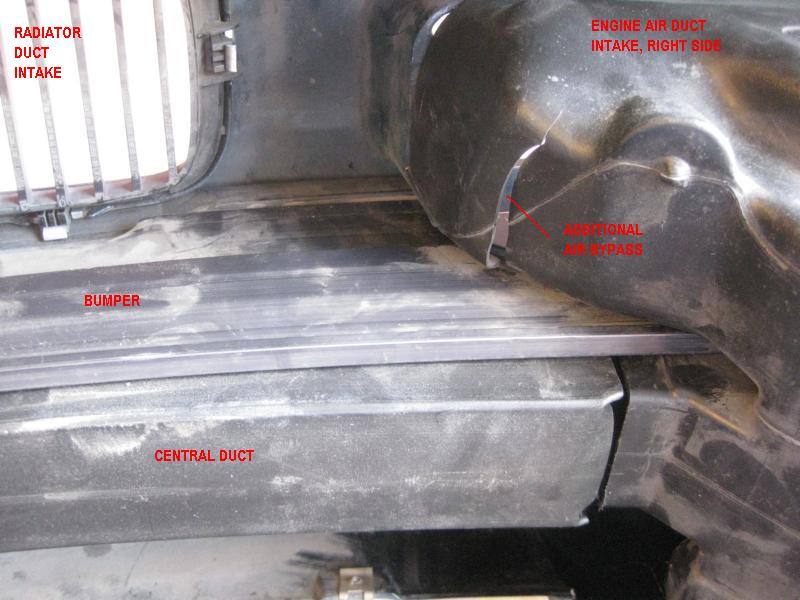
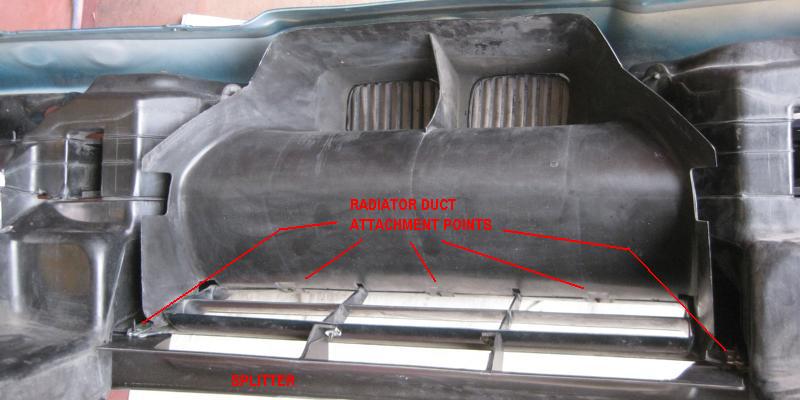
Install the radiator air duct using pretty BMW screws.
Click in the bypass ducts and you are now ready to install the nose as a complete assembly.
{edit: You'll observe in the above pic that I was experimenting with installing the radiator shroud after getting the nose back on. While possible, this required extra work in deep dark places where its difficult to get leverage. However, if the splitter is the last to go on, then you might have good access from below. As you install the nose, the radiator shroud goes to the outside of the radiator duct in the nose.}
As you slide the nose into place, remember to attach the sensors into the bottom of the bypass ducts...
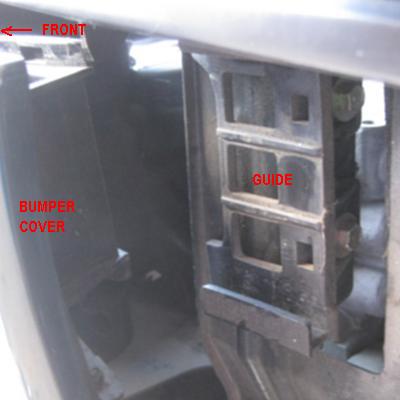
...and capture the bumper cover into the guides.
It helps if you remove the clip on the headlight pod damper strut, and also push the pod away to attach to the air filter(s).
Remember to align the alternator cooling duct and install the belly pan aka engine screen.
Last edited by Hyper; 07-12-2017 at 07:58 PM. Reason: Pic link repair, re PB affair
Member
Thanks for the writeup, I'll be doing a nose job on my '95 840 soon .
Member
Great write-up! I believe the "mystery" bolts is for the horns...
Thor-Egil, Norway
95`BMW 850 M73 Individual
Petrol Mica Blue
Professional HighSider
I made the mistake of doing this by myself once.............once
*~*Yamaguchi-gumi Syndicate Member #59,005 *~*
[ Bippu Couture ] ( D_G ) [ FALKEN Tires]
Member
Quite right. The install requires an assistant to hold up one side while you fuss over the guides and other conflicts over on the other end.
If you happen to be in the trades...a cabinet lift with perhaps a custom cradle to lift by the steel bumper and not the splitter.
Last edited by Hyper; 07-12-2017 at 08:00 PM. Reason: Pic link repair, re PB affair
Member
Thank you very much for the terrific photos. Another really timely post. What is the nose of the E31 made of?
Matthew M.
North Carolina, USA
1997 840Ci | 2001 740iL | 1985 308GTSi Quattrovalvole
Member
Elastomeric urethane I believe. DO NOT media blast it! I learned the hard way. It cost a small fortune to repair after plastic media blasting. If you need to strip, chemically strip it or sand it.Originally Posted by BobieM

Member
Thank you for the advice. Is there a chemical which can safely take the paint but not the Elastomeric Urethane?
Matthew M.
North Carolina, USA
1997 840Ci | 2001 740iL | 1985 308GTSi Quattrovalvole
Member
SEM Products XXX - Bumper Stripper
Part # 77713
That's what I'll be using when I get around to painting my rear bumper.
Last edited by Imndeep; 11-26-2012 at 05:17 PM.
Member
Thanks very much!The PO had a terrible paint job done on the nose and I'd like to clean it all up.....including all of the road rash/debris blasting up there.
Matthew M.
North Carolina, USA
1997 840Ci | 2001 740iL | 1985 308GTSi Quattrovalvole
Member
this post cou;dnt have come at a better time. I'm getting my front clip re-painted and this will for certain remind me how to put it all back together properly. Huge thanks for the pics/advice.
I swear, my cars are like a girlfriend.
Sometimes its a rough ride, sometimes its smooth motorin'.
Sometimes she doesnt like how i treat her and sometimes i dont like how she behaves.
BUT at the end of the day, she loves it when I am inside her.
Member
Nice write-up with pictures. Thanks.
SoCal Eights - CA
BMW CCA Member
+1
Member
Looks like I will be using this to get access to Power Steering Hoses, Thanks
Member
Oh MAN, I feel your pain.
I did my front splitter tear-off on the first day of the BMW Festorics a couple years ago.
I was so excited that the hotel had underground parking, I failed to read the underground entry warning sign and/or recognize the impending dangerously steep slopped driveway "danger", hard landing.
Of course the noise turned heads of other BMW owners and one individual offered their condolences of horror; and said, that looks bad!!
Spent the afternoon walking around the small rural town (the 8 could not be driven) locating the necessary nut-driver and duct tape to get me through the weekend.
My wife was a trooper and I was able to repair the damage sufficiently to get on with the weekend festivities!! Thank goodness for 200 MPH tape!!
To correctly repair the front-end damage the DIY cost was close to $2k, but I'm unusually obsessive and I replaced all the damaged parts to include both air boxes as I did want to leave any evidence of my error in judgement.
Just encase you were unaware the mystery bolts you noted are the original horn mounting studs and the stud bracket is replaceable p/n: 41 13 8 108 805.
They are a spot-weld on part, but I decided they would be better as a bolt on replaceable part so I made a backing plate with studs to attach through the cross-member the bracket. Of course the radiator needs to be pulled (good time to replace it) to install the backing plate.
My 8 has the Euro CSi oil cooler and while I searched for an alternate location for the horns I decided to leave the horns in there original location and just be more careful!!
Last edited by m6bigdog; 03-29-2020 at 12:24 AM.
Member
Hi. The signed sensor is for ,what?
sensor.jpg
Member
Re: Sensor >> Air temperature.
Mounts to the bottom of the right-side bypass duct, which is not present in the photo.
Fyi, there is another air temp sensor on the left-side duct, in a different style.
****
Regrets, these pics from Nov 2012 were labeled in a red text, which has very poor anti-aliasing (sharp vs jagged edge) performance.
Since then I do text in white which uses all the rgb pixels, provides the best definition.
Someday I might go back, clean up the pics, but its low priority.
Member
Air temperature for engine or IHKA?
Member
Screenshot_20200417-090532_Chrome.jpg
These are the horn mounting studs. Most 8 owners relocate the horns above this metal lower section.
Member
I'll have to look at this as I am having trouble getting a new kidney grill installed with everything in place. In fact, I ruptured a disc in my back contorting myself while trying to do this. I'm recovering now from surgery so in about a month I will probably try to get that grill in place, being careful not to mess up the back again.
EricinConejo
1995 850CI, 1959 Chev Impala, 1965 Cessna 172, 1986 Mustang GT, 2002 Mustang GT, 2005 Dodge Durango Hemi, 2016 Land Rover Discovery Sport
Member
hi all, what is the purpose of the 12mm hex bolt that sits inside the front bumper absorber strut/piston which has the 17mm bolt through it (metal bumper carrier actually bolts to this strut).
I was hoping it would raise and lower the bumper fitment a bit, but regardless of which wat I rotate this 12mm hex bolt, it does nothing, so I'm at a loss for what its for, and repair manual shows this absorber strut but says nothing about the adjustable 12mm hex shaft
I swear, my cars are like a girlfriend.
Sometimes its a rough ride, sometimes its smooth motorin'.
Sometimes she doesnt like how i treat her and sometimes i dont like how she behaves.
BUT at the end of the day, she loves it when I am inside her.
Member
I think it is there to finely adjust the fitment of the nose assembly in its entire-ty The steel bumper section inside the nose assembly rests on these two adjusters. Then two bolts attach the steel bumper to the top of these adjusters.
The bolt actually goes through the adjuster.
Member
Agreed, but while I had the bumper on the car, I removed the 17mmbolt & I twisted the right side adjuster all the way up and down, and nothing happened to the height of the bumper. I assumed that the adjuster inside the bumper shock absorber was for fine tuning but I see zero difference.
Sent from my Pixel 3 using Tapatalk
I swear, my cars are like a girlfriend.
Sometimes its a rough ride, sometimes its smooth motorin'.
Sometimes she doesnt like how i treat her and sometimes i dont like how she behaves.
BUT at the end of the day, she loves it when I am inside her.
 Posting Permissions


 Reply With Quote
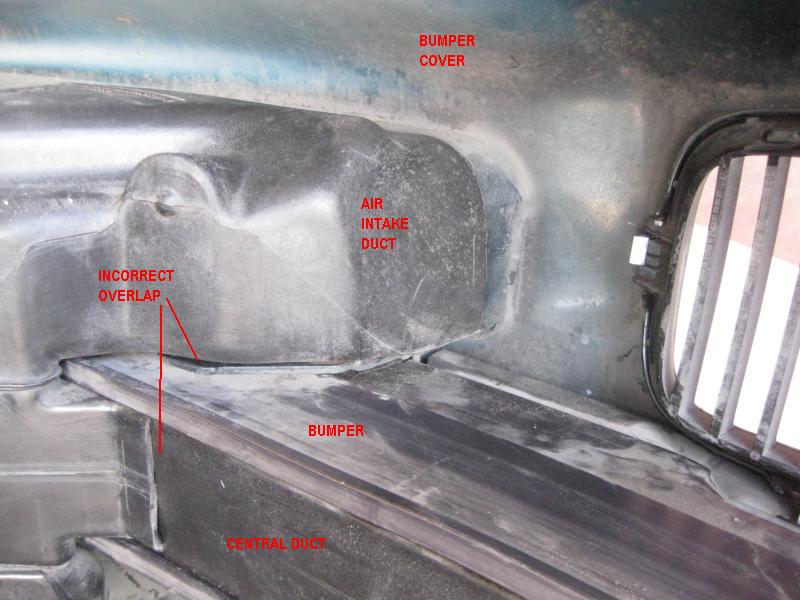
Bookmarks