
 Member
my favorite part of the bay treatment is your homage to Edward Munch's "The Scream" on the drivers' inner wheel well. Nice touch, Bobby.Originally Posted by purduinaM3


Last edited by Cosmos Kramer; 01-04-2013 at 09:53 PM.
Member
Just saw this; sorry, no pictures of the wire routing really, I posted majority of the pictures that I took. When you get in that deep it's hard to remember to stop and take pictures of everything

Member
these pretzels are making me THIRSTY! or maybe I have no saliva left in my mouth. dat bay.
Last edited by Cosmos Kramer; 01-04-2013 at 09:49 PM.
Member
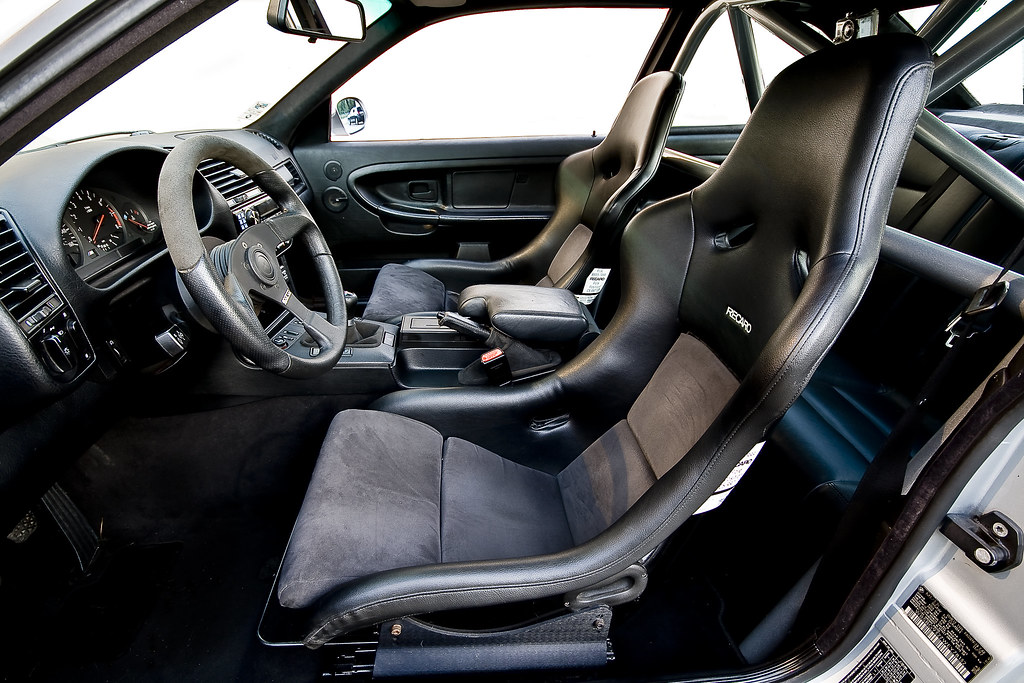
Any pics of your roll bar?
Great execution, attention to detail!
Member
Great job! That's some good execution for accomplishing that in two months! Looks awesome!
1997 Estoril Blue/Modena lllM3, 5spd, Sedan
2003 Titanium Silver/Black 330XI, Auto, Sedan
Member
Unfortunately this is the only decent one that I have
Thanks! Unfortunately I couldn't work on it every minute of every day or it probably would have been done sooner. And unfortunately it happened at the beginning of the summer, so it was 2 months of the best weather to be missing. But at least I didn't have to wrench in a cold garage!
S38 PWRD
Wonderful build! I really like your car. Its the perfect combination of clean, sporty, OEM and custom.
Member
Be my mechanic?
Member
That's quite the compliment, thank you!
If you were closer, then hell yeah!
Member
YES YES 1000X YES!! Thats the money shot I'm going for. Info on cage and wheel please. Also props on the rebuild. Do you have a running total and what the new parts cost you and where did you buy? I pulled the motor out of my car on Monday currently in the midst of doing research on where to buy the goodies.
Thanks in advance,
Mark
Mods: obd1 s52, SS replica headers, SS race mid-section, SS exhaust, euro intake, 3.5" hfm, turner tune, 24lb injectors, uuc flywheel, m5 clutch.
Bear Motorsports
hahaha.. full run down... try 10s of thousands of dollars....
"Torque is like cowbell... you can never have too much." - Michael Cervi
Member
My budget is $1200. In your infinite wisdom, do you think I can make this happen? That's parts labor and assembly included!! Considering I pull and install the motor myself.
Last edited by 95s52; 01-17-2013 at 05:29 PM.
Mods: obd1 s52, SS replica headers, SS race mid-section, SS exhaust, euro intake, 3.5" hfm, turner tune, 24lb injectors, uuc flywheel, m5 clutch.
Bear Motorsports
you posted an interior shot, talked about wheels, and his engine bay/motor build..
care to elaborate what information you EXACTLY want?
Come on Mark, you are not new to this")
"Torque is like cowbell... you can never have too much." - Michael Cervi
Member
Cage is custom, wheel is the Sparco Lap 5. Running total? Yes, but would prefer not to share, or even be reminded of it
1200 for what? The motor build? Not if you go anywhere near as far as I did... I don't have the full spreadsheet on my new computer but the engine build was probably triple that when all said and done, and that's with me doing 100% of the labor myself. I did full assembly and everything except machining the crank and hot tanking the head, which barely cost anything at the machine shop. Adds up quick...
Member
I don't see where you're dropping that type of coin when it comes to the rebuild. I'm not looking to replace anything but gaskets (all), seals, bearings, rings and bolts. Maybe the chain tensioner. That puts me at $400-700 depending on how fancy I want to get the with parts. I renewed my cooling sys <500mi ago so everything stays as is. Pistons/rods are being reused. The head is being shaved, checked and reassembled. The hp to $ ratio does not make sense to me to invest in the head. I have a local guy that goes great machine work for a very reasonable price. Only downside is his turn around time. Head work and bottom end assembly is going to run me ~$500.
What am I missing?
Mods: obd1 s52, SS replica headers, SS race mid-section, SS exhaust, euro intake, 3.5" hfm, turner tune, 24lb injectors, uuc flywheel, m5 clutch.
Member
Sorry, you were asking about what my build cost in a very broad question. Had no idea what your plans or intentions were.
Here are the main parts:
Lower Engine Gasket Set: $100
Head Gasket Set: $300
Front Crank Bolt: $11
Main Bearing Bolts: $77
Head Bolts: $32
Rod Bearing Bolts: $30
Rod Bearings: $75
Main Bearings: $175
Upper Timing Tensioner: $54
Hydraulic Tensioner: $120
Then there's the little stuff like exhaust studs and new nuts, pressure plate/flywheel bolts, etc etc. That's $1k right there, adds up quick. On top of that, I bought the S54 oil pan and pump, Euro Expansion Tank, Stewart Water Pump, S54 Rad, Spal Fan, new Alternator, all new pulleys/tensioners, headers, Catch Can, shaved and painted bay, etc etc.
Also, new piston rings are $700-800+ if you go OEM. I searched high and low and had some made for $100 from a supplier, but that adds to the cost. Add in machine shop cost and anything I've forgotten, and you're well past your budget. Not to mention any tools you might need that you don't have etc.
Last edited by purduinaM3; 01-17-2013 at 07:41 PM.
Member
nice build. didn't know you can use an s54 pump and pan. any modification to make it work with xbrace?
Member
No modification to the X brace or anything of that nature, but you do have to add some brackets to the main bearing caps and block off some sensors on the pan. Theres a thread on here that shows all the part #'s that you need, and its far better than a baffle setup.
Member
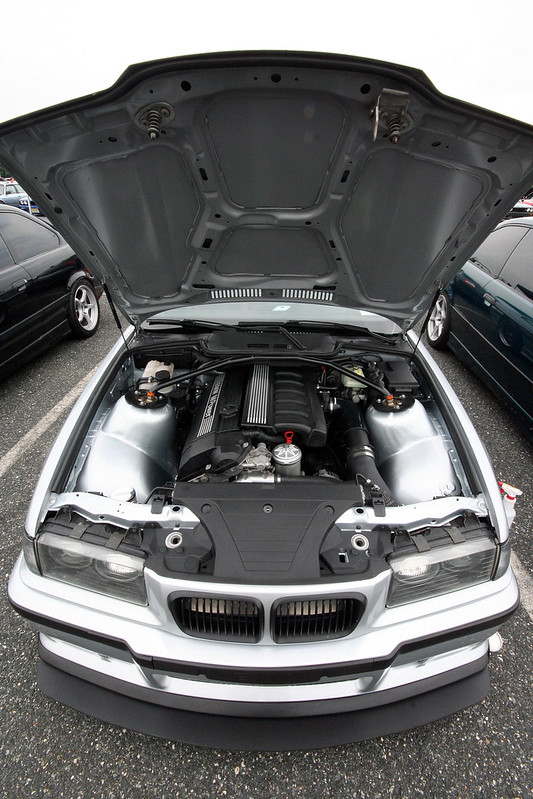
Wow! That's some seriously impressive work. I don't think I've seen another shaved e36 bay so nicely executed, with a nice mix of OEM purposefulness and custom touches but without going too far into hot rod "smooth butter" type shaving.
Did you relocate your washer bottle or delete it entirely? I notice you said that you rarely use the wipers, so I think I know the answer to this...
Regarding the wire routing, on the passenger side does the wiring enter the cavity section before the fire wall and on the driver side does it enter just in front of the fuse box?
Does your catch can run direct to atmosphere or is there a vacuum line to pull the vapours out and into the can?
Finally, what are the three multi-pin connectors between your brake booster and fuse box for? I can see the diag. port on the passenger side, but having a right hand drive, 4-cylinder (M44) I don't recognise the others; possibly COP rail etc.? [EDIT]: These are the X20, X69, X6031 (f->r) connectors for anyone wondering.
My apologies for the amount and silliness of the questionsat least they're somewhat on topic

Last edited by RouteZeroDesign; 01-21-2013 at 09:28 PM. Reason: Researched some more.
AH MUNNA EAT CHOO!!
S38 PWRD
Hot damn.
Member
Thanks a lot!! I'll try to answer all your questions..
Washer bottle was deleted. Car doesn't see snow, winter months, and rarely rain (only if I'm caught out in it), so no need for it. I never even let the car get remotely dirty, its washed as often as I can.
The passenger side wiring was all either deleted or relocated. There's an OEM hose for the Euro expansion tank that I snaked up through the cavity but that's it. Drivers side goes from the front of the fuse box into the cavity and then comes out under the rad support.
Catch can vents to atmosphere with the filter on top. Might eventually pull vacuum but for now it functions just fine.
Three Multi-pin connectors on the drivers side are the X20, X69 and X6031 as you've already found.
Hope this helps!
Yup, easily a 3-4k job doing ALL the labor myself. Well worth it in the end though.
Member
Thanks for help
With my catch can I pulled vacuum from the EGR valve as it is effectively in-line between it and the cam cover. I found it wouldnt run smoothly without pulling vacuum but that's probably due to the lack of dampening in my temporary can.
Thanks again for your help
@M3AMI
First off I'd like to say that I, like everyone else here, I am a huge fan of your build. I think it looks super clean and you did a really great job making everything work. Eventually this is something I'd like to do myself, but many years down the road when my bank account gets quite a bit fatter.
Just a couple questions if you don't mind... Would it be possible to use the euro radiator cover without converting to the euro cooling system? I think it looks much much cleaner than the US one. I've already searched "euro radiator cover" and nothing of value comes back. My fan shroud is cracked where the bleeder screw is so I'll definitely need to replace that and wanted to make sure the euro cover works with the shroud since it looks like you're not running one. Thanks!
@M3AMI
96 BG/Magma Lux
Mods. Lots of Mods.
Member
BMW E36 M3 Expert
I like its appearance too, but I believe that the Euro cover doesn't provide the cold air duct to the alternator:
The Euro M3 routes its alternator cooling from below:
Of course there are plenty of people who do without that duct for one reason or another. It would depend on the sort of electrical loads your car sees.
Neil
Member
Best build thread ever.
 Posting Permissions


 Reply With Quote


Bookmarks