
 Member
Finally got done with my 2 month project and figured I'd share some pictures. This all started when I spun a rod bearing at an auto-x, and was all downhill from there.... seems like all my projects always end up in a similar spiral
Got the motor pulled out fairly quickly. I didn't think it would be that painless to pull, but BMW really made it simple to pull with a harness that disconnects easily from the chassis. Some people have been able to do this with the front end attached.... I'm personally glad that I took it off, it wasn't hard at all and I couldn't imagine trying to get it out and then back in over the whole front end. I pulled the tranny and got it put up on the engine stand, stripped it down and then went digging for the carnage....
Rod bearing on cylinder 5. Kinda figured that, so I brought the crank to my machine shop to get checked out. Since the rod was stretched after checking it, I had to pull off the head to replace it. At this point, it was time for a head gasket and piston rings on at least one cylinder, so I figured to just do an all out ground up full rebuild.
Had to figure out how to get the crank pulley bolt off that's rated at 225+ ft/lb while the motor was on the stand with nothing to stop the crank from spinning. Put a used flywheel bolt in the crank with a deep socket attached and spun it until it went up against the engine stand, and then used my Snap-On MG725 to do the rest of the dirty work.
After that, a few bolts and the crank was out!
Dirty workbench after a long night of wrenching:
At this point, I decided to go all out and paint the block and shave and spray the bay. Took some elbow grease, but after a few hours with a wire wheel on an air drill, I got the block down to bare metal.
Next I had to clean all the carbon build up on top of the pistons and prep the deck of the block.
I pulled all the pistons/rods out, labeled them, and got a new set of piston rings from Hastings. I had to file them down a thou to get the gap within spec, but it wasn't too bad. 3 piece oil rings add a nice touch. I prepped the cylinder walls with Total Seal Quickset, which is awesome stuff and turns green when the walls are clean enough and black/silver if they're not.

Last edited by purduinaM3; 11-30-2012 at 12:26 PM.
Member
I didn't take many pictures here, but next I shaved the bay and removed 7-8 brackets that were going to be unused and I used a wire wheel to remove all the seam sealer. I also welded up new brackets for the Euro reservoir, sanded and prepped the bay, and got ready for paint. I set up a small "paint booth" in the garage and had a buddy come over who paints for a body shop to spray the bay.
aaaaaaand the finished product, a few hours after it was sprayed, before wetsand/buffing:
After wetsanding, buffing, and applying some Collinite 845:
Back to the motor. Got the crank installed, checked all bearing clearances with Plastigauge, and rotated it for the first time by hand. Everything felt great, so it was time to put it all back together!
S54 oil pump and oil pan setup so that this won't happen ever again!
Test fitted the AA Track Pipe section A
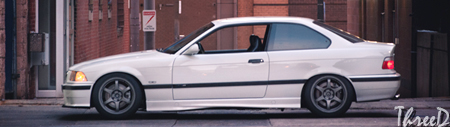
Got it all back in the car where it belongs....

Last edited by purduinaM3; 11-30-2012 at 12:34 PM.
Member
Very close to being finished in these pictures. Here's where I'll share some of the build specs. First off, I decided I didn't want the mess of bullshit under the M50 manifold.
-PCV/CCV was deleted and instead I ran plumbing from the valve cover straight to a catch can. I believe that the CCV was backing up and dumping oil back into the intake, and that's the reason why I was low on oil in the first place. Now I'm going to check the catch can and oil level religiously and add when needed.
-I deleted the coolant lines running to the TB. I added the euro reservoir setup, along with the euro hardpipe, so there was no hardpipe line going to the TB, and then I just used a M12x1.5 to 1/8 NPT fitting from BW for a water temp sender.
-The euro hardpipe also deleted the US hardline that runs under the manifold to the soft line that runs to the current expansion tank.
-I deleted the SAP, which allowed me to delete the two small vacuum lines that run around the motor from the T off the mani to the hardline by the vanos.
-I deleted the evap purge valve and used a 1k 1W resistor to simulate it still being there. Deleted all the vacuum lines and dumped the blue hardline from the evap canister under the car.
-Deleted the IM brackets, since they do nothing but get in the way. I know the manifold won't be fully supported - I don't plan on using it as a seat any time soon.
After all of this, here's what was left from my M50 manifold kit:
And the view from under the manifold!
There's so much room its unreal, and installing the M50 was a 10 minute job.
Here's my SAP simulator:
Here's where I mounted the Moroso catch can:
I deleted the coolant lines that run to the throttle body. The nipples that stuck out of the TB looked tacky so I cut them off and painted the entire TB black to match the rest of the intake system:
I deleted the stock fan shroud and installed a Spal 16" curved blade puller fan on the backside of the radiator. Also note the Euro radiator cover and the cleanly installed factory line that runs from the radiator to the Euro reservoir:
I deleted the battery terminal box that sits where the Euro reservoir now sits. I used these to bolt the power wires together through their respected ring terminals. I believe an M6 and M8 both fit perfectly:
I didn't like how you could see the power wires through the hole under the reservoir, so I fabbed up an aluminum panel to cover it all up. I was going to paint it but decided to leave it exposed aluminum; it blends right in with the Silver and you honestly don't even notice it unless you're looking for it!
Shorty headers:
Almost done:
I'll have to get some better pictures of it all finished that aren't taken with my iPhone. I'm installing a black wrinkle powdercoated valve cover and a powdercoated black strut brace, and a few other small finishing touches. I personally love how it all came out, and learned a ton during this project. Besides a pesky crankshaft position sensor throwing a camshaft position sensor code, the car fired RIGHT up and had zero issues. Not having to bleed anything with the euro reservoir is awesome, and the car pulls like a freight train. I also saved about 100+ lbs from the front end after weighing a box of parts that I removed.
Also added this gem while the car was down:
Its a 3.46 built by Dan the Man at Diffsonline, with 3 clutch packs and 30/90 custom ramp angles.
Last edited by purduinaM3; 07-13-2012 at 01:59 AM.
Member
right on. you didnt waste any time.. a very nice project for 2 months. That differential is purrrrty.
senior LOUNGE creator
Good work dude. Do you still go to the bear mountain runs?
If liberty means anything at all, it means the right to tell people what they do not want to hear.
― George Orwell
Member
Member
Amazing work as usual. Seeing pics of your car always makes me reconsider my immense hatred of silver E36's
Estoril Blue II / Coral Red F30 335i || DAILY
Cosmos / Black E36 M3 || Parted Out
Hellrot E36 325i || Parted Out
S13 240sx SR20DET || R.I.P.
Technoviolet / Modena E36 M3 || SOLD
Avus Blue / Dove E36 M3 || R.I.P.
Briliantrot E36 325i || SOLD
Member
I'd give up a child for your car, Everything looks incredible. I want my car to be as well sorted as this at some point in its life, thanks for sharing this.
BimmerHeads
Wow, that's some GREAT work!!
Senior Moment Member
BMW E36 M3 Expert
Just wondering why you didn't have the block hot tanked? It would have saved you from using a whire wheel? I would have been afraid of all the crap that might have been in the oil galleries, and passages.
But it does look nice.
No matter where you go, there you are...
Member
Really nice build. What was the reason why you put the catch can on the passenger side? I need to install one on my car and trying to figure out a good place for it.
Euro Fiend
This is beautiful, don't often see bmw people shaving bays
Member
This is absolutely gorgeous. Well done.
96 320i Touring
98 Z3 2.8 Roadster
01 PY M Coupe
96 Z3 1.9 - DASC
95 318ti Clubsport
94 Miata M-Edition
13 smart fortwo
Member
Thanks everybody.
Rich - It's hard to tell in the pictures, but I had the entire top of the block taped off and sealed while wire wheeling it, if you look again you can see the blue tape. The motor was always straight up while I was working on it, so I don't see how any debris could have entered through the bottom. I heard that there may be some issues with hot tanking an S52 block, and honestly didn't want to have to strip it as far apart as I would have needed in order to be able to do that.
As far as the catch can, the Dinan CAI paired with the Euro ZKW's takes up all the room on the drivers side, and I didn't want to mount it under the M50 since it needs to be easily accessible to drain and check. It fits perfectly where the AC dryer was mounted, and the previous holes in the frame rails couldn't have matched up with the mounting bracket better, so it was a no brainer.
Member
shouldve just swapped in an ls3
nice work.
Diff cover ftw. I saw a euro car a few weeks ago with an alpina one. do want
Member
An LSx swap has been on my to do for years now, and WILL happen. That's what the diff was for. I wanted to start collecting parts for the swap this summer, but the rod bearing was an unexpected failure. I didn't have the money to do the swap now, so the car would have been down for the better part of a year, and I wanted to finish out the rest of this season. I'd rather drive it while I gather everything I need and then have a fresh S52 to sell when I'm ready. At least the bay is ready for an LSx now, and the euro reservoir will be used with it.Originally Posted by breakfast

Off-Topic King
something I missed, Boobs....
did you send the crank out to a machine shop? what exactly did they do t fix it?
If so, did you have to use oversize rod bearings?
Member
Sorry Rich, I saw your question but forgot to reply. The crank went to a very reputable machine shop locally and was checked and put on the magnaflux machine and was found to have no cracks. They simple gave it a quick polish and it was well within spec, so stock sized rod bearings were used.

Off-Topic King

Bimmerer
So beautiful!
Member
This whole thread:
Member
Awesome stuff right here!
Member
Very inspiring thread, absolutely love it!
Member
BMW E36 M3 Expert
Nice to see someone rebuilding their motor instead of making a trip to the junkyard. Good work!
A couple of quibbles though—and after all isn't that what we're here for? :-)
- That festival of hose clamps under the intake manifold really isn't up to the very high standard of your work everywhere else. Yeah, I know it's not normally visible, but you know it's there and now so do we. There are better solutions.
- Your Euro radiator cover eliminates the alternator cooling duct, and that's not a good idea. The Euro alternator has its cooling duct underneath:
BMW didn't provide a cooling duct for the alternator just to keep its design engineers busy.
Neil
Member
Oh my god.
-Chris
 Posting Permissions


 Reply With Quote


Bookmarks