
 Member
I bought mine from guy on ebay - he rebuilds car electricals and has a lot of good feedback, you should be able to find him, if not I can digOriginally Posted by olinjohnston1

Oleg.
Member
Not too bad, 2 years from the start to the finish. Did send the heater control module off to Programma and they did their magic, only to do the re-install and same problem. AC fan on high and as soon as I turn it down off the auto detent, no fan no nothing. let it sit another 9 months and ended up purchasing a new automatic air control switch assembly from BMW ($1600) and all is well.
Jack
Jack Ramsey
Tulare, CA
1990 E32 750
1991 E31 850
1973 E9 3.0cs
shade tree mechanic
Moderator
New link for sword repairs, the one on page 1 is no longer working, my collection of info http://www.bimmernut.com/forum/showt...o-concentrated
Shogun tricks and tips for the E32 series are HERE!
Member
Hi Oleg:
Is there some way you can re-post this with the illustrations intact? Or post a link to a PDF with the pictures? Or respond to my PM enclosing my email address, so you can email me a PDF with pictures?
The loss of the pictures defeats the whole purpose of the post, and it seems to be a very common problem in the forums.
Thank you, -- E36Ron
Last edited by shogun; 06-02-2022 at 09:12 PM.
Member
^ I second this request. Need to do this repair soon and I still can't really figure out how to get at the sword.
One question: If the fan is stuck on high at all times and turning off the control wheel has no effect, is it definitely a malfunctioning sword? Or could it be the in-dash control unit?
1983 4-spd Mercedes 240d w/403k - Sold!
11/87 E32 735iA w/45k - Daily Driver (finally!)
04/88 E32 735iL - Parts Car
shade tree mechanic
Moderator
Sword repairs I have all collected here http://www.bimmernut.com/forum/showt...nfo-collection
If the blower fan is stuck at high, most probably the sword which regulates the fan speed is defective.
Here another IHKA control module removal + sword removal on E34, same sword on E31, good pics, language German from this site http://proto-web.asuscomm.com/
Testing the sword, German language http://www.e32-schrauber.de/bmw/s-heizschwert.htm
Heater core: http://acme-ltd.com/BMW/E31_8_series_heater_core.htm
Here it is, straight from the horses mouth. This has appeared on a few of the E31 sites, I'm the one who authored it in its entirety originally, so here it is. Ok, I just finished replacing the heater core in my dad's '94 840Ci. While this is fresh in my mid I thought I would outline the procedure, I'm going from memory here, so I will do the best hit all the sneaky stuff. The repair manual is really a necessity here as well. This not a job for the faint of heart. Also, I strongly suggest taking the time to place all fasteners back in their respective holes as you go. It will make things go a lot easier on reassembly. Also, I would advise that you label all connectors as you take things apart. There are an awful lot of wires, and some unused connectors, so labeling them helps to avoid any confusion. Lastly, if you are about to tackle this, read through the entire procedure before starting to get an idea of what is involved.
One last note ... this procedure as outlined applies to a '94 840ci with an automatic transmission. Although all E31s are similar, there might be some variations in yours. You've been warned.
Warning: If you run the car at anytime during this lengthy procedure you have to reconnect both air bags, otherwise you will trip an SRS fault that will have to be cleared by the dealer.
.5) Turn key on, Switch wipers on, Put windows down, open sunroof (for light), lower steering column. Remove fuse for power steering column. Shut key off. (ie leave steering column lowered and wipers vertical)
1) disconnect batteries (Single ground post near L.S. battery in trunk), leave trunk open (place rag or something over latch)
2) Remove left and right kick panels. Removal of the left kick panel requires removal of hood release lever. They will require some gentle persuasion to come out.
3) Remove left and right under-dash panels. These should come out fairly easily with the kick panels removed.
4) Remove left and right and lower dash trim. Start by gently prying these away from the dash closest to the doors. There are studs that hold them into plastic retainers. They require a good amount of effort and will make a pretty bad noise coming off. Also be careful when you get to the ones closest to the center of the dash. Pry them away by sticking a screwdriver or flat blade of some sort in behind them, other wise you may pull the stud(s) out of the trim panel.
Continue removing them from the center console by pulling, They are are held onto the console with Velcro! And I though Alfa's and Ferraris were bad as they are assembled with pop rivets.
4a) if any of the above mentioned studs pull out of the trim panel, you can make Martha Stewart proud, and use a hot-glue gun to reattach them.
5) Remove rear seats. They just lift out from the front edge.
6) Remove the center arm rest in the rear.
7) Remove e-brake boot. The base snaps out, as you work the boot of the lever by turning it inside out, you will see a zip tie that holds it on. Cut this off and remove the boot.
Note: The step 8 applies to the automatic transmission only, YMMV.
8) Remove the shift knob, and boot. The knob just pulls off, with a good tug. Use a rubber mallot to tap it back on. The boot snaps off towards the center of the opening.
8a) Remove the two screws that hold the plate on around the shifter.
8b) Remove the small retainer clip that holds the pin in the shifter to the gear indicator. A steady hand and a pair of tweezers helps here. Gently pry the black plastic clip up, and push the pin underneath to the right. It stays in the shift lever.
8c) Carefully lift the gear selector indicator assembly up, and disconnect the wires to it and the transmission mode switch.
9) remove radio and disconnect wires.
10) Remove OBC display unit and disconnect.
11) Remove two plugs at top of center console and remove screws.
12) You can now remove the center portion of the center console. Gently pry it down and out from the top first and then disengage it from the bottom.
13) Disconnect wires to the seat heater switches, the red thingy, climate control, temp sensor, and the ASC switch. You can now remove this piece from the car and add to the growing pile of parts.
14) Remove the various bins and compartments from the center console, including the ash tray. All the screws that hold the center console in should now be exposed. Remove the two screws at the rear the two or three in the middle (bottom), the four on the sides (bottom) and the four at the front that hold it to the dash. Remove the center console. (Pull the e-brake up as far as possible)
14.5) Remove hazard switch, and disconnect, also disconnect wires to ash tray/cigarette lighter.
15) Open glove box, and remove the two screws that hold the black felt piece on, which is above the glove box, and below the air bag. You can now lift the cover that exposes the passenger side airbag. Remove the other two screws behind this, and remove the glove box lock/latch assembly. There is a piece behind the latch [Oops!]'y which will fall off, this just snaps back on, after it is lined up correctly.
16) The batteries are disconnected right? Remove the orange connector from it's holder (give it a twist a quarter turn or so), remove the four bolts that hold the air bag in place, remove the air bag and set it down carefully somewhere right side up.
17) You will see a tubular brace/bracket to which the air bag is attached. Follow this down towards the middle of the car. Remove the bottom most bolt (8mm, 13mm wrench). Alos, cut the two zip ties that hold the air bag wire to the brace ... carefully.
18) Look behind the glove box. There is a wiring harness clipped to the back of the glove box, or near there. Disconnect the connector and make sure that the half of it that comes from the car is free from the dash. There is also a connector for the glove box lock, disconnect this as well. Now that I'm thinking about this removal of the glove box lock/latch [Oops!]'y in step 15 above is probably not required.
19) Remove lower steering column shroud. There is one screw that holds it on, loosen the screw and remove the screw and retainer. The shroud is clipped to the upper half. Some tugging is required.
20) You will see an orange connector under the steering column. Give it a quarter turn or so and remove it from it's holder. Disconnect the connector.
21) Remove two torx screws behind the steering wheel that hold the air bag on. Remove the air bag and set aside facing up carefully.
22) Remove bolt that holds the steering wheel on, make sure that the wheels are in the straioght-ahead position. You may want to make a pair of corresponding punch marks or somehow mark the wheel to the shaft so that you can put it back on in the proper position.
Note: Do not turn the slip ring independantly when the steering wheel is off. Also, when reinstalling the steering wheel, there is an index pin that fits into a corresponding hole in the back of the slip ring, make sure that is properly lined up/engaged.
23) Remove upper steering column shroud. Comes off the same way as the lower. You dropped the steering column before disconnecting the batteries, right? If not you can still get it out, but it is a lot harder, BTDT.
24) Remove two small screws from the top of the trim panel that surrounds the instrument cluster. There are two clips on either side that holds this in. A gentle pull on the trim, starting at the top and working around it should get it free. The two clips just slide into it so if you don't remove them they will fall out.
25) Carefully unplug all the switches ... Defroster, Fog lights, headlights, and dimmer wheel.
26) You will see two small philips head screws that hold the instrument cluster in place (at the top), remove these screws being careful to collect the cone-washers under the screws as well. You can now remove the instrument cluster from the dash, and remove the single connector.
27) Directly behind the instrument cluster you will see three bundles of wires, these are held to a 'frame' with two zip ties. Cut these zip ties, and pull these cables forward slightly. They will be in front a defroster duct which will come out with the dash.
28) Remove the four switches from the steering column and let the hang there. They are clipped in. There are some ears that you have to push/press to release them. You may have gently tug on the wiring harnesses that go to them slightly to get enough slack to extract them. Note the two pins (Air bag index, and horn contact) that are sticking out of the steerig column.
29) Remove the left and right 'A' Pillar trim. Pull it away slightly from the windshield at the top, and then up and it will come out. There is one clip near the top, and a tab that it fits into on the dash.
30) Remove the two pieces of foam that are at the bottom of where the trim that you just removed sits. It can be removed in-tact if you are careful, and put back in to prevent squeeks and rattles.
31) Remove the two small bolts that are in the corners of the dash. I used a 1/4" drive deep weel socket and a magnet to extract them. To put them back in, I used some dum-dum to hold the bolt into the socket, and some very dexterious fingers are required.
32) Remove the left most bottom bolt in the drivers side knee bolster.
33) Remove the two plugs that cover the bolts in the sides of the dash. (In door jambs) Remove the bolts, and the plastic cups that are behind them.
34) Remove the two screws at hold the lower edge of the dash to the knee bolster on the drivers side.
35) Remove the two bolts that hold the sides of the dash to the car. These are under the dash and go from the center of the car towards the outside.
36) Remove the bracket that is was held by the bolt that you just removed on the L.S., it might be stuck in place, this was also held by the left most lower bolt in the knee bolster.
37) Reach behind the dash through the intstrument pod opening, and there are two wires going to the center fresh air vents. One of them has a connector. Disconnect it. The other wires (there are two of them) go to the light for the fresh air vent dial. You have two choices ... You can cut the wires, and put a connector on them which is what I would suggest doing, or you can remove the vent assembly from the dash. There are three clips on the bottom and two on the top.(or is it the other way around?) You wil most likely break the small tabs in the plastic of the vent that hold the metal retainers into it when you try to remove it, I did. Hence I would suggest cutting the wires, they are just for a light.
If you opt to remove the dash vent from the dash, it has to go back in before the surround for the instrument cluster.
37.5) Remove drivers side knee bolster. There are several bolts that are hidden in deep holes in it.
38) You are now ready to remove the dash. It pulls out to the rear, lifting slightly. Be careful of the two pins that I mentioned earlier in the steering column. Go slowly, and make sure that every thing is clear. Note the clip in the middle near the top, when reinstalling the dash, make sure that this properly engaged.
*Approx. Time so far, having never done this before 3.5hrs.
Yippee, now you are ready to tackle the heater core.
39) There is another tubular brace on the drivers side remove the bottom bolt near where the center console was, remove the bolt that holds it to the body all the way over on the left (there is a large zip tie that holds a million wires, cut this and carefully move the wires over a little), remove the two bolts that hold it to the steering column, and the two other bolts near the last two.
40) This is tricky, There are two more bolts that you have to remove that hold this brace to the steering column. Using a very long 13mm box wrench I was able to loosen them a little, and then using a 1/4" drive air ratchet remove them. The manual says to remove the two shear bolts that a little further up, that would be even more difficult.
41) you should now be able to move this brace slightly. You have to move it enough to clear the cover on the heater box. You may have to make a small slit in the carpeting, I did. It will be behind the console when it all goes back together, so it will not be visible.
42) Remove the two brackets at the bottom of the heater housing.
43) cut the zip ties that hold the wires to the cover on the heater housing, disconnect the two temp. sensors, and move all the wires out of the way. You may need to disconnect one or two of the flap motors on the right side.
44) Remove all the clips that hold the cover onto the heater housing. I think there are six or so. Remove the cover. There is a small foam gasket between the two halves, you may want to make sure that it is there. Half of mine fell out when I removed the cover, but I was able to fit back in, with little difficulty.
45) If you haven't already done so, drain the coolant. Disconnect the three heater hoses at the firewall and/or the heater valves. You can remove the 'cowling' that holds the micro air filters pretty easily on the 8 cylinder cars. Two bolts at the top, one on either side and it lifts right out. This gives more room to get to the hoses. Don't know about the 12 cylinder cars.
46) Using compressed air, at a fairly low pressure, blow out the three hoses/fittings. Otherwise you may make a little bit of a mess inside the car.
47) Remove the plastic double pipe from the metal pipes (one bolt) and the heater core (four bolts) and remove.
48) Remove the remaining bolt from the top of the heater core. This fitting (left most) requires a 1/4 turn or so to disengage the flange.
49) Remove heater core.
50) Install new Heater core. I got mine at the local dealer. Approx. 90.00 or so, and it included new 'o' rings for the fittings, as well as the foam insulation for the heater core. Getting the one flange back on with the new 'o' ring is a little tricky. You can do it with a pair of pliers, very carefully. You may want to replace the plastic pipes that attach to the heater core as well while it is apart. I did not, but have heard that these have been known to crack with age.
*Approx. Cumulative Time so far 7.5 hrs
51) As they say, reassembly is the reverse of removal. Now is a real good time to clean the windshield and the dash. Go slow, and make sure that everything is back together properly and all connectors are properly connected. Especially around the shifter, climate control and radio the routing of the wires is important so that nothing interferes with anything else. I had a problem with something rubbing against the fan in the back of the climate control unit. But I'm happy to say that there don't appear to be any rattles or squeaks.
*Close to another full day to put everything back together.
Last edited by shogun; 04-29-2021 at 05:25 PM. Reason: links updated
Shogun tricks and tips for the E32 series are HERE!
Member
Thank you, Shogun, for posting this. The pics included with the link http://www.ah525i24ve34.at/HTML_ah52...chwert_PDF.pdf are exactly what I have been looking for all along. I will use Google Translate to get the words into English. Regarding the rest, I only hope I never have to replace the heater core!
-- E36Ron
shade tree mechanic
Moderator
Better download the site of ah525i24ve34, got notice on the German forum that he passed away last week, so not sure what happens with his website.
Shogun tricks and tips for the E32 series are HERE!
Member
Done! Thank you for the heads up. Sorry to hear of his passing.
-- E36Ron
Member
thank you so much...art
Member
can anyone please show me the sword location on a 1997 850Ci?
shade tree mechanic
Moderator
http://bmwfans.info/parts-catalog/E3..._limit_switch/
workshop manual says:
remove glove box
unscrew screws and lift air duct out
pull wires off control unit and final stage = sword
unscrew the 2 screws of the sword and pull it out.
https://www.bimmerforums.com/forum/s...nt-illustrated
https://www.bimmerforums.com/forum/s...s-after-repair
from E32, you need a T20 torx screw driver http://www.bimmerboard.com/forums/posts/54597
Last edited by shogun; 10-19-2020 at 03:51 AM.
Shogun tricks and tips for the E32 series are HERE!
meeknet.co.uk
Timm..2007 E64 650i Individual Sport..1999 E31 840ci Individual Sport..ex owner of 2000 E38 740..1999 E38 740i V8 M62..1998 E38 735i V8..1993 E32 730i V8..1988 E28 518i
My BMW Repair YouTube Channel
My Current 840ci Sport Individual
My Current 650ci Sport Individual
My E31 Repair and Information Website
My E38 Repair and Information Website
My E63/E64 Repair and Information Website
Chase - Heroes to a generation
Member
Reviving this old thread. I am looking to replace the sword a.k.a. Blower Control Regulator and was looking for the PDF document that was linked in some of the posts above (the old links aren't working anymore). Anyone still have that document?
Thanks!
========
91 850i 6-speed, 2018 M550 - wife mobile, Lexus GX460 - Family mobile
shade tree mechanic
Moderator
E31 workshop manual has a very short instruction for that:
remove glove box
unscrew screws and lift air duct out
pull wires off of control unit and final stage
unscrew screws and pull final stage out
Shogun tricks and tips for the E32 series are HERE!
Member
The document you refer to was in German, referred to the E34 5 Series, and was mostly about repairing the sword once it had been retrieved. Lots of soldering and component rehabilitation. Rather than spend the time learning how to do all that, I recommend you pull and send your old one to ProgRama, www.programinc.com, to swap out for one reconditioned by them, simple swap out, no problems.
-- E36Ron
Member
Ok thanks everyone, I was able to remove and install the new sword and the A/C is working much better now.
The most painful part was getting that duct out, it has fastening screw all the way close to the windshield.
Now in the reassembly process and that duct is going to pretty painful to put back in.
Sent from my iPhone using Tapatalk
========
91 850i 6-speed, 2018 M550 - wife mobile, Lexus GX460 - Family mobile
shade tree mechanic
Moderator
In case you made some pics, post them here with some info how to....
Shogun tricks and tips for the E32 series are HERE!
Member
Sorry, didnt take pictures but here are some lessons learnt:
1. Follow the instructions from the first post in this thread.
2. You will need to remove 3 trim pieces around the passenger footwell - left, top and right.
3. You will need to remove the upper/lower section of the glove box. Upper one is easy it just slides out when you remove the screws, the lower one is tricky - has 3 hidden nuts inside the black metal support panel that runs underneath.
4. The lower glove box doesnt need to be completely removed you just need to slide it out a bit and you can leave its electric connectors intact and give you enough room to release the duct
5. Look carefully at the duct that blocks the access to the sword, it has a retainer clip at the top (there is a picture of it in one of the posts above) and a screw fastener further up close to the windshield. You can see it if you look straight down from where the retainer clip is.
5. Once the duct is removed you need to first unplug the electric connector to the sword before removing the Torx screws - the top one is not accessible until you remove the connector. Oh one more thing - you need a torx driver with a long reach, i had a torx bit and my screwdriver shaft was too thick to reach them - i had to get creative and create a tool to do it, shouldnt be a problem if you have proper torx screw drivers.
6. As always be careful handling old plastic parts - they tend to be brittle. Fortunately I didnt break anything this round but we have all been there.
7. Working in this area is tough, get some knee pads or a soft carpet under your knees - mine are sore even after wearing them. You will need to kneel outside the car and then twist your torso into the passenger footwell looking upwards - its almost like doing some crazy yoga.
This is really fresh in my mind as I just completed re-assembly.
As Timm says .... now for a cup of tea.
Sent from my iPad using Tapatalk
Last edited by akatoch; 04-30-2021 at 07:04 AM.
========
91 850i 6-speed, 2018 M550 - wife mobile, Lexus GX460 - Family mobile
Member
Old thread, but I wanted to share my successful sword repair with you. Not too difficult, less than 10 Euro.
IMG_6093.jpg
 Posting Permissions


 Reply With Quote
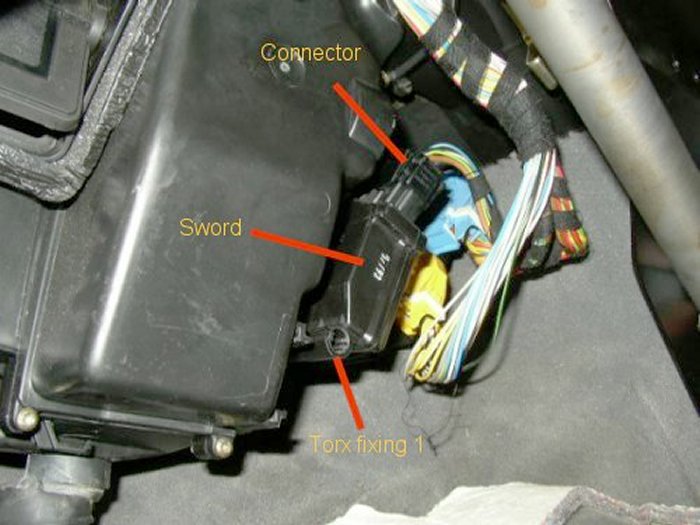

Bookmarks