
 Member
Don't mean to jack or anything but figured you would have a good idea since your bumper was recently off. How easy is it to remove that nose panel once the bumper is off? The headlights would have to come off as well correct?
Thanks!
BTW - Bad ass build! Don't think I'll ever get to do something like this but it's always great to see what other members do here.
Member
This thread is making me extremely jealous
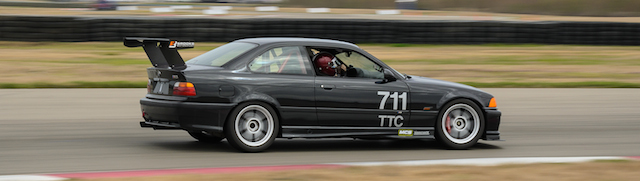
Officer, this is not the M you are looking for.
Member
I haven't really looked at how its connected yet. I will when I get home and let you know!Originally Posted by FranklyIDC

Thanks! It has turned out better than I originally thought it would.
Last edited by gbreeE90; 10-23-2012 at 04:09 PM. Reason: Automerged Doublepost
Member
Thanks! That would definitely be appreciated
Member
Yes, the headlights and corners have to come out to remove the nose panel. You will also have to remove the alternator duct over the rad support. The nose panel attaches with a couple of screws to each fender and I think 4 screws to the rad support. If the nose panel is coming all the way out, you will have to remove the hood latches as well.
Last edited by Malarkie; 10-24-2012 at 02:19 PM.
Two little mice fell into a bucket of cream. The first mouse quickly gave up and drowned, but the second mouse, he struggled so hard that he eventually churned that cream into butter and he walked out. Amen.
Budget M3 Build
HARDMOTORSPORT.COM
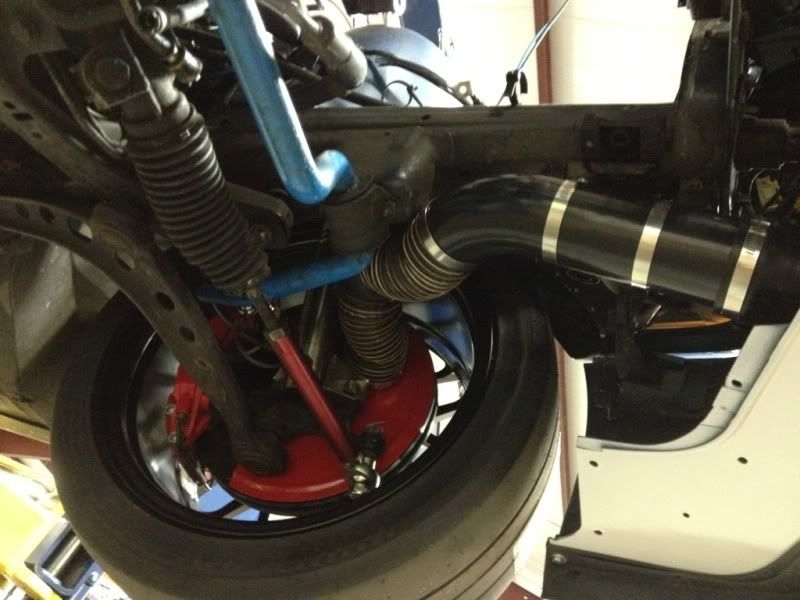
One benefit of our kit is removing the front bumper. Also if you go full lock and hit the duct you will be hitting aluminum and not flex tube which cost 12 per ft. The kit pays for its self after a few session of not replacing flex tube that has worn a hole in it. We spent a lot of time and money trying to find different ways to route the tubing and this was the best solution.
Here is a good picture of the hardmotorsport duct kit
Thanks again for the order gbreeE90!!!!!!
Member
This is a good pic indeed. Much lower resolution on the web site.
Now, can you sell separately:
a) the brackets (that connect the aluminium duct to the frame)
b) the aluminum ducts themselves
c) the "rubber" hose that interconnects the aluminum duct and the front receptacle
I have the back plate, the hose and the receptacles.
If yes, how much.
thank you,
Vasile
Member
Definitely a nice kit.
Member
Well, I won't be driving the car to the track any longer.
The EVO II track splitter from bimmerworld came in yesterday. I will be installing it tonight, so I will post more pictures later.

HARDMOTORSPORT.COM
congrats! on the trailer!
Member
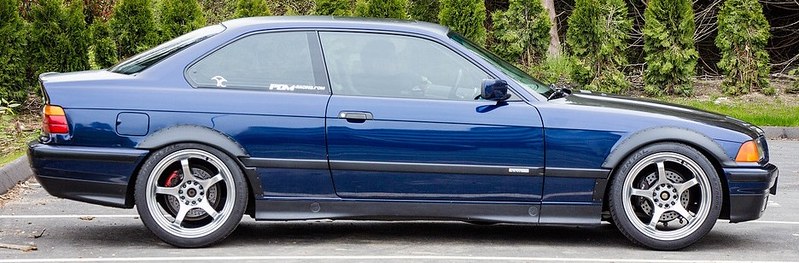
Max Velocity EVO II front lip/underpanel and standoffs from Bimmerworld
Starting on the brake duct kit from Hardmotorsports
My co-drivers helping out!
Taking the rotors off and cutting the backing plate off
New backing plate on
Flex hose attached

Last edited by gbreeE90; 10-27-2012 at 12:24 PM.
Member
Yes and yes.
Happy Birthday to me. New racing gear.

Last edited by gbreeE90; 10-27-2012 at 03:42 PM. Reason: Automerged Doublepost
Member
Thanks for that! Sounds easy and simple.
Happy Birthday gbree!
Member
Thanks! I looked, and it does seem fairly easy.
Member
Build looks really good, I especially like the brake cooling kit I have a small list of items to be ordered from HARD. I planned on doing their emergency kill set up, and the oil pan, looks like ill be adding the cooling kit to the list!
Member
Finishing up the brake duct install
Making a pan to direct air flow to the radiator since we took the AC out.
Finished the brake ducts
Starting to mount the bimmerworld standoffs
Mounted to the bumper
I want to drive it on the street, but im not sure if I can anymore. Any suggestions?

Last edited by gbreeE90; 09-23-2017 at 06:49 PM.
senior LOUNGE creator
Car looks like its ready for serious business
If liberty means anything at all, it means the right to tell people what they do not want to hear.
― George Orwell
Member
Yeah, if I can get it out the driveway :'(
Thank God we bought a trailer.
Last edited by gbreeE90; 10-29-2012 at 08:33 AM.
Member
Looks good. Not uncommon at all to remove the bumper before/after the trailer process.
If you are concerned about driving it on the street, get a 2nd bumper. Should be able to find one + the core for pretty cheap, and youll only be dealing with 4 nuts swapping bumpers.
Current:
E38 2001 750iL - Current DD.
E36 1995 M3 Coupe - Ls1/t56 - FIXED...now with a Ford 8.8 IRS Rearend
E36 1998 323is Coupe - Back-up DD.
R53: 2005 MCS W/ GP and JCW bits. - Wifes Project Car
Past:
E36 1999 Dinan M3 Coupe AW/Sand Beige - In BMW Heaven.
Member
How easy/hard is it to get that tray off if you need to for access to work on something?
Member
Yeah, good point. I might try it for a day or two on the street. It's not like I drive it more than 6-10 times a month anyway.
Which tray are you referring to? I guess you mean the splitter/underpanel, it shouldnt be hard at all.
Member
Yeah the undertray. I've looked at the Motion Motorsport undertray kit that specifically mentions ease of removal so I curious how yours is in comparison.
BTW car looks great!
Member
Thanks! As you can see, the splitter is attached only by 7 bolts (maybe I didnt post that picture, I'll check). It will be MUCH easier to remove than the MM underpanel.
Edit: Here is how it attaches (and two at the very back which are connected to the sway bar)

Last edited by gbreeE90; 10-28-2012 at 11:11 PM.
Member
Is the splitter bolted to the bottom of the bumper itself as well?
Member
No, just to the bumper beam. It will save my bumper if I ever end going off the track (hopefully I wont have to find out).
 Posting Permissions


 Reply With Quote

Bookmarks