
 Member
Why did you go with the canton tank rather than doing the euro tank conversion?
I did the euro tank for a couple reasons... OEM engineering (at least it was OEM in Germany) and excellent fit/finish when using BMW parts. Also there is the advantage of moving a little bit of weight behind the front axle. Every little bit helps
Member
The only reason is because of euro parts availability. BMW has really locked down our ordering euro parts in the US lately. I tried numerous different sources, such as local dealers and Bimmerworld/Turner, for the euro tank brackets and no one can order them unless you provide a VIN for a euro car that's legally registered in the US. Then you have to fill out a form using that VIN in order to get the parts.Originally Posted by alwaysinboost

The Canton tank will be mounted in the same location as the euro tank (where the SAP currently sits) and will use very similar hose routing. I'll just have to fab up some brackets to mount the tank using the SAP mounting holes and hardware.
Member
Canton picture isn't working, which one did you go with?
Member
Canton 80-200 with the Canton 81-030 cap (30 psi)
Member
Do you plan to stay in TTD with the M50 manifold?
Member
Yes, dyno reclass
GoldMember
so when are you racing W2W or did I miss that? great documentation of build.
bmwcca member 404029
2008 E93 M3
2007 E92 328xi
2004 E46 M3
2002 E46 M3 HS build in progress
1998 Z3
1996 E36 M3 IS/T3
1995 E36 M3 track car
1994 E36 325ish.....AER
Member
When you get that overflow tank in i would be interested in a picture. I want to get rid of mine but am struggling to find a good location/tube routing that i like and will fit with a turbo setup.
Whats behind you doesn't matter
Black E36 M3 - Blackbird
Silver 2007 New Body 2500HD - The Judge
Member
I'm planning on doing NASA comp school in April at Summit Point.
My goal is to document the install well with pictures but sometimes I get too focused and forgot to take picture during. Since we have the heater core deleted, the hoses are pretty simple. I have the Bimmerworld OBD1 coolant pipe already installed which is a 1" OD. I'll run a 1" to 3/4" adapter and then 3/4" heater hose from under the manifold, behind the head and then into 3/4" hose barb adapter on the bottom of the tank. Then a simple 5/16" hose from the top of the tank to the radiator and a vent line on the tank.
Member
Small update while I wait to get some time to work on the car again:
Headers are in, M50 manifold is on, and the coolant tank was successfully in. I had some coolant leaks upon start up so I removed the tank to seal the fittings but damaged the tank during that process. New tank is going is this weekend and then I'll see if I still have leaks. I'm afraid I'll have to remove the M50 to check my connections coming from the back of the timing chain cover.
Once I square away the coolant leaks it'll be off to a local exhaust shop to have the midsection fitted to the headers. We couldn't get it on and I gave up trying to make it work while laying on my back. I'll gladly pay someone with the right tools to get that installed.
Also, the biggest item of this offseason was just purchased. Details coming soon but here's a hint:

Last edited by hoki06; 01-27-2016 at 12:25 PM.
Member
I bet it's a diff that you bought online!
Member
My hint was way too easy!
Member
haha enjoy. I have a diffsonline diff, too.
Member
adding new stickers, nice.
Member
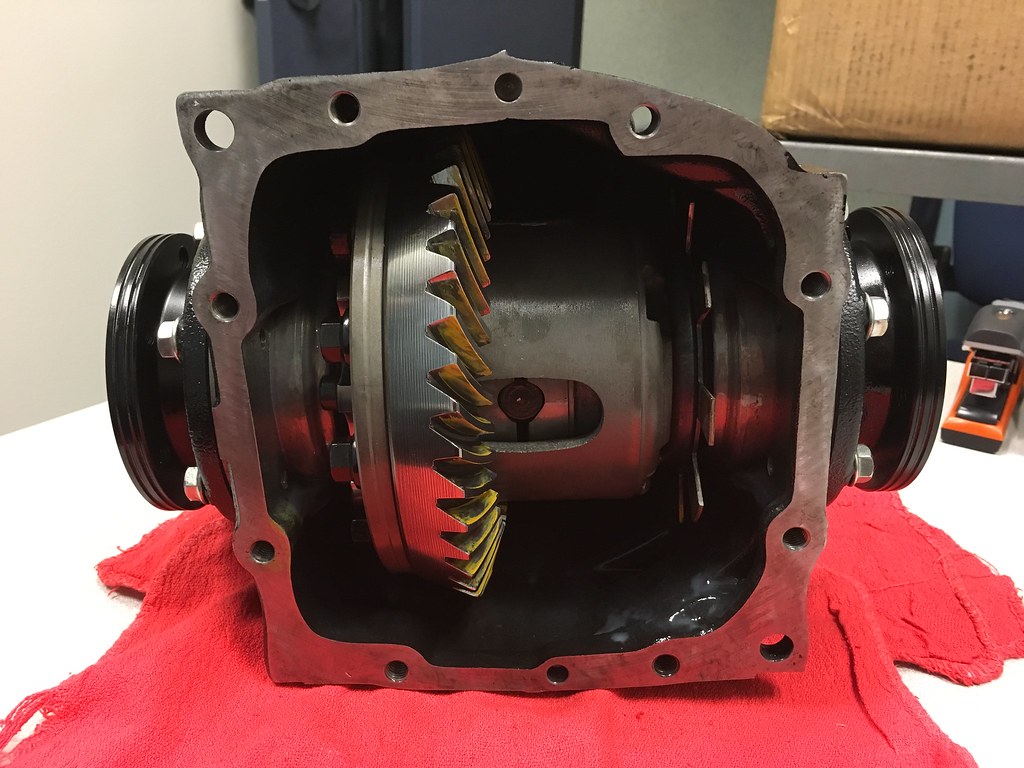
Fantastic build by Dan at DiffsOnline! I can't wait to get it in the car and see how it feels!
Rogue diff cover to help keep our investment cool

Member
specs??
Member
3.64, 4 clutch, 35/65 ramps
Member
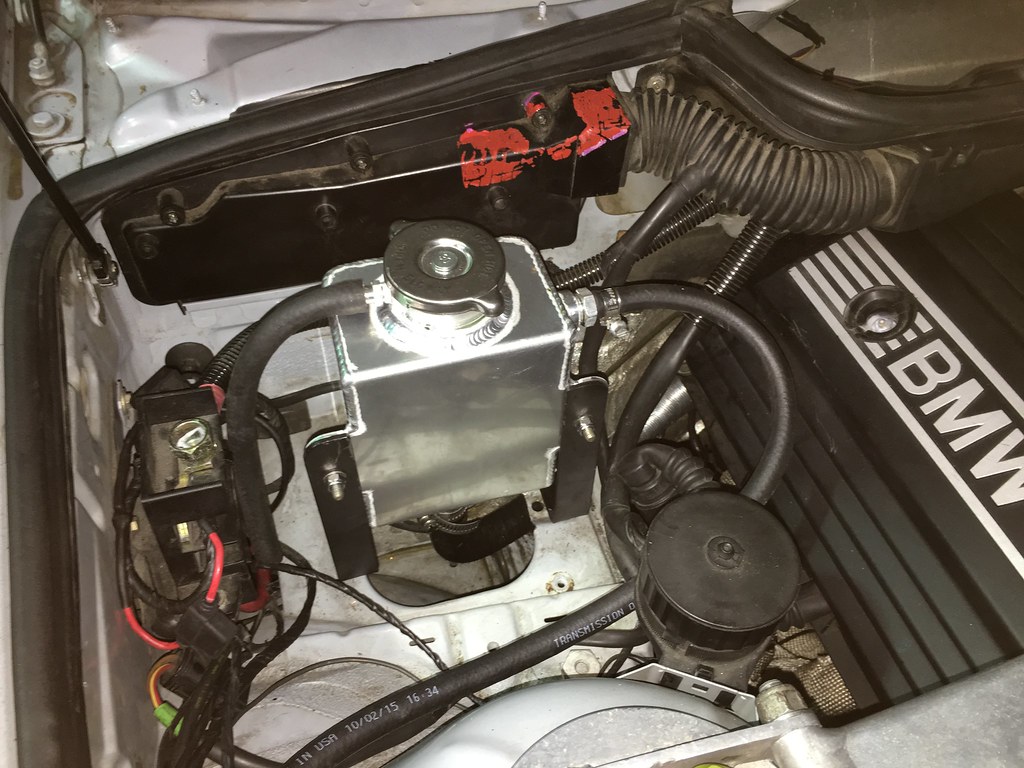
The coolant tank conversion is complete and luckily I didn't have to take the intake manifold off again. The leak was cause by a slightly loose hose clamp that we were able find and correct by pressure testing the system. I owe a big thanks to Zack at Delta V Motorsports for that idea and reaching the clamp with some extensions!
The final parts list for the coolant tank conversion is as follows (listed in order from coming out of the engine to the tank):
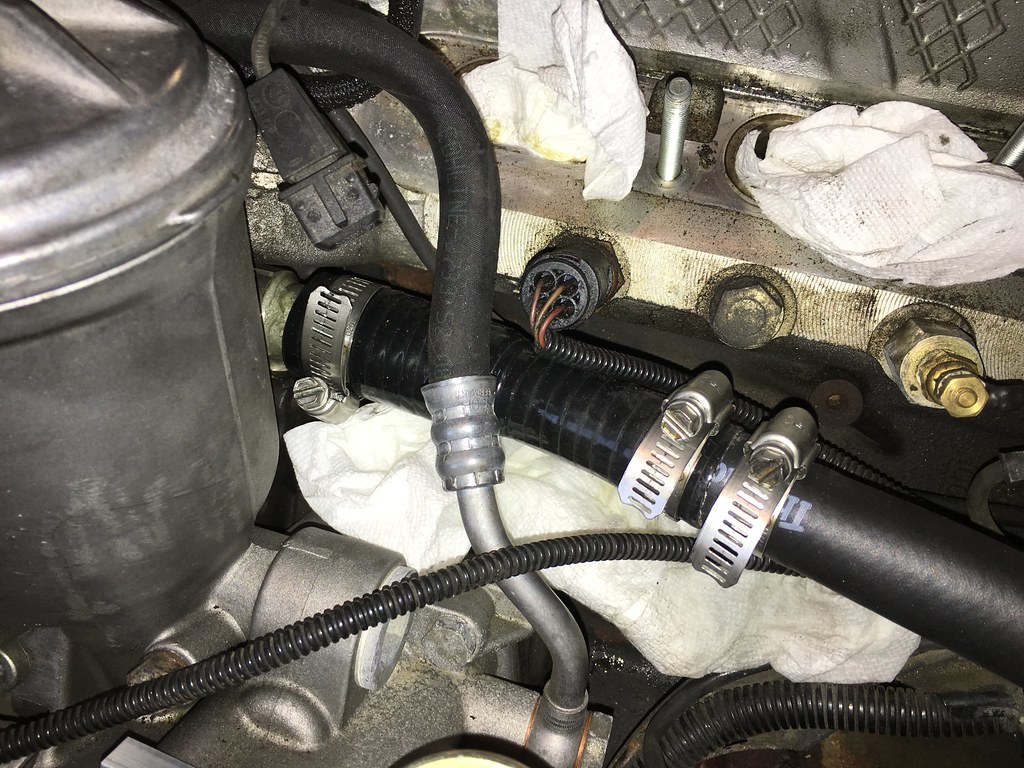
-Bimmerworld OBDI coolant pipe adapter
-Pegasus Auto Racing Black Silicone Hose, 1" ID x 3/4" ID Straight Reducer
-Pegasus Auto Racing 3/4" Aluminum Hose Joiner
-3/4" heater hose and split aluminum sheathing for abrasion protection (ran under the intake manifold and behind the engine to where the SAP used to be)
-Pegasus Auto Racing 3/4" Aluminum Hose Joiner
-Pegasus Auto Racing Black Silicone Hose, 3/4" I.D. 90 degree, 4" Legs
-1/2" NPT to 3/4" hose barb adapter (installed in bottom of the tank with thread sealant)
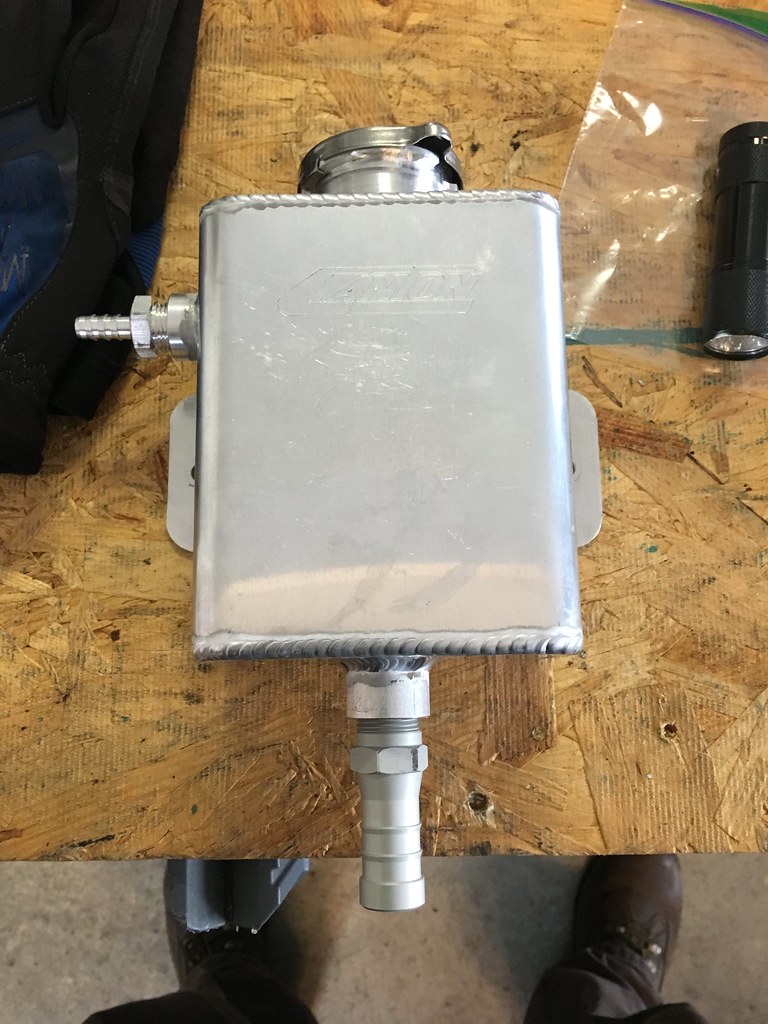
-Canton 80-200 tank
-Canton 30 psi cap
-3/8" NPT to 5/16" hose barb on the side of the tank (return to radiator)
-5/16" heater hose, runs to nipple on the radiator
-5/16" heater hose, vent to atmosphere
-basic homemade L brackets to mount the tank using stock bolts/threaded holes where the SAP originally mounted
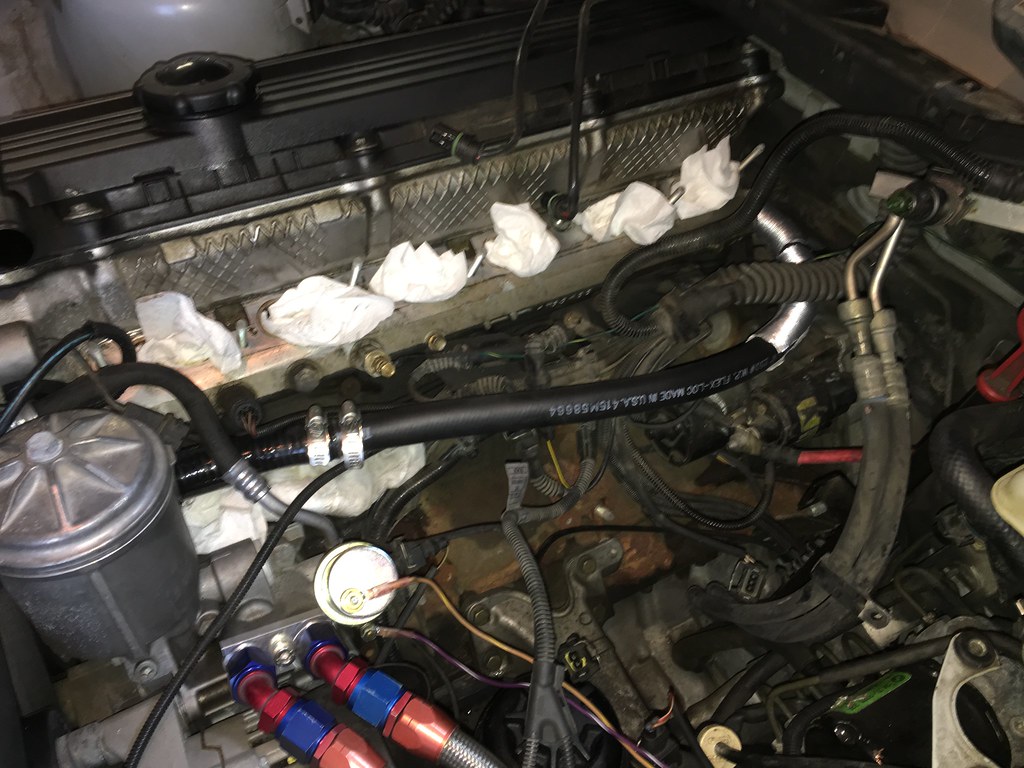
Here's the tank installed. I need to get a longer vent hose and find somewhere to run it
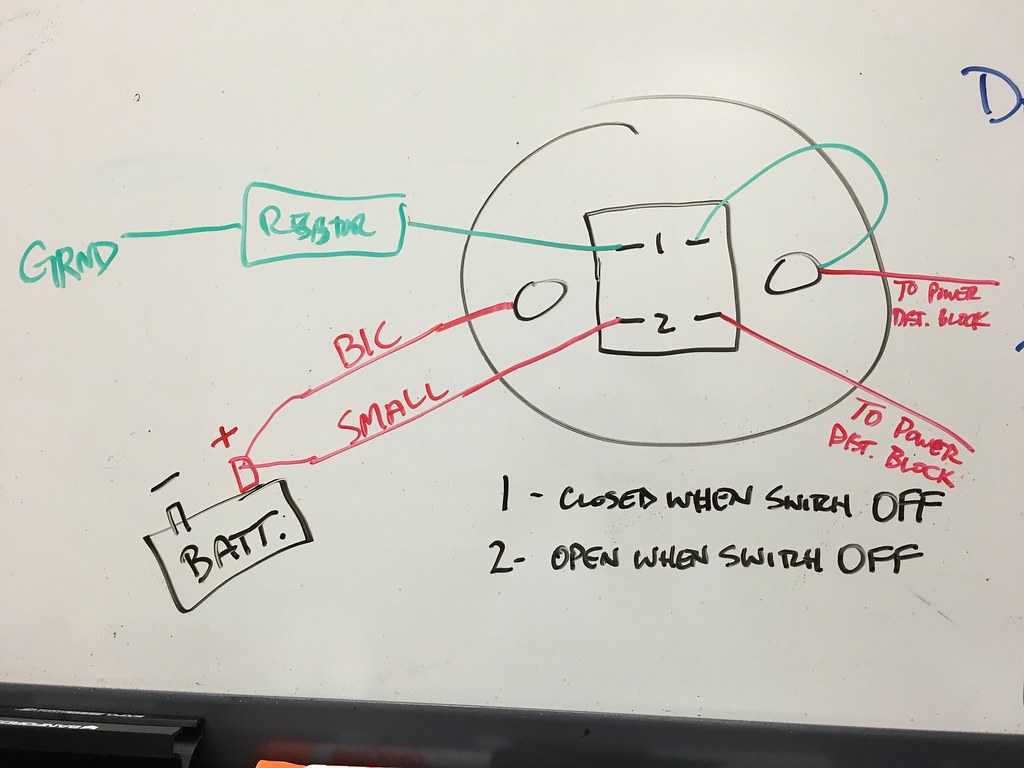
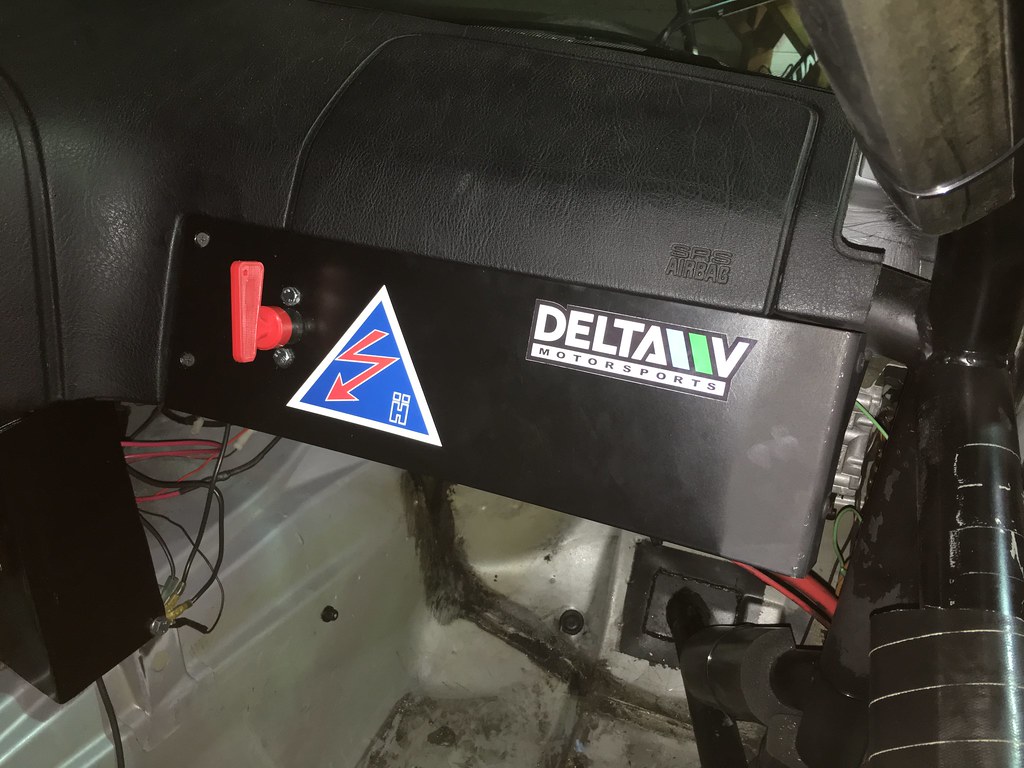
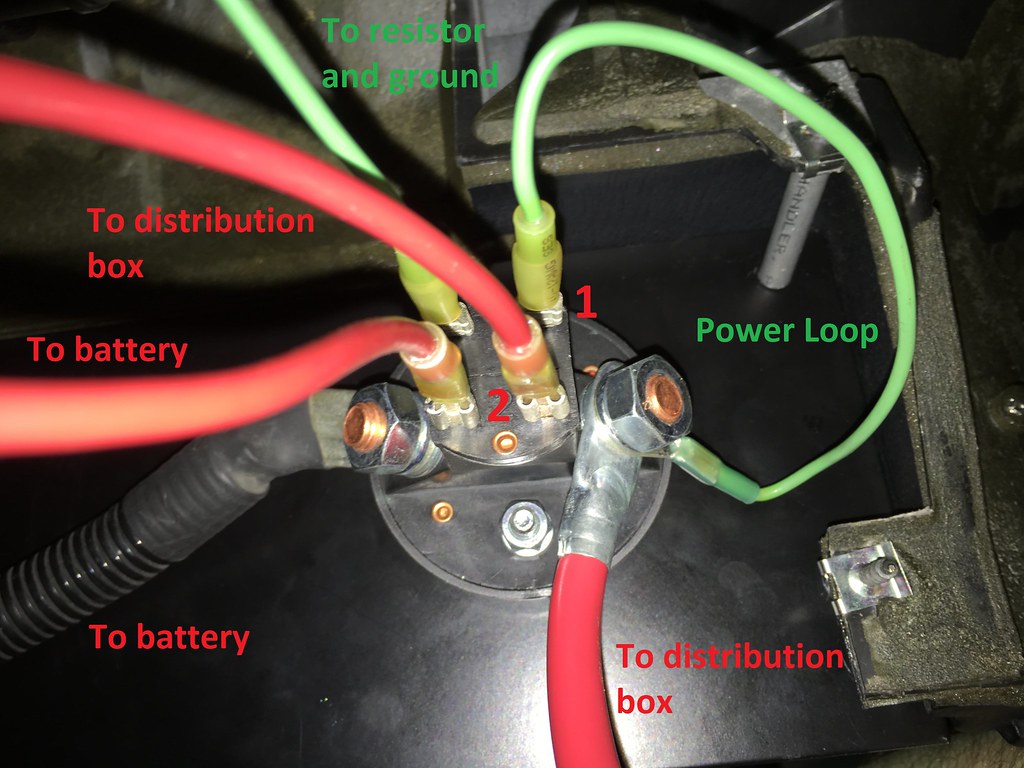
I also got the kill switch mounted and working. I initially installed the Hard Motorsport kit but quickly found out their kit does not address the smaller 10ga wire that also comes from the battery positive post. To do so, you need to install a proper 6 pole kill switch wired as shown in the diagram below. I have called/emailed Hard Motorsport so hopefully they will fix their kit.
RaceComm
What problems were you having with the way the kill switch was initially setup? I mounted mine up as per Hard Motorsports instructions and it kills the engine right away. Just curious cause I would prefer to not run into any issues either.
Member
Agreed; couldn't you just run both the 10ga and the large cable form the battery to the same terminal?
Member
On your coolant tank, if I have this correctly...
Left side of tank, that hose is going to the radiator nipple.
Right side of thank, that is the vent hose.
Bottom of tank is return to radiator.
Correct?
Member
The problem was that it didn’t kill the car. I wired it up exactly per their instructions and it did not work at all. If you trace the smaller 10ga wire from the battery, it goes to the junction box and then to the alternator uninterrupted with the Hard Motorsport. Our cars can and will run if you only disconnect the large cable (same as pulling the negative battery cable) because the alternator generates power. The car will keep running unless you change the engine load when it looks to the battery for extra amperage. I can’t explain why the kit works for you and others because after staring at the system I don’t think it should work. Try revving the car up to 1500-2000 RPM and killing it since that’s the official NASA tech inspection technique from what I’ve been told.
After lots of research online and talking to several racers/mechanics, the general consensus is that the large and small wires need to be kept on separate circuits but killed at the same time. To do this you need a 4 or 6 pole kill switch. I think the 6 pole is a no brainer because of the 3rd circuit for surge protection upon shutdown. There’s a reason why places like Bimmerworld and Turner sell 6 pole kill switches.
Almost, it's like this:
Left side of the tank (on the neck with the cap) is the vent
Right side of the tank loops around to the radiator nipple
Bottom of the tank returns to the OBD1 coolant pipe on the back of the timing chain cover (3/4" hose goes behind the head, under the intake manifold to the coolant pipe)
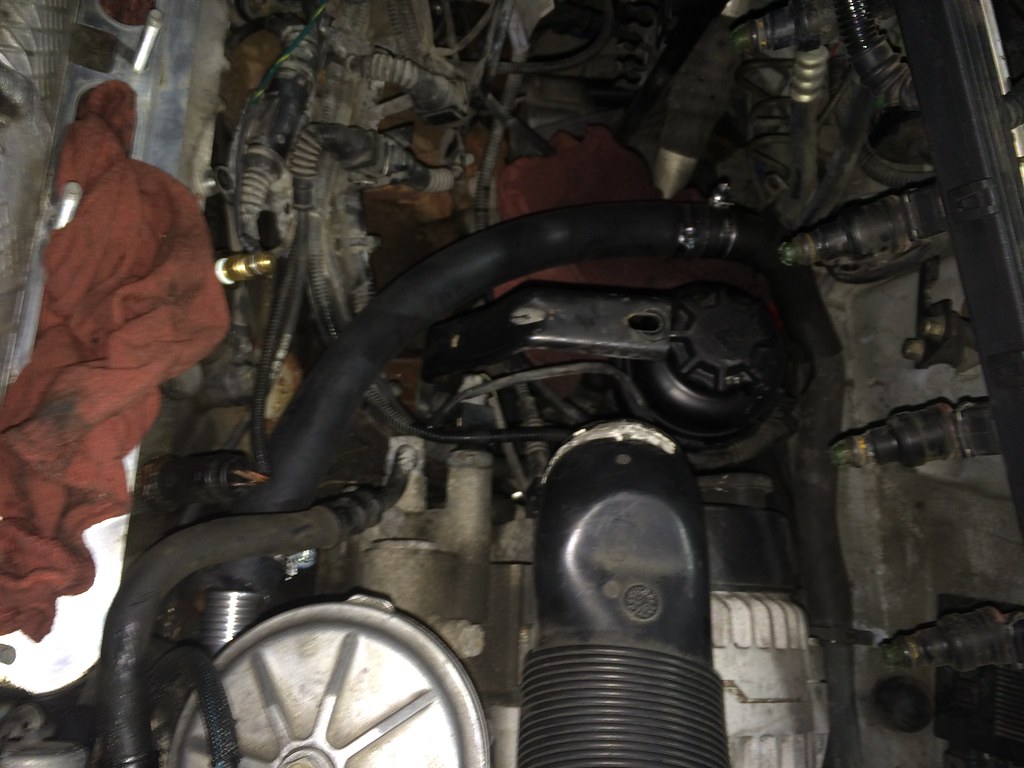
This pictures is taken from the front of the car with the intake manifold off. You can see the Bimmerworld coolant pipe adapter right behind/below the oil filter housing in the bottom left of the picture. It's the shiny silver piece.
- - - Updated - - -
Found more pictures on my phone from the coolant tank conversion.
This shows the coolant pipe adapter, 1 to 3/4 straight reducer, and 3/4 hose connections coming from the timing chain cover and running under the intake manifold.
Tank with adapters
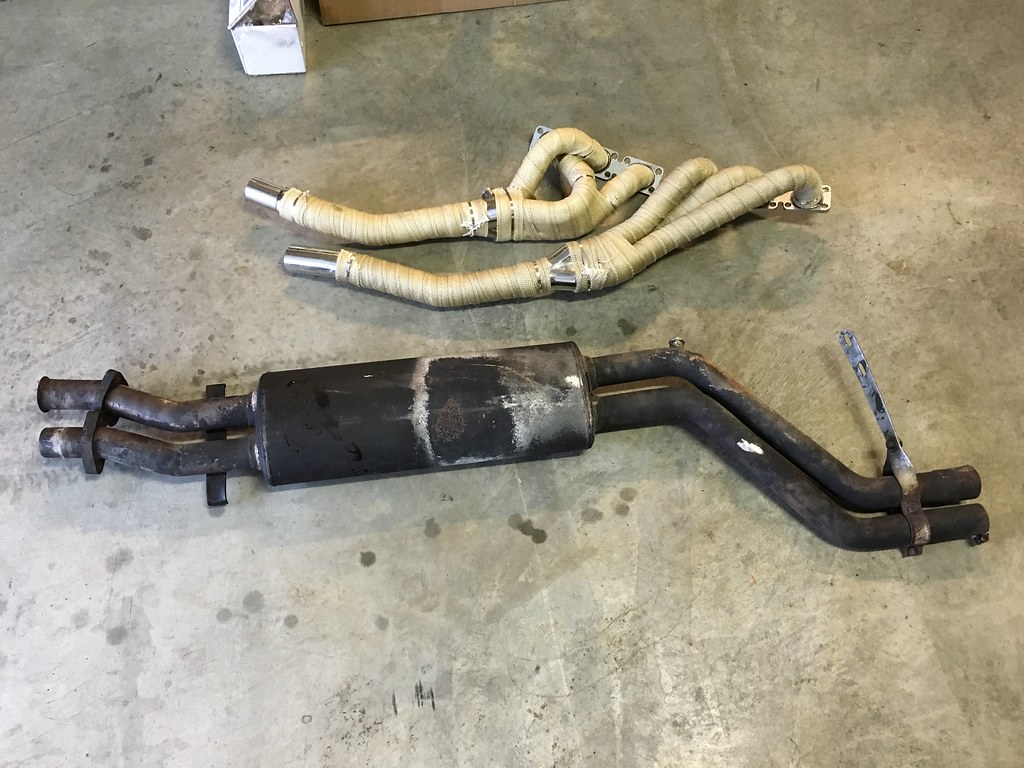
Wrapped eBay headers and custom center section with resonator from another old e36 race car
If you can't get the front header in place and think it won't fit... remove the studs, put the header in place, then install the hardware! It was a major pain in the ass but it worked. This pictures shows how close it was to going on but the header was resting on the subframe and engine mounts and couldn't go on any further.

Last edited by hoki06; 02-26-2016 at 09:44 AM.
Member
Ah right. I got my left and right confused, too early haha. Thanks for the pics.
Why the vent? Isn't that where the nipple goes from the factory? Or does the factory have a built in "vent"?
I think the vent on the neck is the overflow that's supposed to be coming from the nipple, not sure if they side port is even needed. That's how I'll have mine setup.
Last edited by Inflame; 02-26-2016 at 10:20 AM.
Member
You might be right. I assumed there was a vent because the tank has 3 openings but I need to research the stock design more. I might need to cap the right side and run the left as my return to the radiator.
Member
That's what I'm thinking as that's how I remember my coolant system being hooked up. I ordered the same coolant tank too so this is helping tremendously lol
 Posting Permissions


 Reply With Quote

Bookmarks