
 Ralph
Ralph
Ok, I just got done installing the VF kit, and here are my notes and some pics.
First, one caveat--I finished, started and ran the car, but haven't driven it as the hood and bumper are in the process of being repainted at the moment--it will be a week or 2 until they are done.
I installed the kit into my 98' Z3 M Roadster w/o ASC. I understand that the ASC versions (99' and newer) are different.
NOTE: the instructions and pictures VF provides are not for a Z3, and differ from the Z3 instal in many ways.
NOTE: the instructions don't mention this, but when they send back the DME, it comes with a note that you have to reset the DTC codes before it will start. This requires a very expensive piece of shop equipment--not the Peak tool or OBDII reader--plan on how to get one of these or where to have it towed for this procedure.
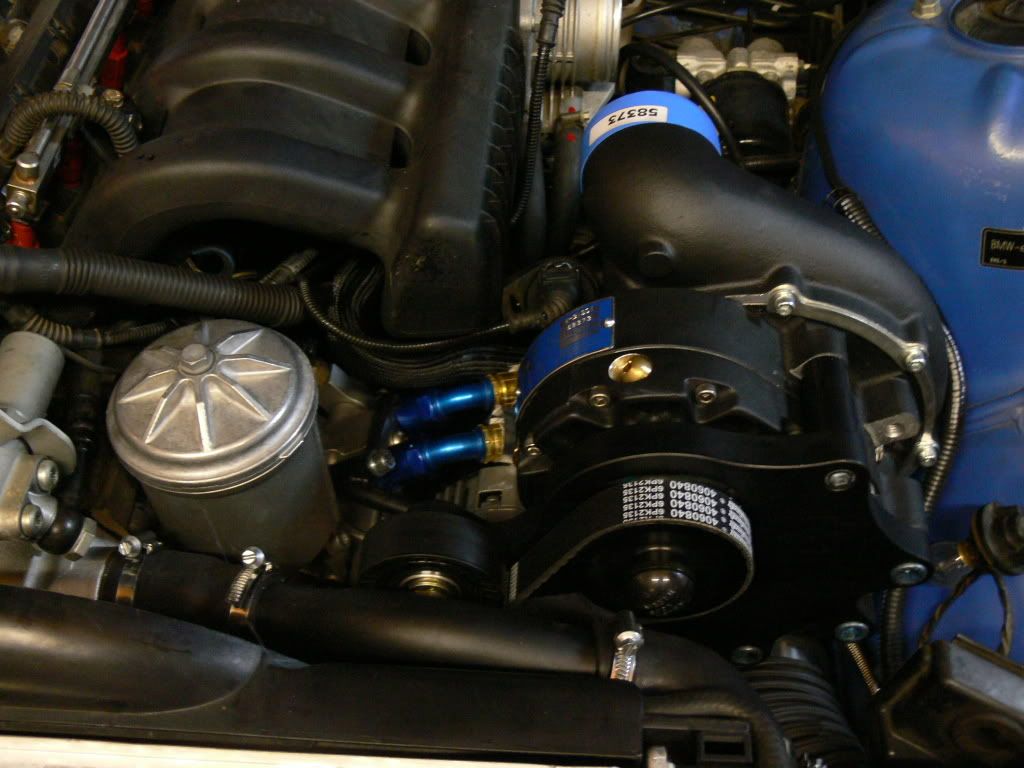
NOTE: the intake duct goes under the SC, not over as pictured.
Note: the intake duct must be laid in place in the car (with clamp) BEFORE you install the SC and bracket--not after as in the instructions--otherwise you have to remove the SC to fit it in (learned this one the hard way).
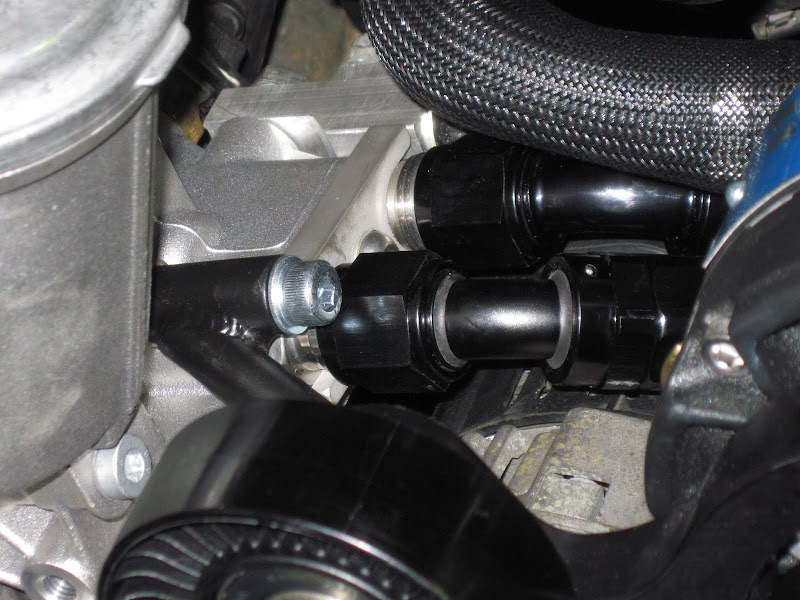
NOTE: The hoses VF includes to connect the bypass valve to the intake and discharge ducts bear no relationship to the install, and cannot be made to work. You will need several spare formed 1" and 3/4 " ID hoses with many curves and bends in order to connect the bypass valve to the intake and discharge ducts. (I used hoses off of a parts 98' Volvo S70). You must plan ahead to have several configurations available.
NOTE: the upper radiator hose set up VF provides will not clear the SC idler pulley, or the cooling fan. You will have to fabricate something in order to replace the upper radiator hose.
NOTE: VF includes a length of 1/4" vacuum line with the kit--this has no application and is simply extra (I called to verify this and VF tech support agreed).
NOTE: VF tech support is very helpful if you can get through. They are in California, so Pacific time 9-5:30. I spoke with Jeff several times and he helped get me over a few humps, including sending pictures.
NOTE: there is a hose strap stud protruding from the frame rail where the intake duct goes--this has to be removed (strap and stud).
NOTE: the wiring harness they provide for extending the MAF harness does not match the color coding for our cars. You will have to remove the boot at the harness end where it connects to the MAF and take note of the color of the wire into the No. 2 terminal (marked inside boot), in my case I connected the yellow wire in the MAF harness to their white wire in the extension harness (or was it the other way around). The instructions mention this possibility.
NOTE: the small vacuum line off of the bypass valve simply needs to go to manifold vacuum--the line they say to tap into does not exist.
NOTE: in my case there was an extra 1/8" check valve included as I don't have a vacuum operated exhaust valve and vacuum storage bottle for one.
NOTE: The bumper and driver's headlight will both have to be removed (no horns to relocate though).
NOTE: the driver's headlight plastic surround (with the ducts in it) will have to be cut away if it is going to be reused, to allow room for the intake duct feeder flex hose (3 1/2" hose).
NOTE: do yourself a favor and remove the radiator for this job--much easier when out.
NOTE: check the SC oil drain line for tightness BEFORE you install the SC (mine was loose and was a pain to tighten).
Ok, here are some pics (I did some other stuff too, pics included):

Last edited by Mr Bingley; 04-01-2012 at 08:06 PM.
Member
Thanks for the writeup. It is a bit disappointing there would be so many issues they did not address in directions. All too often, install directions are for an E36 or some other variant where you are left to fly by the seat of your pants as the instructions or pictures don't match up.
Now in E92 M3 ZCP -- Absolute beast
Member
+1, great notes and picsOriginally Posted by z3papa

yeesh, good thing I haven't tackled this yet; sounds like a LOT of stuff VF didn't plan for")
Member
Yep, sounds like a typical supercharger installation to me!
Nice job MB; I like the pictures!
Did the oil cooler lines work out OK?
Member
^Randy, i'm just gonna roadtrip down to your place to have you do the install
Member
Any particular reason as to why you didn't to an M50 manifold swap?
i3 & Z3 M Coupe
Ralph
Oil cooler lines worked out great, thanks. Trimmed about two inches off one and three off the other. I ordered the Jeggs AN 10 line wrench and I'm glad I did--no marring of the finish. 45 deg. fittings at the filter housing end worked very well with all that had to be cleared. Followed your instruction on marking the hose to make sure it doesn't back out when tightening the coupler. Also ordered and used Jeggs AN fitting sealer and thread lubricant.
Thanks again for putting the lines together for me, and for the vice jaws--I have a feeling I'll be doing this again someday.
I didn't think a manifold swap would have any measurable effect once the forced induction is in place.
Last edited by Mr Bingley; 04-02-2012 at 05:43 AM. Reason: Automerged Doublepost
Member
Yes, you can stay at some place on The Beach while I work on the car (ALL the hotel rates are much-much lower in the summer = off season).
You (and your methods/thinking) sound just like me, only with a lot more formal education
Ralph
Thanks for the compliment--but you are more fastidious, careful, detailed, and anal than I, and why I decided to have you do the subframe work, after studying your photo albums, instead of doing it myself.
The education just gets in the way, except that I paid for it twisting wrenches in a local (Ohio) import shop, and worked for a couple of years out of college in an import shop in Virginia where my first wife had a job as a teacher.
I actually dream about what my life would be like if I hadn't gotten that formal ed. I really love cars, fixing them, knowing about them, sourcing parts--I think I'd rather own a shop and manage mechanics than run a law firm and manage attorneys. I have friends/clients who do, and they seem happy (except when I do their divorces). Maybe someday I can retire to Florida and fix Z's--some people have all the luck.
Member
Thank you so much for this writeup. It will certainly save me quite a bit of trouble. Thanks especially for the heads-up on the DTC codes. I found a local import car place not too far away that can reset the DTC codes and I have a buddy with a trailer + winch to get the car to them. The import car guy on the phone was really excited about the project when I explained to him what I was doing! I guess I have to be ready to do some customization of the plumbing. Forewarned is forearmed.
Ralph
By the way, my pictures show the oil filter housing off the car. This because I was replacing it (to add an oil cooler), not because it had to come off for the job, just in case anybody got the wrong idea from that.
Ralph
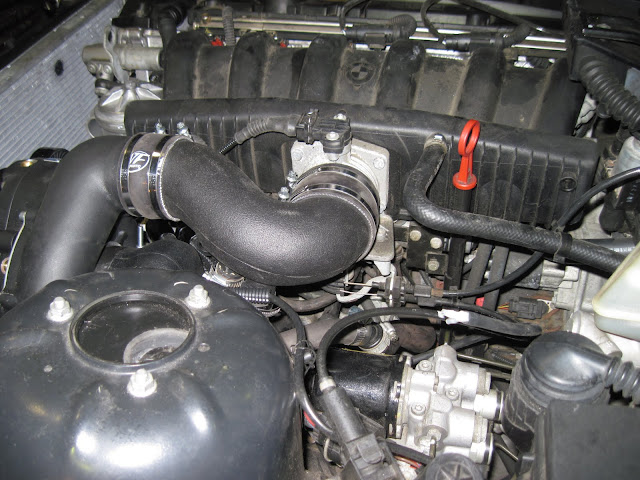
Ok, so I got the newly painted hood and front bumper back on and took it out for a test drive today. First, one more note: the plastic elbow between the MAF and the air filter is not needed, and in fact is in the way of a good fit. Also, I fabricated a hose and intake duct for the driver's brake air cooling, as the original duct will not fit anymore.
Scary fast is my first impression. I took it out on the highway and drove for a good 5 miles normally to bring the oil temp up, got off and back on going the other way and opened it up on the on ramp. Holly s**t, I thought it was going to get away from me. From about 4000 rpm up it just builds exponentially. Once on the highway I opened it up again at about 70 mph, and was instantly doing 100--I reached to shift and realized I was in 5th the whole time. Took it from a stop under full acceleration up a 1/4 mile incline and had to back off about half way up when I hit 100--I didn't want to crest over 50 for fear of police coming the other way--from 100 I let off and it coasted back down to 50 before I hit the top.
I'm used to turbo charging--had it for years on my DD's. This is something completely different--far more raw. I don't know what I expected, but it certainly has met whatever it was I was thinking when I bought it (I was thinking that now that Randy Forbes did his magic, it can handle the power).
It is way faster, and way scarier. I'm going to have to take it slow learning its new potential and limits--it has shockingly more power now. Big grin as I pulled up back at the shop.
Member
It goes so fast so fast (not a typo...)
Grumpy
BMW CCA Member
It will seem normal soon enough.
/.randy
Ralph
I know, I am already planning a 6 speed conversion and HD clutch as next winter's project. And I'm toying with the thought of routing an intercooler into the set up. Routing the plumbing is the challenge on that one.
Tony
Yes it is. AA sells an intercooler that would fit along with a spal fan(aux) that will be sandwiched by the rad and the intercooler.
As far as routing the plumbing, good luck!
Member
Ralph-
Did you end up using the intake config in the pics or did you trim the feeder flex hose? I mocked it up last night (and extended the Mafs lead) and it seems a bit long... I was also thinking it might be a good idea to attach the MAF sensor directly to the intake pipe to move it up (out of the weather?) a bit- might be easier to access for cleaning/ repair as well.
Ralph
I put the MAF directly into the end of the flex hose, and attached the filter directly to the flex MAF, and eliminating the plastic elbow they provide to go from the MAF to the filter--it is positioned immediately aft of the air duct in the bumper for the brake cooling. I think you want it down there for maximum cold air exposure. I don't recall trimming the flex hose (which doesn't mean I didn't do it, just if I did I don't remember). Here is a photo of the finished installation, with the flex hose dissapearing under the headlight housing--I don't have a picture of the MAF/flex/filter configuration (I was too excited to be that close to take a photo, and just put the bumper on):
I then fabricated a separate duct and hose to direct about half the air to the brake cooling, and half to the air filter:
The MAF lead is a little long, but no harm--too much is better than not enough.
Here, BTW, is how my oil cooler lines connect to the filter housing--45 deg. AN10 fittings on that end with straight AN10 fittings on the cooler end--very tight indeed.
Power corrupts..
You are going to love cold days. Just keep in mind cold tires. Congrats!
2002 Alpine White w/ Black 368 (<OO \(||][||)/ OO>)
Power: Custom Exhaust w/ High Flow cats, CSL headers, built, low-compression Supercharged and aftercooled S-54, ViPEC standalone ECU, Vortech V2 Si trim
Driveline: Euro 6 speed, 3.64 diff w/ 40% Lockup, Rogue Octane SSK, UUC Red TME kit, UUC Stage 3 LTW Flywheel/M5 Clutch, SS Shift Knob
Suspension & Brakes: TC Kline True Match Coilovers 500f/500r w/ adjustable camber plates, Racing Dynamics sways, Custom front sway endlinks, ATE fluid, UUC/Willwood BBK 6 piston f - 4 piston r , Slotted E46M3 Rotors, Stainless Lines, Strong Strut, IE Subframe & adjustable rear trailing arm bushings
ICE & Misc: Projector Z's w/DDE & 5k HID, 19'' Gold HRE C20's, Custom Aux pwr outlet, footwell lighting, ACS Splitters, Areo Sideskirts, Custom gauge pods, Z8 Start, Pioneer AVIC Z3, Clarus Components, 10" RE Sub in a Mister-X Enclosure, Alpine PDX 4X150 + 1X600 Amps
Coming soon:and a visit to Randy Forbes
Member
What about the angle of the SC? The oil drain is not at the bottom of the housing. On the Vortex site they show one with the vent port and dipstick even across the top. Would we need to remove the SC to change the oil??
Ok, disregard. I called Vortex and the V3 can be run up to a 45' angle with the top being the dipstick and vent even at the top. Here's the thing.. as provided, the drain tube is not in the correct port. It needs to be moved over 1 port, clockwise putting it at the bottom of the housing. Otherwise you will not be draining all of the old oil and refilling to much as well.
Ralph, by the looks of it in one of your pics your oil drain is at 5:00 (maybe 4:30) instead of streaight down, or 6:00
Last edited by carnut169; 08-16-2012 at 06:07 PM. Reason: Automerged Doublepost
Ralph
I performed first oil change at 2,500 miles as recommended--no problems. The oil drained out the drain hose and it took exactly the recommended amount on fill (- a cc or so). Dip stick reads correctly when full. Some vents out on first encounter with boost, and you will want to wipe this off to keep it off the belt, but all seems correct. Haven't had any issues and would have by now. You will smell the oil venting when you first drive it and achieve boost (above 4500+ RPM, WOT). After a few of these events it will settle down. All told I would say it vents less than 1 cc through this process. I check the SC oil when I check the engine oil (at every fill up). I keep the allen under the armrest.
Member
Have a few minor things to do (tighten hose clamps, refill fluids, install headlights) that will be completed tonight, but then I'm just waiting for the ECU & discharge tube to be returned from VF... if I had those items she could be running today.
In addition to the SC kit I installed a new S54 radiator, & oil cooler, used AN fittings filter housing and lines from Turner, distribution block from Bimmerworld, coolant sensor, fan switch, belt tensioners, alternator, and headlight bulbs.
The S54 filter housing is modified by Turner for the Vanos oil line which works as-is for the M3, but on the MZ3 we have 2 sensors and a distribution block needs to be utilized. The folks at Turner paid for my distribution block (from Bimmerworld) as mine was they did not know their kit won't work in an M-Roadster without the block- at 1st they said my 2nd sensor must be aftermarket. If I were to do it again I'd get an unmodified filter housing and Randy's adapter as the oil flows through it while mine will take longer to display accurate temp readings. I will likely install another temp gauge with an adapter at the oil cooler.
On my kit the upper radiator hose does work and only one bypass hose needs to be replaced. I picked up a 3/4" hose with an S bend to cut up & use.
The install instructions are pretty weak as previously noted. None of the manifold lines are the same as the instructions. Best to email myself or Ralph for a quick description of where they go.
Ralph
Time to get excited. When do the last parts arrive?
Member
Last night VF said the turn around was 2-3 days, but they are in CA... they also said my ecu had not arrived but the tracking info shows otherwise. They said they'd re-check this am.
I'm guessing Monday...? At this point I's be happy to pay for the 2 day return!
Ralph
Don't bother, VF isn't so good on the turn around--they will get to it when they get to it, then send it back fast--the delay is in their shop, not the shipping.
 Posting Permissions


 Reply With Quote


Bookmarks