
 Member
Earlier tonight while I was doing my power seat gear install I decided to make a DIY out of it, and here it goes.
In this DIY I will be replacing my recliner gear.
Tools needed:
1.)Torx screwdrivers or socket bits (T-30, T-25, and T-20)
2.)Socket and ratchet to remove the seat (5/8" socket)
Project time:
1 Hour 40 Minutes (You actually should complete it faster, stopping and taking pictures for this DIY is what made the install take longer for me)
1.)The first thing that you are going to want to do is to remove the 2 plastic caps which are covering the 2 nuts that hold the front of the seat to the floor of the car (one nut and cap on each side):
Now you can remove the 2 nuts, they require a 5/8" socket.
2.)Now you are going to want to remove the 2 bolts that are holding the rear of the seat down to the floor, they use the same size socket as the 2 front nuts did:
3.) Now that the seat is completely unbolted, you are going to want to go to your trunk and remove the cable from the negative terminal of your battery, doing so will prevent an unwanted airbag light from appearing on your dash once you unplug the seats wire harness.
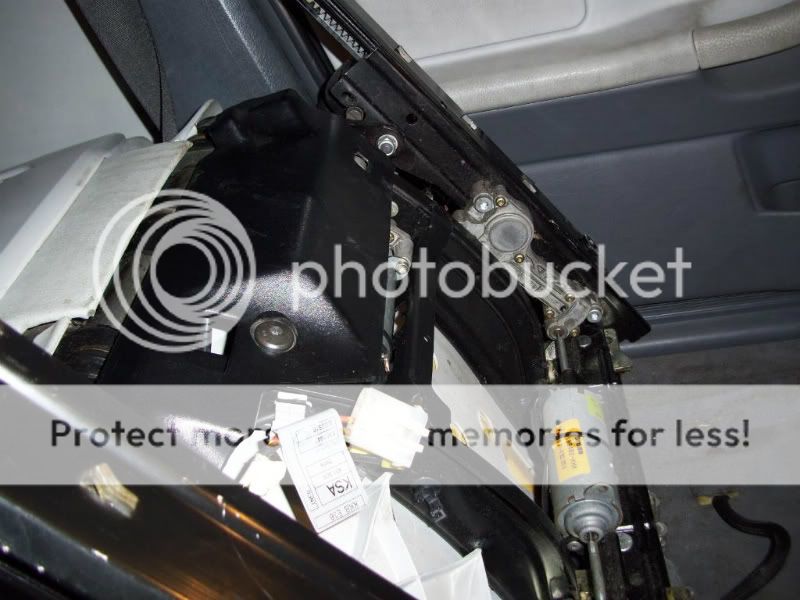
4.) Now that you have removed the cable from the battery's negative terminal, go back into the car and tilt the seat back and peek under it, you will see the wire harness which is 1 large and 2 small female and male connectors, carefully disconnect all three of them:
5.) Now you can carefully remove the entire seat from the car, or do what I did, which was simply turn it upside down in the car. The next thing that you are going to want to do is to remove the black plastic kick plate, there's only one T-30 torx bolt holding it on:
6.) Now that you have removed the kick plate, the 2 motors and gearbox should now be visible:
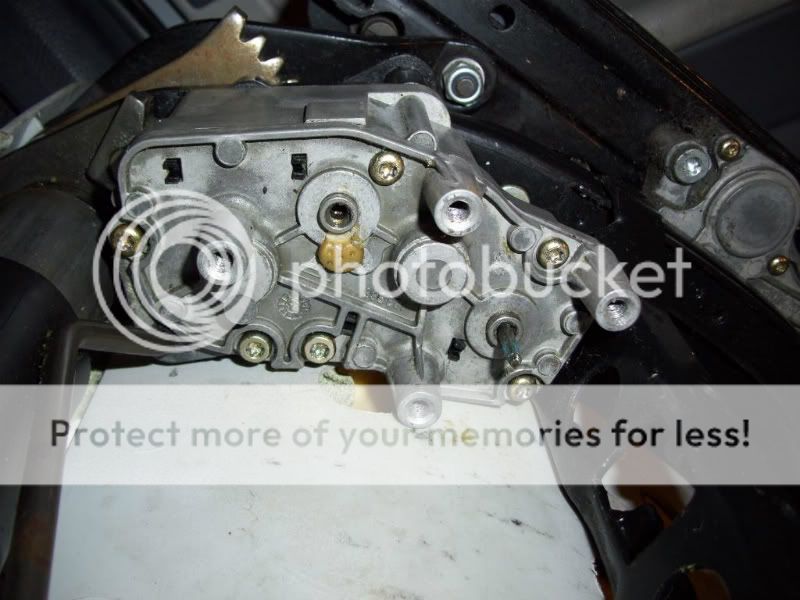
7.) Now you are going to want to remove the 2 motors, there are two T-25 torx screws on each motor that connects it to the gear box. You will have to remove the motor which is sitting on the top first:
8.) Now that the top motor is removed, go ahead and remove the lower motor and sit both of the motors to the side out of the way like so:
9.) Now you are going to want to open up the gearbox, so remove the six T-20 torx screws that are holding it together. (REMEMBER WHICH SCREW GOES WHERE, BECAUSE THE 2 ON THE BOTTOM ARE ACTUALLY MUCH LONGER THEN ALL OF THE OTHERS):
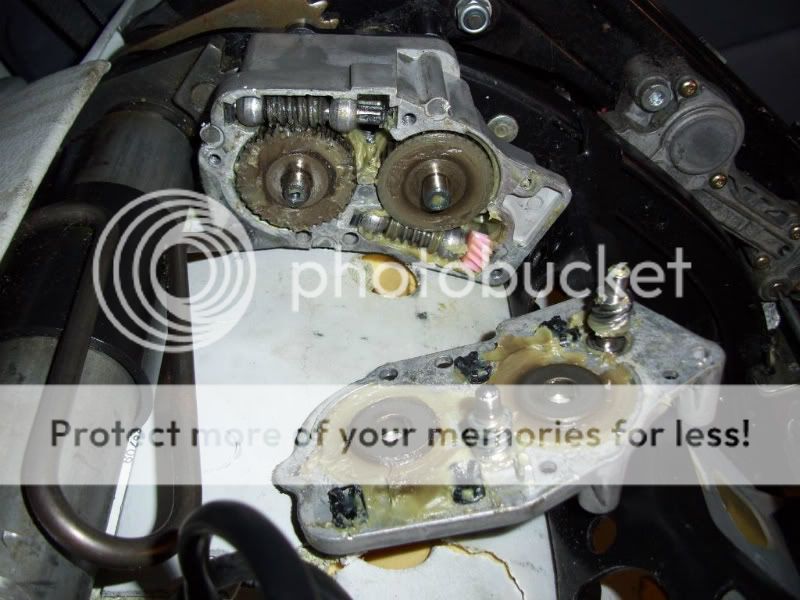
10.) Next you are going to want to go ahead and open up the gear box, you may have to gently use a flat headed screw driver to pry it apart. Remember, GENTLY.:
11.) Now you can carefully remove the gear of which you are replacing, in my case it was the recliner gear which is at the top. The lower pink gear controls the bottom portion of the seat. Here is the threaded rod in which the recliner is supposed to be pressed onto, but the gear has disappeared because it had broken off and was chewed to tiny bits by the gearbox, which is why my recliner wasn't working.:
12.) Generally when you buy a new power seat gear, it will not come with the threaded rod already attached, so you will have to carefully use some sort of bench press or clamp to press the new gear onto your old threaded rod. I didn't have to do this step because I purchased my gear already pressed onto a new threaded rod from a forum member.:
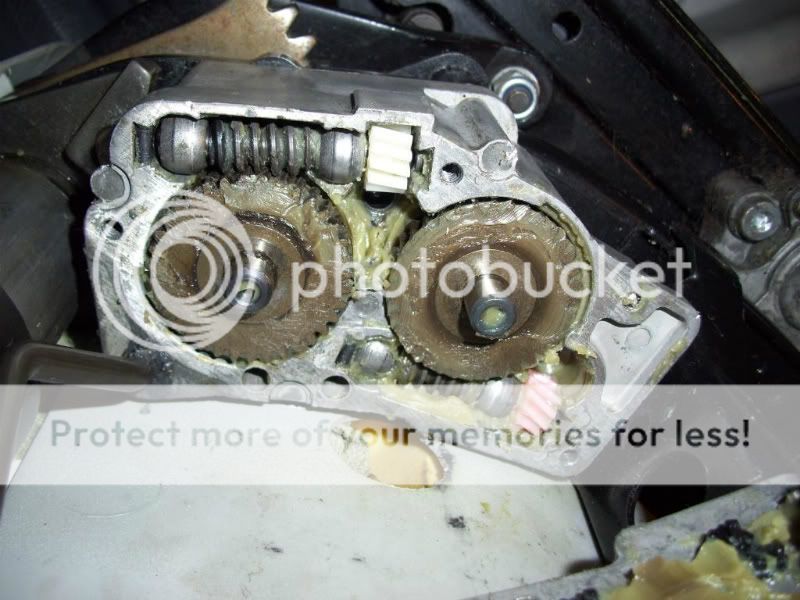
13.) After you have removed the broken pieces of the old gear from the gearbox, you are going to want to reinstall the threaded rod and new gear into the gearbox like so:
14.) Now make sure you lube everything up nicely (get your mind out of the gutter), and put the gearbox back together. It may take some effort to get the gearbox face back on, so just wiggle it and play with it for a while until it snaps into place. Then re-install all of the screws (remember that the 2 longest screws go on the bottom):
Now re-install the motors starting with the lower one first, then the upper motor, then re-install the plastic kick plate which is held on by one torx screw. Put the seat back into the car, or in my case just flip it back over, then re-connect the 3 harness wires that you removed earlier. Now bolt the seat back down, re-install your battery cable back onto the negative terminal of your battery, and enjoy fully functional power seats again.
Last edited by 013137; 01-28-2012 at 01:18 PM.
Member
i need to do this to my drivers side.
how much did you pa for your gear?
any input on another problem i have? the passengers side. whenever i stop, the recliner part goes to the front. its loose. you think the gear on that is bad too. or another part broke?
Last edited by JE BMW; 01-28-2012 at 12:53 AM.
Member
Awesome! Do a DIY on removing and shipping front fenders to me.
Member
Well the plastic gear's only function is to transfer the motion of the motor onto the threaded metal rods, the threaded metal rods are what hold the seat into the position that you have chosen. So I'm thinking that the threaded metal rod must have popped out of place therefore not holding any position. Open the gearbox up and take a look.Originally Posted by JE BMW

Don't you mean front bumper?
Last edited by 013137; 01-28-2012 at 01:16 AM. Reason: Automerged Doublepost
Member
ok. well now i know what to look for. thanks..thats gonna be next on my to do list
currently i have my right back seat belt strapped to the front passenger seat. it holds it back whenever i stop.
good write up btw.
Member
Indeed a good write up.
Last edited by epmedia; 01-28-2012 at 01:52 AM.
Tbd
Member
Thanks for the great write up. I need to do this as well on my wifes car.
Member
Thanks guys and glad I could help
Member
Nice job. If anyone needs one i have the gear for the passenger side. I'll give you the smae deal I gave OP.
Bleed your cooling system http://forums.bimmerforums.com/forum....php?t=1709482The ULTIMATE OEM Alarm/Keyless thread http://forums.bimmerforums.com/forum....php?t=1792200
Member
great write up on this Man those little gears are expensive $40.00 @ pelican parts has anyone found new ones cheaper?? I need passenger side recliner gear
Member
Sorry passenger side gear is sold. This issue comes up fairly often. It nice to finally have a DIY with decent pics instead of just a set of written instructions. This should definately go in the DIY section.
Last edited by flyfishvt; 01-28-2012 at 08:44 AM.
Bleed your cooling system http://forums.bimmerforums.com/forum....php?t=1709482The ULTIMATE OEM Alarm/Keyless thread http://forums.bimmerforums.com/forum....php?t=1792200
Member
Nice writeup
95 E36 316i coupe
M52B28 swap, Electric heated leather sport seats, Mtech steering wheel, Mtech bumpers, PDC, Illuminated gearknob, Chromeline interior, 4300K Bixenon ( Hella evox-r ), Koni Str.t/Eibach prokit, Eibach swaybars, Z3 steering rack, 17" BBS RC304, Michelin pilot sport tires
Member
Thanks guys, and btw I did some investigating and found the exact size torx bits and socket to use, I just now edited it into the DIY
Diff Killer
Moderator
nice work. as per flyfishvt's request, this thread has been moved to the DIY forum.
Hey man, I'm a professional!
Member
I'm having a bit of an issue with the pink gear (seat bottom height adjustments); I fixed the white gear recently, but then my seat stopped being able to go down to the minimum height... when I checked the gears, the pink gear was still intact - the gears are just stuck for some reason! wtf! i don't see any foreign bodies clogging up the mechanism--- do you guys think I should replace the pink gear anyway, even though it isn't broken???
Member
This is great I am having the same issue and need to do some motor and gear work on my driver side. Also need to do the cables that allow you to flip the seat forward for passengers thanks for the write up.
Member
My drivers seat won't recline, and after doing a few searches I found this thread and decided to just take a look at that white gear. The white recline gear is still in and seems to be intact. When I try and recline the seat, I hear the motor working but the seat just wont move. Could the white gear still be my problem? It looks to be intact.. Or is there something else that may be causing the seat not to recline? Thanks.
Member
hey thanks if you have one still (1999 328is convertible) quote me and tell me how to pay
thanks
gatr2000
Member
FWIW, when mine failed the gear was not in pieces; it was just cracked. It looked fine until I removed it from the gearbox.
My seat reclined but would not come back up.
Member
Great write up and thanks for sharing!..
When I first got my 328is my recline didnt work the dealer charged almost a grand for the R+R of the complete motor frame assy for the sport seat!
So, yeah if it happens again I`ll know what to do. Who was your vendor that supplied the gear on shaft assy?
Thanks again
Member
All you need is the plastic gear. Pelican Parts gets their gears from Odometer Gears, and as far as I know they are the only place that makes them. Pelican stores the parts on the west coast, Odometer is on the east coast. Same price either place so depending on shipping, order from whichever one is cheaper/closer to where you live (if time is of the essence).
www.odometergears.com is their website.
1995 M3 Coupe - Cosmos - CES Built S52 Bottom End - JE Pistons - Eagle Rods - S52 Cams - GT3582R - SPA T3/4 Manifold - RK Tuned - 513rwhp
2016 Ford F150 SCREW - Leveling Kit and Tires for now
Member
I just ordered mine from FCP and will be doing it this week. Thanks for the write-up.
http://www.fcpeuro.com/products/bmw-...Fcuh4AodbwYAng
Member
Awesome DIY. Will be using this for my passenger seat.
Member
Hi, on my '98 328i....
The airbag light you refer to in the DIY, mine is on and may be because the passenger seat unplugged itself when the car wash guys moved it all the way back?
I couldn't move the seat until I got under it and discovered that it had unplugged.
Is there a way to clear that light?
Thanks in advance....
Still Workin' Still Broke
Great write up. Thanks to you, I replaced the gear yesterday. 02 Salvage in Hayward wanted $70 for the gear which RM European sells for $35. Highway robbery.
 Posting Permissions


 Reply With Quote


Bookmarks