
 Member
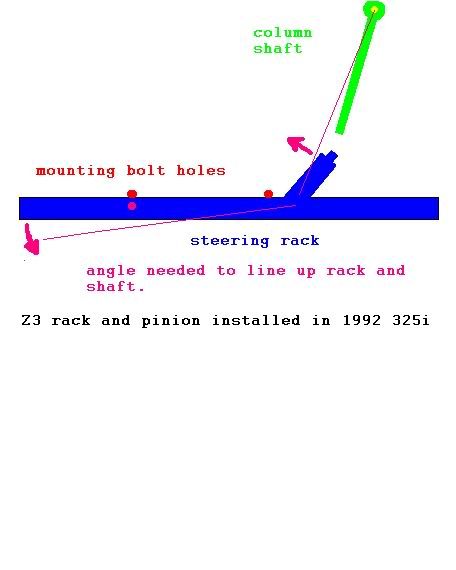
Try aligning the rack and the column with the rack NOT bolted to the subframe.
Had a similar problem over the weekend when installing a ZHP rack.
Who me? I didn't do it.
Joon, Would you happen to know that part number? realoem showed the same thing I all ready have. Thanks!Originally Posted by joon

I think what I need is the second u joint to allow for the differnce in angle. Its good to know that there is a factory option. Vorshlag makes a double u-joint shaft for $350 USD
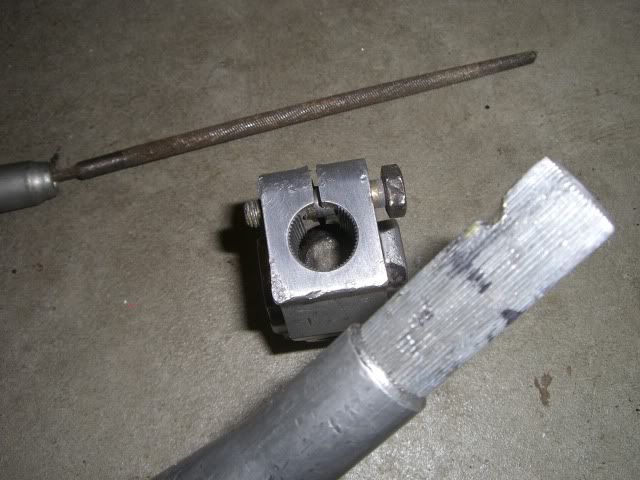
Thanks for the ideas, I tried this though, once the rack is attached the bolt holes will not line up, its just to great of a difference in the angles
Here a diagram......... mad paint shop skillz in progress
Last edited by eye145; 02-06-2012 at 09:28 PM.
Member
Does the u-joint further up the column still articulate?
Who me? I didn't do it.
yup, I even tried to put the u joint at different angles but that doesnt change the intersecting angle where the coupler goes.
Member
Odd...do you think it would fit if you still had the rubber giubo on the column?
Member
I still have a spare piece I'll go home tonight and get you the P/N and take some measurements
The part number is 32306756055
It's almost exactly 390mm long

Last edited by joon; 02-07-2012 at 08:35 AM. Reason: Automerged Doublepost
- Peter Shen -
Who me? I didn't do it.
Awsome! Thanks for the part#, detailed pics and measurments.
Member
Wow nice, thanks Joon, i will need to figure this out too. I am going to switch racks as well to the Z3....
In for update.....
Who me? I didn't do it.
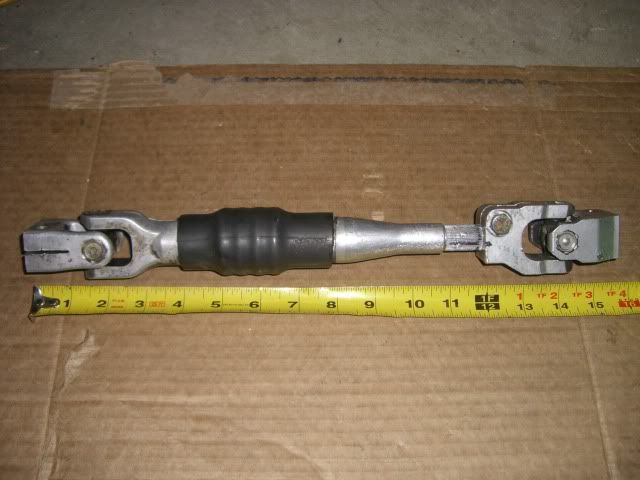
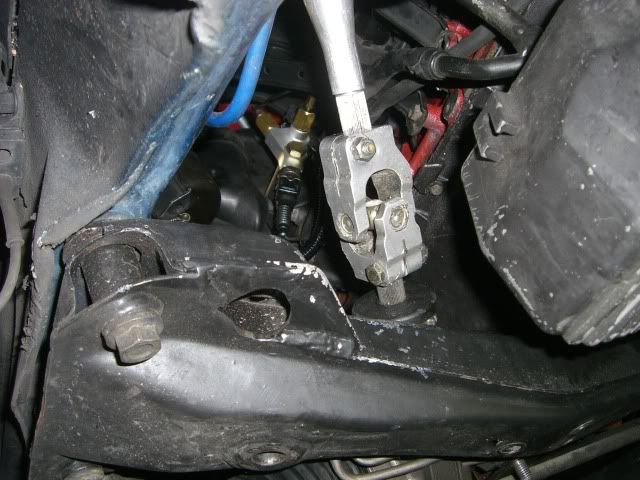
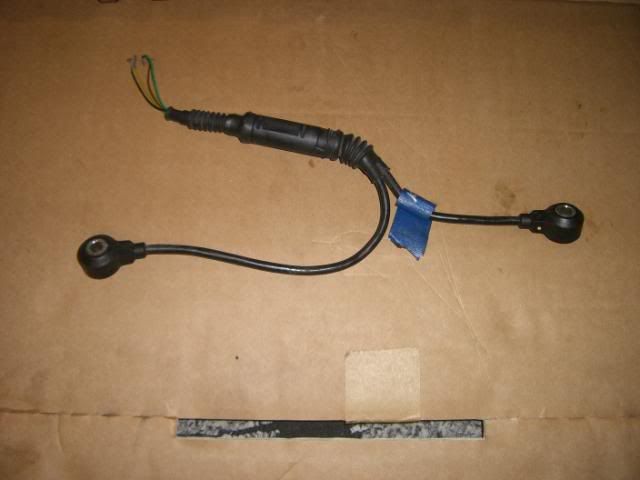
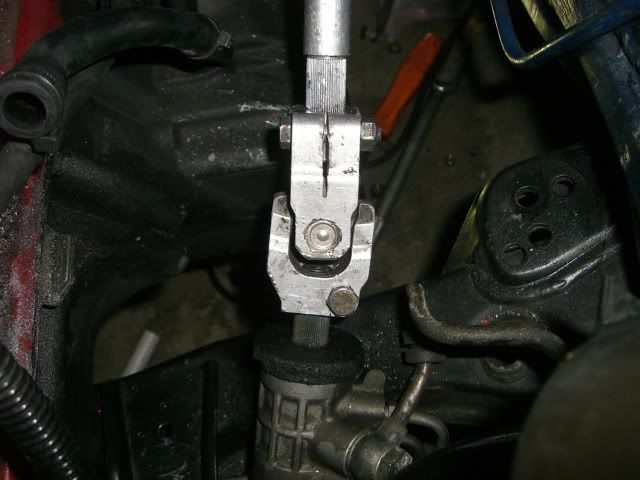
Fixed my steering shaft issue, I had an idea while talking to Damon at our last BMWCCA chapter meeting. He has done a ton of mods on his race car and was trying to understand the issue I was having. He mentioned that his rack had a u-joint right at the connection point like the one Joon has posted picks of. After a trip to the junk yard I found a steering coupler from a e34 (1991 525i) Fits perfect. I had to make one notch in the e36 shaft to allow the bolt to pass threw.
Cost $5 from local junk yard. OEM part and removes the rubber from the steering shaft.
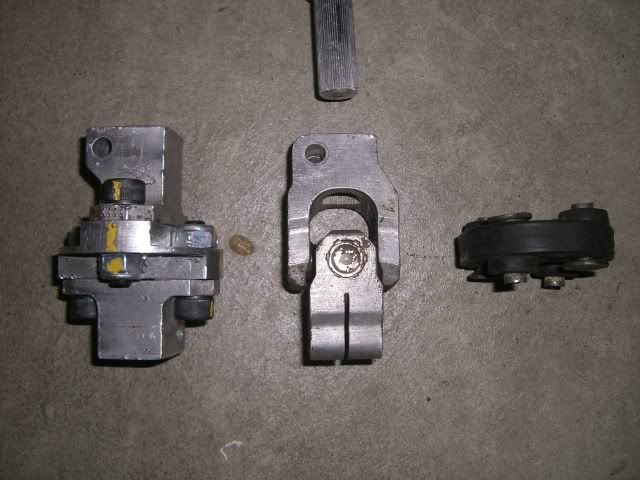
AKG disc on the left, e34 coupler (32311150489) center pic and oem rubber joint on the right.
you will need to file a little notch in the e36 upper shaft to allow the coupler to clamp down.
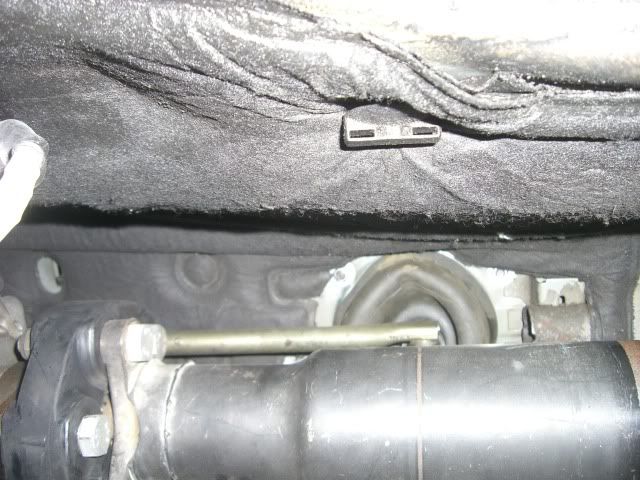
The shaft assembled and ready to go back in the car. 15.5" long
view from the bottom
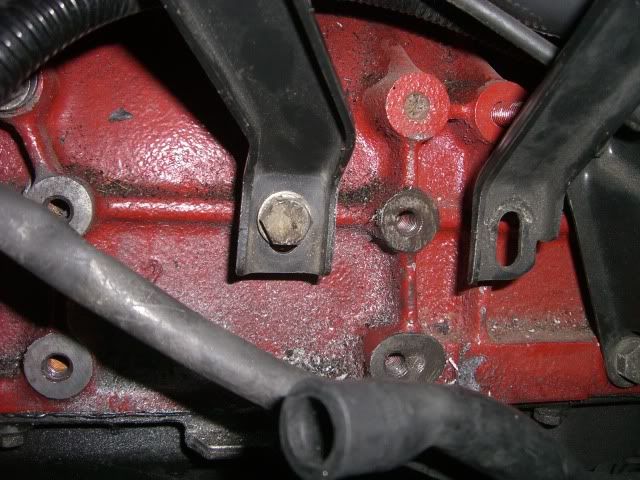
Next up is the motor mounts and support bracket.
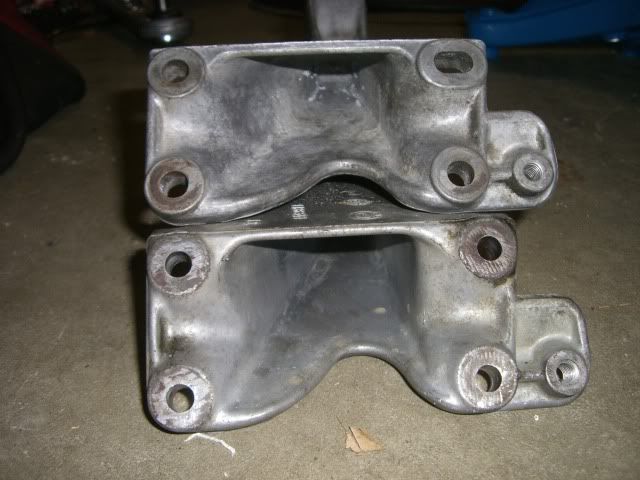
I figured on using the bracket off my m50. No dice, the bottom right bolt hole is moved a little forward on the s52 block. You can see in the picture the little scribe marks right next to the bottom right mount hole. I will work on getting a new engine mount bracket on Monday.
The only difference between the two brackets is the bolt hole for the bottom right bolt. In the photo its the upper right hole in the bracket, notice the one on top is oval and allows the bolt hit the hole. s52 engine mount bracket on top of the m50 bracket
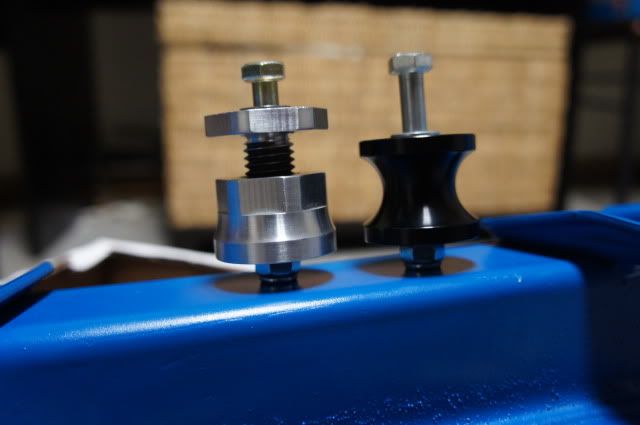
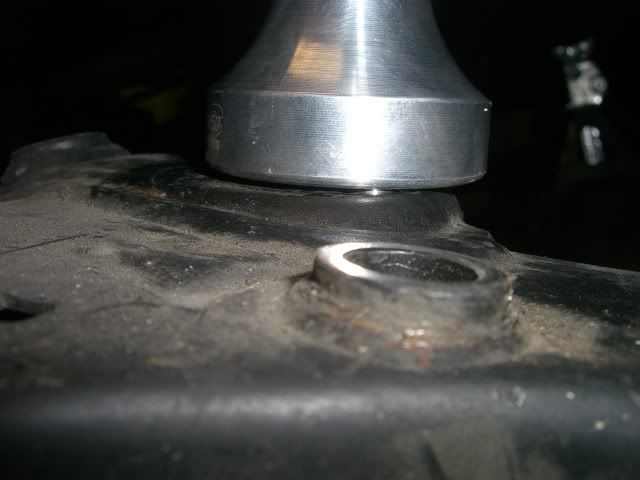
The new VAC aluminium mounts look great. Just one problem, the locating pins bottom out on the subframe. Because of this the mount can teeter on the pivot point thats created. Grinding a couple millimeters of them shoud allow the mount to sit flush on the frame.
You can see that the mount is not flush here
heres the nub that will get ground down a little
Last edited by eye145; 02-18-2012 at 11:43 PM. Reason: Automerged Doublepost
Member
Wow, great fix. This is what i will do. Thanks again and i hope to see more updates.
Who me? I didn't do it.
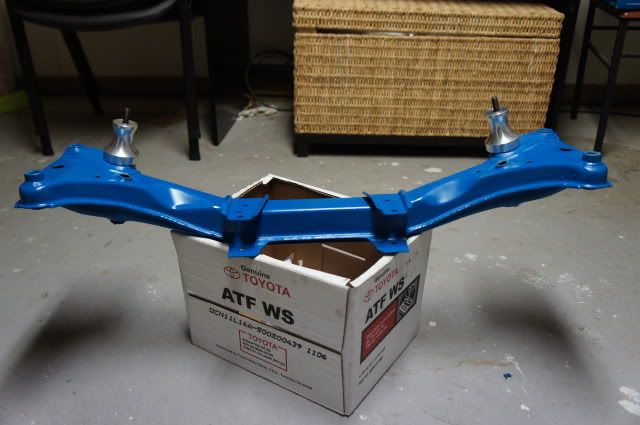
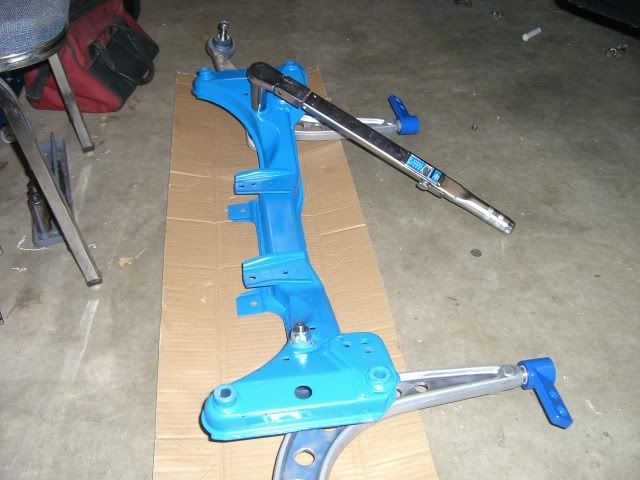
Almost ready to go back together with stuff, still waiting on the left motor mount bracket. In the meantime I decided to paint the sub frame......Ford blue. My coworker told me my car will break down because of it
Here is the solid trans mounts. I am really diggin the adjustable mount on the left, its adjusted up so you can see the threads.
Member
Nice update! Is the dowel aka nub pressed in all the way? Smack it with a hammer and see if it is actually bottomed out, or touch it to the sander, either way is probably fine.
Interesting, I have not seen the adjustable trans mounts yet, caught me off guard. Is this feature used like a stress relief not putting tension on the driveline?
Who me? I didn't do it.
I just ground them down a little on the grinding wheel, only took a millimeter or two off. Glad I caught it and didnt just tighten them down in there.
I am no engineer but would assume that the adjustable mount keeps from loading / stressing the trans case, mounts, arms and mounting points since there is no give like rubber or poly. The cars chassi has uneven mounting points and seems like a good idea just to be on the safe side. May help keep parts from fatiguing.
I bought these specificaly from VAC since they were the only vendors with that option.
Going threw some old photos trying to find some missing shots from stripping the car out and dicided to post these up to:
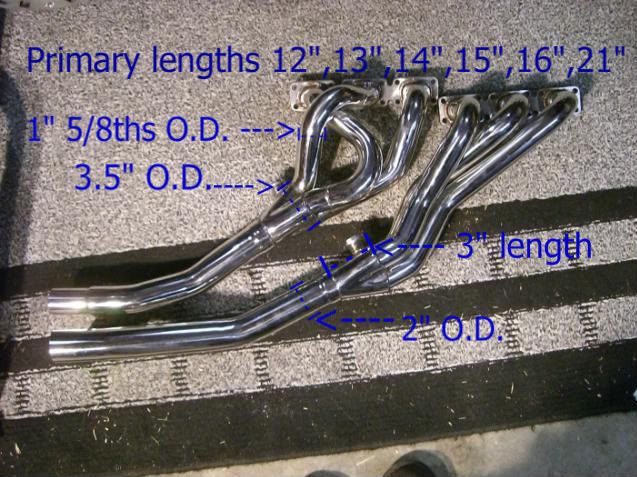
The measurements on the ebay stainless SuperSprint knock off headers. I wonder how much of a difference equal length headers would make in hp & tq? Notice the measurements at the top are the lengths of the primarys. The real SuperSprint headers look the same as these but cost at least 10 times more.
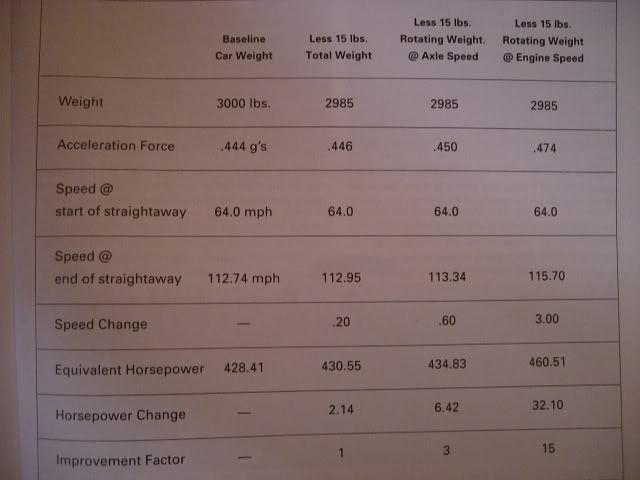
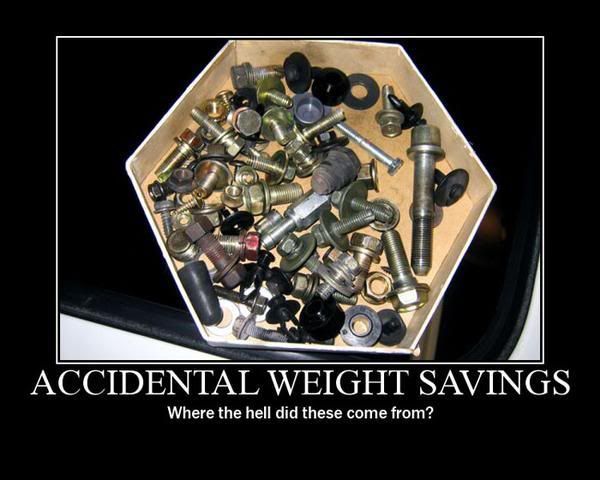
If you have a chance to remove rotating mass, do it! Look at the difference it makes.
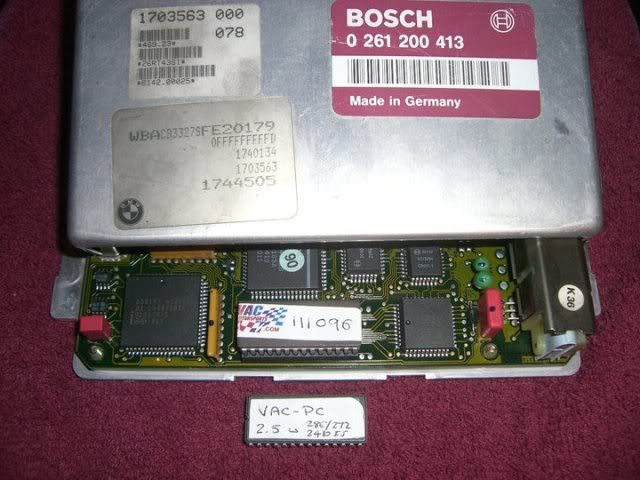
VAC chips, one for cams in the M50 and one for the S52
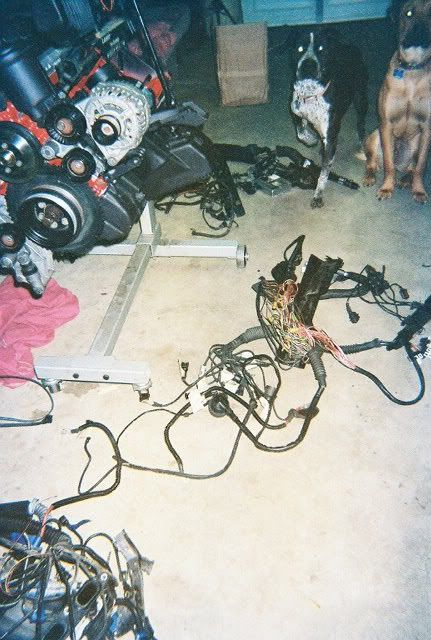
working threw the 1995 vanos/obd1 wire harness. It will control the engine once I get some stuff swapped around. The knock sensors and coolant sensors are different between obd1 and obd2 engines
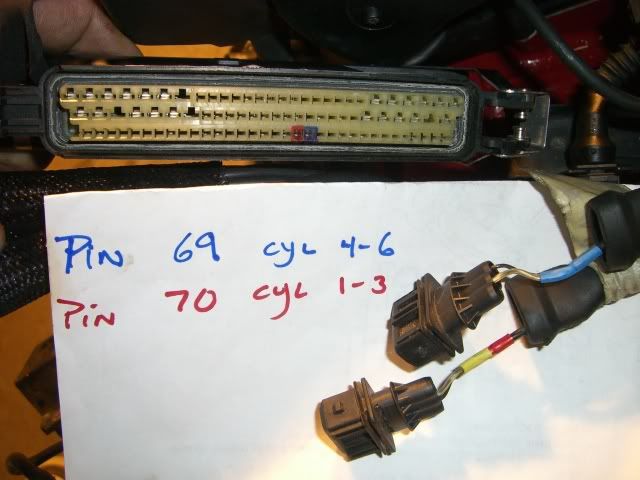
If I remember correctly these are for the knock sensors. To identify them on the wire harness end I did a continuity check. Figured I would make it easy for someone in the future
sensors and plug
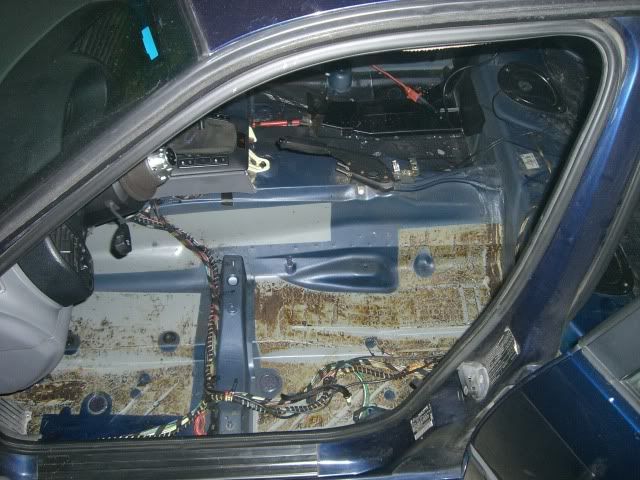
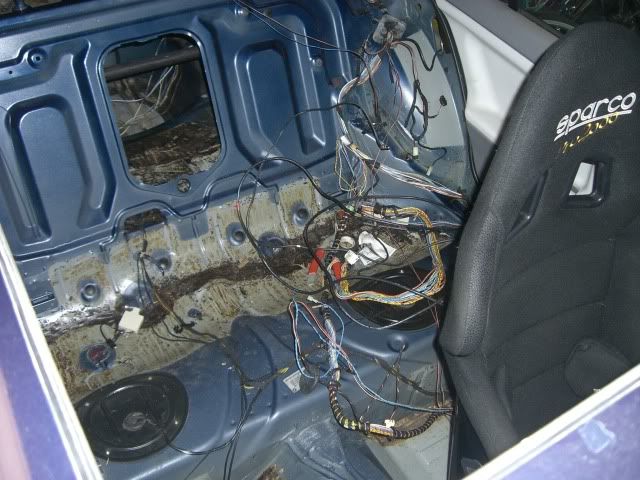
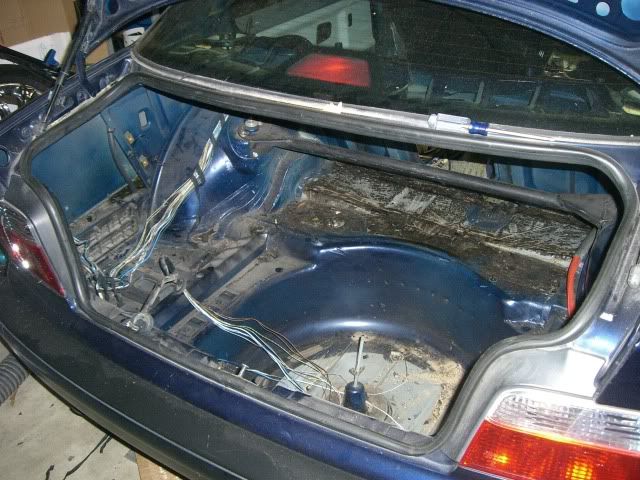
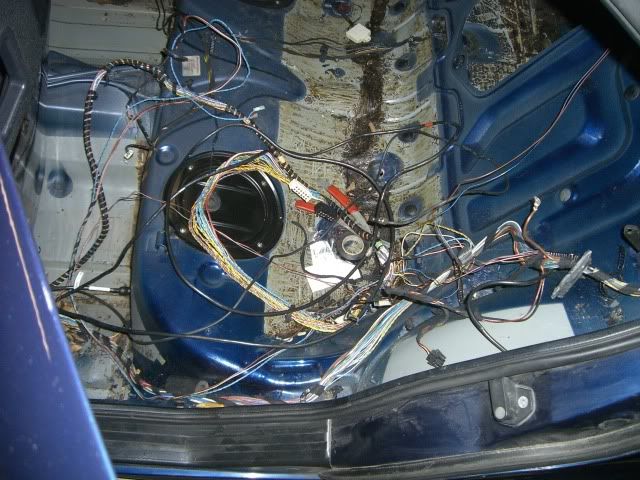
stripping sound deadning and interior out of the car. I think I pulled around 400 pounds of carpet, wires, screws, brackets, carpet, seats, cushions,headliner, sunroof, ect...
Trying to thin out all the unneeded wires to the rear of the car and rewrapping the harness. All most ready for some paint
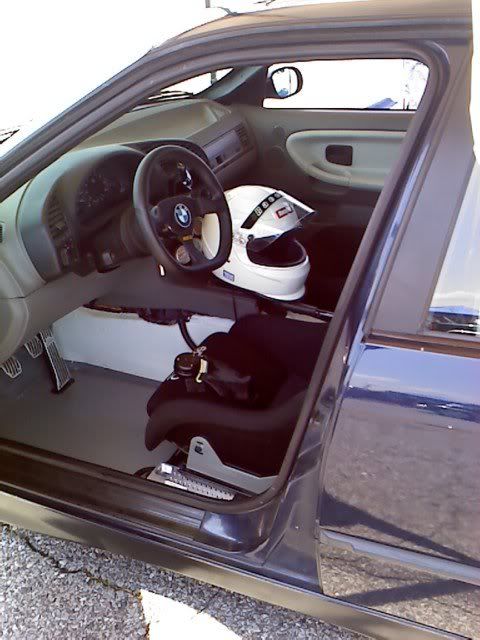
All cleaned up and at the track...
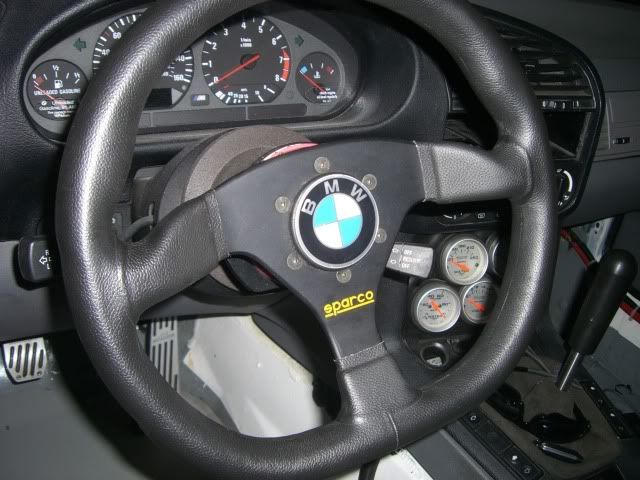
I found the wheel emblem sticker off a e30 bottle cap wheel fits right over the center emblem of the sparco steering wheel
Here is my "high performance waterpump" I think I had around 1500 miles on it and it started leaking. Stewart high performance waterpumps I assume are normaly better than this. I stuck an oem pump in to make it to the race track the next day and still have it in. I cant recall who I bought it from other than it was part of a group buy here on bfc.
I stopped using coolant since the car is now more a track dedicated car. Just water wetter and distilled water so I dont ruin someone else's weekend.
Last edited by eye145; 02-29-2012 at 09:15 PM. Reason: Automerged Doublepost
TraqSlut
Most tracks don't even want water wetter in your system.
We are building a very similar E36 for Lemons/Chump and I was also stunned at how much the stuff we pulled out of the car weighed. BMW may have the heaviest foam rubber on earth! Add to that the maybe 75lbs of wire we pulled out and the car is now much lighter.
Good looking build btw! Hope you don't mind if we steal a few of your ideas with slight modification to be cheap crappy and cheap.
Member
Hey Jon,
Glad to see you got the steering worked out! Also, great job on documenting your build! Lot's of good info you are sharing!
Damon in STL
Damon in STL
'88 e30 M3/M42t - GTS3 #72 - Motorcraft Ign., Volvo Injectors, Thrush Turbo Muffler, Open Source ECU, Aerospace Connectors, Lowes Polycarbonate, Alumacore Front Splitter and Rear Diffuser, Honda Radiator(s), Racer's Tape (white), Tornado, Various Stickers, Farm Implement Paint (gloss white), Nationwide Series Windshield (Fontana version), GMC Boost Solenoid
My current car: e30 M342t Evolution
Compact advocate
Story of my life haha.
Past Builds:
S54 E36 Compact Build|Thread|IG|@_goldfinger|
Current Fleet:
Z4 M Coupe - Black Sapphire Metallic over Black
Who me? I didn't do it.
Thanks! Good luck with your build, if you are going to copy the air damn idea you may want to reconfigure the set up so that a front end impact will not take out the radiator. Since i am doing de's right know not much of a concern. If I was racing I would make it to were an impact would not take out the radiator. Circle track race cars sometimes use canvas because it collapses with out collateral damge. Just a thought.
Thanks Damon, I love getting lucky and figuring out cheap alternatives to my problems..... even if the problem is one I created for myself
Peekaboo!
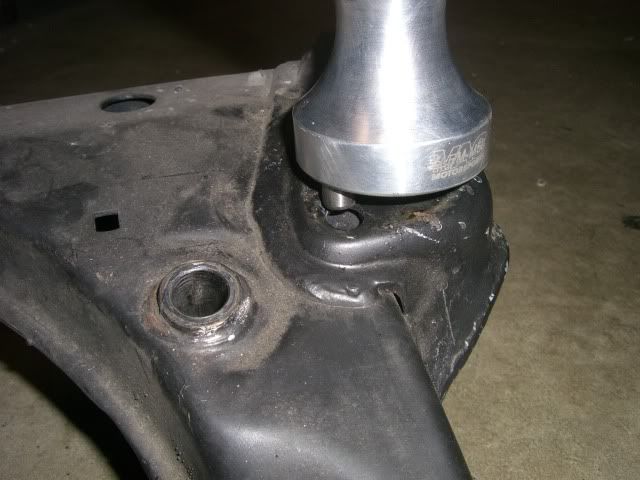
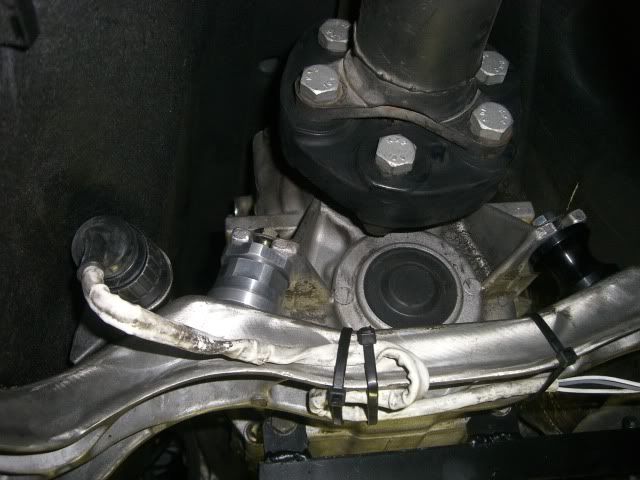
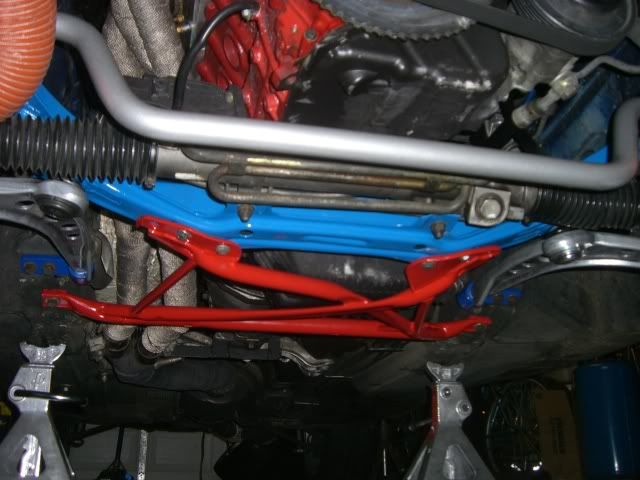
Its a heck of a lot easier to torque the inner ball joints out of the car, be sure the taperd part that the ball joint fits into is clean and free of dirt and paint, other wise in the long run it could wallow out the hole and snap the ball joint.
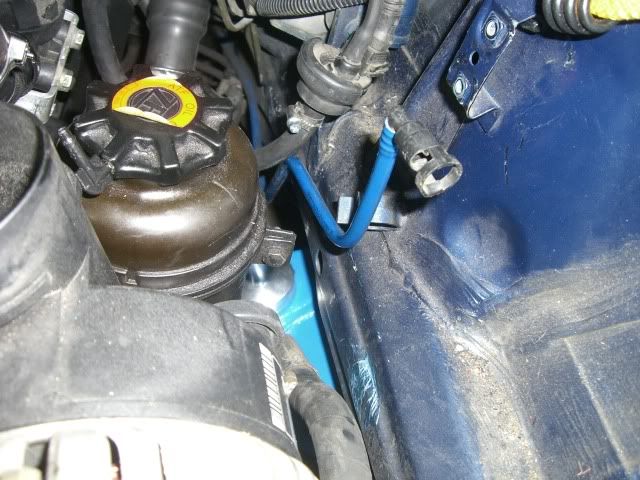
Going back together with stuff.... I think I will leave the charcoal can out and just throw a filter on the evap (blue) line and zip tie the evap valve off to the side to keep the check engine light from turning on
Here are the trans mounts installed.
Here you can see I flipped the rubber boot from the top and covered up the shifter from the bottom to keep out dirt and grit from the solid mount shifter bearing. Notice the shifter rod is mounted in the solid aluminium plate and not the stock carrier wich has been removed.
from the top
Last edited by eye145; 02-29-2012 at 12:41 AM. Reason: Automerged Doublepost
Member
Hey eye145,
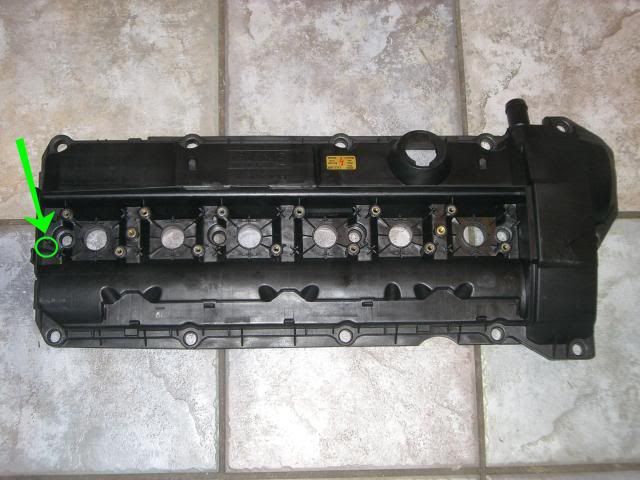
With regard to your item #7 of things to do, thought I'd pass along what the guru of Dutch E36 warned me about: yes, that seepage at the rear of your valve cover has been known to kill #5 and #6 coils/plugs. The cure is to replace (14! of) those little round o-rings and the main valve cover gasket. With all you've been doing, that's probably been done by now, but wanted to make sure you know that this is an established problem that is made worse by pushing the M50 motors hard at the track.
Now, for me...would you mind telling me where you found the best place to be for that dead pedal? I.e. how far to the left of the clutch pedal and how far to the front of the car or to the rear in relation to the clutch pedal?
I'm doing up a recently obtained (cheap!) '91 320i sedan. This weekend is my first driver school where I plan to take the racing license exam. I figure the 150 hp motor is plenty for me to learn how to turn and brake and what the different flags mean, but eventually I'll want to follow your example of M3 power, etc.
Thank you soooooo much for putting all this great info' on the forum.
Take care,
Steve (near Amsterdam, but originally from North Carolina.)
Who me? I didn't do it.
Thanks for the info Steve. I will get some pics and measurements when I get home tonight. I think its more of a personal preference in regards to the angle and height. I have seen a few dead pedals that were adjustable on the foot protection bar if you have a full cage.
Last edited by eye145; 03-06-2012 at 12:43 AM.
Who me? I didn't do it.
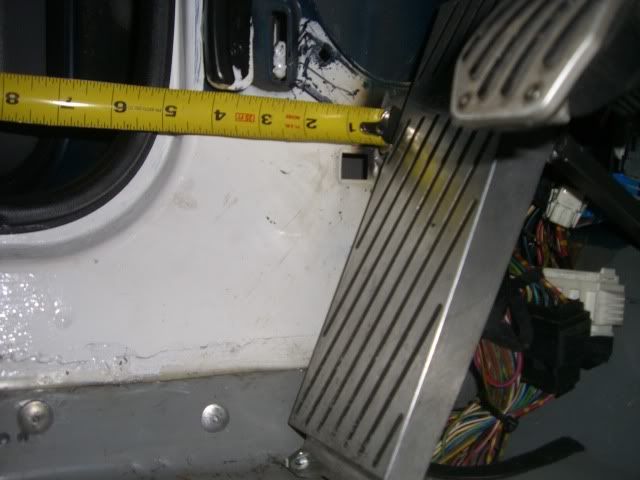
Here is a pic of the dead pedal. It is placed just a little behind the gas pedal and about the same angel as the gas pedal just tilted forward a little more at the top. That is what felt good for me. The idea was to put the dead pedal at the same position as the gas pedal when giving maintance throttle going threw sweepers / hard turns.
To give you an idea of pedal heights I measured from the center of the pedals to the front of the seat:
dead-pedal 19.5", clutch pedal 16.5", brake pedal 17.5", gas pedal 19"
Got a little work done tonight..
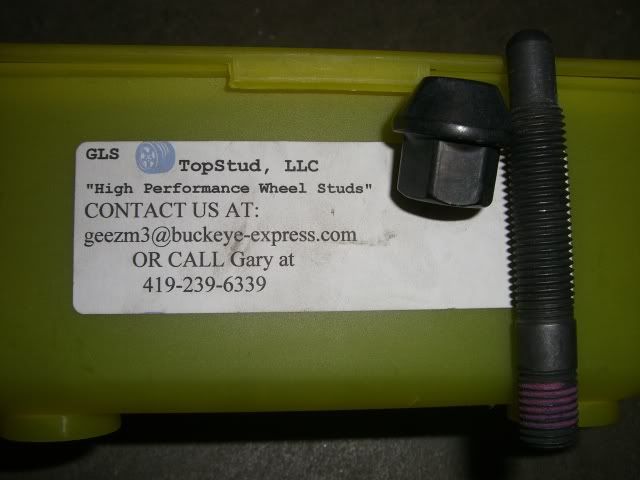
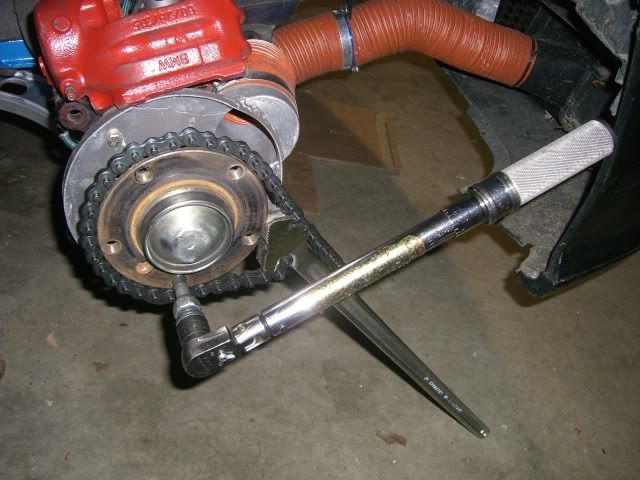
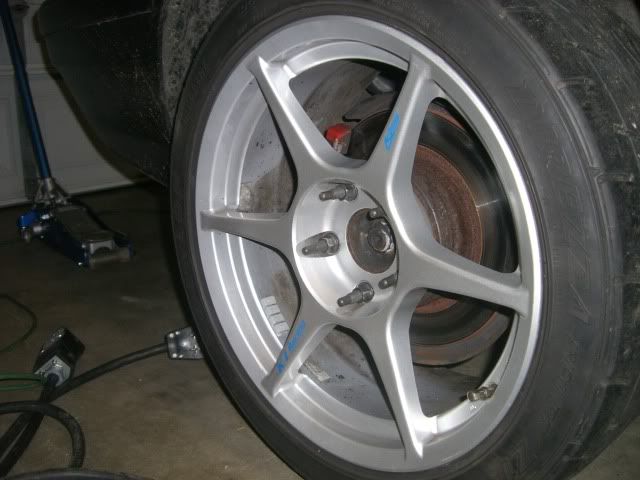
Installed wheel studs, no more fighting with the rotor trying to hold the tire and line up the holes for the factory lug studs. Thanks Julian for the studs!
Putting them in, my chain wrench is overkill since these studs get torqued to only 16 ft. lbs. However it is nice because its one less thing to hold. If you have your brakes together it would be alot easier to just step on the pedal to keep the hub still.
wheel stud hotness
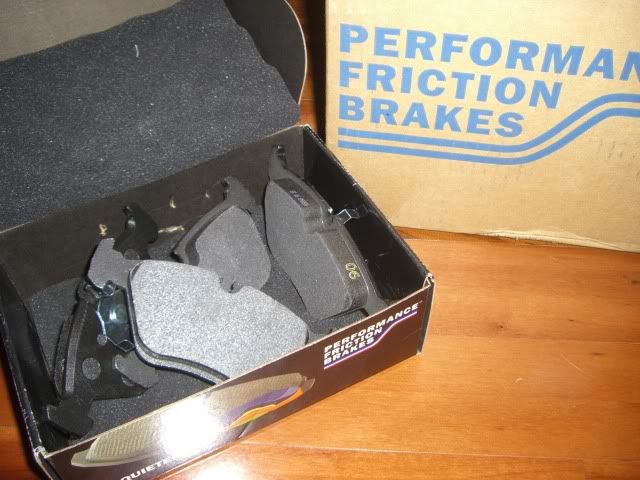
I put the front rotors and calipers back on the car to find out I got the wrong brake padsLooks like the pfc pads I got fit the e30 M3. I will send back for exchange later this week.
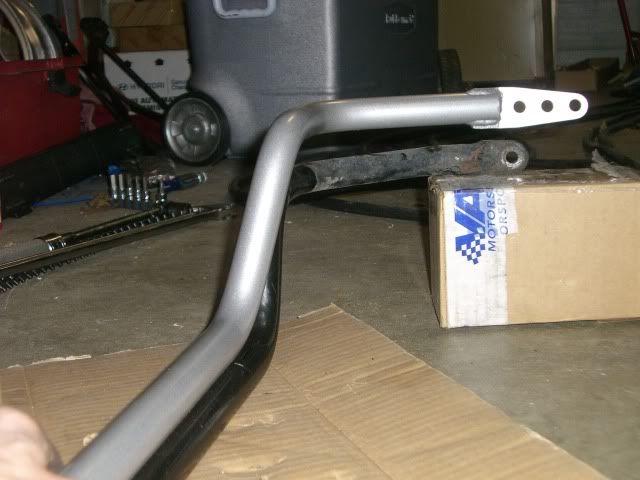
Moving on, I was going to change the sway bar. Got it out next to the new UUC sway bar. Not much of a difference, 2mm to be exact 25mm vs 27mm. However the stock bar is shorter by about half an inch.
My calculations (in no way scientific and could be wrong) stock bar has 468 lbs/inch vs 562 lbs/inch for the UUC bar on the front hole. Middle hole 450 lbs/inch and rear hole 369 inch/lbs. Only the bar set in the front holes will yield more spring rate. ohwell, I hope I am wrong here. Maybe material difference?
here is the old sway bar bracket, ick it looks like leather on the inside... got some new ones since they are fairly cheap and installing a new bar.
new brackets and bar, lubed with some Lucas red tacky grease
Umm... might be time to put the paint can down........
WooHoo!!! brake pads arrived today
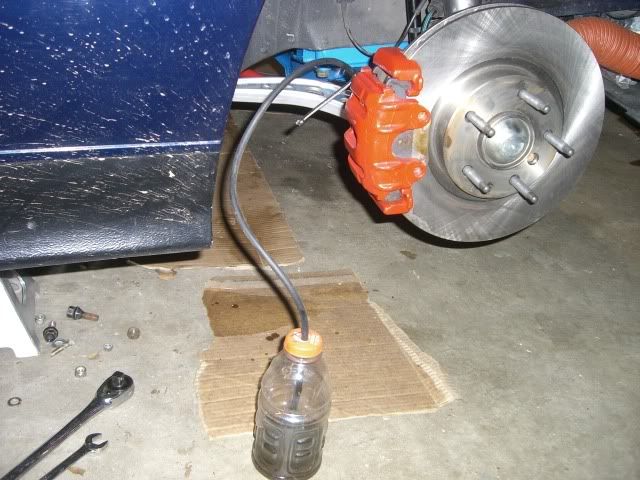
I have found this to be the easiest and quickest way to bleed brakes. Just make sure the tube in the bottle is submerged in the brake fluid, crack the bleeder open, pump the pedal 12-15 times, check your fluid level in the master cyl. reservoir every 4 to 6 pumps, close the bleeder when your done. rinse and repeat on the other wheels.
Last edited by eye145; 03-06-2012 at 12:46 AM.
Member
Something must be off with your calculations.
Resistance to torsional forces increases to the third power of the bar thickness. So 2mm doesn't sound like a lot but it sure is a lot. I would guess that all three holes will exert more force than the stock bar. Materials should be the same.
I love TOKYO
Hmm I just got a zionsville alum radiator and it came with a free steward high performance pump but this has me concerned....should I just have stuck with an OEM pump? Love the build BTW.
Member
Good modification
Who me? I didn't do it.
Jayjaya29, You also need to consider if its a solid bar or hollow tube. If you click on " My calculations " it will take you to a calculator to enter in your sway bar specs.
I wish I new for sure what each hole changes the stiffness to from stock.
Inc3ctiv3, thanks! As far as the waterpump goes I think it was a fluke. When my oem one craps out I will try another Stewart pump.
Eagle86, thanks, just trying to share my cheap mods that I have figured out. It's the go fast ones that I will keep secret.
Last edited by eye145; 02-29-2012 at 12:50 AM.
Who me? I didn't do it.
For those that like the pics, I added a few more pics to post #39 and #46 on page two.
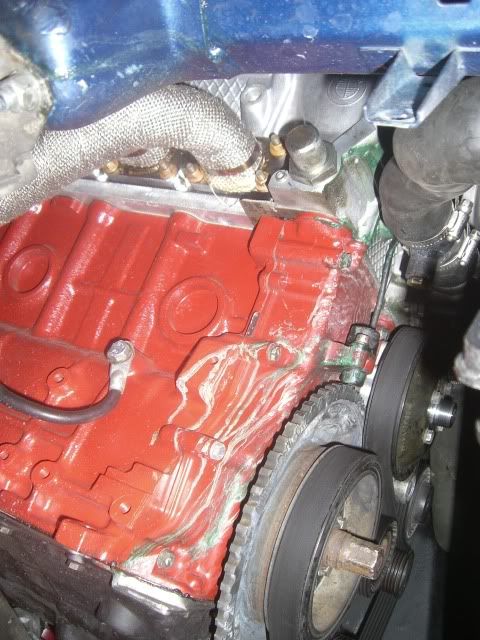
Found my oil leak!! I would keep getting oil pooling around the #6 cyl. hole after driving for a few days. It would blow all over but mostly looked like it was around the plug hole. After removing the valve cover and inspecting it I finally found a hairline crack.
Hopefully I can get the engine buttoned back up and shake the car down a little now that the weather is nice out. I still need to do my wheel alignment and want to put a few miles on it before the NASA event in April.
Update:
Installed the used valve cover that my friends down at European Performance Auto Center were able to hook me up with. While going back together the back stud that screws into the cyl. head decided to strip out. AaaaaaRrRRrrggggGG! figures it's the one thats friggin impossible to get to. I will take care of it next time I have the head off since it will need to be redrilled and time-serted.
I Took the car out to bed in the new brake pads and shake the dust of the car and hoped that the gasket wouldnt leak to bad..... yup it leaked all over the back engine
For a temperary fix I went to Lowes and got a m7x1.0 bolt that was a little longer than the oem stud. Put two washers on the top to keep it from bottoming out but leaves it long enough to grab the threads that are still in the hole. So far dry as a bone.
Here is the replacement bolt and the installed one in the back ground.
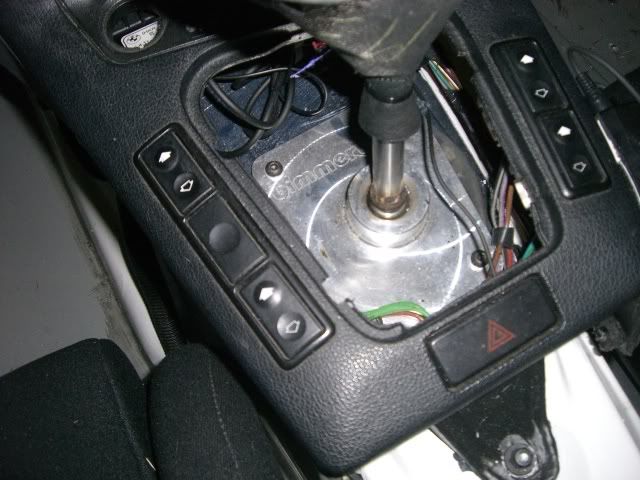
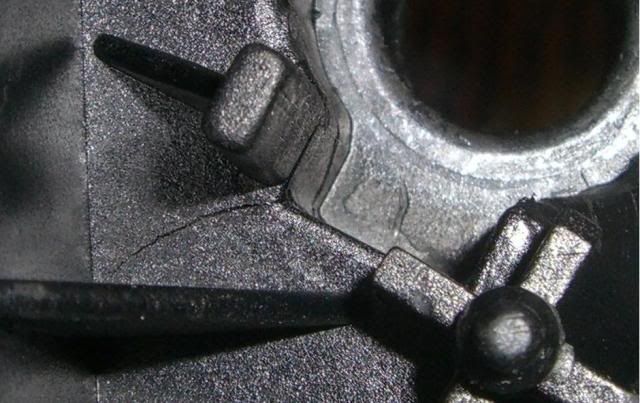
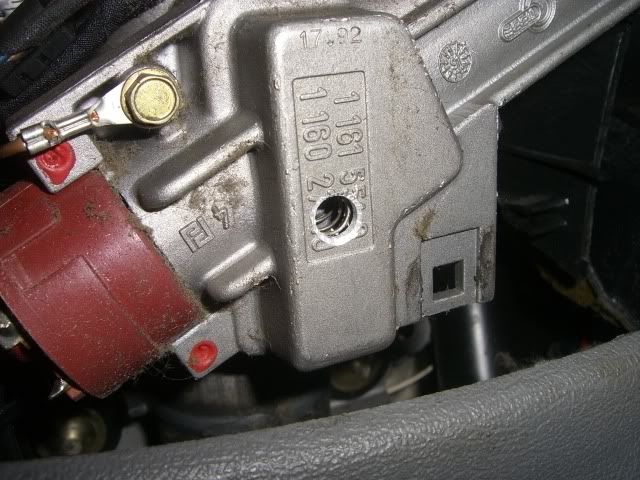
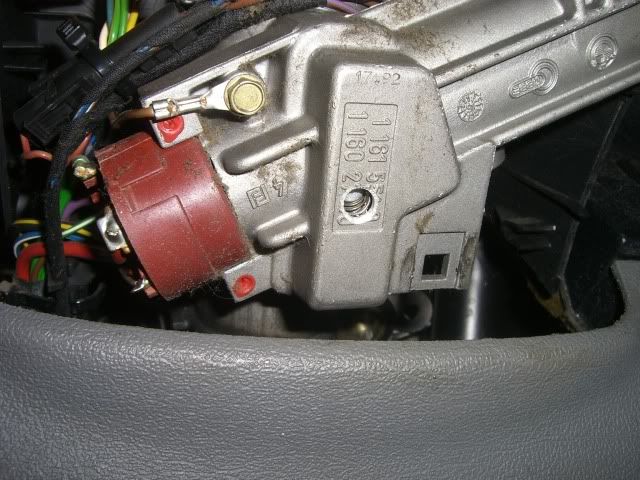
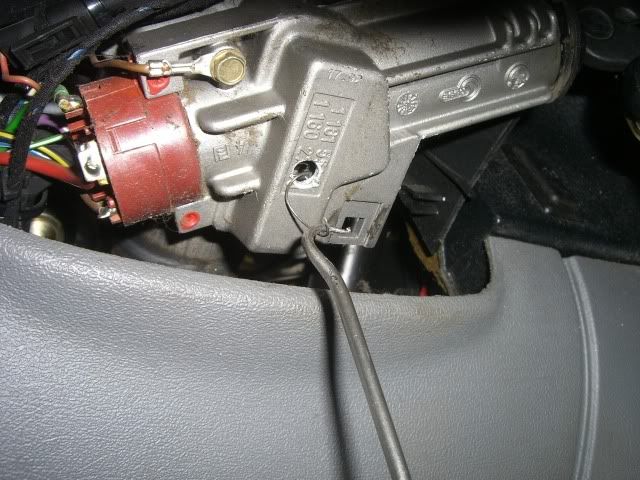
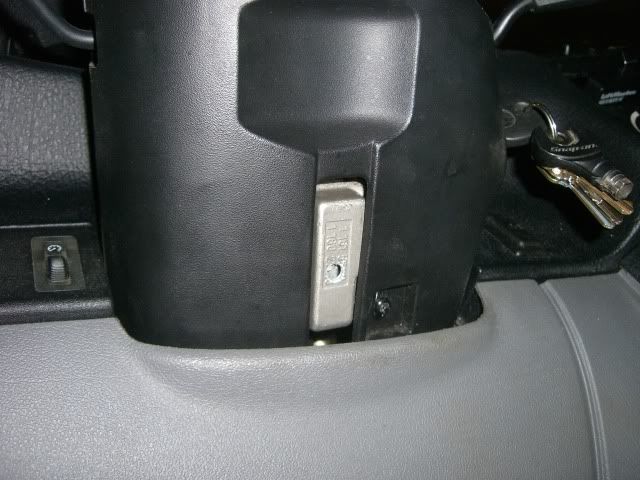
Next I decided to remove the steering lock spring. Just another preventative maintance kinda thing... I would hate to have the steering lock up mid turn on me.
Looks simple enough....Drill hole remove spring.
Key in the ignition causes the spring to compress
Use a pick and pull out spring then grab with some pliers and pull.
I relized afterwards that you dont even need to remove the bottom column cover.
Next task is to get my wheel alignment done and put a few more miles on the car.
My first impression of driving the car with the solid engine and trans mounts is awesome! The good is you can feel everything, the bad is .....you can feel everything.The noise has also increased from the transmission into the cabin of the car. Louder rattle and whine when coming on and off the power, I would not want this on a street car for sure.
The steering joint from the e34 gives a much more direct feel, all the little bumps and jolts that got absorbed by the oem little rubber steering guibo are now shot straight up threw the steering wheel. I could feel as soon as the abs kicked in when braking threw the steering wheel aswell as imperfections in the road surface, I cant wait to get on the track with it.
Got the car into the shop tonight, cleaned off the oil from the bottom of the engine.... left over mess from the valve cover fiasco. A couple cans of brake clean later and good as new.
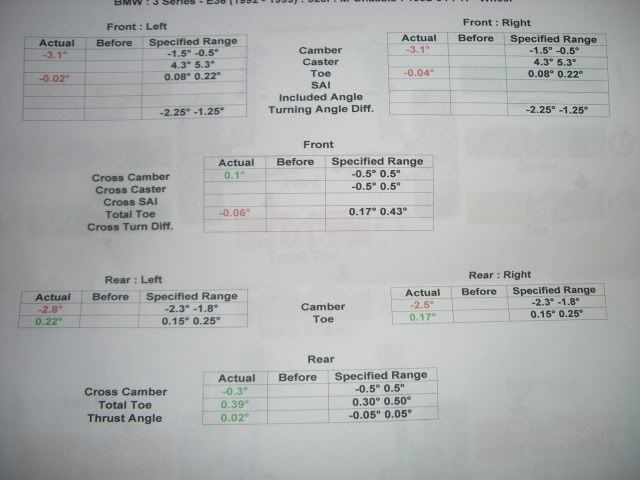
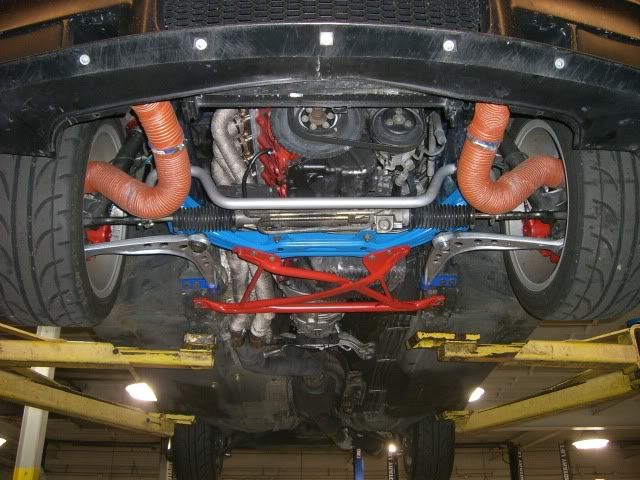
Next up a trip to the alignment rack since the front sub frame was out of the car along with the new ball joints. I couldnt get as much camber in the front as I wanted and need to take a little out of the rear but close enough for now.
Last edited by eye145; 03-07-2012 at 11:06 PM.
 Posting Permissions


 Reply With Quote


 Build Thread and Travel Log

Bookmarks