
 Member
Did you ever get it, or diy, the cables? Any pictures?
BMWCCA 484984
I have the parts but haven't had the time to do it. My Indy was able to get it rigged together so it works until we can reschedule.Originally Posted by SpiicyTuna

I don't have the time to DIY right now.
Entwicklung 39
I always cringe a little every time I pull that hood release.
Waiting for the inevitable pop that will signal the death of the cable.
BMWCCA 484984
Imagine doing it knowing it's rigged.
Once it's fixed, I'll always lovingly and caressingly pull on the hood release lever. No more careless yanks.
Member
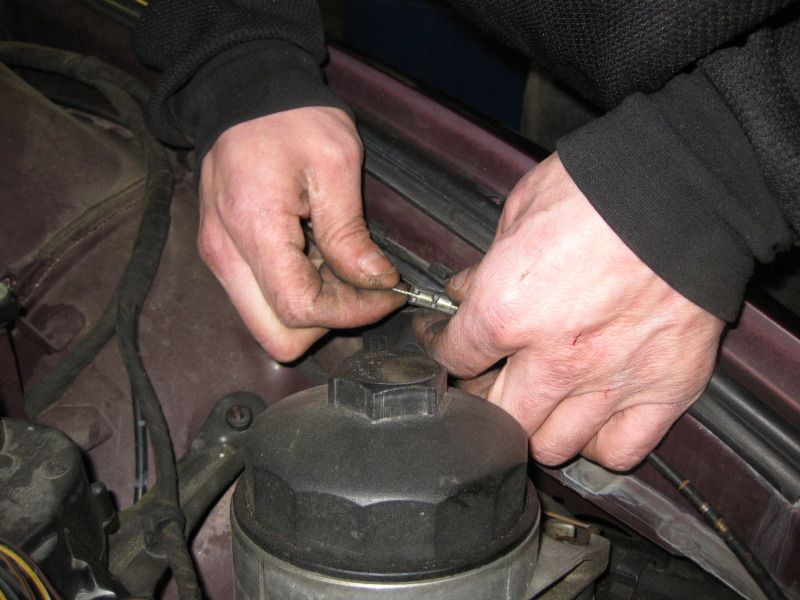
I opened up the plastic cable junction box and sprayed TriFlow into those cables using a motorcycle cable luber tool. The luber seals around the cable and casing and has a port for the plastic straw of a spray lubricant. The pressure from the can forces the lubricant through the casing.
I don't know if this will prevent problems in the future, but the cables operate much better now.
Steve
2001 530i/5 S+P CDV delete/Akebono ceramic pads/M5 SSK/RedLine MTL/M5 rear sway bar
BMWCCA Member #337964
Member
That's exactly the tool I remember. I need it for my Virago AND the 5er...do you remember who makes it?
Sent from my Transformer TF101 using BF.com
'00 540iA Sport w/235k+ Original TCG's, Vanos and transmission.*Trans failure at 244k+...FS Now
BMWCCA 484984
Okay. The cables and latches are fixed and I now know the procedure.
It may be possible to replace the bowden cables from the junction box to the latches without removing the latches, but at this point, I recommend removing them even if you don't plan on replacement. It's much easier to see how the ends of the cables insert into the latch mechanisms with the latches out of that tight space.
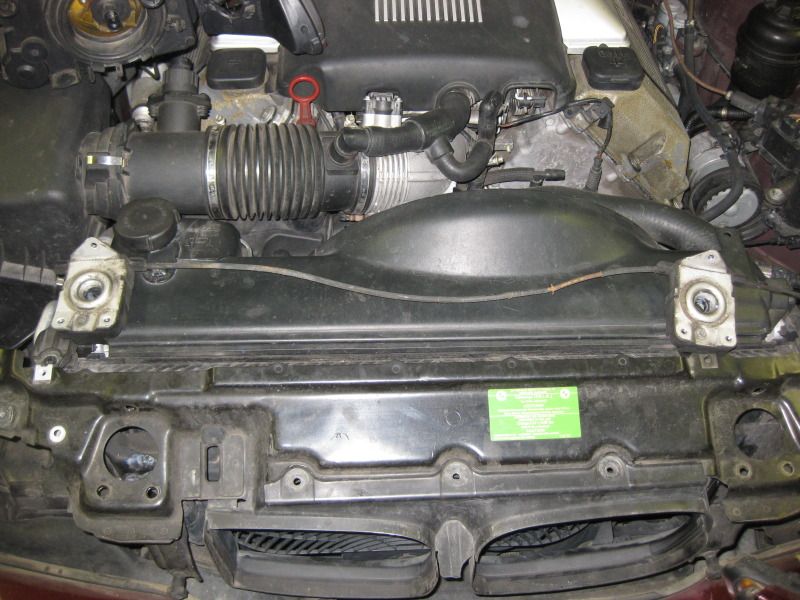
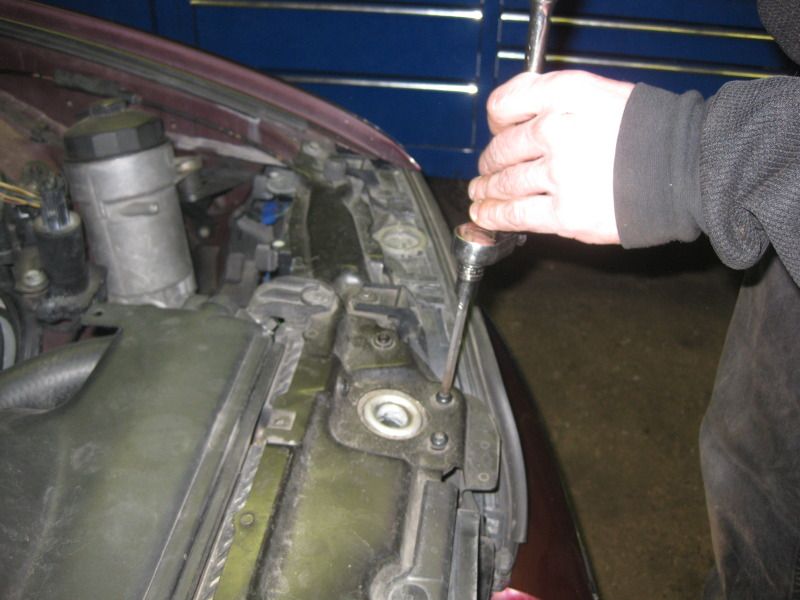
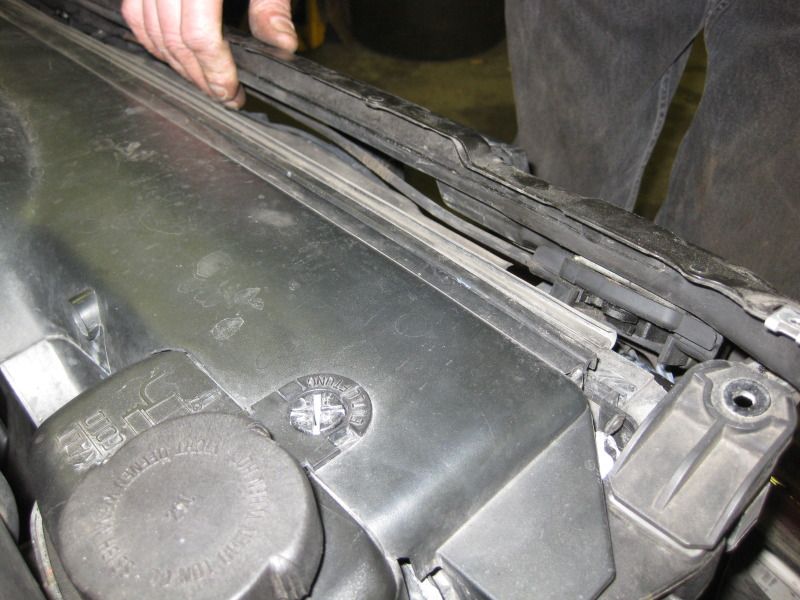
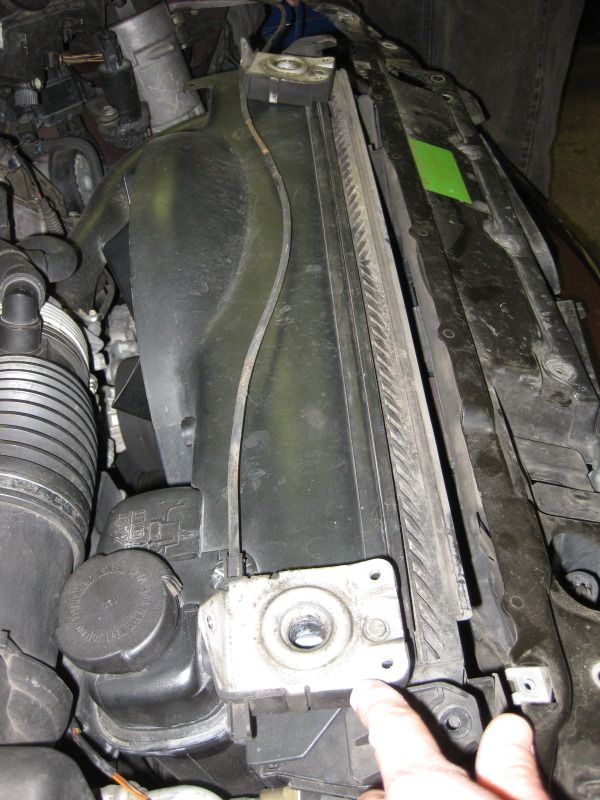
The front panel crossmember doesn't have to be removed, but the headlights do need to come out. The front panel crossmember has two 10 mm bolts and two phillips head screws on either end, and the two latches have three T30 Torx bolts each, six total that need to be removed. The radiator doesn't need to be removed, but you do need to release the two tabs anchoring the rad to the crossmember by removing the two 8mm bolts. You can bend the crossmember upwards and outward slightly to access the cables and the latches. The cowling that directs the airflow from the kidney grills is connected to the crossmember with three expansion rivets. It may not be necessary to remove these rivets, but we did it to minimize the risk of cracking the brittle plastic. I'll elaborate on how to remove them later.
I'm going to have some dinner right now and I'll add pics and more info later tonight.
________________
Essentially this procedure included replacing the bowden cable from the hood release cable to the junction box as well as the cables from the box to the latches, but that DIY and the procedure for removing the headlights are already in the DIY section. This post is really for the replacement of the cables from the box to the latches and the latches themselves. I'll include links to them for reference.
Hood Release Cable Replacement (Hood Release Lever to Junction Box)
Headlight Adjusters/Covers Replacement
- Using the DIY linked above, remove the headlights.
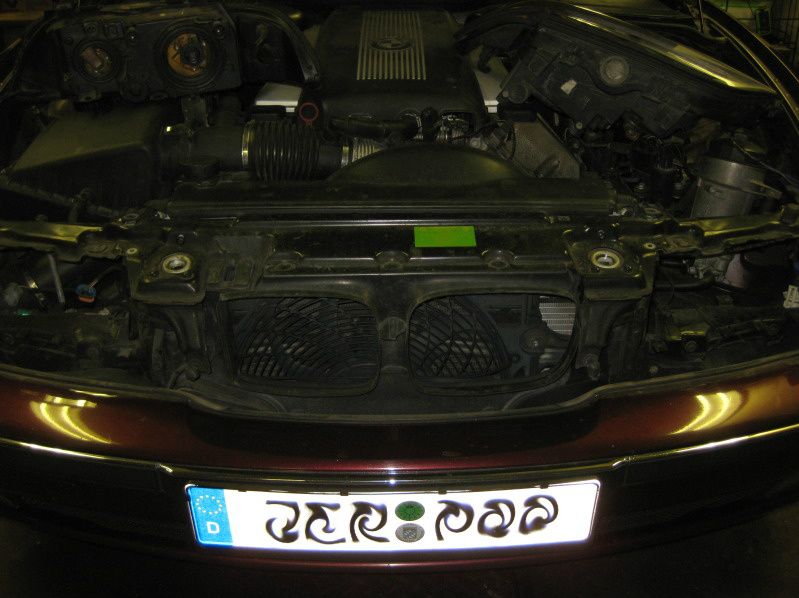
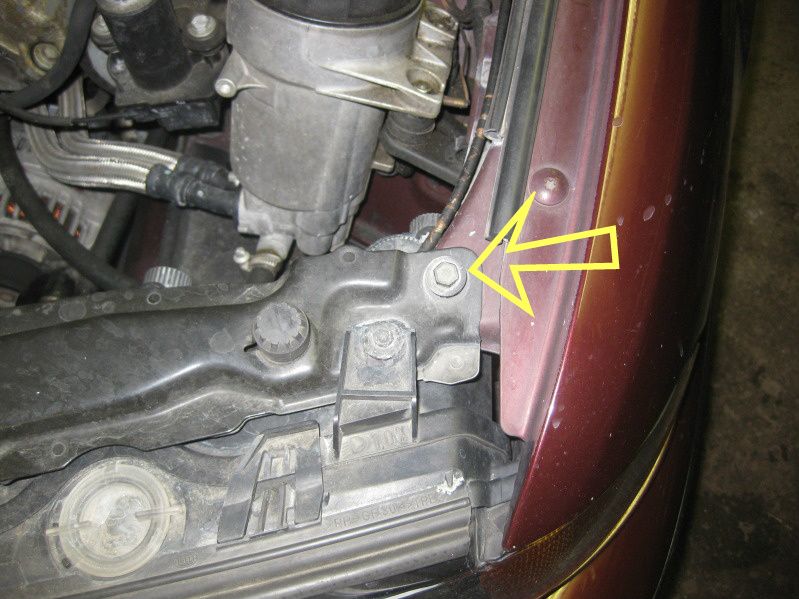
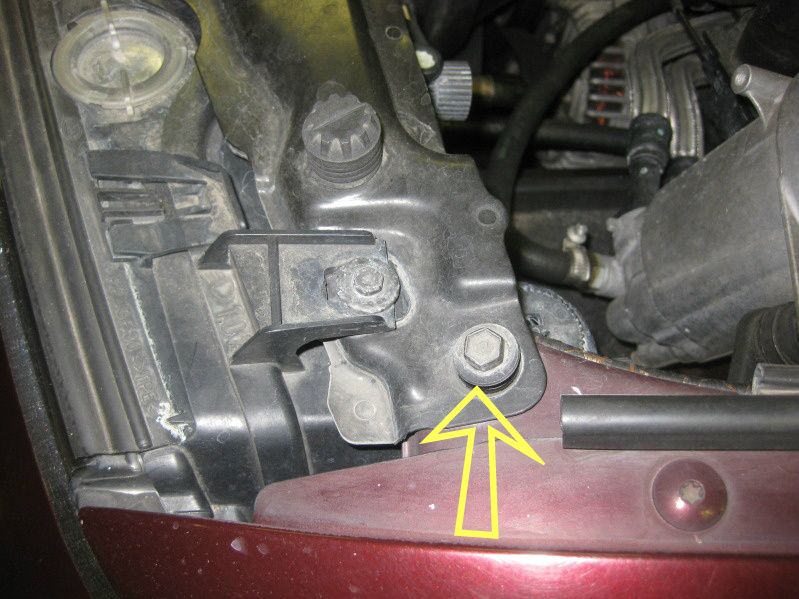
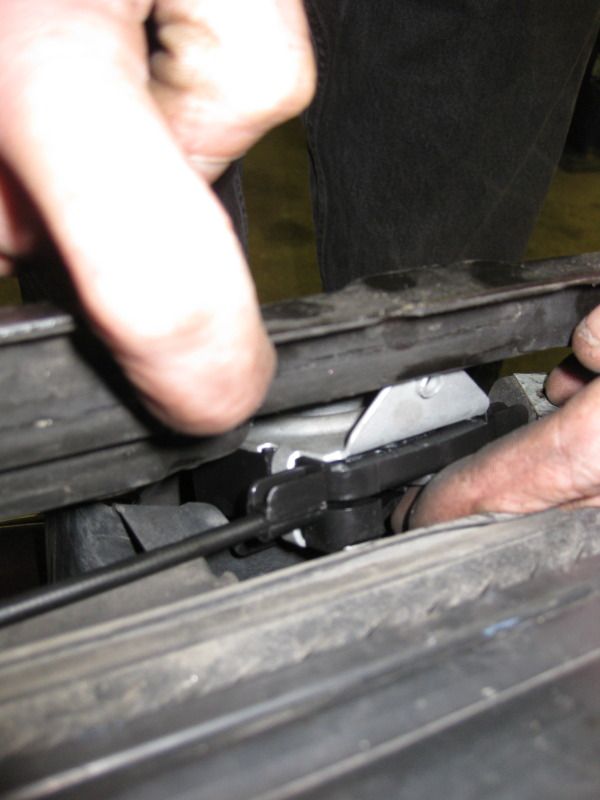
- Unscrew two of the three T30 Torx screws on each latch leaving the one closest to the radiator loose but still attached. This will prevent the latches from falling away from the crossmember. Unscrew the 2 phillips head screws (one one each side) as well and also the 8mm bolts for the radiator tabs. (Driver side latch pictured below).
- Two torx screws, one phillips head screw and one 8mm radiator tab bolt removed.
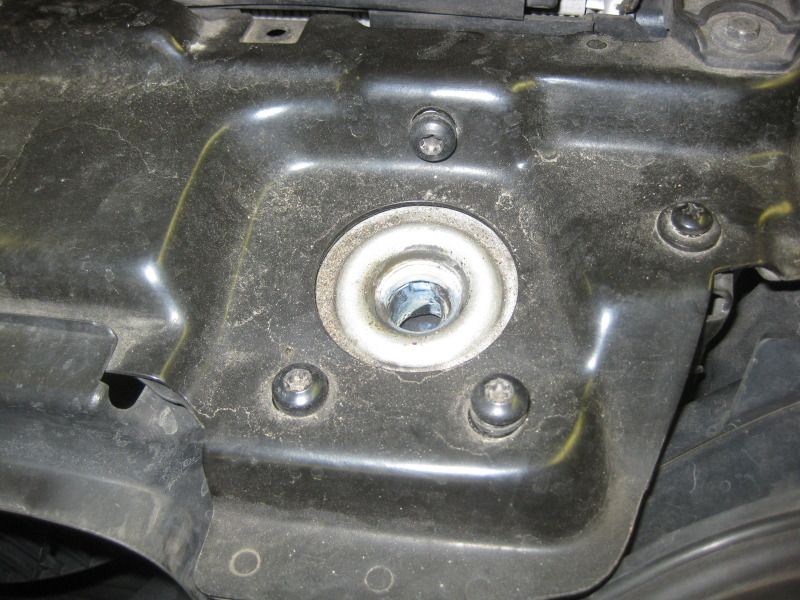
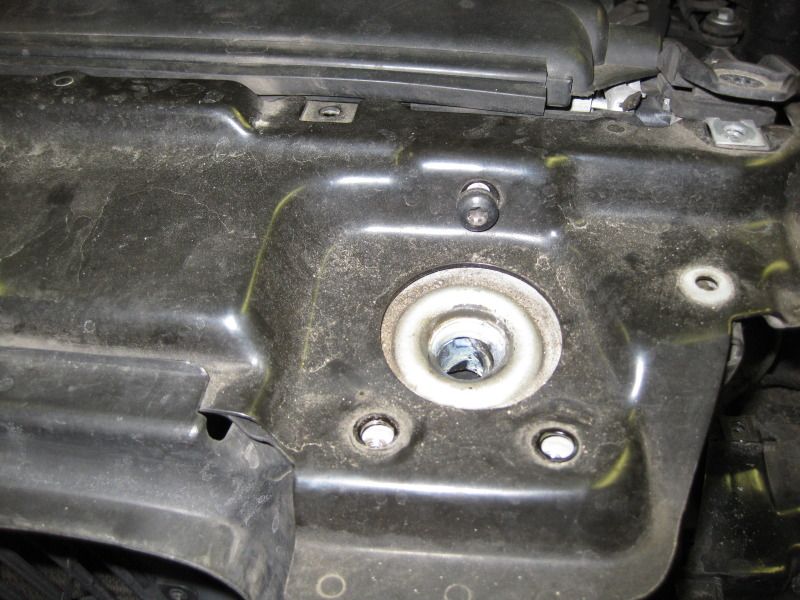
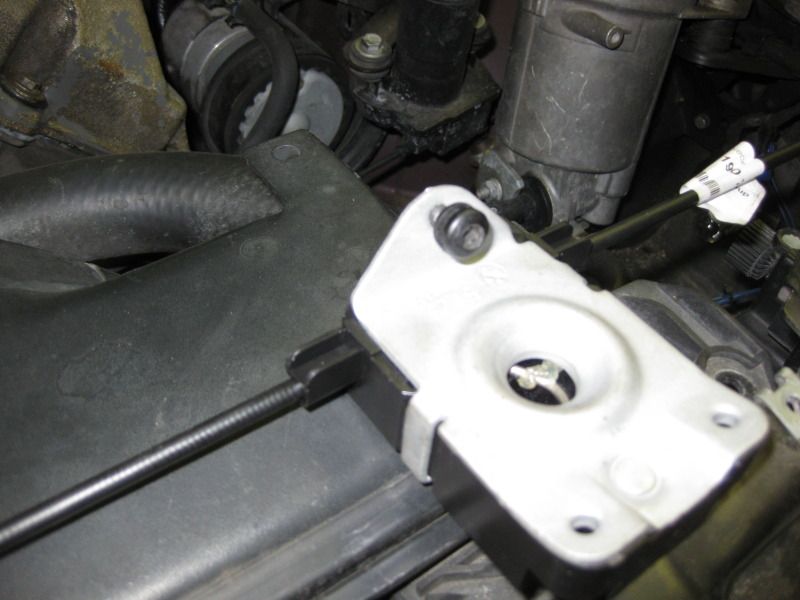
- Remove the 10mm bolt pictured here on the upper right hand side of the crossmember.
- 10mm bolt loosened.
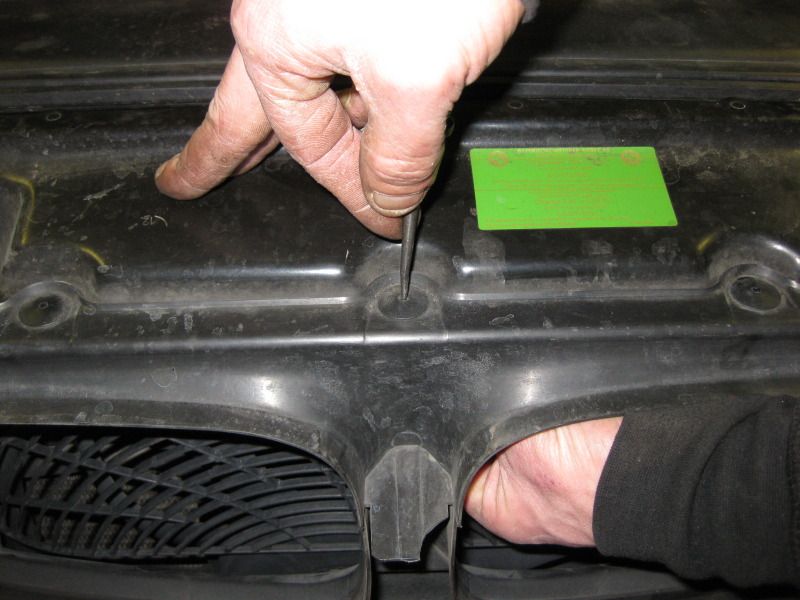
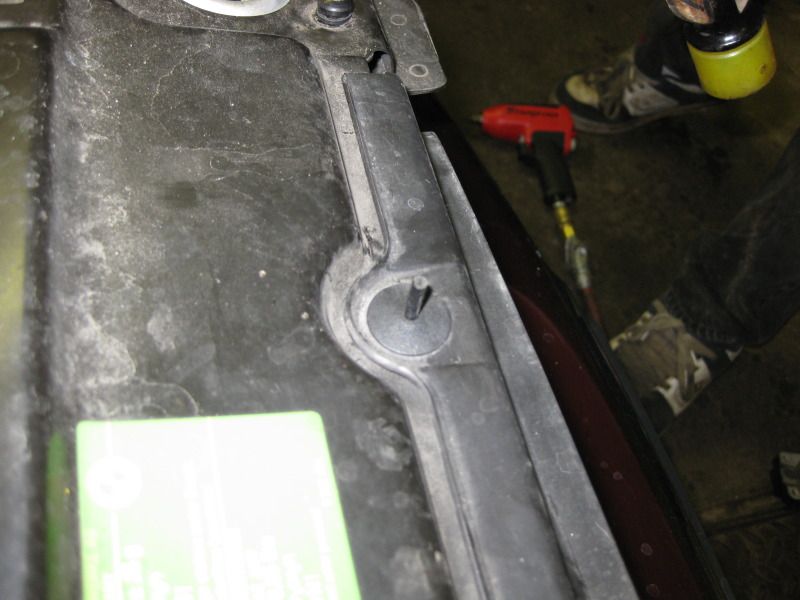
- Using a punch tool, push the center retaining pins of the three expansion rivets out and then remove the rivets (optional). This will allow the crossmember to be bent outward without risking cracking the plastic cowling. Make sure you support the pin from underneath as you will be reusing the pin and rivet.
- Rivet with pin removed.
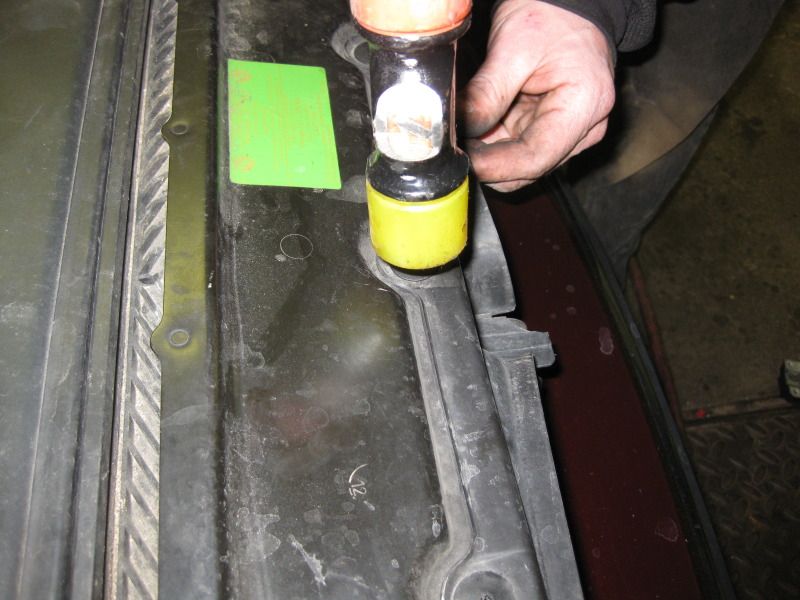
- Rivet removal tool.
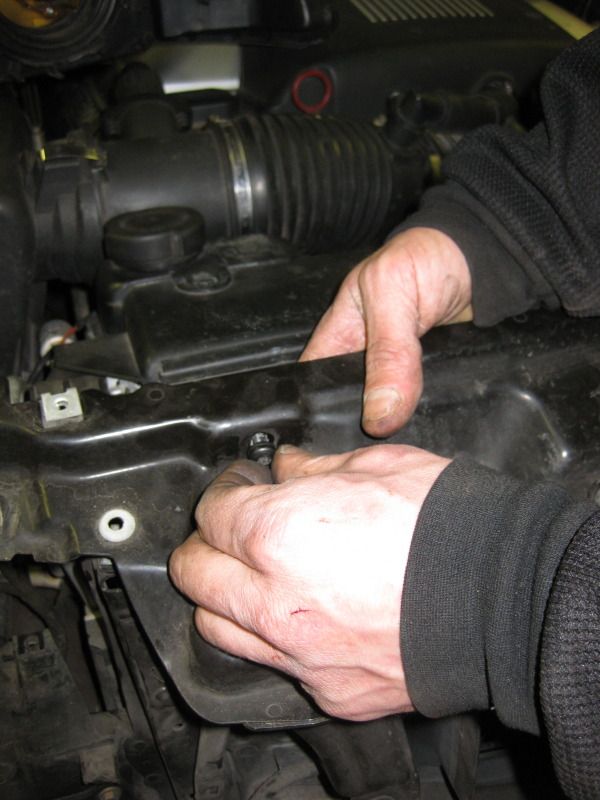
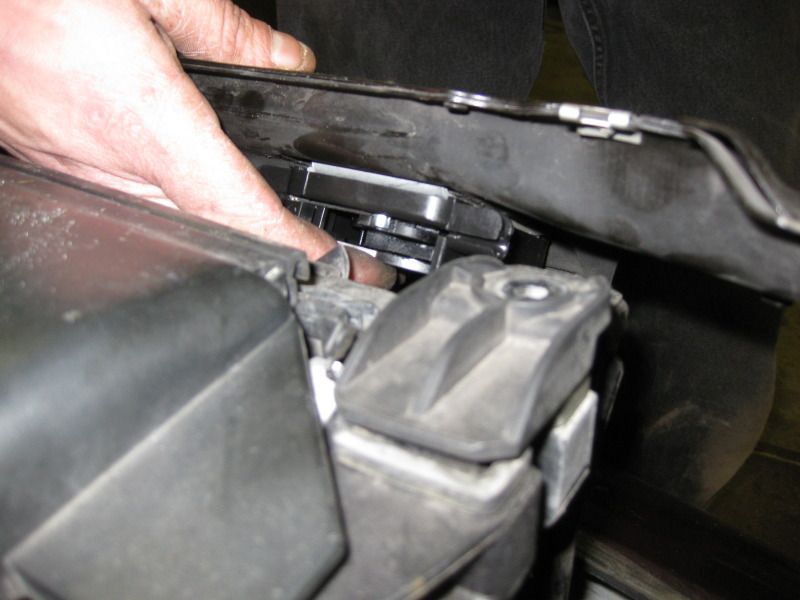
- You can now bend the crossmember outward to access the latches and cable underneath.
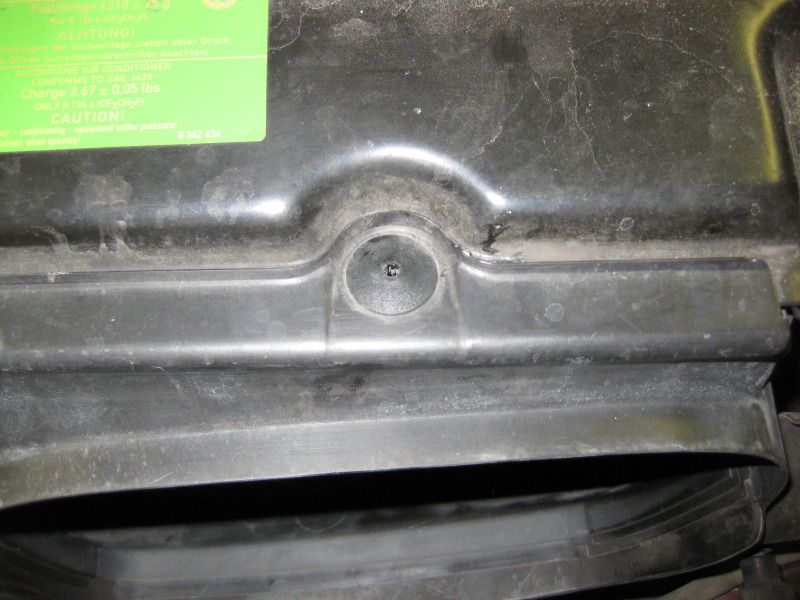
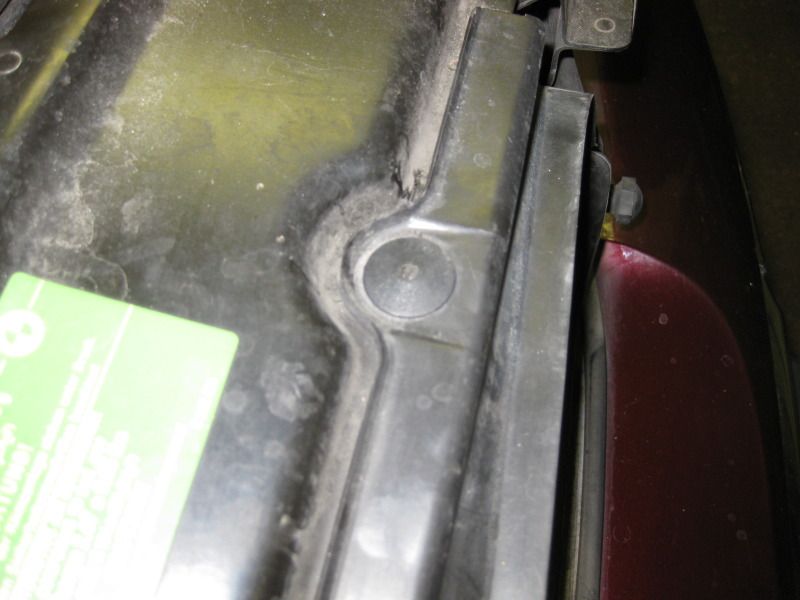
- Unscrew the remaining T30 Torx screw and remove the latches and cable. DO NOT wipe the crossmember down or clean it as you will want to be able to see where the latches were seated when installing the new ones.
- Latches and bowden cable removed.
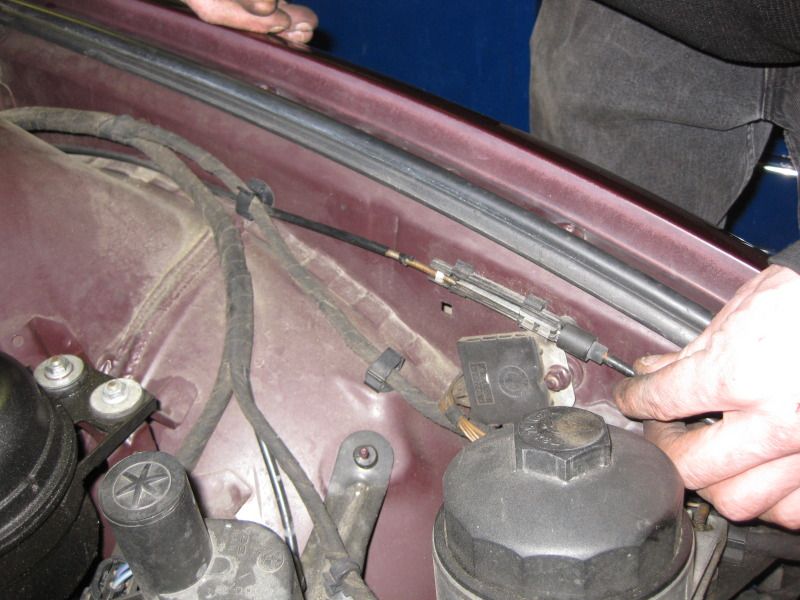
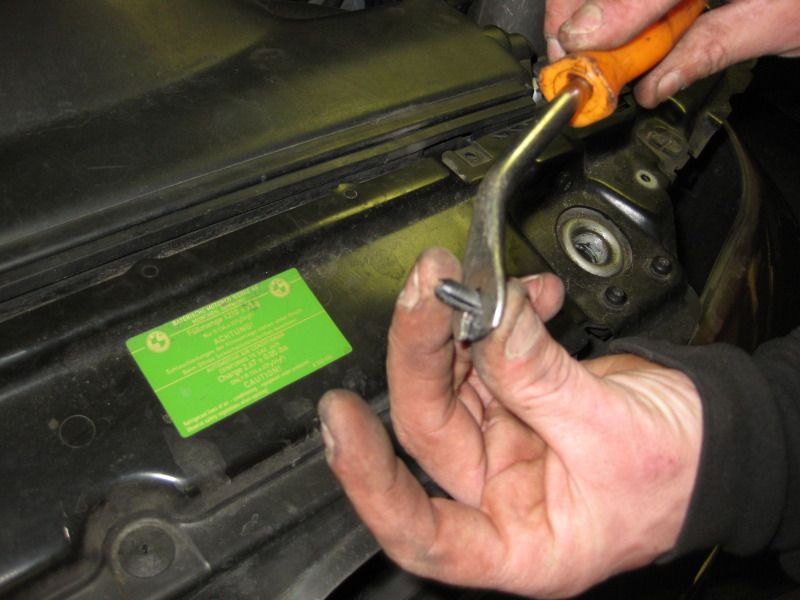
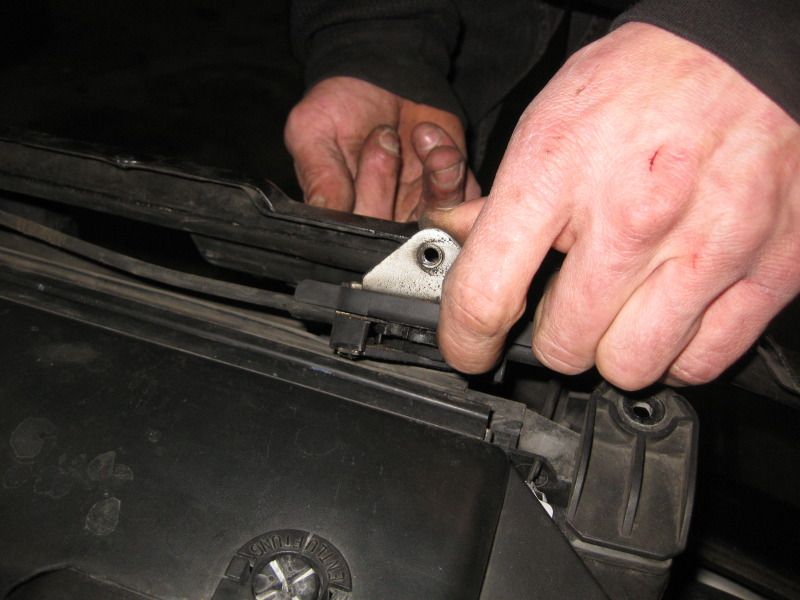
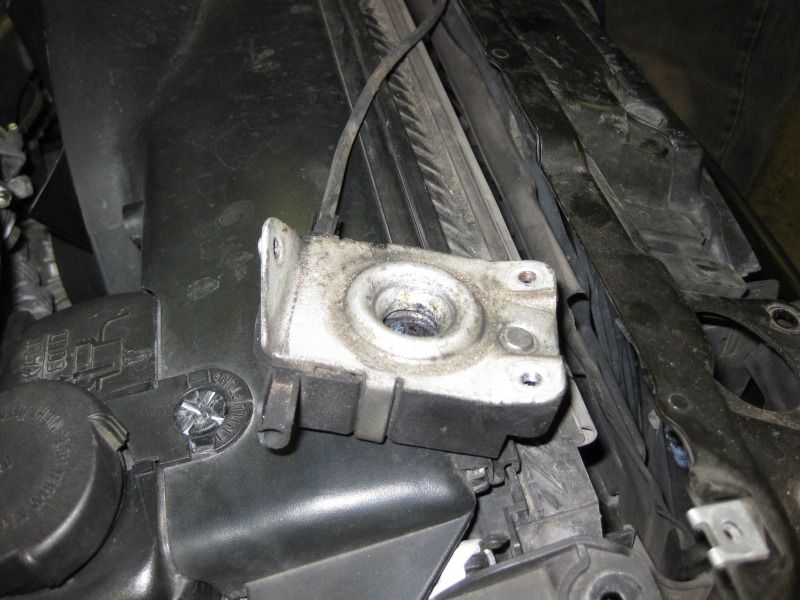
- Pull the junction box away from the body. There are two clips holding it in place. Since this installation includes the bowden cable with the new junction box, you don't have to worry about being too rough with it as this may take some force.
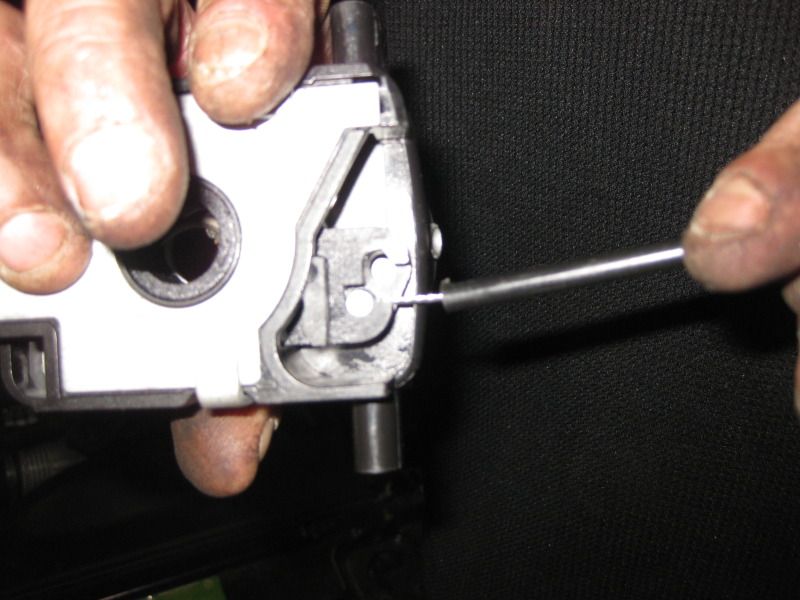
- Connect the new bowden cable to the new passenger side latch before installation.
- The holes for the latches are not tapped and the metal is very soft to allow the screws to self tap the threads. This is easier to do if you use an impact wrench but it's possible to do this without the power tool. Do this to all three holes prior to installation.
- Carefully bend the crossmember out and install the latches and cable.
- Don't tighten the T30 Torx screws down fully yet. You want to tighten them after you position the latches back in their original positions using the outline left on the crossmember.
- Reinstall the expansion rivets and reinsert the pins using a hammer with rubber or polyethylene head.
- Secure the crossmember with the 10mm bolts, 8mm rad tab bolts, and phillips head screws.
- Reinstall headlights making sure the bowden cable is routed properly above the housing.
- Use the DIY above to install the cable from the junction box to the hood release lever.
- Test the installation to make sure everything works.
- Have a beer and relax.
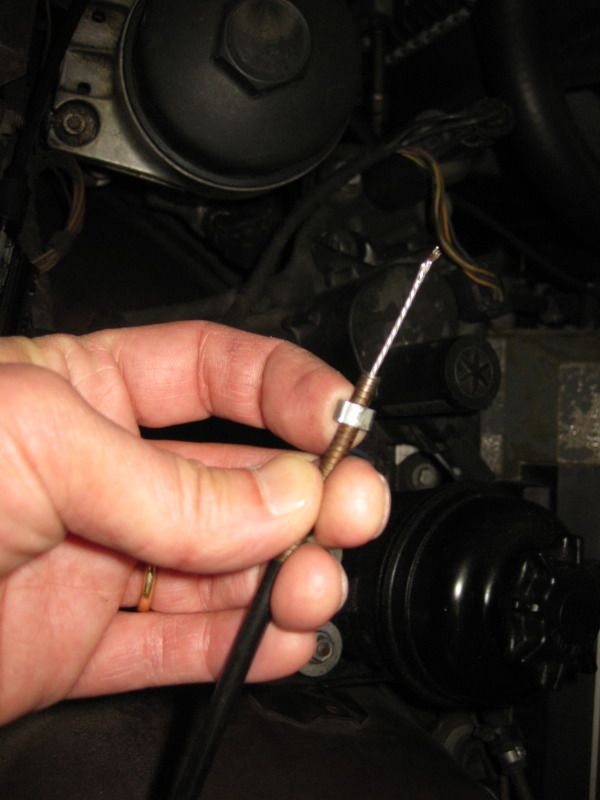
- In the following pics, you can see the metal sleeve that failed in the junction box. Crimping this sleeve allowed me to be able to temporarily pop the hood.
Last edited by jamesdc4; 03-05-2012 at 03:38 PM.
Entwicklung 39
Very well done Jamie. The nicked knuckle adds a bit of realism.
Member
Wow J...you DIY'd your own hood release cable?!? I can't believe it...or did I miss something?
Sent from my Transformer TF101 using BF.com
Yes, I did miss something and lmfao at the Leprecaun comment! :-D
Sent from my Transformer TF101 using BF.com
Last edited by ViolinARC; 03-01-2012 at 09:20 PM. Reason: Automerged Doublepost
'00 540iA Sport w/235k+ Original TCG's, Vanos and transmission.*Trans failure at 244k+...FS Now
BMWCCA 484984
Lol. Thanks for the vote of confidence. With the help of my indy and his tools.I have to introduce you guys the next time you're out here. Very cool. He alone replaced the cable from the junction box to the hood release lever, but I really wanted to know how to do the junction box to the latches. I really only assisted him. The DIY took approx. two hours and is not difficult. It was much harder trying to access the cables through the kidney grills to unlatch the hood after the cable broke.
Next up, sunroof cassette repair, lubrication, calibration and drain cleaning.
Last edited by jamesdc4; 03-01-2012 at 09:46 PM.
Member
Good thing you posted it, Jamie. I know I have to do it, but it's too cold now. The front cable - on drivers side - is frayed. I have the cables, but as I said, the weather isn't right for now.
Timewise, how long did it take you?
Looking for a DIY? Parts? Check this out, it might be your ticket
Stable: e92is, e53 N62, e46M54B25, Tribby & e39 M54B30 R.I.P.
Member
"Approx. 2hours"...lol
2
Last edited by ViolinARC; 03-02-2012 at 02:39 AM. Reason: Automerged Doublepost
'00 540iA Sport w/235k+ Original TCG's, Vanos and transmission.*Trans failure at 244k+...FS Now
BMWCCA 484984
We were shootin' the s*** so it may be a little less than two hours, but we were flying blind. I was surprised at how straight forward the job is.
Lol@ 12C.
Last edited by jamesdc4; 03-02-2012 at 07:15 AM.
Member
This is good info and thank you James. Nice work. I need to look into this soon.
Member
The one I have was made by Motion Pro, IIRC. They're commonly available. Google up "motorcycle cable luber".
Steve
2001 530i/5 S+P CDV delete/Akebono ceramic pads/M5 SSK/RedLine MTL/M5 rear sway bar
BMWCCA Member #337964
BMWCCA 484984
About greasing the bowden cable, I'm hearing negatives about doing this. The claims are the lube ends up attracting dust and debri over time causing premature cable failure. Hence the reasoning that the cables do not come prelubed. Can anyone comment on this?
Last edited by jamesdc4; 03-02-2012 at 09:32 AM.
BMWCCA 484984
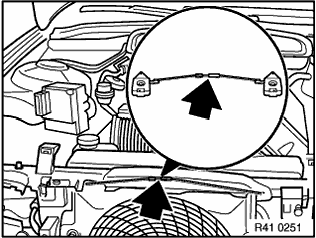
I just realized the cable adjuster shown in the diagram I posted earlier is NOT present on either the old or new bowden cable. The diagram is from the online TIS. Strange.
Entwicklung 39
They're characteristically similar to motorcycle control cables but you can easily remove those and clean/relube them unlike the Bowden cable nestled under the hood..
I might consider something like WD40 or possibly a silicone based lubricant since both are light weight and don't collect goo. WD40 is also good for repelling moisture, a sure despoiler of those types of cables.
Remember using cable oilers for motorcycles?

BMWCCA 484984
I just realized from another DIY there's also a cover for the junction box on the driver side of the engine compartment. I don't have this part on my car for some reason. Anyone else have this cover?
Last edited by jamesdc4; 04-25-2012 at 02:37 PM.
Member
I don't have that cover. That must be a luxury edition or something!
Member
thanks!!!
Copied from the link provided...
Hello,
I had to sign up and post the solution to the broken E39 hood release cable. I repeat not a broken plastic release handle in the car. Recently we had this problem on a traded in E39. We had a Hell of a time trying to open the hood ourselves. It pretty easy once we figured out how.
First pull the drivers side kidney out of the Hood, use a small mirror about 2'' or 3 ' ' If you look and use your fingers to feel the upper right corner of the kidney opening you just made you can locate where the cable comes into and out of the driver side latch. It's very hard to see but it is there.
Now once you locate the latch place the mirror inside against the condenser-You'll have to find a place the mirror will rest without falling off while you work.I found the perfect perch on the plastic fan bracket. Angle the mirror so you can get a good look at how the cables connect to the back side of the latch. This part is impossible to see without the mirror. I used a flash light in one hand to angle off the mirror, that's when you'll see the plastic arm that has the cable ends connecting the release cable and the passenger side latch. I used a heavy duty pick tool with a 90 degree bend on the end in the other hand. I sharpened the end on a grinder to a good sharp point.
It will take a few tries because it backward you know looking through the mirror. I found if you press the sharp point against the arm just between here the holes are where the cable ends connect and push towards the drivers fender-It will take a little effort- but push it over about .5'' and pop she'll open right up. It was so easy that i had to redo it for some of the nonbelievers around the shop who said it couldn't be that easy.
I can now do this job in under a minute. Hope this helps who ever finds themselves facing this problem.
Last edited by Duce735sanda318; 02-15-2013 at 12:53 PM. Reason: Automerged Doublepost
Member
Thanks for posting this, there are many threads on the bonnet release problems but very few on how to actually get to the latches so top marks. The only problem I had was that one of the latches wasn't holding the post properly so I thought I'd just take everything apart and clean it up. My car's a very well maintained 11 year old car but sure enough one of the cables under the front had rusted and although it wasn't causing problems would have at some time in the future so pleased I took the time to investigate. New cables ordered!
cheers
Barry.
On the Roam
Awesome thread! I replaced all 3 Bowden cable sections and both latches with OEM parts - procedure was followed to the T but I encountered 2 issues:
1. What is the part # for the "Rivet with pin"? The centre one crumbled when it was removed. I can't find it on realoem.com but I can see it in one of the diagrams.
2. The biggest issue was removing the dead pedal assembly - the handle, cable end was a breeze but the dead pedal section was my nemesis. With -10C temperatures outside lying on the driveway trying to replace this was my nemesis. Its a good thing I ordered a new one, the original owner broke the pedel section and part of the vertical section perhaps during a previous failed attempt. Can someone overlay the diagram with arrows and steps? i.e. pull away from you, etc. doesn't make sense. Also its harder to install it than to remove (making sure those two sharp tabs fit in the holes).
thanks.
Last edited by gardenmaster; 01-04-2014 at 03:22 AM.
Member
I found that I was able to use the same method without a fancy tool. I found a flathead screwdriver around 8" long and felt for the notch. Thread the screwdriver in the notch and then push down on the hood with your other hand while pushing the notch away from the center of the car. I can open my hood in seconds now (of course the kidney grill is out until I fix the cable).
Just wanted to post to let people know it is possible even without a custom tool.
Member
Bump. Can someone rehost the pictures?
 Posting Permissions


 Reply With Quote


Bookmarks