
 Member
My uncle's Z3 seat is stuck in the highest position I was wondering if there is a way to lower manually
Member
Sounds too painfully familiar. The only way I found was to remove the up/down motor, and use the flex drive line in a cordless drill to drive it back down. Hopefully you haven't fried the motor in trying to use it to drive it down - $140 mistake. Hopefully the motor will still nudge the seat a bit, ie, it's still alive.Originally Posted by oldbold

Bigger picture: this was after pulling the seat and finding that the drive screw that lifts (and lowers) the seat was driven hard against the far end stop, and the steel of the drive had embedded itself into the aluminum of the guide housing. After lubing up the lot, I put a large o-ring on the end of the drive screw so that steel-on-alum contact couldn't occur; likewise put another on the drive shaft so that when the seat was lowered that instead of coming to a hard stop, it would have to compress the rubber of the o-ring first... and hopefully I'd notice that I was getting toward the end and I would not force the seat all the way down to the last micron. Ended up spending over a full day reengineering the fore/aft and up/down mechanisms - lots of rubber stops, lots of grease... and did the 15 minute job of replacing the bushings - that was the easy part.
The Z's seat have been one of the few major frustrations with the car - have seen better engineered seats in $10k hondas. Truly wish they hadn't gone the electric route and had left them simple mechanical seats - wouldn't have the rocking-horse seats (the bushing problem), wouldn't have the $140 fried motors etc. Almost seems like they hired someone from Jag to design them - very/painfully un-teutonic in design.
Last edited by gmushial; 11-24-2011 at 08:18 PM.
Member
Mine was stuck in the up position for about a year before I noticed it. Was fiddling with it one day while driving and it started working. I guess it was stuck, like gmushial described above.
2001 Z3 3.0i -Oxford Green/Sandbeige
2016 428xi -Estoril Blue II/Black
2018 430iC- Estoril Blue II/Black
2018 330it - Melbourne Red/Venetian Beige/Black
B!tch Moan Whine
replace with racing bucket seat, problem solved
Member
In my case came that close to doing exactly such... but since the primary use of the car is as a touring car for wife and self... if I were to do such I needed to make sure that the seats were comfortable for her for what have become common 500+ mile days. If I had more butt-hours/experience with any of the seats I had found in the various catalogs, I would have done it. What seats did you end up with? Happy with them? How about for long miles?
Member
Yes, as stated above, you can rotate the up/dn drive motor manually. You have to remove the seat first. As you locate the motor (near the center of the seat) you will notice at the end of the motor opposite the drive-end, there is a female, square-drive. I used a pocket screwdriver to insert into the square drive and was able to rotate the motor manually. Yes, it takes a while to make much progress, but it is possible.
Member
It is an old topic but since many of the second hand Z3-s are finding new owners these days then I think this topic deserves a little update - so don't take it as a necro but a good will to help out others with the same problem. My write-up is based on my experience on a 1999 facelift car with sport seats but I'm pretty confident that the seat frame is same for all type of electric seats.
There are many written solutions for the jammed seat problem, including smashing the seat motor with rubber hammer, using a lot of spray lubricants on moving seat parts, etc. Sadly none of these is the correct solution.
Z3 seats are known to get jammed if moved to the end of the up/down or front/back rails and the reason for this is that the washer at the end of the threaded spindle gets jammed into the aluminum rail housing. Any further movement trial in no matter which direction results in the sound of the motor starting and that's all - reason for this is that the power supply for the motors is supplied with load sensitive relays and the power for motor is instantly cut to avoid burning down the brushes and the copper contact ring for brushes.
Luckily the problem can be easily fixed and here is a description for solution if the seat is stuck in the highest position:
1) Move the seat all the way to the back and remove two 13mm nuts at the front of seat rails (use socket wrench).
2) Move the seat all the way to the front and remove two 16mm bolts and the back of seat rails(use socket wrench).
3) Remove seat belt from the side of the seat buy remove the 16mm (use normal wrench, one with ratchet makes it much easier). The bolt stays attached to the seat belt clamp. PS Remember to look how the seat belt was aligned before removing.
4) Remove seat belt from seat backrest guide.
5) Tilt the backrest all the way to the front and move the seat in the middle of rails so that both front and back bolt/nut holes are covered.
6) Lower the roof if dealing with roadster seats.
7) Tilt the whole seat to front and disconnect connectors under the seat: 1 bigger white, 1 bigger black, 1 smaller red connector, passenger seat also has one small white connector for load detection for airbag.
8) Remove the seat from the car and place it on some table or bench on its back so that you can access things under the seat. Use some old blanket under the seat do avoid scratches to seat plastic or leather.
9) Remove the 11mm nut and 10mm bolt that fasten the aluminum height adjustment rail housing to the seat - this is the part that gets stuck to the threaded part.
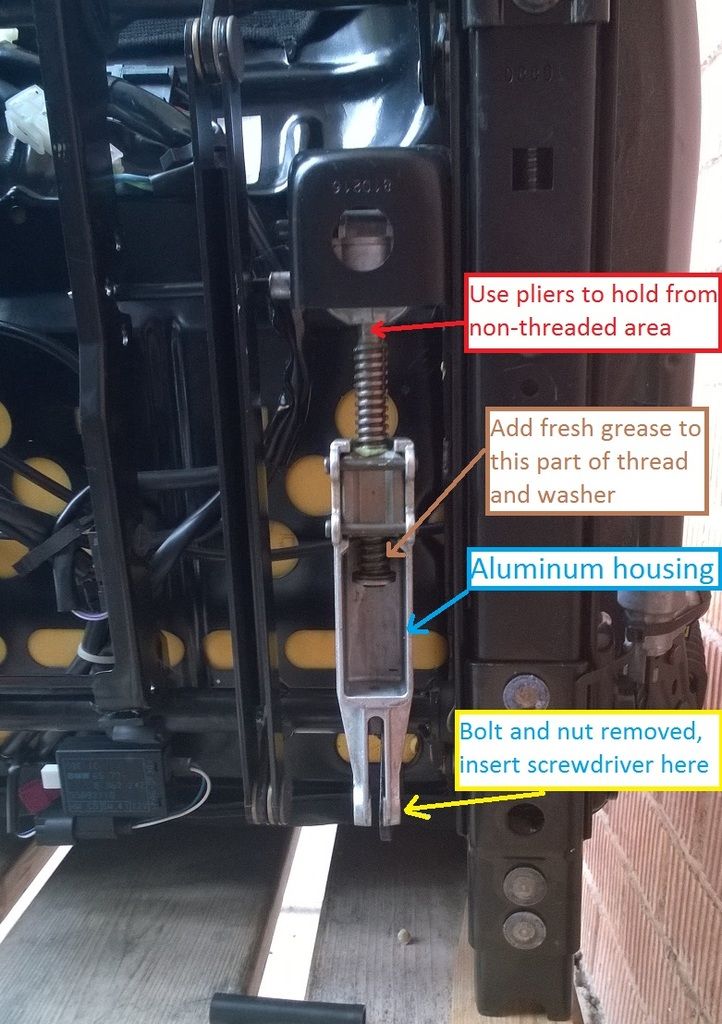
10) Use some pliers to hold the threaded spindle from upper non-threaded part (closer to motor gearbox), push screwdriver through the hole where you removed the attachment bolt for the aluminum part and turn the aluminum part in the direction like you would fasten a nut on the bolt (clockwise). It takes some strength to do it but it will loosen the jammed threaded spindle/washer from the aluminum housing.
11) Now that the housing rotates freely on the threaded spindle turn it a bit more and use plenty of grease (some thicker lithium based grease will do) on the end of the thread and on the washer that was jammed to avoid same problem in the future. Would be wise to add a little bit of fresh grease on the rest of the threaded part as well.
12) Turn the aluminum housing back at the bottom of spindle but not so far that it gets jammed, lower the seat manually a little by twisting the seat frame moving parts and fasten the bolt and nut that connect the aluminum housing to the seat frame.
13) Installation of seat is reverse of removal. The connectors are baby-proofed and can be inserted only the correct way. PS. I had there some extra connectors that had no wires attached so make sure to check first. Usually the whole wire loom is taped in the way that you can't connect it wrong.
14) Enjoy fully functional seats
Here is a photo from under the seat to explain the parts involved once the seat is out of the car (click on it to view bigger photo):

PS. It is optional to remove the seat motor and test if the gearbox is free and turns the threaded part by turning the spindle that goes inside motor. If it is clear that the threaded part was stuck in the aluminum housing it is not needed to do it. I removed the motor first because I wasn't sure which part is to blame for the fault.
PPS. While the seat is out of the car it gives an easy access to vacuum clean under and behind the seat.
It takes about 1 hour to do this fix alone if not planning to clean the seat frames from dust and not cleaning the car under and behind seat. Takes probably same time if someone else is cleaning the car interior while you fix the seat
Member
Great write up, thank you
I had a seat stuck in the fully down position caused by the threaded block getting stuck on the end of the thread of the worm. I measured up the space between the end of the worm thread and the gear box, where you have your red arrow. Cut a washer from suitable thick stiff plastic, split the washer, opened up the split and slipped it onto the worm gear. This provides a stopper so that the worm gear will not get stuck in the future. Works well.
1999 2.8L Z3 Roadster,
2000 3.0L Z3 Roadster,
There is only one thing more pleasurable than working on a Z3, that's driving it top down on a fine day.
Member
I needed this, as it appears my passenger seat is stuck as well. Thanks.
Member
Appreciate the detailed instructions. I bought a car knowing it had this issue (max'd out up/slop in the bushings). I had no problem getting the front nuts undone--easy access and came right off. The rear is another story. I spent 30 minutes on just the driver's side of the seat, used WD-40, and simply cannot get it to budge. Tried the inner edge bolt as well, and no can do either. It's weird, it's like the 16mm socket fits, but there's not much 'meat' for it to grab onto. I don't know if that's part of the problem or not. Either way, it's like they're seized.
Unless anyone has ideas looks like a trip to the shop for me. Despite my mechanical limitations I really want to do this--for the sake of doing it on my own and more importantly to keep the money in my pocket.
I hate that it's max'd out high. I'm pretty short (5'6") but it still feels way too high even for me-- I feel like I'm staring at the top of the windshield almost.
Bummed...
Member
WD-40 is a better lube than penetrant. Try Aero Kroil or PB Blaster.
https://www.amazon.com/Kano-Aerokroi...etrating+spray
https://www.amazon.com/Blaster-8-PB-...enetrating+oil
BMW MOA 696, BMW CCA 1405
Member
I am the poster child for impatience.... the wd-40 worked, just needed to let it sit a while. Was still tough, but finally both broke free. Soooo.... we'll see if I can figure this thing out. May not have time today, but good to know I'll at least be able to remove the seat and see if I can figure it out. If nothing else, I'd like to be able to lower the seat, at least a little bit. That would make it a lot more pleasurable to drive for now. So maybe I can accomplish that if nothing else. Thanks for help so far everyone!
Member
Try this...
"... stuck at the highest position. I unbolted the seat ( not completely necessary ) and tilted the seat forward. This gave easy access to the height adjustment bracket bolt. Just undo the bolt and remove then manually twist the linkage 1/2 turn and then reinstall the bolt. Now click the down button and the seat should now go down..."
https://www.bimmerforums.com/forum/s...2#post26157972
BMW MOA 696, BMW CCA 1405
Member
- - - Updated - - -
Saw that! I am going to give that a try, would sure be nice to get lucky ha ha Do you know where that height adj brack bolt is Vintage? Is it at the back of the seat?
Member
With either seat motor jammed (up/down or fore/aft) can usually be rectified if you can get enough access to remove the motor and turn the one or two, depending, drive cables in the opposite direction that the mechanism is bound in; if it's all the way up, twisting them to go down a hair is usually enough.
I've never dissected the control circuit(s) but there are no limit switches, so it must cut power to the motor based on either torque or amperage overload.
A little more risky, but maybe even flashing the terminals of the motor with 12VDC will get it to budge. Reversing the polarity changes the motor direction.
Member
Good to know thanks Randy!
Member
Don't know. But from this picture, the front motor is connected to the tracks, so the center motor must be for height and I see a worm gear extending to the rear, where the bolt must be.
Z3 Seat Motors 2.jpg
BMW MOA 696, BMW CCA 1405
Member
Is there any reason you wouldn't just make a completely new bushing out of some sort of suitable material, versus 'reinforcing' the existing one with the suggested thin white bushings?
Member
If you are talking about the bushings in the carriers on the two screws that do the fore and aft movement, the original bushings are rubber and have liquified. That goo must be removed, not reinforced. The replacement bushings are plastic (delrin).
BMW MOA 696, BMW CCA 1405
Member
Thanks-- so in that picture, the example on the right... are all three pieces new? (2 thin white pieces, larger center black piece) I thought the one video I watched, the guy just added the 2 thin pieces to the existing worn away bushing.
Member
The large center black piece not a bushing, but is a threaded steel block that rides up and down on the big screw rod.
BMW MOA 696, BMW CCA 1405
Member
Ahhhhh! Didn't realize that, thanks
Member
I wish I'd read these instructions before trying to do this myself.
I didn't use pliers to grip the shaft when twisting so put extra strain on the "gearbox" before the jammed end came loose. Suspect I might have damaged the "gearbox" as it wont transfer the motor's power consistently now. Not sure how easy it will be to remove it to check.
Wanted to post this as a warning to others who might do the same thing.
Member
Just adding to this, has anyone on here successfully removed the seat height adjust gearbox for their z3 or seen instructions? I cant see any way to remove the part to try to repair or replace it.
Member
My height adjustment motor was frozen in my Z3. I gave it a light whack with a rubber mallet and it's worked perfectly ever since. I was about to pull the seat but still going strong a couple years later.
I know this doesn't help you now, but maybe it'll help the next guy.
Sent from my SM-G975F using Tapatalk
Nathan in Denver
1999 M Roadster, VFE V3 S/C, Randy Forbes Reinforced, Hardtop, H&R/Bilstein, Apex PS-7, Supersprint
1999 Z3 2.8 Coupe, Headers, 3.46, Manual Swap, H&R/Koni, M Geometry/Brakes, M54B30 Manifold, Style 42
 Posting Permissions


 Reply With Quote


Bookmarks