
 Member
nice car
Member
Looks like a fun car! I love seeing people out there using their car for the purpose it was built for.
Bummer to hear about the accident but I'm glad to see it being repair so quickly!
Member
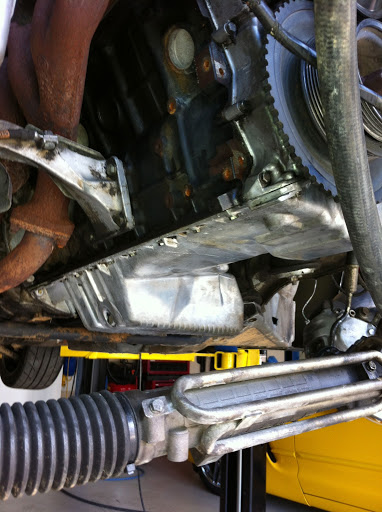
Front subframe is looking good! Need to do this to mine, How did you hoist the motor in the air?
1996 328i (m52B28US) OBD1 euro ZF 5spd. 3.23LSD conversion / Chem. PnP Head/ DINAN stg.2 CHIP/ VAC race valves/ S52 cams/ A/C delete/ fan delete/ Washer Fluid resv delete/ ARP head studs/ Cometic 140MLS / VAC Solid Engine/trans Mounts/ CAI / 2.5"Borla race exahaust/ NGK R spark plugs, M50 Mani, S50 Oil Res, Riot Racing HFTB, SAMCO Hoses, JBR FW, X-Brace, Mtech Front Bumper, RE RSMs, stoptech SS lines, Bilstein sports, H&R Race Springs, S52 Reinforcement plates, Kosei K1 w/ bridgestone RE960as, Brembo/stoptech slotted rotors, M3 Trailing arms, M3 Calipers, M3 Axles, ACS strut brace, weight reduction.
http://mbuild.blogspot.com/
Member
Yeah after cleaning up the welds and a fresh coat of paint the subframe looks great. Here is a closer shot of the new AKG poly motor mount and the cleaned up subframe.Originally Posted by stealthbeam

No need to hoist the engine just support it with the typical Harbor Freight engine support seen here.

Member
Good time to consider welding in a bung in the oil pan to install a oil temp sender. Wish I had!
Member
I didn't think about that but I was considering to have a set of baffles welded in but given the current budget on the rebuild and the timing I decided not to do it. Both the baffles and bung might be a good winter off-season job. It's not too bad to drop the subframe!
So most of things are back together.
Tack welded the oil pan nut on
And in keeping with my obsession with cleaning parts before they go back on, the oil pan get a serious cleaning!
Installed
Got the subframe with the new motor mounts in
With the subframe back in I can start with more of the upgrades, the new Mehle LCAs and the new PowerFlex bushings.
Had a tough time getting the Power steering rack back in alone, couldn't get the u-joint down onto the splines all the way, but finally got it.
At this point I'll move onto the top side, and then the body pieces that remain.
Last edited by MCMM3; 08-28-2012 at 09:37 AM. Reason: Automerged Doublepost
Member
Now onto the cooling system.
The crash took out the stock radiator, fan, shroud, and made the water pump have wobble that I just didn't trust.
So first was the water pump. The co-driver/wife wanted to try to help so I told her I'd walk her through the water pump install, she did just fine.
Then was the install of the radiator, and fan. This was a little challenged, first due to me not pulling the fan temp switch out of the old one so had to order a new one and wait!!!!
As this is a track only car I'm ditching the clutch fan and auxilary fan and only going with a 16" puller that is wired into the aux circuit to bring temps down in grid and paddock.
The radiator install was sinple but with no stock shroud and the original expansion tank I needed a solution for mounting. So I came up with this bracket that I bent, cut and welded to custom fit into the general stock location. The hole is for bolting to the radiator and the slit is for a clamp to go through holding the tank. Welded a bracket to sit onto the top of the radiator channel to give it support
After getting all together I think it worked out fine.
View of the fan install from the other side.

Member
Hey Mike I didn't Know about the wreck ,I am glad you are Ok and rebuilding the car . Hope to see you at the next PDX at RA.
Juan Santamaria
White 1995 BMW M3.
Member
JCS, yeah at the SCCA Time Trial. It poured before my second session and I should have shut it down sooner, but it is easy to say that now. The rebuild is going pretty well, most of the mechanical work is done and now looking into the loose end, body and paint.
We plan to be at the November PDX and will make the next TT event at TGPR in October. I'm missing the event at CMP is two weeks, just too soon.
OK, well enough completed now to give the car a test down the street. I figured SooZee gets the rights given I plowed it into the Armco on its last trip!
New motor mounts sure are noisy at idle, I knew it but it was something to get used to. Still need an alignment badly of course as it wants to drift to the right a bit. But all things considered it is OK. Still more to do but feels like I'm getting there.
Last edited by MCMM3; 08-31-2012 at 10:24 AM. Reason: Automerged Doublepost
Member
See if you can get the idle bumped to 900-1000rpm; it made a huge difference on my car with the Vorshlag MM/TM combo.
Robert
Member
subscribed
Member
Hey thanks for the idea. I think I'm going to get a full tune once this is all done so that could part of that work. I think I'll be going to TRM for a bit of their experience, I know they have done good things for you.
Now on to finishing the top side items and front end. I grabbed these radiator ducting panels from the salvage yard to ensure proper cooling, funny thing is the car never had these before!
Then I test fit a new M3 bumper cover, now that makes it look more like the car it should be. I'm just testing the fit before painting. Cars not silver anymore!

Last edited by MCMM3; 09-01-2012 at 11:46 AM. Reason: Automerged Doublepost
Member
OK, onto the intake. The Dinan CAI was crushed so needed a replacement. I looked around at many different intake filter combinations and ended up piecing my own together. I found a 3.5" aluminum 45* mandrel bent tube sold for intercooler/turbo fabrction and order it, then figured I could cut it to fit this application. I installed it and then a K&N universal filter and it all it in nicely with the air being picked up very close to where it was with the Dinan intake so this was a win for the budget, maybe $70 total!
Looks good too!
RIGHTEOUS!!!
This is like a Disney movie. Things start going the heros way, hero gets kicked in the nuts, hero works out bigger better faster, kicks ass, gets the girl happy ending! Now we just need the happy ending!
Glad the crash didnt rattle you to bad. Some people dont take it so well! Stay in the fight!
Member
Thanks for the encouragement! I will say that The very next night after the crash I was tearing the car apart beginning the process, so I certainly didn't sit around feeling bad about it, I just got to it!
Decide now was a good time to add adjustable lower control arms to the rear end to get the negative camber I needed. Nothing fancy here just steel adjustables for now. Maybe I'll upgrade in the future when I move to coil overs but then again they may be with us for a while.
Gotta admit I agree with everyone, what idiot makes you undo the differential to pull out a suspension component!!!The lift makes it much easier though.
That is one of my last "mechanical" repairs now I have to do something about the black meets silver paint scheme.
Member
OK, so we came up with an idea of how to change the look of the car with minimal painting, I wanted to do something simple that I could just do at home, no booth, quite the opposite, spraying right outside in the driveway.
So after a bunch of goole searches and sketching ideas we had a plan so work got started.
First was to pull the mirrors as they are changing color.
Then the rockers.
Both mirrors and rockers got a wet sand with 600 grit for prep. So for paint I wanted something really simple and easy to spray, local NAPA paint guy steered me away from a single stage to do a base coat/clear coat. Now I've never done this type of painting and it has been about 25 years since my last paint and body work. The NAPA guy was able to set me up with premixed paint that just poured right into my new HVLP gun and off I go. I liked this idea since it was foolproof, no mixing so I went with it.
So here is a mirror with 2 coats of base. No shine until the clear.
And here is the mirror with three coats of clear. This needs to be mixed but it is no big deal really.
The rockers took a lot of time to tape as this is how I plan to transition the black in front to the silver in back. So here I just sprayed base coat black, pulled all the tape and re-clear the entire rocker
So far the pieces are coming out great good shine and no runs.
The new bumper cover was a bit more challenging, had a run in clear and some areas that were rough so needed to sand and re-clear, but the final product is OK, not great, but I figure on a track car this is going to get abused anyway.
I'll post the rest of the spray and completed pictures soon.
Member
Nicely done!
Member
This is looking better and better!
1996 328i (m52B28US) OBD1 euro ZF 5spd. 3.23LSD conversion / Chem. PnP Head/ DINAN stg.2 CHIP/ VAC race valves/ S52 cams/ A/C delete/ fan delete/ Washer Fluid resv delete/ ARP head studs/ Cometic 140MLS / VAC Solid Engine/trans Mounts/ CAI / 2.5"Borla race exahaust/ NGK R spark plugs, M50 Mani, S50 Oil Res, Riot Racing HFTB, SAMCO Hoses, JBR FW, X-Brace, Mtech Front Bumper, RE RSMs, stoptech SS lines, Bilstein sports, H&R Race Springs, S52 Reinforcement plates, Kosei K1 w/ bridgestone RE960as, Brembo/stoptech slotted rotors, M3 Trailing arms, M3 Calipers, M3 Axles, ACS strut brace, weight reduction.
http://mbuild.blogspot.com/
Member
Wow, that looks great! Not bad for an at home job I must say.
|ProjectTechnik| - The Alberta BMW Enthusiast Community
E36 328i - OE M3 Bumper | M3 Mirrors | Jim Conforti CF CAI | UUC Motorwerks Underdrive Pulleys | M3 Contours | Koni Sport Springs & Shocks |
E46 325xi Touring
Founding Member of the Canyonrot Club #343!
|Canadian Alpina Forum|
Mean Mr. Cone
Looking good Mike. I think I'm seeing the plan now and I'm excited. I think when I get my new bumper / mirrors / skirts I'm going to find where you got your stuff mixed and go with that. Might need some help
WUTCONE?
RIGHTEOUS!!!
Good job on the paint! Are you using a SATA HVLP? How big of a compressor do you have?
Member
I'm certainly no expert but I'll walk you through all I've done and used and can recommend things that did and didn't work for me. The products I used are all NAPA products, Crossfire is the base coat, and Finish 1 is the clear. I bought a quart of black, only a pint of orange, a pint of silver, and a gallon of clear and then the the hardener that is a quart. Al said with tape and stuff it was only about $150.
I figure that is pretty reasonable for making the car look like it has a designed paint scheme, instead of two car halves tossed together!
Nothing to complicated in my setup. I have a 30g Husky upright compressor from Home Depot I've had for about 10 years that I use for all my air tools. Then recently I purchased a very inexpensive HVLP detail gun from Amazon, it was only about $18 as I recall. So far I'm very impressed with this little gun. Sure the cup is small, but doing work like this I just fill it and spray the stripes, then allow the paint to flash off for 10-15 minutes, and during that time fill the cup again. I've got a cheap water separator inline as well but like I said simple inexpensive stuff I'm running.
Last edited by MCMM3; 09-17-2012 at 10:49 AM. Reason: Automerged Doublepost
Member
OK, well ding the parts off the car went well but now it is time to hit the doors and the lower section of the rear quarter panel.
The idea is to use the orange mirrors as the start of an orange stripe that borders a black strip of the same basic line.
So the rocker skirts go onto the car so that I can mask out the orange broken stripes in the right place to match up to the black.
After the masking of the orange stripes, I then cover all that to do the angled black area on the front of the door to make the transition from the front of the car look more natural in the striping.
Here I am spraying the black base onto the front of the door, No fancy spray booth here!!!
Then I mask off the black on the front of the door and uncover the orange stripe area. Here is the orange base going on.
So now with all the orange and black base sprayed it is now time to clear, so all the stripe taping is removed and the plan was to just clear the entire door and the quarter panel up to the moulding strip.
Of course things were going to well at this point so a gust of wind came up and flipped the masking paper up and stuck onto the clear on the driver side!
So with the tape all removed and the clear curing this is what I have so far.

It will take more shape with the moldings back on, and the addition of the orange mirrors. The finish of the clear was not as good as I would have liked, I think my gun settings were not right and the clear didn't flow out as it should, the clear flowed very well for me on the mirrors and rocker skirts. So I came back and wet sanded the doors with 1200 and 1500 and then buffed it and that made things better, but I have to remind myself this is a track car, not a show car!!!!
I have a few more things to do on the paint including an idea on the all black hood so when I get the entire painting done I'll post so good pictures.
Member
Looks fabulous. Now pack your stuff up and head to the west coast to do my car!!!
 Posting Permissions


 Reply With Quote


")


Bookmarks