
 Mean Mr. Cone
Good luck finding aluminum doors...I haven't seen a set for sale in a really long time. You'd be better off (since you have the full cage) at procuring a set of CF doors (though I have no idea how that would class you when you do move to W2W).
WUTCONE?
Member
Not sure what you mean by taking advantage of our state? Maybe some laws make it easier to keep a heavily modified car street legal? Of course the car is a 95 and will need to maintain emissions for the next 10 years or so. I have an 89 corvette that I'm hoping makes it to the point when I can not do that.Originally Posted by Sutt

Also, you know the weather here in the south, the idea of driving a gutted car with race seats, harnesses and no A/C for an hour or more to the track is not what I was looking for. I can go with this car being single purpose, so don't see that advantage of driving it on the street.
I think I was not too clear on that last posting of item to do, the aluminum was just to remove the remaining half of the interior door panels and replace with aluminum skin.
Last edited by MCMM3; 01-10-2012 at 11:00 AM. Reason: Automerged Doublepost
Mean Mr. Cone
ooo...I thought you were talking about 1995 M3 LTW Al doors...
Proceed
WUTCONE?
Member
One thing I did complete was the interior insulation/sound material removal. Some places went pretty easy, others were a pain. If I was getting it clean for paint I would need to do a bit more but overall it cleaned up well and maybe shed 15-20# of useless weight.
Passenger side about 2 weeks ago
Driver area was the last to get done!

Member
[QUOTE=MCMM3;23460333]Not sure what you mean by taking advantage of our state? Maybe some laws make it easier to keep a heavily modified car street legal? Of course the car is a 95 and will need to maintain emissions for the next 10 years or so. I have an 89 corvette that I'm hoping makes it to the point when I can not do that.
Also, you know the weather here in the south, the idea of driving a gutted car with race seats, harnesses and no A/C for an hour or more to the track is not what I was looking for. I can go with this car being single purpose, so don't see that advantage of driving it on the street.[QUOTE]
I was trying to be funny that our state is a little lax on what is considered street legal. It can be done but it you have the means for the car to be single purpose then my point is basically mute.
Member
Finally got time to finish this up this interior cleanup, got the last of the insulation up, but ran into an issue with the sheet metal screws that were holding the floor pans. The screw would no longer bit as the hole were getting to big. I had never used rivnuts and looked into these and figured this would be a good use for them, I would have a permanent attachment in the floor for the floor pan to be attached. I picked up the rivnuts and tool at Northern Tool for about $30, maybe not the best tool but did the job.
I had to customize the 6-32 rivnuts so they would bottom out in the hole but once I did that they installed fine.
Close-up
The install of the plate was then a breeze, and if I need to remove it I know I can put it back without issues. I can see these rivnuts being handy in the future.
Now I can get onto other projects like the A/C compressor and lines removal.
Member
OK, on to the next project. Much of the interior A/C components were removed but not the business end. We have no plans to return this car to street duty so it all must go, looking to trim the weight where we can
Got the lines off and now to go after the compressor
All the parts, no total on the weight on these yet. I'm not attaking the evaporator yet that may come later.
And the area where the compressor and bracket were attached to the block! And yes with the opportunity to remove years of grime I gave it a quick cleaning, just hate working on a dirty car!
This went really fast for the most part, but dang the bolt on the front of the bracket behind the pulley, now that was fun!
Gotta get on t finish running the brake ducting to the front of the car. More fabrication to do there to build it into the front bumper.
Member
I had a thought for you as you tackle running the brake ducts and tubing. My car started life as a 325is, prior to turning it into an M (motor, tranny, suspension, sways, etc.). When I put in the new motor, I replaced the 325is underpanel with the M3 model - which was much larger in all respects and ties into the M3 front bumper (which my car also has).
The larger underpanel made routing the brake duct tubing challenging and I had to use excess tubing with some modifications to fit around the sides of the underpanel. If I had to do it again, I would stay with the 325is underpanel as it is less intrusive wrt to running the tubing.
The 325is underpanel attaches to the rubber shrounds alongside the radiator and do a good job of directing all the air into the radiator (OEM design). It just doesn't integrate into the M3 bumper (pork chops). Take a look at RealOEM to see the 325is set-up.
Good luck. If you are at the Peachtree event at RoadA in March I'll see you there.
Member
I'm not 100% sure I follow but I have had some issue with running the brake duct hoses, mainly it is tough to find a position to run the 3" hose where the tire will not rub it on the inside when turning.
I plan on re-routing what I have currently and going around the inner-liner and put the hose right near the sway bar mount then make the turn to the front. I figure that might keep the hose away from the tire.
I still need to put together a solution to mount to the front bumper, I've got soem ideas of what I want just need to get on it. That is one of my next to-do's.
Sorry I'm not making the Peachtree event, doing other Rd Atl events during the year with SCCA.
Member
My point about the 325is underpanel is that it is much smaller in width thereby allowing you to run the hoses closer to the centerline of the car before they make the turn outboard toward the backing plates.
With my M3 components I have enlarged (vertically) the OEM brake duct openings to allow the 3" hose to pass through. I have also flattened (oval) the ducting in a vertical fashion in that area so to allow the tire some room when turned inboard (fully).
It's not pretty but I just zip-tied the tubing ends into the OEM brake duct openings in the M3 bumper.
I'm sure you'll work it out.
Mike (Marietta, Ga)
Member
Well back to making progress with the car and doing pre-season maintenance.
Did the transmission and differential fluids, wow those transmission plugs really like to get tight! Did finally get them with a little extra length on the small breaker bar.
I've been spending some time coming up with a solution for the brake duct intakes that I liked. The first prototype I came up with just didn't work well. So after looking at a few other ideas I decided on a solution for the duct to sit behind the bumper and attached to the frame rail.
I decided that I could mould a one piece fiberglass part into a intake section and tubing. So I created a mould using MDF and then for final shaping used Bondo and created the smooth tube area and transition to the intake.
Mold
Layup
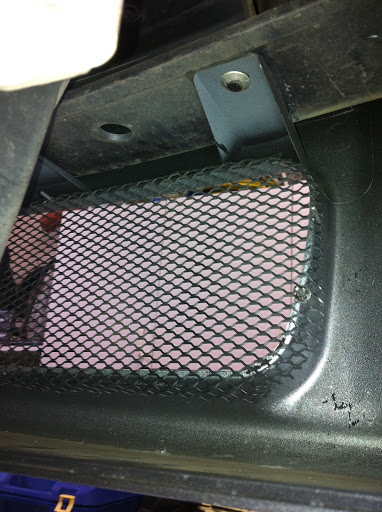
Then it was just laying up glass and pulling parts off the mold. the mold was for a half section that I could then join. They came together pretty well, I added wire mesh to keep out anything from the intakes. I made some aluminum brackets and mounted these up to the frame rail.
Pieced together and filled
Test fitting bracket, duct primered
Installed bracket and wire mesh
I finished the install and for now since I had already installed the section from the brakes to the fender liner and had fabricated the coupler I decided to just go to the coupler. I'll see how this works for rubbing and if it becomes a problem I'll re-route the hose from the front duct around to the side of the liner and direct to the brake. All things considered I'm happy with the project, it is pretty rugged now that it is all installed. The last thing I wanted is for this to be falling of on track.
One side complete
Other side
Outside view
Glad to be finished with this project and move onto some other items.
Member
I may have missed this but, have you done a cruise control delete? Would save a few pounds. But I like your work thus far, keep it up!
HARDMOTORSPORT.COM
Nice duct setup how many turns from center do you get before they hit the tubing?
Member
I've not done the cruise delete yet but it is on the overall list. I'm trying to work down the the list from highest weight to least. The insulation was on the list since it helped clean up the car and gave me a good look at the sheet metal as well.
I need to check what I've got, I know I don't like the angle of those routing out of the fender liner, but figured I'd let them go for now.
I'm going to 245's all around so I assume that will make it a little tighter on the duct hose getting rubbed.
Last edited by MCMM3; 02-14-2012 at 11:59 AM. Reason: Automerged Doublepost
Member
OK, got more things done.
Got another set of Koseis and gave them a quick paint job before mounting the scrub Hankooks.
Then it was on to make a replacement for the broken lower bumper grill. The original had about a 4" opening on the end where it was cracked.
I used the same gutter guard material that I used over the brake duct inlets, just cut it out and made bends to contour to the opening.
I thought I would use the orignal frame but it fit so well that it wasn't needed, just needed to remove it now and paint.
Installation, the bumper pins would go through the mesh and it was really tight, then just put back on the washer clips, I'm surprised it is really tight.
Finished
And if it gets destroyed on the track it can be reproduced for about $3.00
Last edited by MCMM3; 02-19-2012 at 05:57 PM.
Retired Air Force!
Awesome work Man..
I like the progress.. I'll be moving to your area next week. When I finally get settled, I'd like to check out your lift and the M3. The wife wants an M3 so she can DD and track. She doesn't want to use the gas-guzzler and also doesn't want to "damage" my MCoupe in the track. She bit the bug last month..
Take care..
- Y2K M Coupe (Garage Security)
- '98 318Ti M-Sport - BEATER/ Mileage Hog/ AutoX
- '87 944 N/A SILVER - (Project/DD/Cones)
- '08 Land Cruiser 200 (Family Hauler)
- '06 Royal Enfield Bullet 350 w/sidecar (weekend cruiser)
Future
- 88-91 M3 (maybe.. if I can find one, regret selling in 05)
- Richie
Who me? I didn't do it.
You might want to remove the a/c condensor to help get more air to the radiator since you have allready got rid of compressor. Also are you sealing off the bottom were this gap is? I had an over heating issue when running at full throttle on the track. Turned out to be the airflow would hit the radiator then just go under it instead of threw it. I did not have the mechanical fan installed, to scared it will grenade at some point Just an electric pusher fan to keep things cool at idle.
In the middle of this post is my "air duct" fix to keep things cool.
Or ignore all that if you are putting the oem bits back in.
Nice job on the brake duct inlet tubes, your cars lookin good!
Last edited by eye145; 02-21-2012 at 01:37 AM.
Member
Thanks for the encouragement. I'm trying to take my time and pay close attention to doing things well instead of fast!
I do plan to remove the condensor just didn't get to it. One thing about that is I'm not sure how the fron t fan mounts? It seems to mount to the condensor so if that is gone I guess I'll need to fabricate something to mount it?
Also I agree that the air flow needs to be managed to get the best cooling and also best aero. The folks I bought the car from didn't have the OEM bits for the under side so I either need to get those, or more likely I figured to fabricate something. One thought I had was to make an entire underpanel and combine that into an additional splitter on the front side. Nothing crazy huge but just something to drop the front a bit and take the lip out a bit. Any comments on that type of plan are appreciated.
Member
OK, got inspired to get rid of the condenser. Pretty easy to get out for the most part. That should help the cooling with a open path to the radiator.
Now the question is mounting the fan. The fan sits on the support with no bolts attaching it. I can put two bolts in at the mid point but even with those the fan can tilt back and forth given no attachment low or high. I'm thinking a couple custom brackets from the midpoint down to the lower attach points would do it???
What have others done for this?
I think the fan will still be effective for cooling at idle being about 2" from the radiator? The only idling is in grid or paddock so not a issue usually.
Member
OK, came up with a plan for attaching the fan after the condensor removal. Had some angle aluminum stock that would do the job well. My idea was to mount to the middle two attach areas of the fan that mount to the cross member where the fan sits. Then attach at the bottom on the sides.
So made up the brakets
Install was simple, just a few M6 bolts
It's pretty secure, and I think even with the distance between the fan and radiator I think it will still aid cooling when it kicks on.
Member
Sweet build. Definitely need an underplate so that air passes through the radiator. http://www.motionmotorsport.net/ will be coming out with an aluminum underplate with a OEM-like baffle soon, they also have an adjustable splitter that fits with the underplate.
Member
Agreed, that is one of the next jobs on the list. I'm considering to fabricate one on my own in fiberglass and maybe incorporate a slight splitter addition to it as well.
But yeah, gotta get that air flowing right. I'm surprised that the previous owners didn't have cooling problems, or maybe they did????
Member
Well a more critical job came up. I decided to remain on the Bilstien and H&R setup for a while so no new coil-over setup. So I did the front strut mount swap L->R R->L with new pieces. Took me a bit as this was my first work on struts but got it all done quickly.
Now maybe it is just as you test drive after a project that things "seem" better, but I can visibly see the negative camber difference and on the test ride it just seem to turn in quicker!!!
Still have to do a actually alignment but this seems to be wel worth the $140 in new parts, even without the swap the old ones looked worn!
Member
Making good progress! Having fun with the ol i6 coming from a v8?
Member

 Posting Permissions


 Reply With Quote


Bookmarks