
 Member
Mike I just found this thread, sucks for both of us that I didn't know the roll bar attached to the shock tower. I spent many hours configuring the wastegate.
Everything looks great, can't wait for first driving impressions.
My manifolds powering 8sec and over 1000rwp cars
Home of the highest HP stock M30 in the world 550rwhp/622rwtq
1/4 mile---> 9.81 @138 C4 Auto
10.08 in car vid --->https://youtu.be/OiinFhUomjg
Dyno vid... http://www.youtube.com/watch?v=C7aM7..._order&list=UL
Turbo e30 600whp/473wtrq
Mike i would like info on this please wiring thing.
E30 Turbo 2.8L - 60ft - 1.70 :: 1/8th - 6.99 :: MPH - 105.47 :: 1/4 - 10.66 :: MPH - 132.53
Daily E36 M3 - 60ft - 1.790 :: 1/8th - 8.20 :: MPH - 84.68 :: 1/4 - 12.81 :: MPH - 107.05
*RIP* E36 M3 - 60ft - 1.944 :: 1/8th - 8.64 :: MPH - 80.00 :: 1/4 - 13.55 :: MPH - 99.95
Cool2seat's TTstg1 E36 M3 - 60ft - 2.123 :: 1/8th - 8.44 :: MPH - 87.71 :: 1/4 - 12.94 :: MPH - 107.95
You've got red on you.
Go beat that thing's face off
Van's Parts
Yeah sorry again about that Otis. It totally slipped my mindOriginally Posted by good & tight

I'll be sure to let you know how it drives!
Sure thang, I'll post up later tonight with a few pics and the necessary stuff about the X20 connector. Everything else is just usual lights, etc. and is easy.
Will do!! Got quite a few things still to take care of before it's driveable, but it'll be soon-ish. Probably still a few weeks out
-Mike
IG: @mikevanshellenbeck
Van's Parts
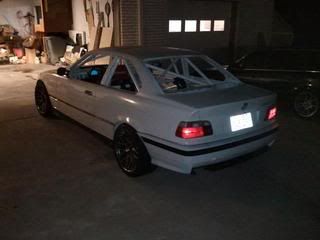
well not many picture updates but a few small progress things. Been busy with work / school the past weekish
-installed stainless clutch line
-determined (I think) that the diff leak is at the speed sensor seal... I'll probably be dropping the rear subframe tomorrow or this weekend to fix the shock threads and seal that up / find out where it truly is coming from
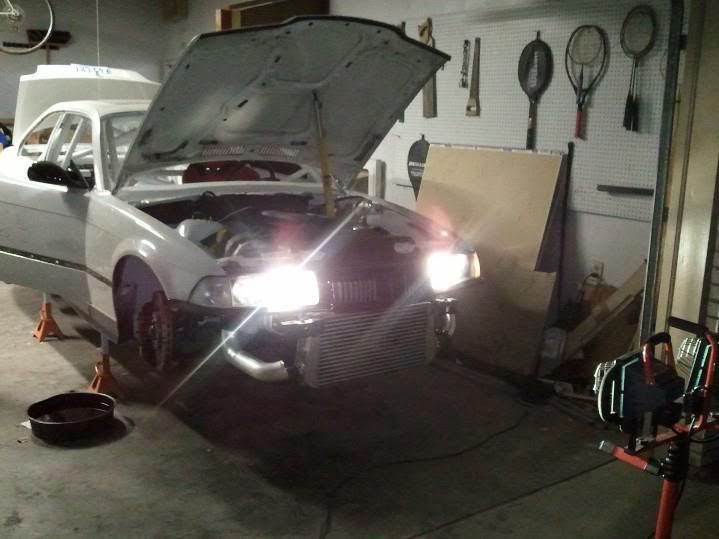
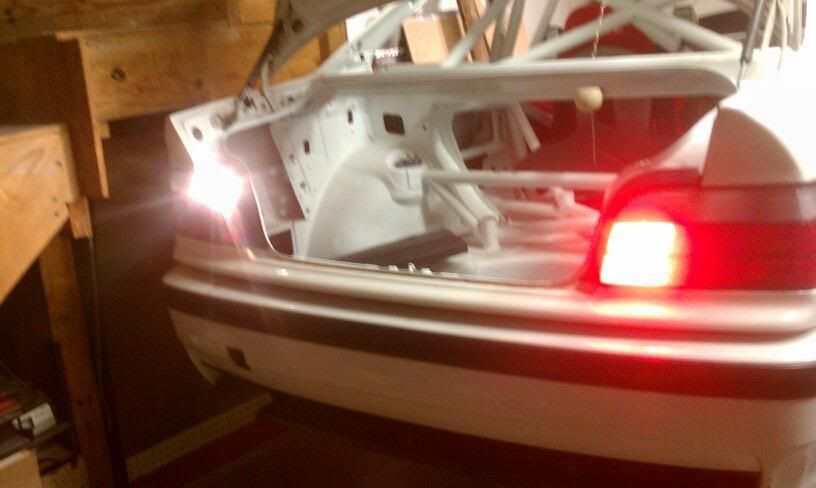
-taillights, parking lights, and headlights (low and high) all work now(I think I need to wire in a relay though for the headlights... the high beams are weak sauce when they come on... that wire is not flowing enough current to power them properly while the low beams are already on. The low beams are bright-ish though and I won't really be using the high beams ever so I guess it's good enough for now... I guess if I get picky later on the high beam brightness I can relay them.
Been reading a lot of ETM crap to figure out light switch, turn signal switch, brake switch, tailight pinouts, etc. to figure out what needs to go to what. I think I have it mostly figured out... just need to figure out a few more wires on the turn signal stalk switch / flasher... I'd like to use the factory one for turn signals since it's a lot easier on the stalk vs. a dash mounted turn signal switch. Also, 4 wires to the brake switch but I think I have those figured out too (except for 1)... should have all the light wiring done by this weekend, and hopefully the diff leak fixed, shock threads fixed, brakes and clutch bled, and wheels on it!
also need to mount the dzus fasteners for the front bumper, and order some for the rear bumper to mount it a little nicer.
tighten fuse block bolts
make brackets to mount MXL to steering column bar
secure wiring more
mount dash
that should be more than enough for this weekend.
My GF is hosting a car meet on Nov 11 so the goal is to have the car running and tags on it / street able by then. Stay tuned for more pics
-Mike
-Mike
Last edited by MikeE36; 10-14-2011 at 12:02 AM. Reason: Automerged Doublepost
IG: @mikevanshellenbeck
Van's Parts
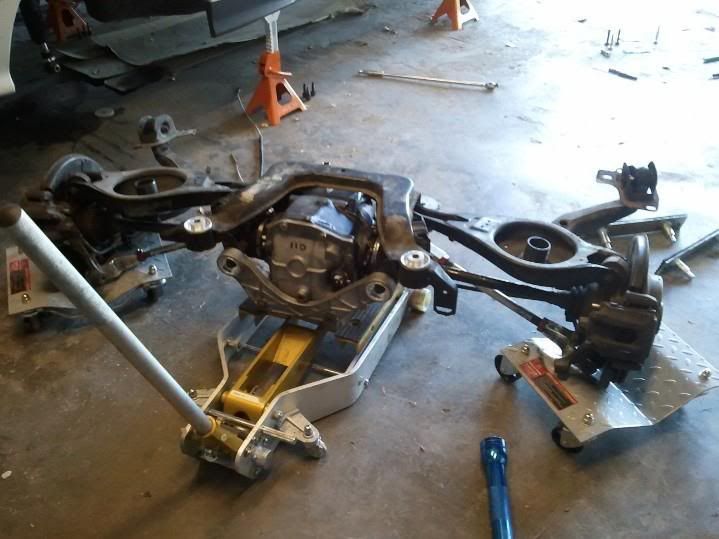
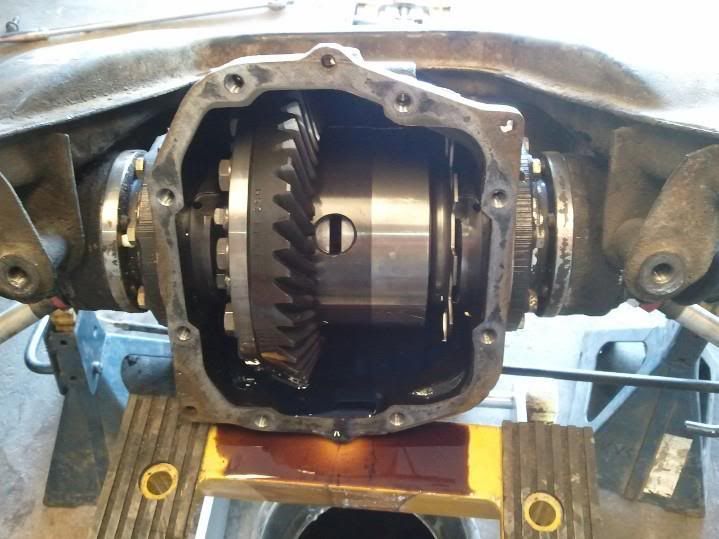
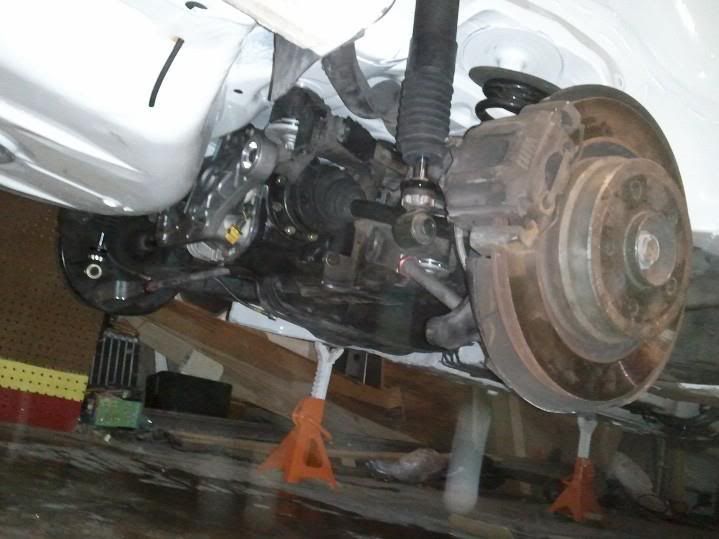
dropped the rear subframe today, found my rear diff leak.... rear cover is crackedThinking of JB-welding it or otherwise to get up and running soon at minimal cost. Tired of this F-ing CES 210mm diff conversion already. What a PITA.
Tapped my shock threads in the rear hub to 1/2" and they thread in fine, so one down. Just need to fix the diff cover and then I can put everything in, throw in the DS, bleed brakes and clutch, and test drive it...
I'll sleep on it tonight and figure out what I'm going to do with the rear diff cover. Might pull it off and have my buddy weld it up a bit more legit instead of JB-weld it... either way will seal it I'm sure. Mounted the fuse block permanent and mounted the MXL...
To do:
-rear turn signal wiring
-brake light wiring
-MAP sensor for MXL
-mount dash
-fix rear diff cover
-reinstall rear subframe
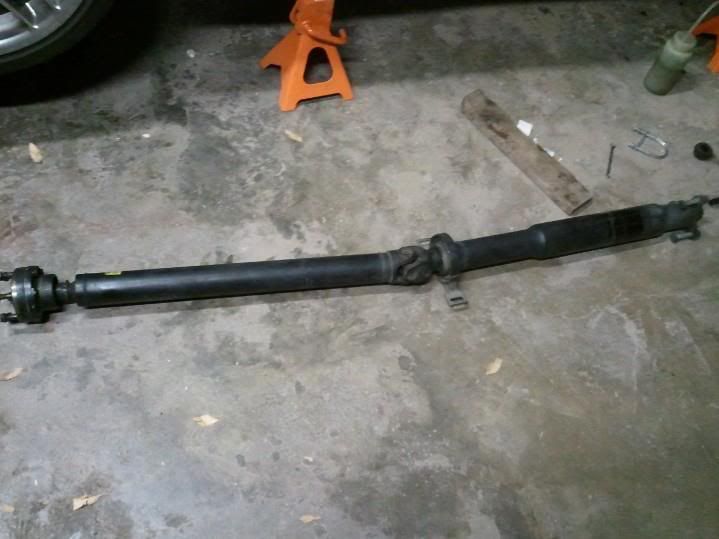
-install ds
-bleed brakes and clutch
-have my buddy fab a wg dump tube + fix my hot side IC pipe
-mount front bumper
-install lexan rear 3 windows
-get glass windshield installed
-inspected
-DONE.
Not sure how much of that will be done tomorrow, certainly not even half but it's going to be done soon... goal is nov 12, since that is my GF's car meet here in Texas, and I definitely want to have it ready for that
pics later
-Mike
IG: @mikevanshellenbeck
You've got red on you.
@ DONE
ok buddy.
Van's Parts
What? It's getting close!
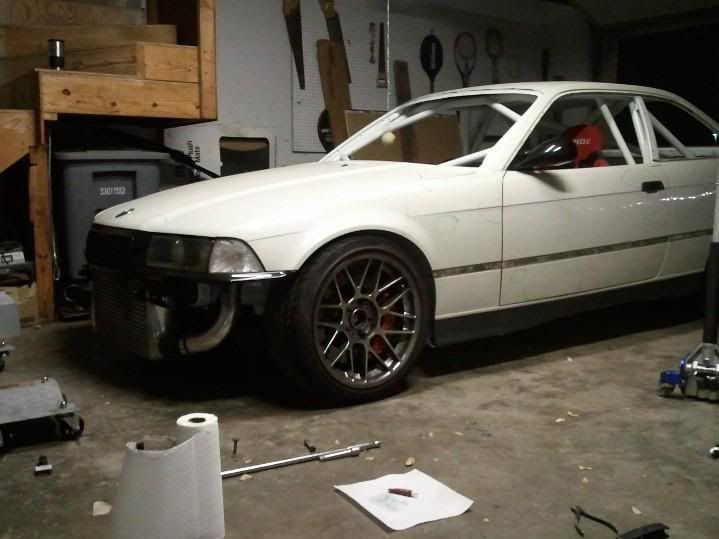
Mounted up a fuel filter bracket, since the PO of the chassis cut off the bracket where it mounts, or maybe this chassis had a different mounting location than my '95.
Mounted the MXL, mounted the fuse block... wired up the brake switch it works properly... just need to do turn signals then I'm done with lights. I'll tackle those tomorrow, and figure something out for the diff cover leak.
Don't laugh at me Benny, it'll be done soon ish!(actually more to that list though, SLR angle kit + flares + wider wheels
you're right it never ends
)
-Mike
subframe take 2
das crack
The ETM pinouts don't always match the actual wire colors your connectors have - lolz
-Mike
Last edited by MikeE36; 10-16-2011 at 03:34 AM. Reason: Automerged Doublepost
IG: @mikevanshellenbeck
Drifter
Nah I think thats normal how many e36 do you see with properly working tail lights lol.
Van's Parts
-Mike
IG: @mikevanshellenbeck
Member
You've got red on you.
I was laughing at you saying it'll be 'done', it's never done man, you should know that.
Van's Parts
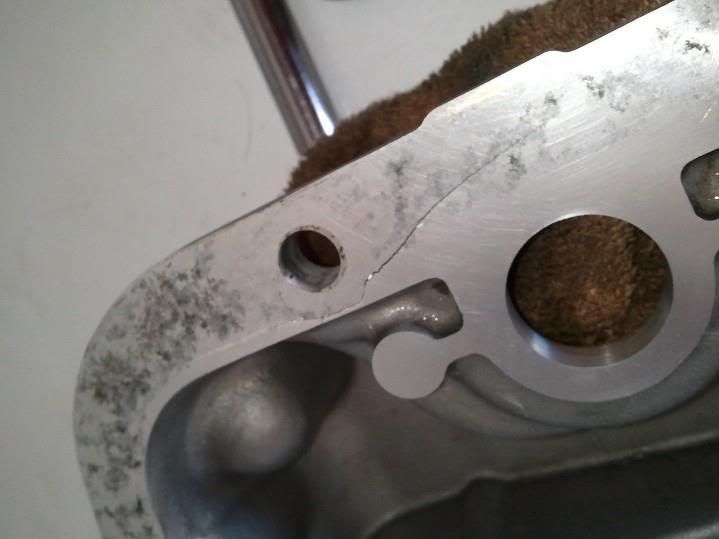
I'm not sure why it was cracked. It could've gotten banged up in shipping. I didn't torque those bolts beyond how they are assembled from CES motorsport.
oh of course not, I know that... but done as in I'm driving it and posting videos of the glorious sounds
back in and no leaks this time!
rear end is done now except for drilling out the bushing on my right rear TRM coilover to 1/2" since that's what I tapped the threads to. Can't find a suitable drill press bit to do that, and tried to doing it with a hand drill and ended up just getting the bit stuck and the drill hitting me in the face lol... so I'll find a bit and drill that tomorrow, then bolt that shock.
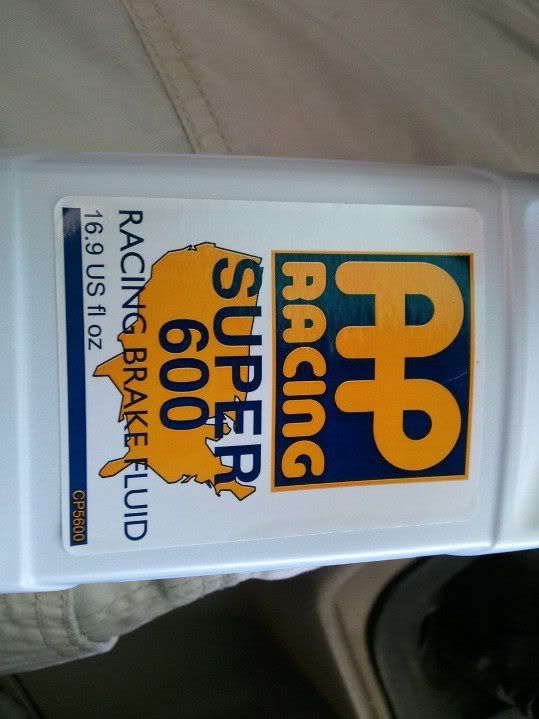
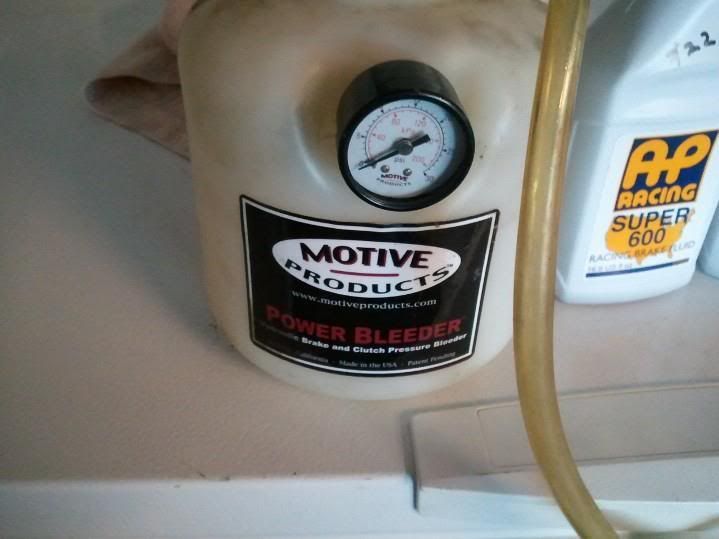
Next up, attach rear brake lines, add fluid and bleed the brakes and clutch
Already ran the turn signal wires today and wired them up at the rear lights, but haven't dealt with the switch on the column yet (I'm retaining the one stalk for the turn signals. I think dash mounted toggle switch signals are a PITA to use with street driving).
Going to order some HDPE black plastic so I can box in my dash a little and make it look semi-legit on the end where you can see the wires behind it, and try to hide it a little more. I'll make a cutout / end cap for the dash, since I only have a half dash as-is.
To be continued!
-Mike
Last edited by MikeE36; 10-16-2011 at 10:17 PM.
IG: @mikevanshellenbeck
Member
318is... Hehe nice
Van's Parts
-Mike
IG: @mikevanshellenbeck
Member
Awesome build man.. what specs on rims and tires?
AZ 51 STEP GRAD.
You've got red on you.
oh snap
Turbo e30 600whp/473wtrq
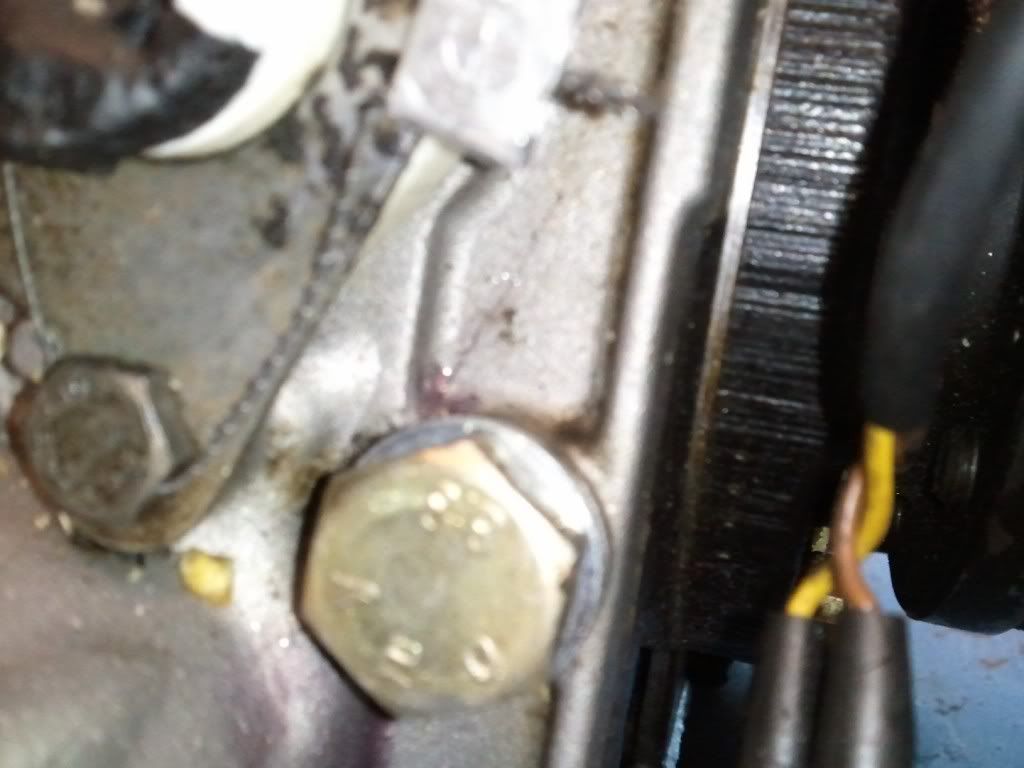
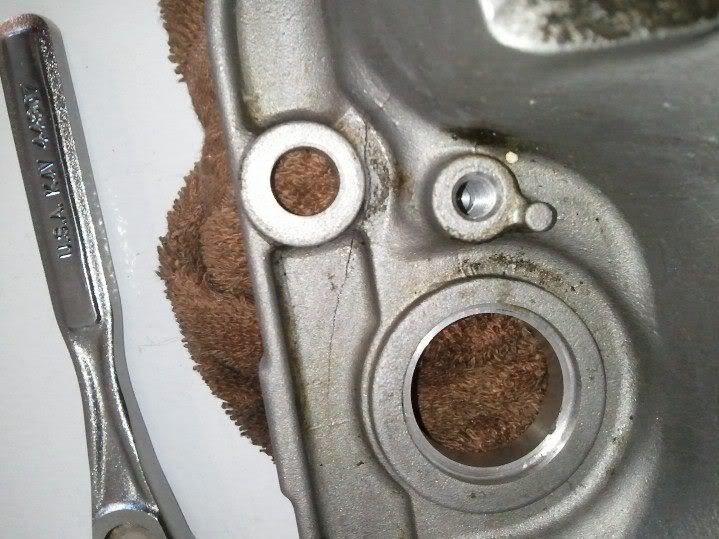
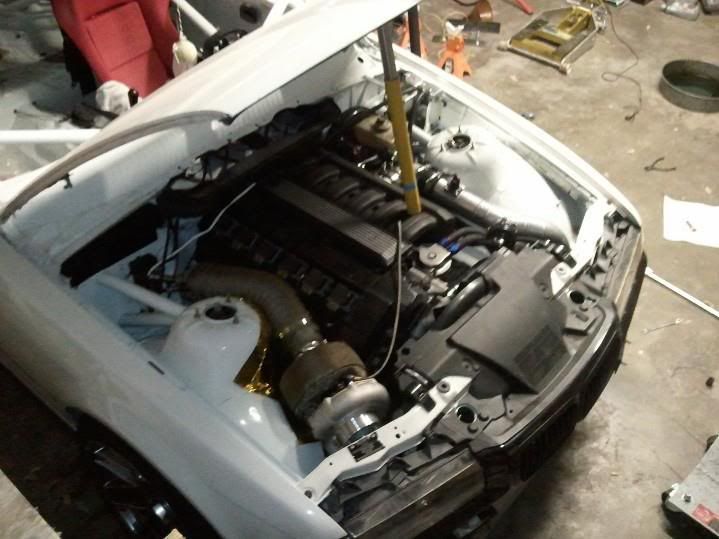
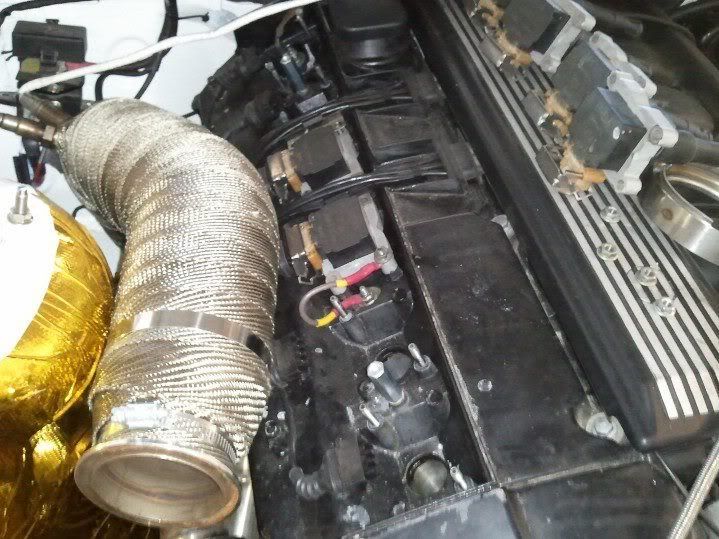
Mike is that last photo a valve cover, cover, cover lol..
E30 Turbo 2.8L - 60ft - 1.70 :: 1/8th - 6.99 :: MPH - 105.47 :: 1/4 - 10.66 :: MPH - 132.53
Daily E36 M3 - 60ft - 1.790 :: 1/8th - 8.20 :: MPH - 84.68 :: 1/4 - 12.81 :: MPH - 107.05
*RIP* E36 M3 - 60ft - 1.944 :: 1/8th - 8.64 :: MPH - 80.00 :: 1/4 - 13.55 :: MPH - 99.95
Cool2seat's TTstg1 E36 M3 - 60ft - 2.123 :: 1/8th - 8.44 :: MPH - 87.71 :: 1/4 - 12.94 :: MPH - 107.95
Van's Parts
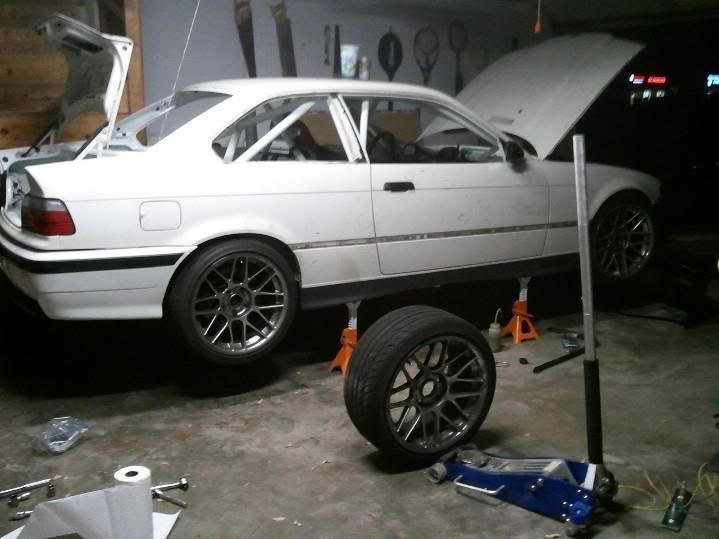
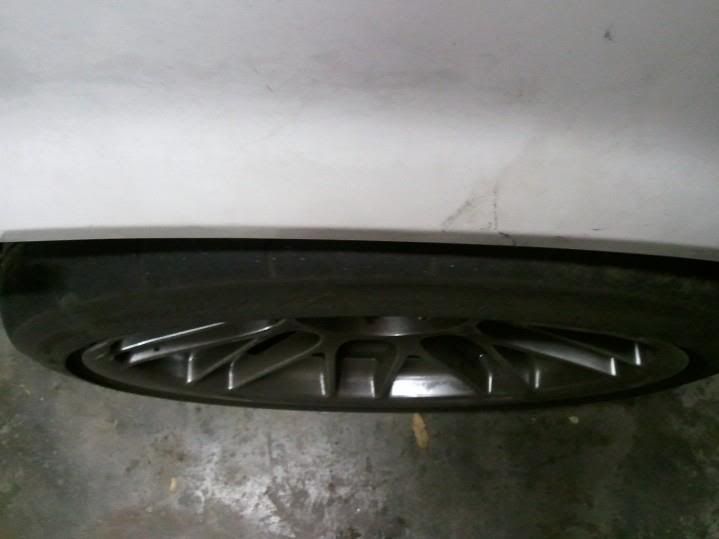
thanks! they're apex-arc8 e46 m3 fitment. 18x9.5 +35, and I run a 12mm spacer up front so effectively +23 up front
should be able to move under its own power by tonight, then tidying up some things and will start on the lexan / IC pipe / wg dump tube fab this weekend
yea lol an ignition heat shield. replaces the stock valve cover cover
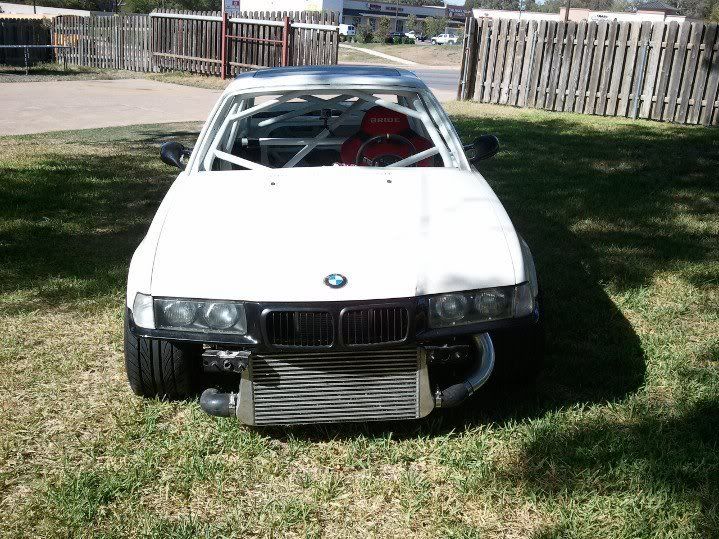
found out my tire is going to get really friendly with my hot side IC pipe as it sits, so ill definitely have to figure something out there. I'm thinking that with sean's angle kit and +50mm track width on each side the the radius that the tire swings will then clear the pipe and just hit the control arm, but we'll see.. as it sits, no bueno. I'll figure something out this weekend to change it. I didn't want to reclock the compressor inwards and ditch the mech. fan but it looks like I might *have* to.
-Mike
IG: @mikevanshellenbeck
You've got red on you.
yesssss. screw clutch fans.
Member
Wow man, they sure look great on ur car.. what tire size can u run with these..
AZ 51 STEP GRAD.
Van's Parts
not that big really. I run 235/40/18 front and 255/35/18 rear but you need to flare the fenders quite a bit and get aggressive with a roller for it to work.
-Mike
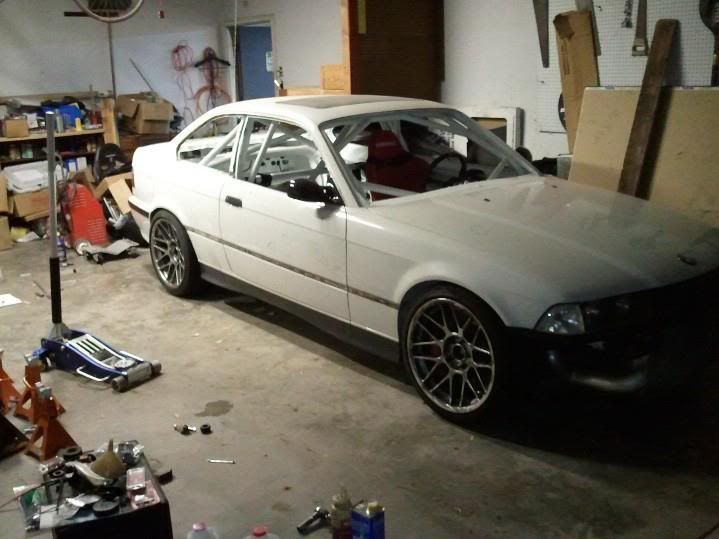
well it moves under its own power now. need to get my buddy over to help me bleed the brakes. for some reason im getting a shitty bleed with the pressure bleeder, not sure why. they feel sponghayyy
pictars
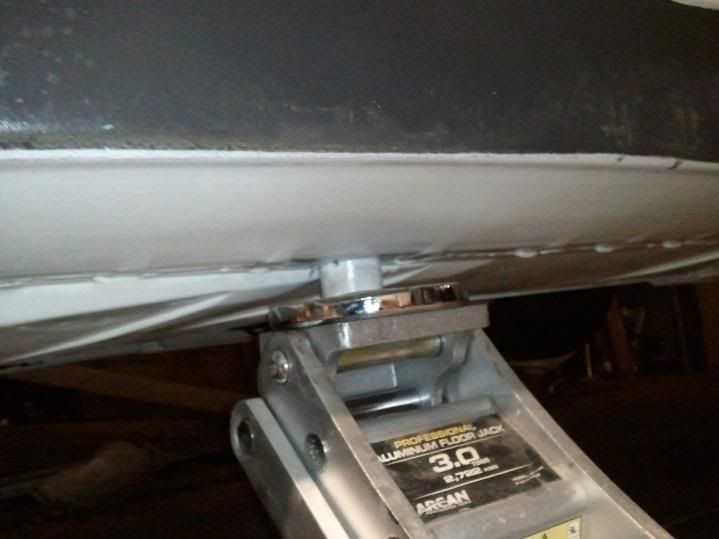
testing out the built-in cage jack that collin added to the chassis, works AWESOME
more to come... so much more to do, even though it runs and drives lol. mehhhhhhhh
found a local plastics shop so on friday (i have a midterm tomorrow) ill swing by there and get some 1/8" lexan to cut my windows and rivet them. My fabricator buddy is ready for the car whenever so i may trailer it to him on fri or sat for the WG dump tube fab and changing up the hot side ic pipe a little since i think the tire is going to get raped at like 30* of angle. I want to be able to take full advantage of the SLR angle kit... so can't have that. We'll see what needs to be done. Also smell some coolant, and i got lazy when i swapped in the colder thermostat and didnt clean the surface, or add any gasket maker, so it may be seeping a little there (although I don't see any leaks..) so I'll have to investigate that a bit more. If I have to ditch the stock fan shroud and mech. fan to run the hot side IC pipe inside the frame rail for tire clearance, I may just go ahead and order a bigass custom griffin radiator and move it closer to the engine, and then run a pusher e-fan on the front of it for low speed / idle situations. Need to double my capacity and see if I can keep it real close to the 71C thermostat. I like engines running cool on track
Anywho, that's it for now. not sure what to do next so I'm doing nothing at the moment lol.
-Mike
Last edited by MikeE36; 10-19-2011 at 09:58 PM. Reason: Automerged Doublepost
IG: @mikevanshellenbeck
Member
Car is so effin sex! I'm amazed at the progress! You the man!!
My car is ready to run now just gotta get some headers so I can crank it. Got any? Got fuel tank fixed with a small adapter from lowes. Cutting it close..T-minus: 7 days til I need it ready!
Hey what seat is that I see in the background behind your car? Wanna sell??
Last edited by driftin07; 10-19-2011 at 11:24 PM. Reason: Automerged Doublepost
Member
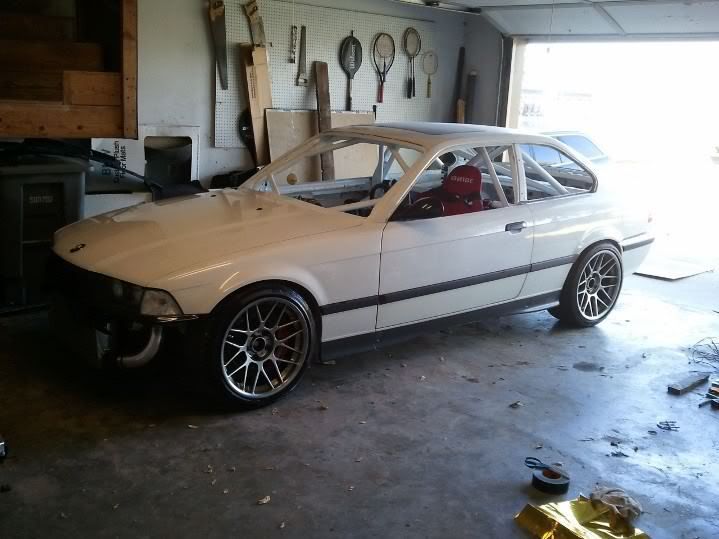
Are the circles on the body for dents? Is the car getting a full respray?
Nice, quick progress!
"Believe nothing you hear, half of what you read"
Van's Parts
haha thanks man!! good luck gettin er' ready for the next drifties day!
the seat behind the car is a a Corbeau CR1 pass. seat I've had forever. My first set of seats after the vaders were corbeau CR1s in black cloth. I already sold the driver and just havent bothered trying to sell the pass. It is slightly ripped on the back of it due to rubbing my roll bar on track. I'd sell it for prolly $100 + shipping if you want it, but it may not be of use to you idk. comes with slider rails too.
thanks, yeah the circles are when it was at the bodyshop and they were gong to fix some things and respray the whole car. After they charged me *more than expected..* on the black car, I decided not to have this car sprayed, considering it is going to be a track rat and might get a little dinged up in the process. I'll see though, I might want to have it painted after all. For now, it's just marks that need to be washed off.
-Mike
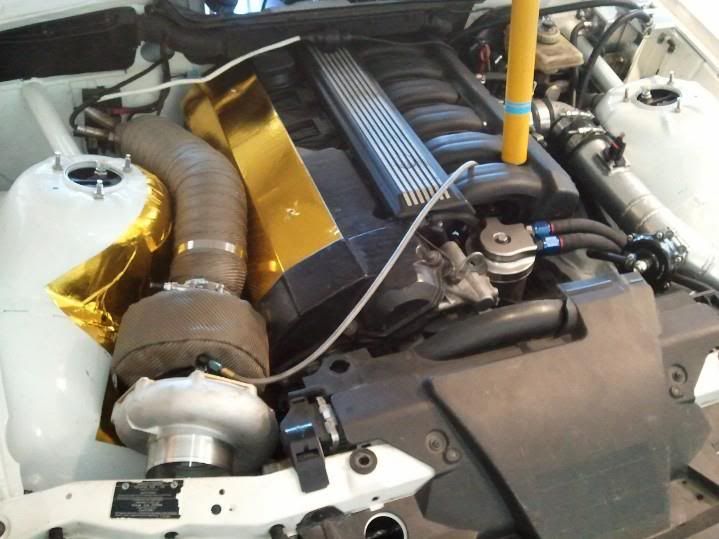
installed my ignition heat shield (thanks Jon and Jay!!), wrapped in DEI for a little extra protection (and ultimate ricer status)
installed some mouldings off the M3, and washed off those green circles everywhere. Turns out it's fairly difficult to wash a windowless racecar without getting water inside
Next up I need to try reclocking the turbo and see if I can make the hot side IC pipe fit inside the frame rail or not. I'm not sure the manifold will allow me to, given the angle of the turbo relative to the radiator. We'll see. After it is clocked in a reasonable position, I'll put it on the trailer and take it to my buddy Russell to fab the IC pipe, wg dump tube, and v-band my current exhaust to the downpipe. Then it goes for a windshield and inspection
-Mike
Last edited by MikeE36; 10-20-2011 at 05:38 PM. Reason: Automerged Doublepost
IG: @mikevanshellenbeck
 Posting Permissions


 Reply With Quote


Bookmarks