
 Member
I think I'm going to lose it here. I replaced all air conditionig components on my 1991 850I. Full charge no leaks but still hot air. It turns out that my brand new heater control valve isn't getting power to it to close the valves. I checked all fuses bled cooling system after putting in a new heater core. Any thing ells I could look at? This is the only thing holding me up. The rest of the project is done after almost two years. Any help would be greatly appreciated.
MAX@FINEMOTORING.COM
Here's a stab at the problem from an earlier discussion; stay tuned, there have been recent developments and a likelier fix is in the works.
http://forums.bimmerforums.com/forum....php?t=1621991
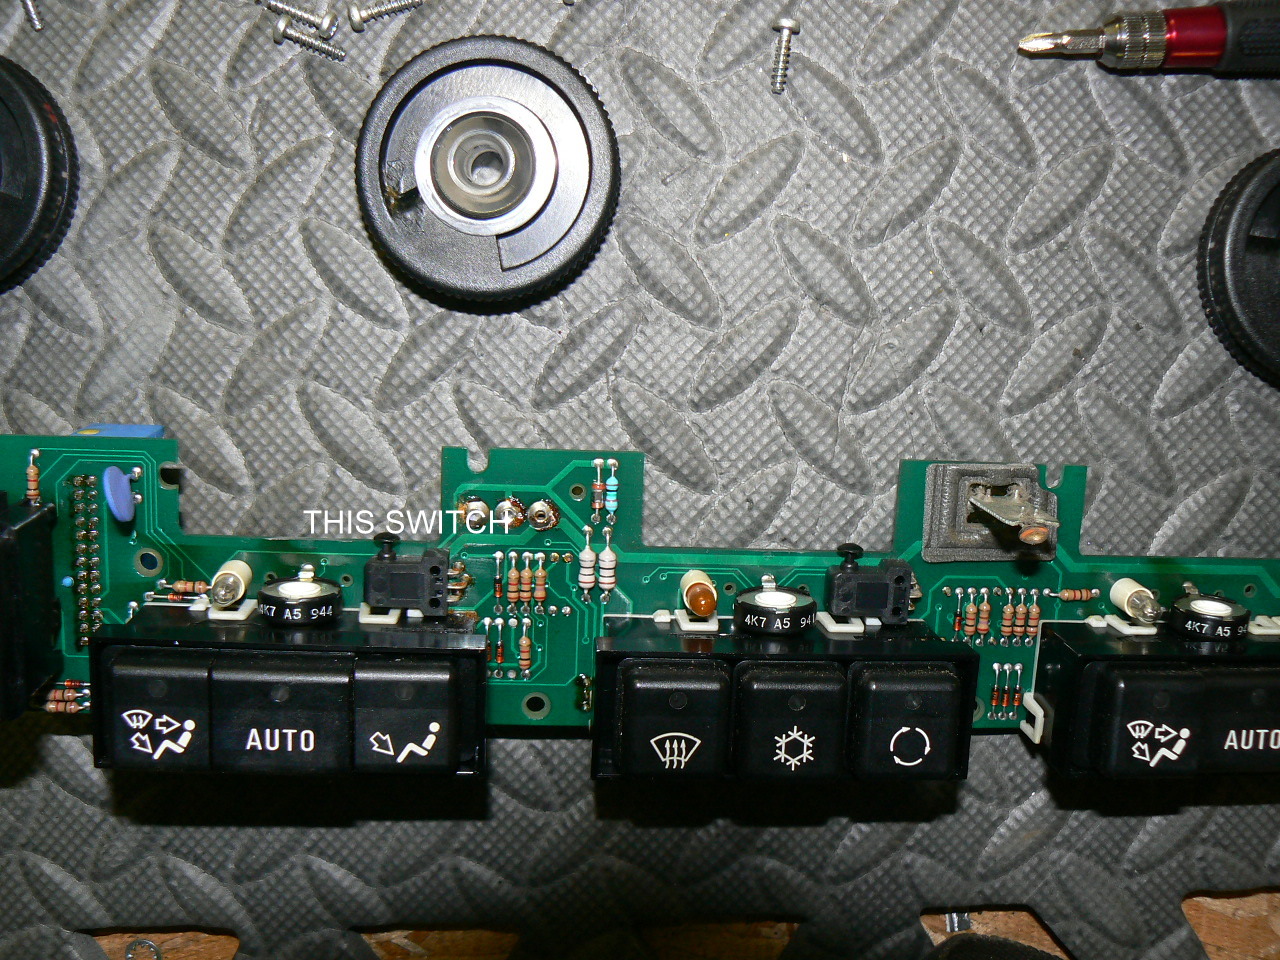
Courtesy of a curious and capable e34 guy comes the fix to the hot air problem caused by no power to the heater control valves. It's the switch under the driver's temp control wheel on the IHKA controller in the console. It accumulates ohms over time, until there are so many stacked up they don't let the volts through. He reported 250ohms, and the e32 box I checked had 190 or so; it would seem the switch is a little undersized for the job and/or dust accumulates on the contacts. The fix is to pull it off the board, disassemble, and clean; gets the resistance back to 0. It would be great to find a source for these, but they look pretty obscure.
Pic is from an e32 unit, but e31 is similar:
Last edited by Max Lumens; 09-03-2011 at 04:03 PM. Reason: Automerged Doublepost
How come the middle half of any project always takes the most time?
Member
First I'll start with the batteries. Always start withe the easy ones. Iv'e already had the dash switch apart twice. I'll take it apart again desolder the micro detent switch and take it apart and clean. Please keep the ideas coming. Thanks so much for the help.
MAX@FINEMOTORING.COM
Test the resistance of the switch first; no need to fix what isn't broken.Originally Posted by lihp321

How come the middle half of any project always takes the most time?
Member
I took the micro detent switch apart and cleaned it soldered it back to the board. Ice cold now. I hope it stays that way. Thanks so much Max Lumens.
MAX@FINEMOTORING.COM
Bueno. Good to hear it confirmed; thanks for posting your results.
How come the middle half of any project always takes the most time?
Member
This is big news, Max! This could possibly be the answer to my problem.
Do you happen to have the link to the E32/34 forum discussion?
MAX@FINEMOTORING.COM
There was no forum chat, just a few emails back and forth. Here's the gist of it:
.... My IHKA has its heat always on. After some diagnostic work, I
traced the problem to a small switch soldered onto the circuit board of the
main unit with all the buttons and dials. The power to the heater valve
runs through this switch. The resistance was high and prevented power from
reaching the heater valve. I was able to polish the contacts and fix this
Regarding the switch: Mine ohmed out at 250 or so. Way too high to feed a pair of 13 ohm coils. The power to the heater valve runs from a fuse, to that switch, then to the valve. The return from the valves runs back through transistors on the control board to ground. Two 13 ohm heater valves pull an amp of current, which is apparently too high for that little contact. At least too high to last more than 20 years <grin>.
Fortunately most of the problems can be fixed with off-the-shelf parts. After unsoldering the switch, I used a pair of exacto knives to pry the case open and access the contacts inside. After polishing, I was at 0 ohms. A workaround would be to solder a wire across the switch to have the power fed to the valves all the time. This is how the standard E34 IHKR (non-automatic) system is wired. The only reason to have that switch is to shut off power to the valves which turns them fully on. The controller can open the transistors and do the same thing. This is different than the final stage unit which when the transistors in it are fully on, there is still some voltage drop. Having a relay there, supplies full power to the fan. In this case, the controller can turn the power fully off without the switch.
BTW, I drove the car yesterday and the heater valves worked perfectly. This morning it automatically added some heat and then cooled down once things warmed up
How come the middle half of any project always takes the most time?
Member
Super, thanks!
Just to clarify, do you mean the black switch as indicated in the modified image below?
P.S. When I'm ready for new headlight wiring harnesses, I'll be in touch with you (other priorities now - like this one).")
Member
All I used was a couple of squirts of MAF cleaner and some compressed air. This is of course after I took the switch off the board and apart. Worked fine. I would have used contact cleaner if I had some. The contacts were nice and shinney. I'm happy to report my A/C is still ice cold. It's hot here in the desert. Thanks again Max.
Member
Being an old electronics guy I can tell you from experience that you should have used contact cleaner with lubricant on this type of circuit. I'm not familiar with MAF cleaner but if it isn't made for electronic circuits you risk further problems.
When dealing with old circuitry it is important to clean with the proper cleaner to avoid the repeat of the corrosion that created the problem in the first place. The use of cleaner with lubricant ensures that the moving parts will not further erode the rheostat.
Carl
Hamann's baby!
excellent! I think i'll try this before replacing my water valve and aux pump
CB42366 - 1991 850i 6-speed. Brilliantrot & Black Nappa Leather
CD00144 - 1994 850CSi. Hellrot & Black Nappa Leather
My other projects:
Supercharged Tbirds, V8 Tbirds, V8 Mustang Convertible, Audi V8 Quattro & Audi S8
Member
To clean electronic components that become dirty with dust/grim use the following process. (Ensure your hands are clean.)
If the unit is sealed, then when opened, use compressed air (shop air or spray can) to blow away the grim then soak a soft brush or cue tip in circuit cleaner (I use deoxIT http://www.amazon.com/gp/product/B000RGD9PK stay away from the cheaper cleaners like the ones from Radio Shack or Lowes.) Let it dry and repeat a second time. Reinstall being careful not to touch the exposed rheostat or potentiometer wiper or resistor surface.
Most controls have a hole that the circuit cleaner can be sprayed in. If this is the case then you do not need to open the control. Just follow these directions.
http://www.axiomaudio.com/tips_clean..._controls.html
Carl
Got s38? No turbo needed
Question...I just happen to have my center panel out of my car right now and wanted to take my dash heater control apart to clean. I had no problem getting the back off and taking the first circuit board out. I was able to get the center pivots off the wheels, but I can't get the next board out to get to the switches. Do I just pry it out wheels and all? Is there something else holding it in? Can somebody share the final technique?
Thanks in advance.
Current Garage:
91 e34 M5 - spoiled & demanding 27 y/o -glanzshwarz
91 850i/6 -another spoiled & demanding 27 y/o- schwarz-gone but never forgotten
06 325i - undeserving, spoiled & demanding 27 y/o daughter's DD-hellrot
03 MINI Cooper S JCW -spoiled & demanding, yet deserving wife's DD - Chili/Panther
05 X3 3.0i -family workhorse - diamond schwarz
12 X5 3.5d - torque monster - space gray metallic
86 GMC Cabellero - Old Faithful 32 y/o DD BMW Support Vehicle
08 Cub Cadet 19HP 46" hydrostatic- yard vehicle
88 Schwinn Sierra - 1WD Off Road Vehicle
e31 & OHC BMW CCA #385540
Member
There are two screws that hold the lower board.
Got s38? No turbo needed
I removed the two screws and still it won't come out . Trying not to pry or force it. Is there anything else that holds it in after taking out the two screws and the thumb wheel pivots?
Current Garage:
91 e34 M5 - spoiled & demanding 27 y/o -glanzshwarz
91 850i/6 -another spoiled & demanding 27 y/o- schwarz-gone but never forgotten
06 325i - undeserving, spoiled & demanding 27 y/o daughter's DD-hellrot
03 MINI Cooper S JCW -spoiled & demanding, yet deserving wife's DD - Chili/Panther
05 X3 3.0i -family workhorse - diamond schwarz
12 X5 3.5d - torque monster - space gray metallic
86 GMC Cabellero - Old Faithful 32 y/o DD BMW Support Vehicle
08 Cub Cadet 19HP 46" hydrostatic- yard vehicle
88 Schwinn Sierra - 1WD Off Road Vehicle
e31 & OHC BMW CCA #385540
Member
I forgot about the push buttons on the front of the panel. They have to come out. These you can pull out. That's the only other thing holding in the lower board.
Good Luck
Got s38? No turbo needed
Got it...the buttons were what was keeping it from coming apart. Everythings been cleaned and put back together. Just got to get my new center panel delivered and installed and I'm back in business. Thanks for the help.
Current Garage:
91 e34 M5 - spoiled & demanding 27 y/o -glanzshwarz
91 850i/6 -another spoiled & demanding 27 y/o- schwarz-gone but never forgotten
06 325i - undeserving, spoiled & demanding 27 y/o daughter's DD-hellrot
03 MINI Cooper S JCW -spoiled & demanding, yet deserving wife's DD - Chili/Panther
05 X3 3.0i -family workhorse - diamond schwarz
12 X5 3.5d - torque monster - space gray metallic
86 GMC Cabellero - Old Faithful 32 y/o DD BMW Support Vehicle
08 Cub Cadet 19HP 46" hydrostatic- yard vehicle
88 Schwinn Sierra - 1WD Off Road Vehicle
e31 & OHC BMW CCA #385540
Member
Still no confirmation of my question in post #9.....?
What switch?
MAX@FINEMOTORING.COM
Yes, it's that switch, as you marked it. 3 legs, little hat on top. You can test the resistance on the other side of the board, see if you need to take it off.
How come the middle half of any project always takes the most time?
Hamann's baby!
to you guys doing this clean up....I'm sure I'm not the only one who would appreciate a write up with pix
The board will thank you
CB42366 - 1991 850i 6-speed. Brilliantrot & Black Nappa Leather
CD00144 - 1994 850CSi. Hellrot & Black Nappa Leather
My other projects:
Supercharged Tbirds, V8 Tbirds, V8 Mustang Convertible, Audi V8 Quattro & Audi S8
Member
Keep in mind the swith location on our 8's is located differently than the above photo. Switch will be found 180 below the push buttons.
MAX@FINEMOTORING.COM
Pix? Notes? How about catching the ball that Caifan tossed you and putting together a how-to?
How come the middle half of any project always takes the most time?
Member
My AC seems to be blowing cold from all the upper vents, but I have a constant heat coming from the floor, even when I push the mixed button on the control. Is this what you are talking about, or is this something different?
Last edited by IJustDrive; 09-08-2011 at 10:41 PM.
Member
Excitedly I pulled my HVAC control from the panel and took it apart using the helpful instructions listed here, only to realize that testing this switch can be accomplished by simply checking pins 11 and 12 on the controller's blue connector (x612, on the back) for continuity - a lot easier. See the images below. The photo shows the actual switch itself (circled in white) while the schematic from the service manual shows the equivalent circuit (circled in red).
Mine tests OK. The switch reads 0 ohms when closed (not full hot) and infinite ohms when open (full hot). No need to disassemble anything folks: just test the pin-outs instead.
Incidentally, for those whose switch is defective (reading more than 0 ohms), a simple work-around has been performed by Bryson in this post. It bridges pin 11 and 12, effectively bypassing the switch.
Last edited by Frankie; 10-20-2011 at 11:38 PM.
 Posting Permissions


 Reply With Quote


Bookmarks