
 ///Member
The Car: This DIY was preformed on a 2000 328ci E46. But this DIY should apply for all MY E46s.
Difficulty: 2/10 Very easy to do with a good socket set, nice jack, and a pair of jack stands.
Diagnosis:
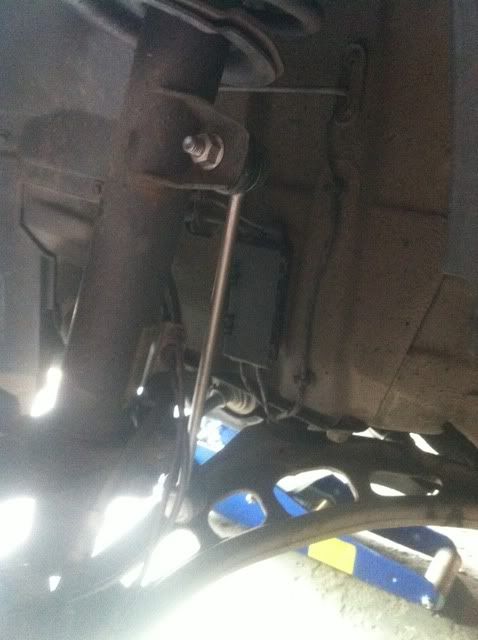
For the past couple of months, I have noticed a faint clicking noise when slowing to a stop with the windows down. So I got under the car and did some investigating and found that my Front Sway Bar/ Stabilizer End-Links were shot. So I ordered new ones from ECS Tuning and decided to write up a DIY since I had trouble finding a good one to do this job.
Parts List:
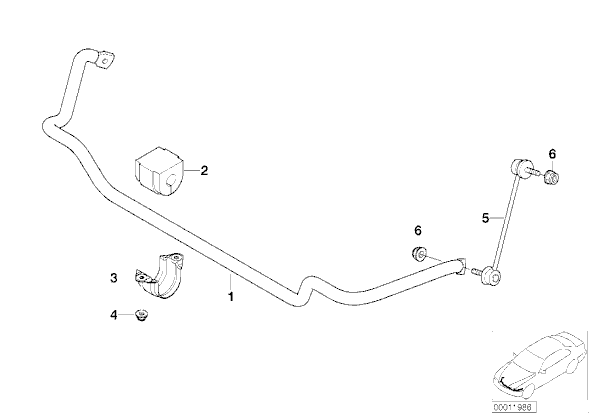
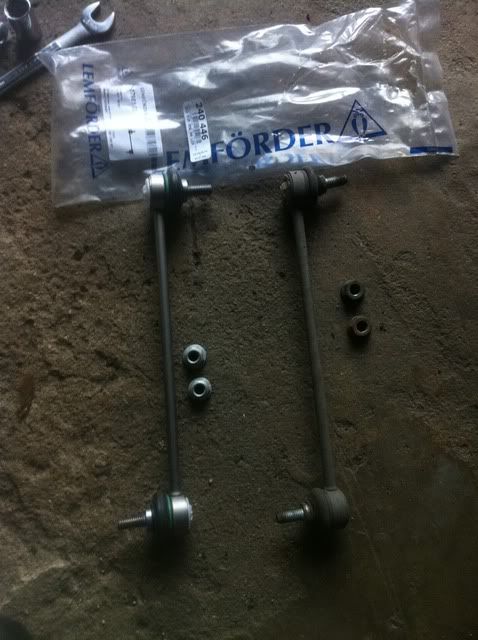
(x2) BMW Part #: 31356780847
Part #5 in the Diagram below
BMW wants something like $45 a side for these. I found them at ECS tuning for $27 a side. That was the cheapest I could find. LEMFORDER is the OEM supplier, but MEYLE is also a very good choice. I would shy away from FEBI however, I have read people complaining about them failing in as little as 30k miles. But the choice is yours.
Instructions:
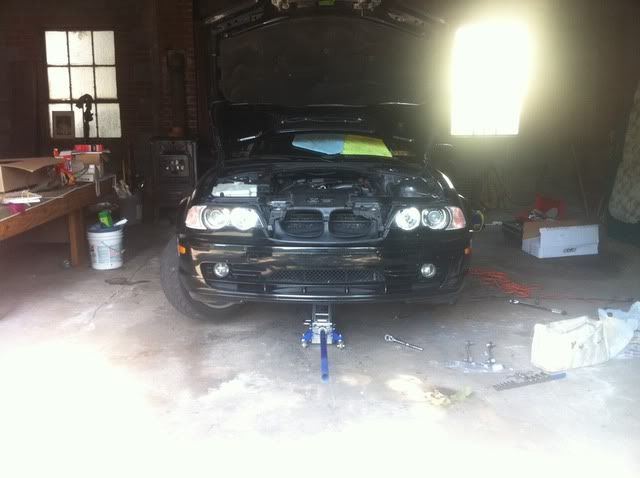
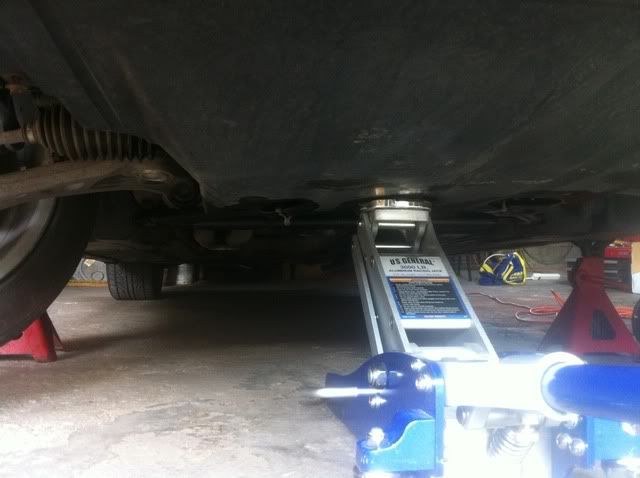
1.) First break the torque on your lugs, and then jack your car up from the center jacking point under the engine. If your jack isn't slim enough to fit, jack up the car one side at a time so that both wheels are suspended off the ground. Support with a good set of jack stands.
Close Up of the center jacking point under the engine.
2.) Next Remove the wheels and turn your steering wheel to one side. This will give you more clearance to access the End Link nuts.
3.) Then grab your socket set. This is where I have found a trick that will save you from buying a special wrench. The way the End Links are designed, you need to hold the End Link itself from behind the steel mount while loosening the nut. You'll soon realize that your average open end wrench isn't slim enough to fit between the steel and the End Link. So what do you do? Open up your BMW tool kit in your trunk and grab your adjustable wrench. It fits perfectly behind the steel mount and will hold the End Link secure while you loosen the nut. Breaking that initial seize on the nut can be a PITA. I used a rubber mallet which helped move things along.
4.) Repeat step two for the lower nut. Be careful when loosening the lower nut. You don't want to rip your steering rack boot in the process. Also, your passenger side lower nut is perilously close to your auto-leveling sensor if your car is equipped with OEM Xenons. It will take some time to remove the nut without bumping it. Just be careful.
New VS. Old
5.) Install is the reverse. All in all a very easy job. Now go enjoy your noise-less ride.
New End Link Installed
Last edited by 328ci906; 05-30-2014 at 08:56 PM. Reason: Broken Link
2003 ///M3 6spd Jet Black/Cinnamon | BC Racing Coils | VMR VB3's | Coby Wheel |
(I Loan Valve Adjustment Tools! PM me...)
Member
perfect write upthank you
does an alignment need to be done after sway bar links are changed?
Last edited by esberelias; 08-01-2011 at 01:20 AM. Reason: Automerged Doublepost
My Previous Vehicle - In the Edmonton/Northern AB Area? We're having a meet... Click Here
///Member
Nope, you don't need an alignment. Sway bar links have nothing to do with your alignment.
2003 ///M3 6spd Jet Black/Cinnamon | BC Racing Coils | VMR VB3's | Coby Wheel |
(I Loan Valve Adjustment Tools! PM me...)
Member
Thanks for the DYI! And FYI, I have a '02 325xi and it's the same procedure.
Member
Thanks for this! A very helpful site if I may add!
Needing to replace my front driver's side too. Have a clicking noise whenever I make a full U-turn to the left an found out that the upper bushing of the stab link is shot.
Member
I'm getting ready to change mine out this week they are really bad. I hate that clicking noise
Member
328csi906 implies the installation is extremely easy. The thin channel locks he mentions no doubt does make it easy, but if you've purchased a used E46, it is most likely that the entire BMW tool kit is long gone. If so, this job is not so easy. You can use the appropriate Allen wrench in the end of the bolt while you tighten the nut. This means you can't use a socket and ratchet. Therefore you need to tighten the nut with an open end wrench. Then, as is typical of German over-rated engineering, the upper bracket is just a little too small to make this operation easy. The typical wrench does not quite fit inside the upper bracket. Thus you end up with a lot of maneuvering with you wrench to tighten the nut while holding the bolt steady with the Allen wrench.
All of this is doable but it is time consuming and not as easy as,"5.) Install is the reverse."
Member
I mean if you do the install with the wrong tools or ones that he doesn't suggest then its your fault for making it harder.
Member
You can do this with a socket set simply by just using the appropriate size hex bit socket and open end wrench, lil pb blaster if you wanna show off
Member
I want to do the same with my car
hungry like the
Thanks for the DIY!
Member
Just wanted to say thanks for the DIY Guys.
Just did this to my E46 330ci in less than 45mins. And that included jacking the car up on both sides with stands, taking photos and generally not rushing.
Parts cost me $80AUD Delivered. The Mechanic wanted to charge me $510 initially, then changed his storey the following day to $220.
Used the Adjustable BMW wrench from the boot to hold, then a socket set to remove.
Driver side was a bit harder to get to lower bolt, so had to use open ended wrench but still was relatively easy.
Either way, a good saving!
Doing the VCG, Plugs and Filter/Oil change on Saturday, and following another DIY form there!
This site has so my knowledge on these cars its brilliant.
Cheers.
Last edited by Andrewdm10; 01-09-2014 at 03:54 AM.
Member
Just make sure you spray some rust breaker oil on bolts a few days before doing the job, it will save you another 20 minutes as nuts will come off easily, rather than be a knuckle breaker or having to wack socker wrench with sledge hammer. lol
Member
I just did mine and it was a little bit of a PIA to remove but a wrench does fit back there. You need to first break the nut loose and then you can push the boot back a little for a standard wrench. I used PB Blaster and let it soak for a few then zipped it off with a air tool. Be sure to leave your steering wheel unlocked so you can turn the steering by hand which will help you pick up a little more wrench room. Going back on was even easier as the joint didn't pivot in the hole and using an air wrench zipped it back together quickly then I double checked the torque and I was good to go!
 Posting Permissions


 Reply With Quote
Bookmarks