
 Member
5/29/11 Edit. Corrected some information, added additional reference links. Added narrative and pics to the charging section.
DISCLAIMER:
It is illegal to vent R-134a in to the atmosphere. If your car has residual R-134a in the system, you must take the car in to have it professionally evacuated. Legalities aside, R-134a is toxic! Wear gloves and eye protection when dealing with this stuff. Note, this procedure is for R-134a cars only! This means 93+ E36s. I am not responsible for anything. Below is an account of how I did it and it may not work for you …
This was on my '96 328. I know that BMW used two different compressors on the 6 cyl cars, Nippon-Denso and Seiko Seiki. You have to replace with the same version. The name is on a plate you can see from underneath, or look at pics on the web. My car used the Nippon-Denso. I have lived for years without a/c, I knew the compressor was bad from breaking a part of the input shaft retaining ring groove off on my previous attempt to change the clutch. I knew I would spend a lot of time on research so just kept putting it off. It is not a hard job, just a little time consuming to do all the proper steps. Plus you are dealing with toxic chemicals and high pressure which is a little intimidating.
I used these threads for research and inspiration that I had bookmarked over the years. DIY: A/C Troubleshooting - this one is a good overview of the system and how to properly recharge your system. DIY: replace your A/C condenser, vacuum & re-charge - this is the one that actually inspired me to replace my compressor. Basically the exact same process, just a different major component. Finally Summertime A/C Troubleshooting Thread He uploaded pdf's from the BMW TIS manual. Covers replacement of compressor, compressor clutch, dryer, condenser and expansion valve as well as extensive troubleshooting using a set of a/c manifold gauges.
As anyone knows who has priced out a remfg unit installed by an independent shop you are looking at prices of $1,000+!I decided to go with a used unit, they have really dropped in price as the supply far exceeds demand. Search on www.car-parts.com for nationwide salvage yards. You can look in your area, but I got a compressor shipped to me from Wisconsin (hopefully lightly used!) for $30 delivered to my door. Std 30 day warranty.
I wasn't going to just slap a used compressor in, hopefully this job will last. So I wanted to replace all the o-rings and clean the system as much as possible. New parts I sourced from Pelican Parts: O-rings, Receiver/Dryer. Local parts store R-134, a/c oil, a/c flush. A note on the o-rings, axroh in the condenser thread noted what was in his car did not agree with RealOEM. Mine did not either. RealOEM shows my car to have 3-14mm, 1-7.65mm and 4-11.1mm o-rings. I actually had 3-14mm and 5 11.1mm o-rings. Either order some extras or just get one of the metric assortment kits from your local parts store. Just make sure to get HNBR (normally green) which are for r-134a systems.
I had some difficulties determining capacities for the system. Especially the recommended weight oil for the Nippon-Denso. I finally found a a/c site for Technical Chemical Company that lists info for a wide range of compressors. The pdf from that site (Updated Link 9/21/21) is A/C Lubricant Capacity Guide That chart showed the NipponDenso model 10p in my car needed 8oz of oil and the stock oil was ND8 with a viscosity of 46. PAG 46 is the correct alternative available at local parts stores. I also saw it mentioned that in practice most shops do not just add some r134a. The correct pressures generated by the system varies quite a bit depending on both relative humidity and temperature. So determining the correct additional amount to add is problematic. So standard procedure at most shops is to evacuate the entire system, test for leaks with UV, then refill the system with the specified weight of oil and r134a. For r134a, Bentley says 1000g/2.20lbs. But the green label on my car says to fill with 880g so thats the one I went with. For a partial can I used a digital kitchen scale. My cans had 340g of r-134a, the total product with can weighed 436g so the can weighs 96g. 2 full cans have 680g (340g x2) so I needed to pull 200g from the last can. Which with simple arithmetic means I stop when the last can hits the weight of 236g.
I don't have many pics in process as I was hot and sweaty and my hands filthy. But I did take some after that show locations.
First this is really hard to diy without some specialized tools. Harbor Freight has several that should be good for the few uses we are talking. You need a r134-a manifold gauge set (under $50 on sale at HF) and a vacuum pump. The electric ones are much superior and will pull a deeper vacuum, but again for my 1-2x use the HF venturi one running off my air compressor did just fine. I do have a 150psi, 6cfm compressor which helps. Alternatively you could install the parts yourself, just leaving the plugs in the Dryer and take it to a shop for the vacuum and recharge steps. After this writeup I did call an Autozone and they do have a vacuum pump in their tool loan program. My location did not have it in stock so I could not determine if it is a good quality electric type, I would check these out. They did not have any 134a gauges in the loan program.
Hook your gauges up. On my setup the blue low pressure hose went to the low pressure port on the firewall. You can not hook them up backwards as the low pressure and high pressure ports are different sizes. Open the valves and read the gauge. If it shows any pressure take it to a shop to have the remaining r134-a removed and recycled. This step should be cheap as they get to keep your r134a, also tell them you will come back for the vacuum recharge. Here is my gauge hooked up to my low pressure port.
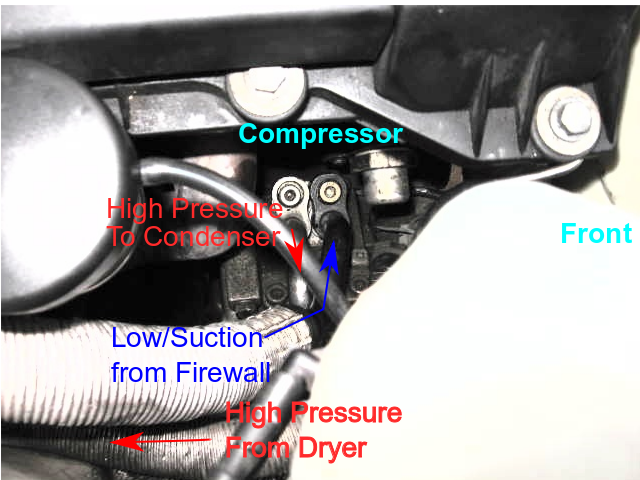
Pulling the compressor is easy. Pull the two r-134 lines from the top of the compressor. They take a 6mm hex. You will need a socket. Then disconnect the power connector. Now unscrew the top two mounting bolts. Mine took a lot of torque to break loose. You won't have enough room to pull the bolts out, just leave them loose. Now jack the front end up and support with jack stands and get underneath. Take out the bottom two bolts and lower the compressor down and out. Installation of the new one is the reverse. If you got a used one turn it upside down to drain any remaining oil, turn the shaft clockwise several times. Put the caps back in the new one to keep debris out. Following is a pic of the top of the compressor and the r134a fittings. In my pics I try to show the flow direction using red for the high pressure side and blue for the low pressure/suction side. (same as most gauge sets colors)
Per the A/C Lubricant Capacity Guide the components I was not flushing would have 2oz of old oil so I need to add 6oz to get the the 8oz total. After the compressor was bolted in I used a small funnel and added 1/2 (3oz) of the PAG46 oil to the suction port. The rest will go in the receiver/dryer. Remember to rotate the compressor in a clockwise direction for a minimum of 10 rotations after the lines are hooked back up to move the oil through the compressor. You can't compress a fluid!
Now on to the O-rings. All of the fittings use the 6mm hex. There are two on the fire wall, two on the condenser under the car and two on the receiver/dryer. Plug the two openings on the firewall to keep any debris out, I used some rubber from an old inner tube. I just totally removed the lines so I would not get flush solvent all over the car. I also kept track of the coolant flow so I would back flush the lines. The flow is from the low pressure port to the compressor suction port, back out the compressed high pressure port down to the condenser to cool. Back out the condenser and up the front of the car to the receiver/dryer, then on to the firewall to the expansion valve and evaporator in the interior. Here is a shot looking up from the ground at the condenser, the dryer is visible in the background and the bottom of the compressor on the right.
The high pressure line from the right comes down directly from the compressor port, so undo the the condenser fitting and the rubber body attachment and remove. The other line threads down from the front and can be removed after disconnecting from the dryer. Now up to the dryer.
I messed this pic up. The front of the car is actually at the top. The arrows indicating the flow are opposite of what they should be. The line at the top comes from the condenser and the flow if from the condenser to the dryer. Undo and thread down the front of the car and out. Note the high pressure port. This is where the high pressure gauge attaches from your set. The bottom line continues on to the firewall and the expansion valve/ evaporator. Remove the electircal connector to the safety pressure switch and remove the line. Now undo the two screws holding the dryer in place and lower it down and out the bottom. The brake duct and pork chop under body panels have to be removed. Well the brake duct can just be moved around for clearance.
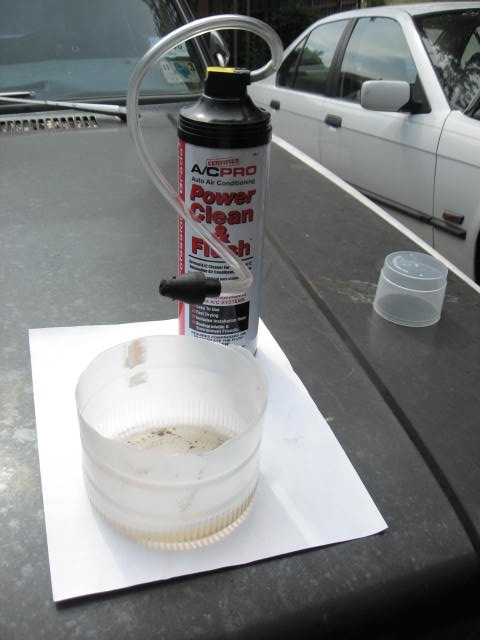
Now flush all the lines you removed. I back flushed them all. You need special chemicals that are compatible with the a/c system and will readily evaporate. I used A/C Pro Power Clean & Flush. Check with your parts store. The Autozone guy said he had never heard of such a thing!
So I went to O'Reilly's where they had it.
Note the flexible hose and the rubber tip to try and seal around the line. I just cut an old bottle in half to use as the catch container. Put on rubber gloves to keep chemicals off your skin. Use goggles, or at least safety glasses as chemical can shoot through the air. I did the lines in twos, so each one would rest for a min to let the solvent work, but not so long that it would evaporate and redeposit any thing that came loose. You are supposed to use dry air or Nitrogen to blow dry them until no more solvent is dripping or misting out the end. Regular compressed air has tons of water vapor which is very bad for a/c systems. Luckily I have a CO2 onboard air system for my 4x4 that is also a dry gas. If I didn't have that I would have been forced to use compressed air and double or triple up on the vacuum steps to make sure all water was out. I was surprised how much debris was in my lines! Here is the debris and old oil at the bottom of my catch can. I'm glad I dropped the extra $18 on the flush now!
I also flushed the condenser. That was super messy, chemical got every where as I didn't have a helper to hold the catch can. Also when blow drying large clouds of mist would come out. I held my breath and tried to stay as far away as possible. It did have a nice lemony scent though! The instructions say not to put solvent through the expansion valve so I didn't flush anything from the firewall in.
I now replaced the o-rings on each fitting, oil with a light coat of PAG and replace on car. As mentioned at the start, what was on my car was different from what RealOEM said. 3-14mm and 5 11.1mm rings. Here are the old ones.
The new receiver/dryer is last, it should be replaced whenever the system is opened. It has desiccant in it for removing water vapor from the lines. So keep the plugs in till the last minute. Side Rant: I saw several people trying to sell USED dryers on ebay! These are a one time use item! To add insult to injury their prices were higher than the Behr I got from Pelican for $31 or so.Anyway, I added the remaining 3oz of PAG 46 oil to that, (remember from the compressor step?
) reinstalled the plugs and pushed it up into position from the bottom and secured to car. Still leaving the plugs in.
At this point I hooked up my gauges to the low pressure port, the high pressure port and my vacuum pump to the yellow line on the gauge set, when you open the ports on the manifold the yellow line gets opened to both the blue low pressure and red high pressure lines Pic of gauge with air pump ready, still needed to add high pressure hose.
Now all thats needed to start pulling vacuum is hook up the air line to the 150psi waiting in my air tank. Finally, it's time to close the system up, pull the plugs out of the dryer and screw the fittings down. Hook the line up and start pulling a vacuum. Though my cfm should keep up with the vacuum based on it's rating it still pulled it down over 5-10 min or so. I could keep 30 inches of pressure pretty easy till the psi dropped below 100. It is recommended that you pull a vacuum for 30 min to remove all moisture. So I did 3-4 repeats of 10 min or so. While this was going on I got under the car and rotated the compressor 10+ times to get the oil out of it. (remember?) Also got the car down off jack stands. It is kind of hard to make out, but the gauge is right at 30" of vacuum!
OK, now the water is out of your system. Close the yellow gauge and shut the vacuum off. You should still be holding the vacuum in the system. Close the valves at the quick release to isolate the car from any gauge leakage. btw remember the quick release fittings onto the car open by screwing down to push open the fitting. This is intuitively opposite of how you normally open valves, like your water hose. Wait at least 30 min. This is your leak test. If the system can't hold a vacuum for 30 min you have a leak somewhere. See the A/C troubleshooting DIY's referenced at the top.
OK, now for the recharge. Taken from axroh DIY: replace your A/C condenser, vacuum & re-charge thread. so I could cut and paste!
Notes on charging: You should be able to get most of the 1st can in from the combination of vacuum and the pressure in the can. This should get you enough pressure to engage the compressor. Mine did not, so I had to jumper the line to the compressor. It is a single wire and you just need to apply 12v to it to lock the clutch. I just ran a wire with alligator clips from the pos. power lug on the fender to the compressor. Here is a pic of the upper connection.Originally Posted by axroh

My compressor still wasn't engaging, so I checked fuses and found #26 (I think) 7.5A was blown. When I replaced that the pressure switch worked and the compressor engaged. Also check to make sure your aux. fan is turning on when the compressor engages. If it doesn't you need to troubleshoot that. It takes awhile for all the liquid in the can to turn to gas and get sucked in. You can swish the can around or put it in a container of water to warm it and speed the conversion to gas. Just don't turn the can upside down and try to pour the fluid down the hose ... again, liquids don't compress and your new compressor would not like this.
On the third can watch your weights. I let it go a little too far and over charged. I calculated I put in about 860g of R134a. The spec calls for 825 with a range of 25g, so I was about 10g over the upper range. I think this reflected in my final pressure readings. Here is a pic of my gauge readings after the fill:
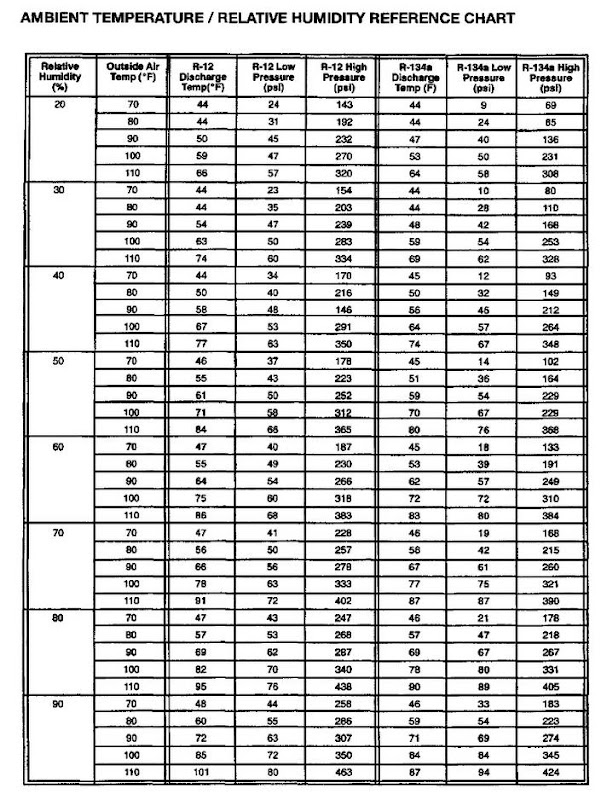
40psi low side and about 230psi high side. Now how to interpret those? You need three more data points. Outside temp (81*), humidity (65%) and air duct temp (52.5*) Here is a pic with the temps:
30 degrees from ambiant seemed pretty good, but I've heard of people getting lower readings. In my research I found that outside tempature and humidity play a large role not only in the outlet air temp, but also in the compressor psi readings. I found a chart that lists for both r-12 and r-134 the values you should be seeing for various temp/humidity readings.
Based on that chart at 80* and 60% humidity I should expect 53* outlet temp, low pressure of 39psi and high pressure of 191psi. Wow, my numbers are almost right on. The high side is about 40psi over ... but based on the TIS troubleshooting guide referenced at the beginning a elevated high side reading can result from an overcharge, and I am 10g over the upper limit. So everything does look good!
Oh, yeah ... a cost breakdown. Your mileage may vary!
Used Compressor $ 30
Reciver Dryer $ 32
Flush Chemical $ 19
R-134a (3cans) $ 21
PAG46 oil 8oz $ 9
O-rings $2
Hydraulic Tensioner $45 Of course I didn't find this was seized till I took it off and the other parts were here. So hurry up and wait another 3+ days.Hopefully you don't need this!
Total Parts cost $113 plus the $45 for the tensioner. $158.
Tools.
134a manifold gauge set under $50 on sale, don't remember.
Venturi Vacuum pump $14. So another $64 or so at the local Harbor Freight.
Cold air on a 100* Texas day?? Priceless!!
Any way you look at it a heck of a lot better than the grand or so a shop would charge you.
If any actual A/C techs want to correct any misinformation please do!
Last edited by paniolo; 09-21-2021 at 03:09 PM. Reason: Update Broken Capacity Link
David M.
'96 328 Sedan
Member
Very nice DIY, thanks a lot!!!
Definitely needs to go into the DIY section. Thumbs up for all the details and clear explanations. You deserve a few beers

ASE Certified Master Tech
i am a ase ac tech..u did a pretty good job actually..
normally we have machine at the shop to do the ac work and normally i would evacuate it for at least 30 mins..just make sure u put the right kind of pag oil and right amount and lubricate all the o rings...and i dont know any thing about power flush..because the machine we have at the shop takes care of every thing..
Last edited by ganzibye; 05-25-2011 at 07:44 PM.
2000 BMW 528i / Manual Tranny / Sport & Premium package / Xenon headlight / Sport seats / Premium sound / DSC /
2011 BMW X3
Member
Thank you for the props!
Yeah, that is the main problem with the venturi type vacuum pump; you really want to run it for at least 30 min. But it's hard for most home compressors to put out that kind of volume and that is a really long time to run a home compressor non-stop. I really need to look up the duty cycle on my Sears compressor. That's where I hoped breaking the job up into 3-4 runs of 10 min or so accomplish the same goal. I do hear some occasional hiccups or burps from the vac pump which in my mind is water vapor boiling off and coming out.
Damn, I thought about lubing the O-rings since that is std practice. But didn't want to mix oil with the a/c .... duh ... just use a little of the PAG.I hate having brain farts! Hopefully the oil in the system will be adequate, it is still holding a vacuum this AM.
Last edited by paniolo; 05-25-2011 at 09:28 AM.
David M.
'96 328 Sedan
Member
This is just what i was looking for. Just bought a new Denso compressor, drier, o-rings and oil. Indy quoted my $980 for the job without the drier. I paid $350 for all the parts. I plan on replacing the compressor, drier and o-rings and have shop do the evac/recharge.
I bought the Pag oil so I assume that the shop will not do that? I will have to load the oil into the compressor when I install?
If I am having the shop do the evac and charge, is there anything else I have to worry about other than replacing compressor, o-rings and drier. You mentioned to keep the plugs in the drier. Anything else you can think of?
Great writup thanks.
Member
echo46, cool it makes me feel great to have helped somebody in the first 24 hrs!
I'm sure the shop could put the pag in, but you've already got it and it is easy to do when installing the parts so I would do it myself. The referenced web site indicated the evaporator should have about 2oz of residual oil. My compressor had an 8oz oil capacity, so I took the needed 6oz and put 3oz in the suction port on the compressor and the other 3oz in the dryer. You will need to pull both plugs out of the dryer to do this so the oil can flow in. Use a small funnel and go slow. Then put the plugs back in. Go ahead and rotate the compressor at least 10 times by hand to move some of the oil out of the pump after you get the lines on and before installing the belt.
You will need to leave the fittings to the dryer loose and let the shop screw those in when they pull the plugs out to pull a vacuum. Just make sure to tell them you already put the oil in. Nothing else I can think of but keeping your eyes open. On mine the hydraulic tensioner for the belt was frozen too.
Good Luck!
Last edited by paniolo; 05-25-2011 at 01:51 PM.
David M.
'96 328 Sedan
Member
How hard is the vacuum and recharge. I'm thinking about buying the manifold and vacuum. The indy guy wants about $150 to do the job. I can get the tools for about $60 plus refrigerant. Is it worth it? Oh and I have a 135psi air compressor, is that sufficient?
Last edited by echo46; 05-25-2011 at 02:16 PM.
Member
I always like buying tools when they cost less than the shop ... then next time it feels almost free! My manifold was like that as I bought it almost 6 yrs ago. It is not a hard job, you just feel apprehensive dealing with potentially dangerous pressures and toxic chemicals.Of course getting under a jacked up car is probably more dangerous, but we've gotten used to that. Using proper tools is a big step in the safe direction.
As far as the compressor ... I would say pulling a vacuum for 30 minutes puts a major strain on them. It is running non stop and losing ground. I've assumed breaking it up into shorter cycles gets the same results. So say 3 10 minute rounds with compressor cool down in between. My 150psi/ 6.4cfm compressor still slowly lost ground. At 15 minutes it was down below 90psi and was noticeably warm, but the vacuum still showed as 30. I looked up my duty cycle and it was 50% over an hour. So it should only be run 30 minutes of every hour ... but I'm thinking 30 minutes straight still wouldn't be good. I broke it down in 15 minute segments and was still somewhat uncomfortable. But the compressor seemed to come through fine. But in the 10 years I've owned it I have never put anywhere near that kind of stress on it before. You can't just pull it down to -30 inches and seal the system up. You have to keep it open and pulling so any water present will boil off in the vacuum and you pull the water vapor out. After a 15 min run there was noticeable droplets of water from the bottom of the vacuum pump. I assume that was pulled from the system and not just condensed out of the air?? That's what I'm choosing to believe anyways!
edit: If you can find one of the commercial electric type vacuum pumps with oil those are the best tool. But they are too expensive for an annual or less use. I don't think Autozone etc loans those out, but maybe call them. Also a tool rental shop may have those.
edit2: I did call Autozone, they do show the vacuum pump in their tool loan program but this particular one did not have it on the shelf so I could get no info. If they have one of the electric models I would go that route vs. the venturi air based ones. They did not have 134a gauges listed as part of their tool loan program though.
Last edited by paniolo; 05-29-2011 at 02:12 AM. Reason: more info
David M.
'96 328 Sedan
Member
Thanks for all the info, I just purchased the manifold and vacuum pump from harbor freight for a total of $70. Also picked up the r134a from autozone. Just waiting on everything to arrive and off we go.
Member
One other question, do you put the pag oil in the compressor and drier before you pull the vaccum to get all air and moisture out of the system?
Member
Yes you do. Once you close the system and pull the vacuum you don't want to open it again to put oil in
Bleed your cooling system http://forums.bimmerforums.com/forum....php?t=1709482The ULTIMATE OEM Alarm/Keyless thread http://forums.bimmerforums.com/forum....php?t=1792200
Member
Thanks, that makes sense. I assume that the system is not "opened" when you add the refrigerant as this is done after the vacuum?
Member
Anything you add through the gauge set into the low pressure port does not open the system back up to the air. If the oil you have is in a pour able container you would pour the needed amounts in before sealing the system and pulling a vacuum. If you have the oil in a pressurized can or combined with r-134 you would add it in through your gauge set connected to the low pressure port after pulling the vacuum on the system.
I added some notes and pics to the charging section of the original post. My final gauge numbers after slightly over charging with 860g of R-134: Low side 40psi/ High side 230psi and the temp at the air duct was 52.5*. With an outside temp of 81* and 65% humidity those numbers are right in line with what they should be based on the relative humidity chart I added at the bottom of the original post.
David M.
'96 328 Sedan
resident
towed to the DIY section as requested by the OP. after reading it it belongs in here anyways.great job, man! very nice write up
-ducky
Member
Thank you for your generous comments!
When I started researching this project there wasn't really anything on a/c in the DIY section, and not much detailed advice in the main section either. Those 3 threads I linked in the third paragraph have some really good information that got me on the way. With those and this thread I think people should be able to get a good handle on what is wrong with their a/c and have the resources to replace any of the system components in the engine bay. Now we just need somebody to add in an evaporator and expansion valve diy!
David M.
'96 328 Sedan
Member
so on the 92's I have to upgrade to 134.. how do we go about that? can we get used compressors? from what year?
Member
Sorry don't know the answer. I would google r134 conversion kits. I think they use your existing r-12 compressor and oil.
If you were changing to a 134 compressor I think those started in '94? You would need to make sure the fittings on the compressor match those on your car. Also I believe the PAG oil used in 134 compressors is not comparable with the oil used with r-12 so you would need to flush the entire system. Try googling both items.
David M.
'96 328 Sedan
Member
If you are just coverting over becuase it is low, I would recomend finding and fixing the leak and having it filled with R12 (you can still get it). On a 1992 it could simply be dried up O-rings or a rotted condensor. To do a conversion requires the R-134A fitting adapters, replacing ALL O-rings, dryer, and flushing the old oil from the system. The problem with converted systems is they don't have the needed capacity to hold enough refridgerant and usually don't cool as well as the R-12 systems. You could probably just get all the components of a R-134a system from a wreck and swap it over. There are plenty of them in the bone yards.
-Jim
97' SL600 Sport Pano
95' 325i Conv Montreal Blue S50/5spd AA Stage II SC
96' 900s Conv
95 C280
99 Durango
Member
yeah in CA it is almost impossible to get r12... I supposedly have a leak in the condensor.. now that my summer job is over. I may tear into the replacement of it.. I just hear it is a very large PIA job to do that... so from 93 on they use 134? i may go swipe it out of a wreck..
Member
Hi There,
I used to be an A/C tech for commercial refrigeration and I still help around my old boss every now and then.
To answer your question you don't need to get r12 itself there are replacements that we use nowadays. For R12 we'd use something called HotShot freon replacement.
I'm not sure if you can get it in small quantities but I'm here in LA if you need some just let me know and I'll be able to fill you up
If you decided to convert to R134 on the other hand you definitely need to swap the evaporator, expansion valve, compressor, condensor and basically everything
That said the 325is I just got has a bad compressor on it so I'll be replacing that when I get a chance and I would love to thank you for sharing your experience on the matter.
Best Regards,
Richard A.
Member
UPDATE.
Saw a link to a post about PAG oil capacities for the E36 compressors. Link to Post. Note this post is in the 8 series forum, so the info in the text applies to an 8 series, but the attachment charts also list e36. This appears to be from a BMW TIS.
The amount of PAG oil to use in the system is different from the link I used above, which was a generic supplier link. It says from 9/92 onwards to use 120ml/4.1oz +/- .7 oz. compared to the 8oz listed in my link! If doing today I would use the lower amount of oil listed in this post. I also noted the link I just referenced, shows the fill of R134a to be 1000g. This amount was also listed in Bentley. However, the green label on my car called for an 880g fill which is what I went with.
So it looks like I over filled the PAG oil, and maybe? under filled the charge. But overall the a/c is still working fine. I will probably hook some gauges up to it this spring to see what they say and will update the results here.
Last edited by paniolo; 04-11-2012 at 04:37 PM.
David M.
'96 328 Sedan
Member
bookmarked! awesome write up! gonna be doing this soon.
glad i looked up threads that you started.
Member
When adding the PAG46, do you add directly to the compressor or do you split it between the compressor and dryer as I saw mentioned on a different thread? Also, is there any good way to flush a compressor to be sure it does not have debris in it?
Thanks,
Tim
Tim
Indianapolis, IN
88 325is (M50 Project)
92 525iT (5 speed)
I may be the one that has CARS (Chronic Automotive Restoration Syndrome) but my wifes the one that suffers.
Member
To flush the compressor I would add clean oil to the inlet port and hand cycle till it ran clean. Then tip it upside down to drain everything and put it the new oil.
David M.
'96 328 Sedan
Member
Sounds good.
Thanks,
Tim
Indianapolis, IN
88 325is (M50 Project)
92 525iT (5 speed)
I may be the one that has CARS (Chronic Automotive Restoration Syndrome) but my wifes the one that suffers.
 Posting Permissions


 Reply With Quote


Bookmarks