
 pompous a*s
This post is a work in progress, and over the next few days I plan to verify a few more things.
So, you like the look of the newer LED tail lights but you've been told they don't work without the official retrofit kit with ballasts. Well, whoever told you that was very possibly WRONG!! If your car has a LCM II (e39s before MY99 that didn't replace the LCM), you would benefit from the retrofit kit as it's about the same price as a new LCM (LCM IV). However, if you have an E39 with an LCM III or newer, you can simply code your LCM to be the ballast that everyone charges a crap-ton for.
This swap requires:
- drilling new mounting holes in the car's light buckets
- hammering a little bit for clearance of the new light (different shape)
- inserting pre-crimped wire leads into a plug
- soldering some wires (please don't cheap out and use some universal crimp connector)
- Light Control Module coding via GT1, SSS/Progman, NCS expert,BMW Scanner v.1.40, or Autologic (there may be others)
NOTE: if you don't have the coding tools the regional sub-forums are tools of great value, and you can often find the computer coding tools you need.
Chassis Bashing:
The blue line is where you'll need to bash (2 minutes with a hammer for me) and drill *note*, I forgot the arrow pointing to the other lower mounting hole I drilled):
Fit comparison (after bashing) - OEM US facelift Celis lights:
vs. pre-facelift OEM hellas:
Electrons in motion (bench testing):
Not really sure why everyone asks the proper voltage for these lights, it's only printed on them.....(NOTE: LEDs are current driven devices, and to get the driving current we use P=V*i, or 1.2W/12V = ~108mA):
Unfortunately, all my power supply could muster was about 10.2V which was just enough to illuminate the LED tails, albeit under driven as seen below on the multimeter (only ~33 mA).
Take some adderall or something so you don't mix this up:
More wire prep, this time on the Celis plug (IIRC, this is also the right):
Planning to solder my Celis wires for the right side, and comparing WDS wire colors to actual - WDS was right, I just wanted to be careful:
Feeling cramped:
In-car workstation (400W inverter hooked directly to the battery to power the 40W soldering station):
Left tail light just before shrink wrapping the solder joints and re-looming the remaining wire:
Final testing - if you're wondering about the varied tail light intensity, the tail lights are just sort of propped up at different angles, i assure you they're the same (the pre-facelift lights are not actually on, that is just the camera's flash bouncing off the tail light lens)
They are installed now, my LCM IV is coded and everything is A-OK.
I did confirm that the LCM acts as the ballast via voltage measurements (I plan on corroborating that by measuring current, too...when it's not dark outside), 11.8-12.2V @ idle while the battery was at 14.2V.
I'll post up wiring later, it's rather simple, you do need to cap one of the original tail light wires as it's not needed.
Member
Thanks for sharing, I have a set of Celis tails just sitting in my garage right now and a GT1 soon as it gets warmer I'll follow in your lead.
Member
mattmartindrift,
You are the man dude. Many have "talked" about reporting their findings & promised to document what they found out about these. But you on the other hand, actually took the time & snapped a few picts to make a proper & informative DIY article on these. THANK YOU... !
Heavy wheels SUCK!
I would like to see the procedure using Gt1 or any of the other programs. I am planning on getting my own software. Would this work for Tourings as well? Wiring them up I mean?
1999 E39 Touring Sport and 3 pedals
pompous a*s
Originally Posted by xpcgamer

It should. You'll need to cross reference WDS for the wiring, and I'm not sure what wiring connectors those celis lights use. I'll go to the gt1 screen, but I personally have to use sss/progman due to my lcm being newer than gt1/dis v.44 (last version that allowed coding).
Heavy wheels SUCK!
You lost me Matt. I was just wondering where you went in the system(Which ever you used) and what you told it to do/ignore. My LCM is the newer one I think. Build date 03/99. I have a Dual stage airbag and newer style connectors on my seats if that has anything to do with it
1999 E39 Touring Sport and 3 pedals
pompous a*s
:/
I'll try and describe my thought process
I knew that the Facelift (FL) Celis lights only had one +12V source for the tail-lamp section; however, the pre-FL cars had two +12V sources - one for each bulb. So, after seeing that, I basically, I just rooted around in WDS until I found wiring diagrams for the LCM for both pre-FL and FL cars. Comparing the two LCM pinouts, I decided to "cap" or eliminate the +12V source that did NOT show up on the FL wiring diagram.
WDS link: http://www.bmw-planet.com/diagrams/release/en/index.htm
WDS Navigation:
- Body
- Lighting
- Light Check Module
- Tail Lights
I have attached screen shots of the touring wiring diagrams and a link to the diagram's symbol/color key.
In your case, you would compare the pre-FL touring pinouts to the FL diagram. Notice that pins 2, 5 and 13, 17 are used for the pre-FL wiring. However, the FL car only uses pins 2 and 17. So, you would find, on the diagram the wire color and cap the wires associated with pins 5, and 13 of the original lights.
The wire colors are on the diagram usually as XX/YY where XX is the abbreviation for the main wire color and YY is the stripe that runs the length of the wire. here's a key to the colors (also in WDS):
http://www.bmw-planet.com/diagrams/r...ld/symbols.htm
Hopefully that helps everyone. If it makes any difference, the wires you cap are the same for the touring example I gave here, as they were for my MY1998 sedan.
Last edited by mattmartindrift; 03-08-2011 at 08:44 AM.
Member
Can u tell me where u bought the taillight from? Thanks.
Live the e39..!!
Call me Eric :)
I think the PO set up mine like that, with no ballasts and the LCM taking care of the voltage. I've never found them on mine.
Do you still have the strobing at ignition?
Resident Third World Country Advisor
pompous a*s
I purchased them from a forum member over at www.m5board.com
No, I coded them the way they're supposed to be coded which means no strobing and no check-bulb errors. whomever coded yours did not do so correctly and/or at all.
Call me Eric :)
Mine do not throw the bulb-out warnings, but they do strobe at ignition. It has always baffled me how they were installed without ballasts.
I guess they used the same procedure as you, minus the bulb-check disabling.
Resident Third World Country Advisor
pompous a*s
take a picture of the wiring.
Call me Eric :)
I will. Probably tomorrow since I'm using the other car. I bought a Weber carb and I'm still tuning/testing the hell out of it.
Resident Third World Country Advisor
Member
Awesome DIY.
Mods should pin this up!
I ended up snipping the top section you bashed in. Now I have to weld or rivet a piece of metal back onto the body because one of my tails leaks. A metal adapter I made to hold the lower outer nut does not hold very well...
Did you do any cutting to the plastic housing on the tails? I went to town on mine.
pompous a*s
No cutting, however, I did consider filing away at the tail light housing. In the end I chose to keep the lights un-modified in the case I choose to sell them.Awesome DIY.
Mods should pin this up!
I ended up snipping the top section you bashed in. Now I have to weld or rivet a piece of metal back onto the body because one of my tails leaks. A metal adapter I made to hold the lower outer nut does not hold very well...
Did you do any cutting to the plastic housing on the tails? I went to town on mine.
Last edited by mattmartindrift; 03-10-2011 at 11:06 AM.
pompous a*s
Part numbers for the un-pinned tail light connector and pre-crimped wiring leads:
Leads: 61130006626 ***qty: 12***
Unpinned connector: 61136984758 ***qty: 2***
Support your vendors like EAC!!!
pompous a*s
had some rain issues. I tapped a little too hard on the passenger side tail light housing. So, all I had to do, with the light still installed was look where water came through and tap the metal from inside the trunk to be more flush with the foam tail light seal.
All is still good!
Member
tHANK goodness mine came with these... will never buy an E39 without them. Nice job !
Member
Are you thinking about doing the xenon reverse bulb mod? I'll have to do some googling to find a link...
Call me Eric :)
Hi Matt. I haven't forgotten about the picture. Actually I already have them in my camera but I keep forgetting the camera cable at home. Stupid me.
Resident Third World Country Advisor
pompous a*s
nope, I don't drive in reverse often enough to justify the cost of that.
plus, the parking lots I frequent (work and home) are lit.
Member
Lol I saw that mod a few years ago and questioned how the tails didn't melt.
Im all for the mod. Especially a switch for the drivers who love to drive with their high beams on.
Member
Yes, I've been wanting HID reverse lights on a switch for the longest time...
Maybe I'll get around to doing it and have the HIDs solely on the witch and keep the regular reverse lights, might help conserve the bulb life and limit accidental meltings...
Call me Eric :)
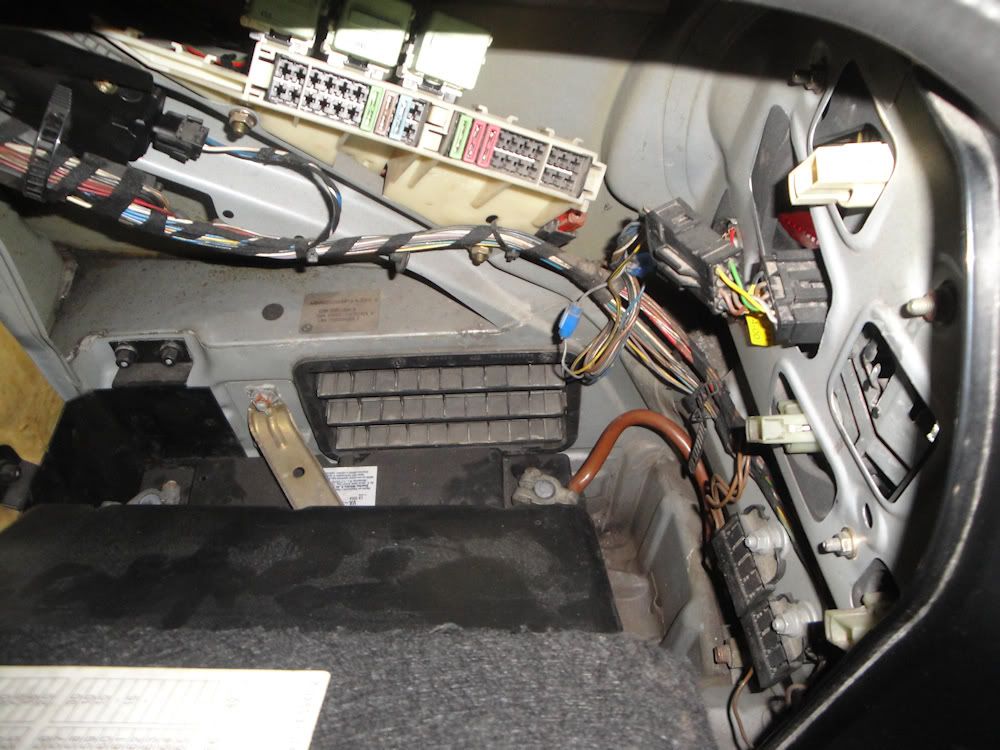
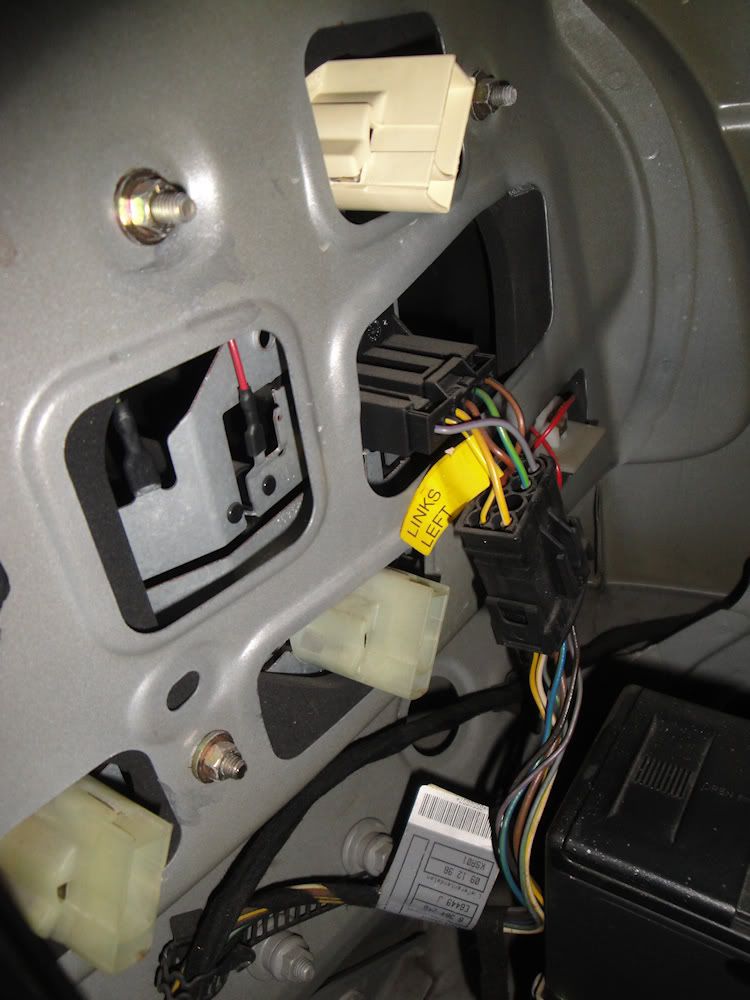
My car's wiring (no hammer smashing was required apparently):
Resident Third World Country Advisor
Call me Eric :)
So Matt, is that similar to your setup?
Resident Third World Country Advisor
 Posting Permissions


 Reply With Quote


Bookmarks