
 Member
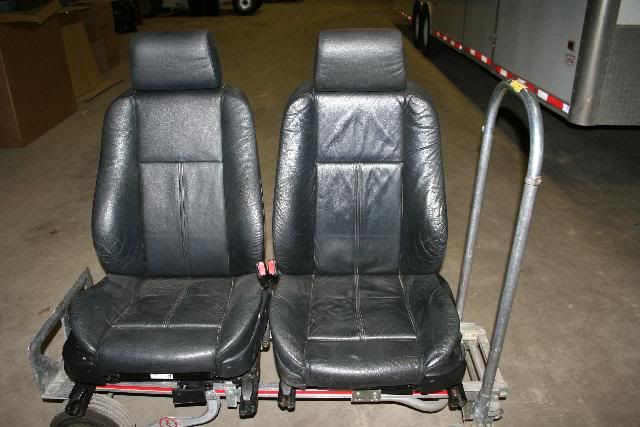
A week or so ago I posted about buying a set of sport seats for my '99 528iT wagon and, to my dismay, finding that the connectors on the sport seats were the older-style black connectors indicative of an older E38 or E38 with single-stage airbags (my car has the later yellow connectors indicative of two-stage air bags), despite the fact that the owner assured me the seats were from a 2000 540i sport. In other words, they should've had yellow connectors. As that old Russian proverb quoted by that old American president goes, trust yet verify.
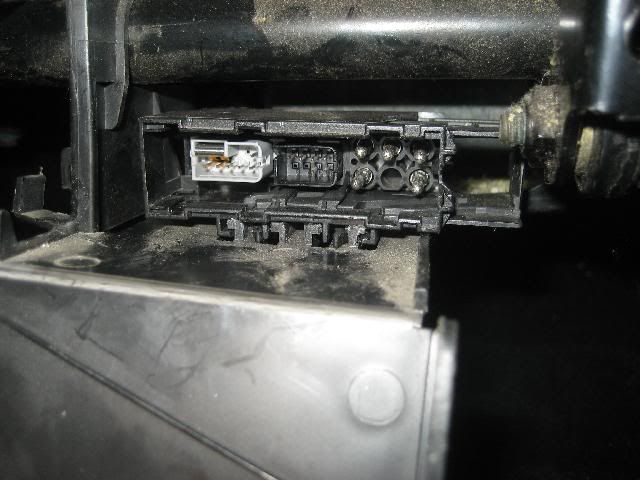
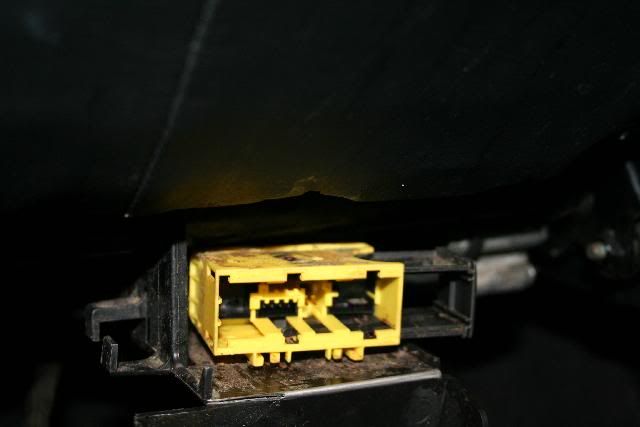
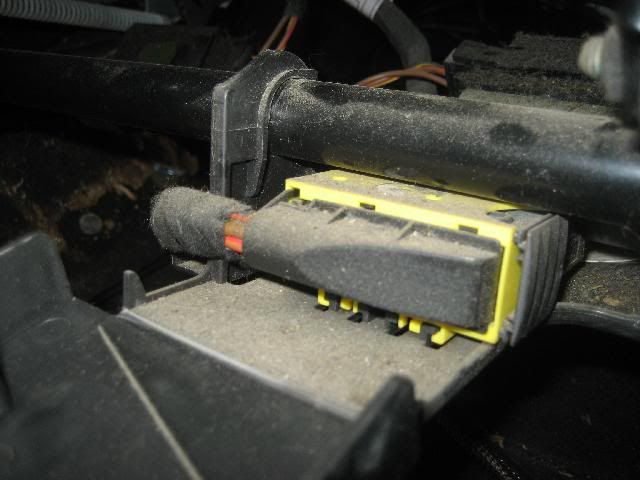
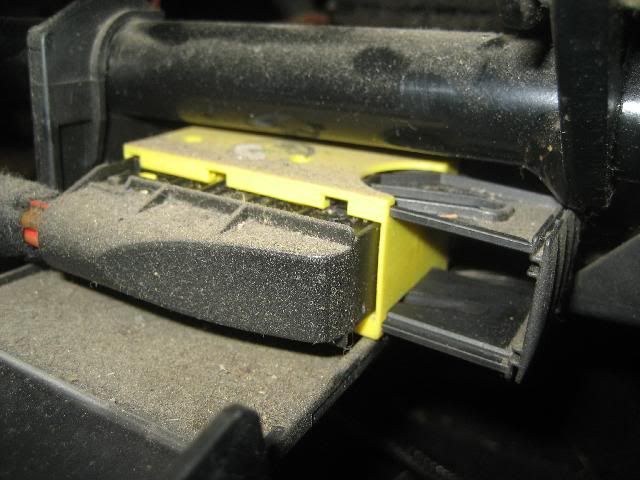
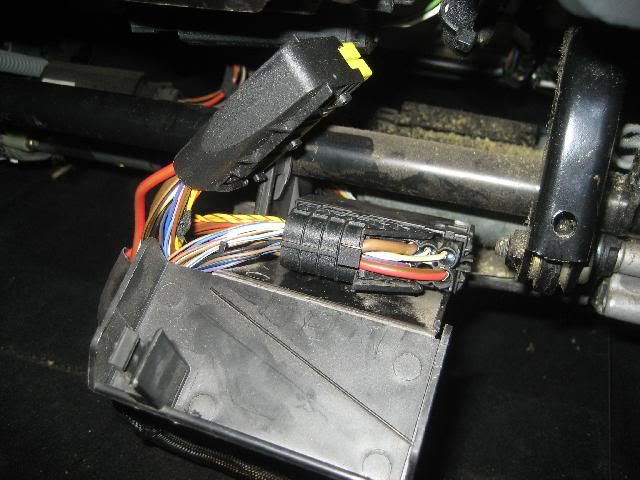
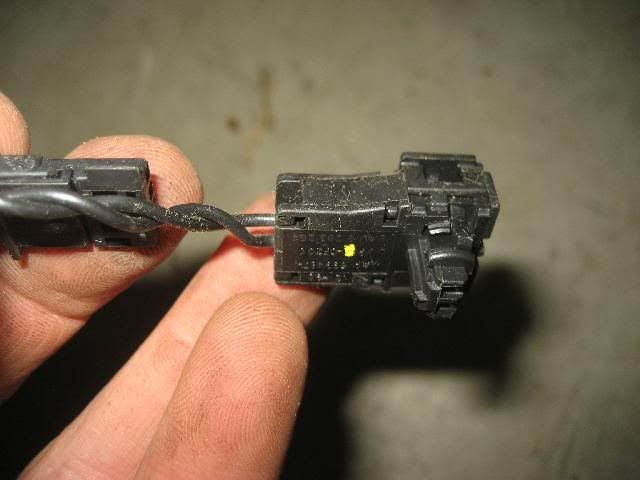
Here are the two kinds of connectors. Below I'm showing the plug on the wiring harness side as it comes out of the floor. The black one is from the older car with the single-stage airbags; the yellow one is from the newer car with the two-stage airbags. I've seen several dates reported for the changeover, but I got in trouble by relying on it, so below I simply refer to them as black and yellow, or old and new.
Below is the seat side of the connector socket. First the older black connector socket:
And the newer yellow connector socket:
I spent hours scouring posts on this and other forums to find out how big of a deal it is to put seats with black sockets into a car with yellow connectors. The prevailing wisdom seemed to be:
Mechanical: Total non-issue. They bolt right in.
Wiring: The color of the wiring going into the black connector is identical to that going into the yellow connectors -- you should be able to just cut off one connector and put the other one on. (Keep in mind that, if all that you want is for the motors to work, it's literally two wires -- hook the thick red and brown wires to hot and ground and you've got your motors.)
Tensioners: The seat belt tensioners need to match the type of air bag on the car, so if installing earlier (black connector) seats in a later (yellow connector) car, you need to pull the tensioner assembly off the seats you're taking out and stick them on the seats you're putting in.
Convenience Exit: Whether the car loses the automatic steering column raise ("convenience exit") or not is a function of the part number on the seat switch. Qsilver has a thorough post on this, which I'll quote below:
"These are the BMW part nbrs to look for if you want to upgrade to the convenience exit feature...the last nbr on the list is the latest part nbr you can purchase from BMW...the ones above it are in the succeeding order that the part was used (then discontinued):
61 31 8 368 993
61 31 8 381 609
61 31 4 101 871
61 31 6 905 509
61 31 6 910 717"
Heat: The older cars have a rheostat-based seat heating setting on the dash, whereas the newer cars have a three-position pushbutton, so how well the seat heating would work when the connectors were simply cut off and spliced without paying attention to the difference in heating control was unknown. Some people said it worked fine with just a wire-for-wire connection; some folks said "some adaptation" was required but didn't say what it was.
I have successfully completed the swap. It wasn't that bad, but my strong advice to anyone buying used seats is to verify that the seat connectors match what's in the wiring harness on your car. Unless you're getting a freaking steal on the seats, (and in my case I paid $200 for a full interior (front and rear) and paid nothing for shipping because a business trip took a colleague right past the seller's shop, which probably qualifies as a steal), buy the ones with the right connectors and save yourself the headache.
First, the seat removal. This is very straightforward, but there were steps missing in most DIYs I read.
1) Get a T50 Torx bit. You're not going to do this without it. T50s not only bolt the seat rails to the floor but the tensioner and seat belt to the seat.
2) Raise up the seat as high as it will go. Using the T50 buit, undo the bolt holding the seat belt to the corner of the seat (left rear for driver's seat; right rear for passenger), and pull the belt up through the slot in the seat.
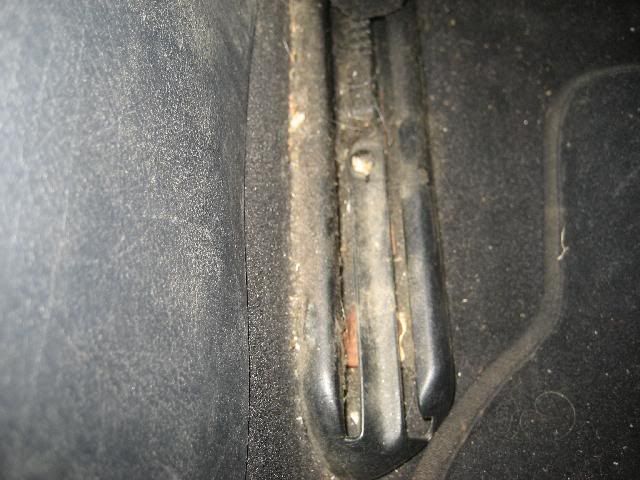
3) Move the seat as far back as it will go and pull off the plastic pieces covering the front of the seat rails, then remove the two T50 bolts holding the front to the floor.
4) Move the seat as far forward as it will go and pull off the plastic pieces covering the rear of the seat rails, then remove the two T50 bolts holding the rear to the floor.
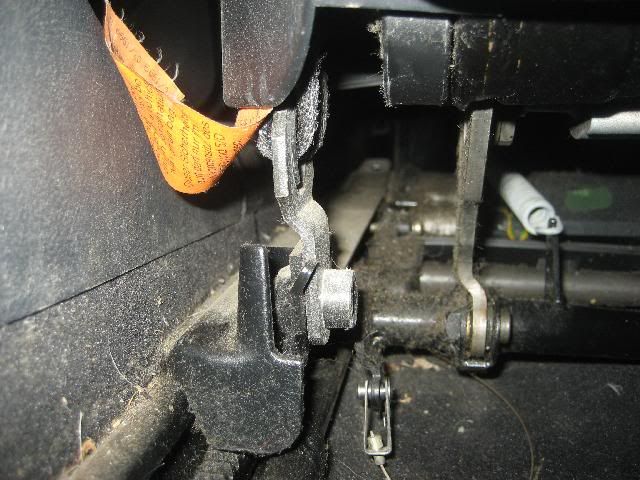
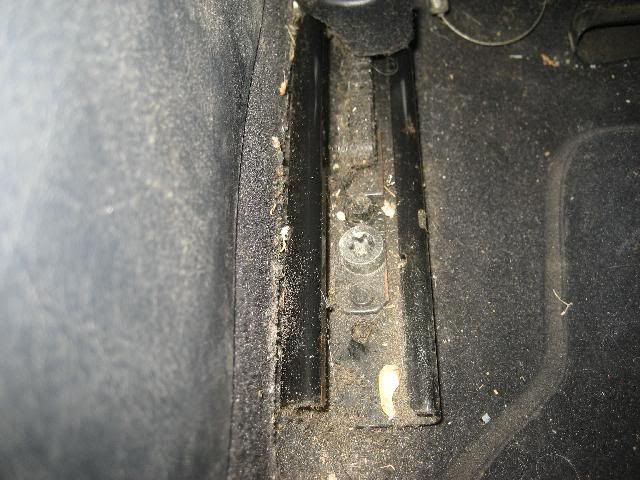
5) Tip the seat forward and undo the metal clip holding the metal cable that connects to the seat belt tensioner (on left side of driver's seat, right side of passenger seat). This is visible in the photo above to the right of the Torx bolt holding on the seat belt.
6) Disconnect the battery. You don't want to undo any electrical connectors while it's plugged in or it'll trip the SRS light.
7) Now, with the battery disconnected, pull the connector out of its socket at the front of the seat. This was tricker than I thought. There's a slide lock on the right side of the socket as you're looking at it. On the newer yellow connector you can stick a screwdriver in the slot and gently pry it to the right. On the older black connector, take your thumb and forefinger and pinch the right side of the connector top and bottom and slide to the right. In either case it'll slide and force the connector out of its socket. Swing the connector to the side and pull its cable harness out of the hook holding it to the bottom of the seat.
8) Now you can pull the seats out. Other posts made a big deal about removing the headrests to get clearance to pull the seats out, but I didn't have any trouble. They're heavy, though -- using two people helps. With the seat out, you can see where the wiring harness and connector plug emerge from the rug.
If you bought seats with the same connector as the seats you're taking out, just stick 'em in, plug 'em in, bolt 'em up, but if the connectors don't match, now the fun begins with electrical adaptation. When I say "plug," I mean the end that emerges from the floor. When I say "socket," I mean the end that's attached to the seat. Even if the colors of the new seat / old seat wiring is supposedly identical, you have to decide how to finesse the fact that the connectors aren't. You'll need to change the plug, the socket, or both. There are basically four approaches:
a) The No Plug Or Socket Approach: Cut the plug off the wiring harness on the floor, cut the socket off the wiring harness on the seat, and mate up the wires by hook or by crook with wire nuts, crimped barrel connectors, spade and lug connectors, or solder and heat-shrink tubing. Boy, you'd better be sure that these seats are what you want, because there's no going back. They're hard-wired. They're not coming out without a fight. I'd read that the sport seats had very stiff bottoms and, my steal notwithstanding, I wanted to leave myself a back door to put the original sets back in if these proved to be downright uncomfortable.
b) The Change The Socket Approach: Leave the plug on the wiring harness on the floor intact and change the socket on the seat to match it. This was my preferred approach (I thought it'd be great to pull the seats into the basement and do this in a heated well-lit space on a table top), but I could not find a part number for the socket, and found caveats advising that even if I did I also had to order the pins and then crip wires onto them. eBay was not a source for the sockets, as they would have to be cut off an otherwise good seat. I did see some entire seat wiring harnesses on eBay, but they were all for seats with the early-style black socket -- I needed the later-style yellow socket. I thought about cutting them off the seats I was taking out, but I wanted to be able to put them back in if necessary.
c) The Change The Plug Approach: Leave the socket on the seat intact and change the plug on the wiring harness on the floor to match it. I was fortunate that my seats each came with a six-inch pigtail chopped directly from the floor wiring harness, providing me with the correct plug. My hesitation in doing this was three-fold. I wasn't certain that I'd like the stiffness of the seats, I wasn't even sure that the wiring adaptation would work, and with my bad back I wasn't thrilled with having to do the work bending over onto the floor of the car.
d) The Hermaphroditic Approach (what I did): Splice BOTH the old and new plug onto the wiring harness on the floor. In theory, if you have to cut off the old plug and splice another one in its place, it's not that much more work to essentially Y-adapter every splice (one wire in, two wires out), and that way, when you're done, you can use either either seat. Other than having to work bent-over on the floor of the car, I liked this idea. Hell, if tomorrow I found a set of E38 sport/comfort seats with adjustable lumbar (and yellow connectors) for a hundred bucks, I wouldn't be kicking myself.
So that's what I did. For each wire coming in from the harness on the floor, I soldered and heat-shrinked the connection to the wire of the corresponding color on both the old-style black connector (for the sport seats I was installing) and the new-style yellow connector (for the standard seats I was removing).
There were a few pitfalls. It's not, in fact, strictly true that the old connector / new connector wiring is all one-to-one. After I wired everything up, I found that there was an extra brown/black wire and an extra blue/black wire on the black connector that hadn't been spliced into anything. I tried to use spagetticoder.org to see what the wires were, but for some reason couldn't blow up the diagrams enough to see. So I did it blind. In both cases, I'd already made a one-into-two splice with these color wires, so I opened up the splice and soldered in the errant wire, making it one-into-three.
It's basically all working. First I tried it on my existing standard seats and the yellow connector:
Everything continued to work. Then I pulled the standard seats, put in the sport seats, and plugged in the black connector:
The motors all move. The steering column rises when I get into the car. Life is good.
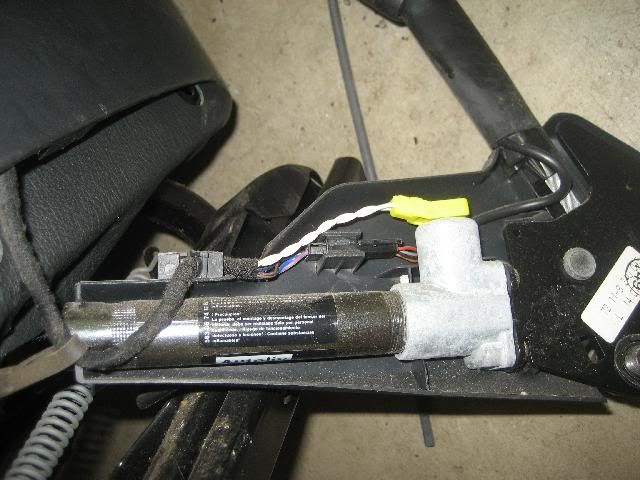
Lastly, above, I skipped explaining the step of swapping the belt pre-tensioner, so let's talk about that now. With the seat out of the car, you unbolt the Torx T50 holding on the tensioner assembly from the corner of the seat just like you undid the seat belt, and pull it down through the slot. The form factor of the old and new tensioner itself is identical, but the connectors are slightly different. The tensioner in fact has two connectors -- a flat one and a round one. On the older black-connectored seats, the flat connector has four wires, whereas on the newer yellow-connectored seats (the ones whose tensioners I needed), it has only two wires.
This is the older tensioner and its wiring before removing it from the older sports seat:
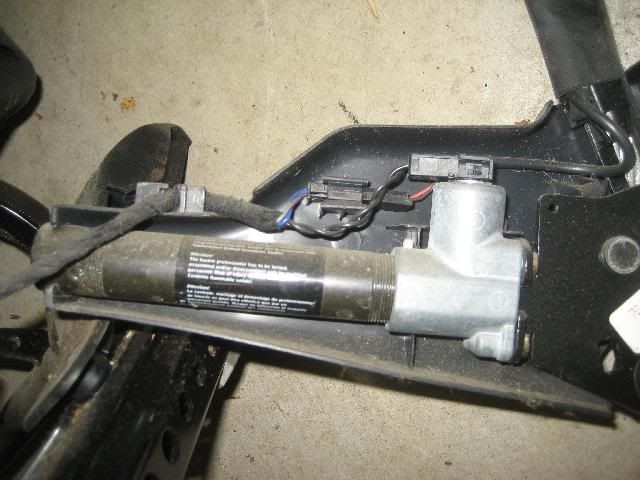
And this is the newer tensioner and its wiring before removing it from the newer standard seat:
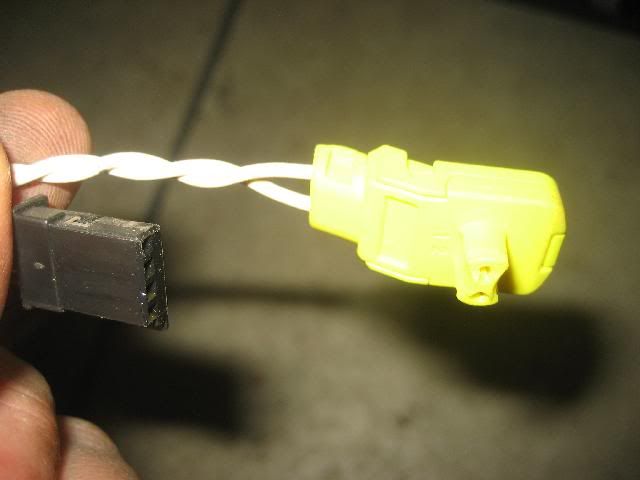
I followed the advice I read in several posts and simply swapped the tensioners. With the flat connector, it's easy; I plugged the two-wired plug into the harness carrying four wires. But there's a bit of subtlety with the round two-pin connector. The pin-to-pin separation of the round connector on both tensioners is the same, but the form factor of the attachment mechanism is slightly different. On the older seats the connector plug is supposed to just press into the tensioner, but on the newer seats the connector plug has a snap-and-lock mechanism on the top.
Older round connector for tensioner for single-stage airbag:
Newer round connector for tensioner for single-stage airbag:
Since the pin sizes and separations were identical, I just pushed the older tensioner connector plug on the sport seat into the socket on the newer-style tensioner, even though there wasn't a snap mechanism to hold it. I don't think it's going to go anywhere.
I assumed that I'd trip the SRS ligth at some point so I ordered one of those $50 B800 airbag reset tools on eBay, but I didn't have to use it. The tensioner swap worked fine. I'm curious how, and if, this works if you're trying to go the other way and swap the newer seats into an older car. There, you'd be swapping tensioners the other way -- needing to put the tensioner with the four-wire connector into a seat with a wiring harness with two wires. I saw one post asking about retrofitting this portion of the seat wiring harness, but did not see any resolve on it.
Regarding whether the heat is working... I am feeling heat, but I need to drive the car on the three heat settings and see if I can quantify whether all of them are working or not. I'll report back on this as I drive the car.
So... not bad for two hundred bucks. But all other factors being equal, you'll save yourself a pantload of work by simply buying seats that have the right connectors on them.
Personally inscribed copies of my books available at www.robsiegel.com
1972 2002tii x2
1972 Bavaria
1973 3.0CSi, 1979 Euro 635CSi
1999 Z3M Coupe, 1999 Z3
2003 530i stick sport
1974 Lotus Europa Twin Cam Special (I know, I know...)
Impossible is Interesting
great write-up! Glad it worked out.
Member
Ditto. Thanks for posting back your results.
Become a BMW CCA member! Click HERE to join and feel free to use my BMW CCA member #191509 as a referral.
2015 650ix GC (Moonstone/Cohiba Brown) <<~>> 2014 X5 50i (Space Gray/Mocha)
Member
Nice write up, but all that dirt kinda made me disgusted lol
PM me for Interior Trim Wraps!!! Get rid of your old wood!
**PM ME FOR DETAILING/ROOF WRAPS(BAY AREA**
Member
awesome writeup.
Crazy Cracker
BMW CCA Member
Oh, wow I've always wanted to upgrade to the sport seats, but had no ides about the different style connectors.
Member
Just to complete this:
--@jackcat559-->It's not that the sport seats and standard seats have different connectors; it's that early and late seats have different connectors (black and yellow, respectively). This post was about installing seats from an early (black connector) car into a late (yellow connector) car.
--Heat: The heat in the driver's seat functions, but it feels like the back bolster has heat whereas the bottom part of the seat does not. Don't know yet if this is a wiring issue, a connector issue, or if part of the seat wiring is bad.
--Passenger seat: I got the passenger seat installed using the same trick of grafting both the new and old style connector into the floor. On the driver's side, above I said that there were some extra wires in the black connector but that they all matched the colors of wires already in the harness. On the passenger side it was the opposite; there were wires in the black connector that didn't directly match anything in the harness. I noticed that not only did the passenger seat heat not work, the indicator lights didn't even come on when you tried to turn on the heat. I found the following wiring correspondence:
Wiring harness for yellow connector Black connector
white with green white with yellow
white with brown white with blue
Passenger seat now has functional heat.
Personally inscribed copies of my books available at www.robsiegel.com
1972 2002tii x2
1972 Bavaria
1973 3.0CSi, 1979 Euro 635CSi
1999 Z3M Coupe, 1999 Z3
2003 530i stick sport
1974 Lotus Europa Twin Cam Special (I know, I know...)
BMWCCA 484984
Thanks for the follow-up and great write-up.
https://twitter.com/shled
That's a very cool and thorough write up.
I found it while researching removing my '01 black sport, heated, "horn" seats with electric thigh (<word never looks correct) support. Send me a PM if those are similar to what you are may be looking for.
Of course I have to find suitable active comfort e38 seats to use instead.
I think 'active' were only available as an option on the '01 750iL.
...on the gas
Shled
Charter Member, BMW e38 Real Beef Club
2001 Dinan 740i (stage 3) Supercharger, High Flow Throttle Body, HF Mass Air Meter, Free Flow Intake Manifold, Stage 3 Suspension (matched set performance tuned springs, camber plates, front struts and rear shocks), Stage 2 Front & Rear Big Brake Conversion, Stage 5 Supercharger Engine & Trans Software, Quaife LSD (from M5), HF Cold Air intake, Dinan Free Flow Exhaust, e60 M5 bi-xenon HIDs; BMW e46 ///M3 flappy paddle 3-spoke sport wheel: aspheric, electrochromic, power fold mirrors: factory hydraulic trunk: BM53 Radio: BMW TCU: iPhone integration audio, video to AUX w/USB charging: M5 large body diff w/QUAIFE internals: (sig limit reache...
Member
Stupid question, but I didn't think sport seats came heated. Was this a late change?
I'm looking at buying an e39 wagon and being able to add heat to the sport seats would rock up here in cold Portland.
No current BMWs.
1994 Roadmaster Wagon
1974 Alfa Romeo Berlina
Member
Hi!
First I must say, nice job!
Im actually doing this conversion, but the other way.
I have a 1997 e39 that had old plush seats in it, and the owner before me bought frontseats and backseat from a later model of e39.
When I got the car, the front seats and the "ass-part" of the backseat was fitted, but not the cables for the front seat nor the backrest of the backseat.
Backseatproblem is solved. Had to make compleately new brackets and locking mechanism to fit it, but that went okay. (car originally equipped with fixed backseat, and the new one was foldable+skisack)
My second and real problem is the cableswitch. My car has the old black n' blue connector, and the seats has the new black n' yellow connector.
So here's some questions:
1: Are you 100% sure that I can't use the newer style tensioner? The previous owner has already thrown away the old seats...
2: Heat in the seat... black connector has three wires for the heat. The yellow has only two? What to do? Which two of the three should I use?
Really hope you can help me out here...
Im gettin a Carsoft 6.5 soon so I can reset the airbaglight as many times as I like... But it won't help me much if it keeps lightning up everytime...
Cheers!
Anders.
Member
ooookay... Not much action in here!
I got a pair of yellow/black connectors from a newer car.
The colors of the cables matched up quite nice, accept for those two going to the seatheat. But that was'nt a problem. Nothing was a problem actually, until I got my Carsoft 6.5 and tried to erase the error memory for the airbag unit... It erases the errors, but ½ second later it's there again. The errors Im recieving can be seen on the attached image.
This must be because I hav'nt changed the tensioners right? The ones from my old chairs is gone so I have nothing to replace my new with...
And another strange thing is that I only have two wires to each tensioner?! As far as I can see from your guide, there should be a connector with two wires,and one with four wires? (to the tensioner)
Anyone got any suggestions?
//Anders.
Member
I did the same swap as you and have the same srs errors... We need the earlier single stage tensioners from the older assembly... I'm not sure if they are plug and play like these as I just learned this was the fault, but if I figure it out, I'll send you a PM!Originally Posted by janebrink

Chris
Last edited by listed5; 01-28-2011 at 02:06 AM.
Member
Oh! Someone with the same problem!I suspected that I needed to change the tensioners...
Do you get the "battery connection" error as well?
Member
I have similar WOES> I have a '97 E38 with a 1/97 build (black seat connection plug) and have proceeded to install sport Contour seats(I think that is the appropriate term for the 18 position sport seats in an '01 E38) for an earlier model with yellow seat connectors. I did get the pigtail from the earlier car to splice into my vehicle for more plug and pray. I also rewired the belt tensioners from the older seats to match the older vehicle(this step could possibly be my undoing as I may have spliced the wires incorrectly and that is what is causing the airbag light spasm on my dash. At first I was elated that I had removed the light by reinstalling the tensioners but as I saw my dash at night I could see the faint very quick flashes of light from the dreadful airbag light).
Problems, headaches, late nights, and more problems.
I currently have moderate heat at the edge seems of the main cushions on the passenger seat, no heat on the driver's seat (the indicator light on the activation button turns off after a few seconds due to a break or short in the temperature sensor-use fault codes on spaghetticoder.org.) , my airbag light faintly flashes repeatedly. Yes they are upgraded seats but I have fully downgraded my mood, functionality and spirit.
Leftover wire connections:
Driver Side- I had matched every wire color from the vehicle to the connector on the earlier model seats. I had two brown and black wires (one was def. a ground wire as tested with Multimeter). I connected the non ground coming from vehicle to seat. Left the ground unattached. There was also a small blue and black coming from the vehicle with no corresponding wire to attach it to. On both the driver's side and passenger side there was a medium size brown wire coming from the new yellow connector that had no connection to mate up to. After following it into the seat connector it seemed like it didn't connect into the seat on any plug anyway.
Passenger side: There was an extra red and blue wire coming from the seat that didn't have a mate on the vehicle wiring and there was again the medium size brown wire from the new connector that did not have a mate or purpose that I could find.
I am willing to do the legwork and make the connections but does anyone know anything that might help. I of course would be happy to compile a correct write up for going from the opposite of what "thehackmechanic" did. Great job by him. Really valuable stuff. You deserve a lot of credit. I feel the upgrade of the older model is either a myth and I have been lead astray or my overlooking a necessary step may be the cause of the problem. Any help or ideas are welcome. Let's put this mystery collectively to bed and get some definitive answers.
Member
I have been working on this same project for the last few hours. I finally got the convienience exit feature working, and most the steering wheel adjustments. It sstill wont go UP with the knob.
I aslo have the "extra" blue and black wire with no where for it to go...
Any addtional info would be great... sooner the better...
Member
Pics of said sports seat installed please....
Great write up and WOW, what an effort....
Member
Man... I've been searching all over for something close to what I'm about to attempt.
I have a '98 E39 wagon, found comfort leather powered seats from the junk yard. Primo condition, fully functional. $70 for the pair. Leather is in great shape...sorry ranting about my steal.
Delima is, my seats are heated and manual, but I now have the electric set. The plugs are the same, just the new seats have more wires...lol.
Will they work or do I need a larger gauge power wire?
Member
Great write up, thanks for this.
Ultimate Driving Machine
Thankyou!
So pleased I just stumbled across this after picking up my new interior. I have a '98 with the black connectors. New seats are yellow...
Going to see if I Can switch the looms between them when I get a chance, If not. Possibly ebay some looms to make up. As Ideally i'd like to sell my comfort seats.
Cheers
Mat
Member
Just wondering
Member
Guys, thankyou for the information provided in this thread. It allowed me to fit seats from a 1997 E39 540i into my 2001 E39 530i. I fitted black connector seats into my facelift connector car, and spliced the necessary black plugs into my existing yellow wiring.
I ran into one problem not yet mentioned that caused the airbag light to come on and stay on. The code was a 'Pretensioner' code (even though I correctly swapped the 2-stage pretensioners over to match my original seats).
The reason the light stayed on is because there is a difference in the seat wiring between the Pre 1999 seats and the Post 1999 seats (at least in some occasions like mine). There is a metal 'bridge' in the seat's plug that connects pins 9 + 10 in the attached diagram.
When I removed the bridge, the light went off, as electrically the circuits were now identical to my previous seats. It takes about 10mins per side to remove this 'bridge' and it occurs on both seat plugs.
Picture below shows the wiring diagram - note the difference between Pre and Post 1999:
Check the wiring diagrams - www.bmw-planet.com
- - - Updated - - -
The forum won't let me upload another pic (I had a few to show the 'bridge' clip in place). In lieu of this I'll try and explain - basically you take the seat plug apart. The aim is to remove the light grey coloured mini plug from the larger plastic plug holder thingy. Use a screwdriver and push the sliding black piece off the plug (it slides towards the back of the plug and off). This then lets you push the grey mini plug out through the hole created.
Once you have the light grey mini plug out, you should see a metal connector connecting pins 10 + 9 (just like it shows in the diagram above - aren't we pro!
Pry out this metal, taking care not to bend the pins in the plug.
Once this is out, reassemble plug and test the seat - It should work without an airbag error.
Be patient when taking the plug apart - They are well made and slide apart with the right amount of force. If you have to forcefully pry or bend you are probably missing something - Push in a different direction!
Also (obviously) check the wiring diagrams for your exact car and check to see if this is even the problem. I SAY 1999 but I did this work a good month ago and may have made a mistake. If I have I apologise - Please correct me for the good of the forum
Member
Thanks for nice write-up, well done.
I am trying to do almost the same - replace the seats in my 1998 540iAT with seats from an M5, and unfortunately the colors of the wires does not match at all. Not a single wire matches, all are different.
And, the wiring diagram from BMW-planet does not work. Java first insisted on updating, but then just says "Due to security reasons, this app has stopped running to protect you".
Thanks a lot, computer geeks.
Does anyone know a link to a site that shows wiring diagrams for the BMW E39 ?
Member
Does any one got the part number of the yellow socket on the seat mine were cut off.. thx
Member
Thanks for this writeup. I am doing the reverse. I have a 98 528 and I am upgrading to 2002 E38 sport seats. Going from a black to a yellow socket. I have the yellow connectors from ebay. As you said, I got the seats on a sweet deal and I have been looking for a few years going from just covers, to repair, then I finally found a pair of sport power seats, no heat that were in great shape with a yellow socket. I will let you know how the swap goes. I have I don't think I will have to change the tensioner based on above doing later to earlier, but I have them just in case.
 Posting Permissions


 Reply With Quote


Bookmarks