
 Defender of the Innocent
Being the holidays and all it might prove difficult to get a replacement rheostat. I recall that Randy had a write up on jumping the rheostat but can't find it. Anyone know the link or how to find it?
Also I'm having a heck of a time finding the part number I need to order for this.
edit: Found the info here: http://forums.bimmerforums.com/forum...immer+rheostat
I thought there was a bypass... linking here in case someone else is searching:
dash lights dimmer rheostat
(added for search purposes: more people should do this...)
Last edited by GBimmer; 12-22-2010 at 09:12 AM.
protip: If you're reading the post above, it's probably a joke.
Member
If there was a write up, it wasn't from me...
... I just take pictures:

Defender of the Innocent
I'm holding the piece in my hand right now as I type (well... I put it down for a sec to look at your pic and type but...).Originally Posted by Randy Forbes

warming up soldering iron now.
BTW: if anyone else needs to do this you have to remove the cover over the knob (it pops off), use an 8mm socket and remove the nut inside it, unscrew the knob (it's screwed on), remove a screw hiding behind the know and pull the whole light switch/vent assembly out. Unplug the rheostat and light bulb, push in the tabs holding the rheostat into the assembly, and take knife and pop off the metal cover on the rheostat assembly. You can then get to the two tabs that need to be soldered in series like Randy shows in the pic above.
I'll post up again with results.
PS: fix the short in the shift knob first...
Last edited by GBimmer; 12-22-2010 at 12:00 PM.
protip: If you're reading the post above, it's probably a joke.
That one RS'd Coupe
BMW CCA Member
Guessing your off today? lol
Defender of the Innocent
Nope. Working hard though.
even brought my soldering iron to work with me today. Sorta like "bring your daughter to work day" but more manly as it involves melting metal and fixing stuff...
You off? Want to get lunch?
protip: If you're reading the post above, it's probably a joke.
That one RS'd Coupe
BMW CCA Member
Yeah I took this whole week off. Ill send you a txt in a few.
Defender of the Innocent
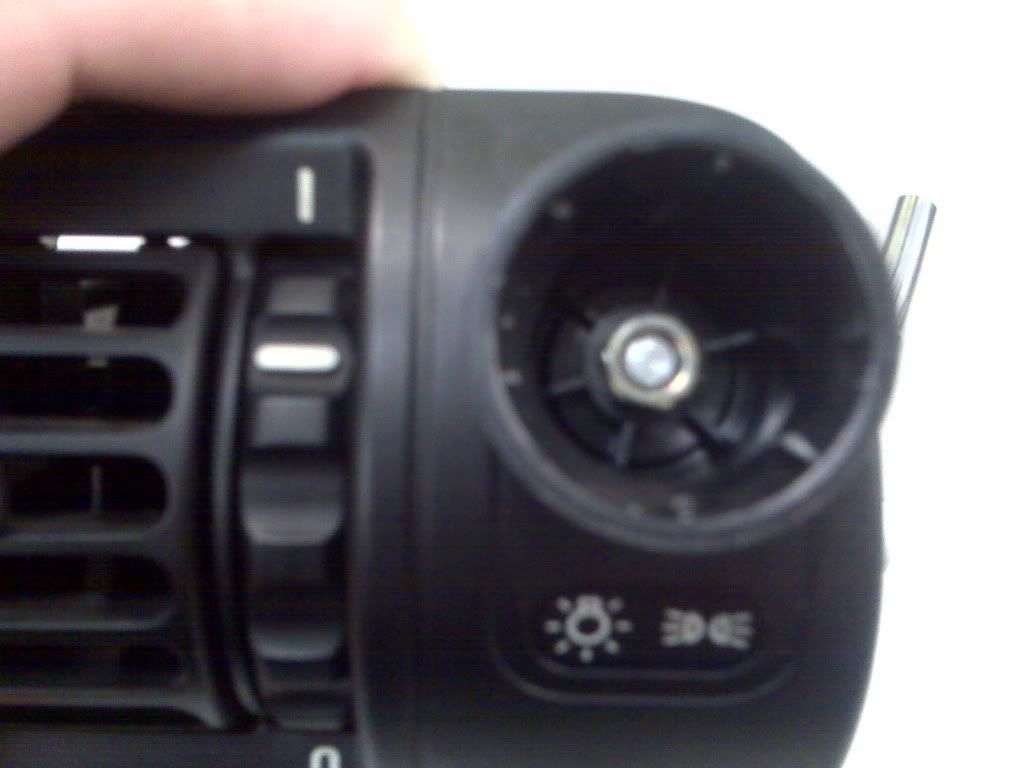
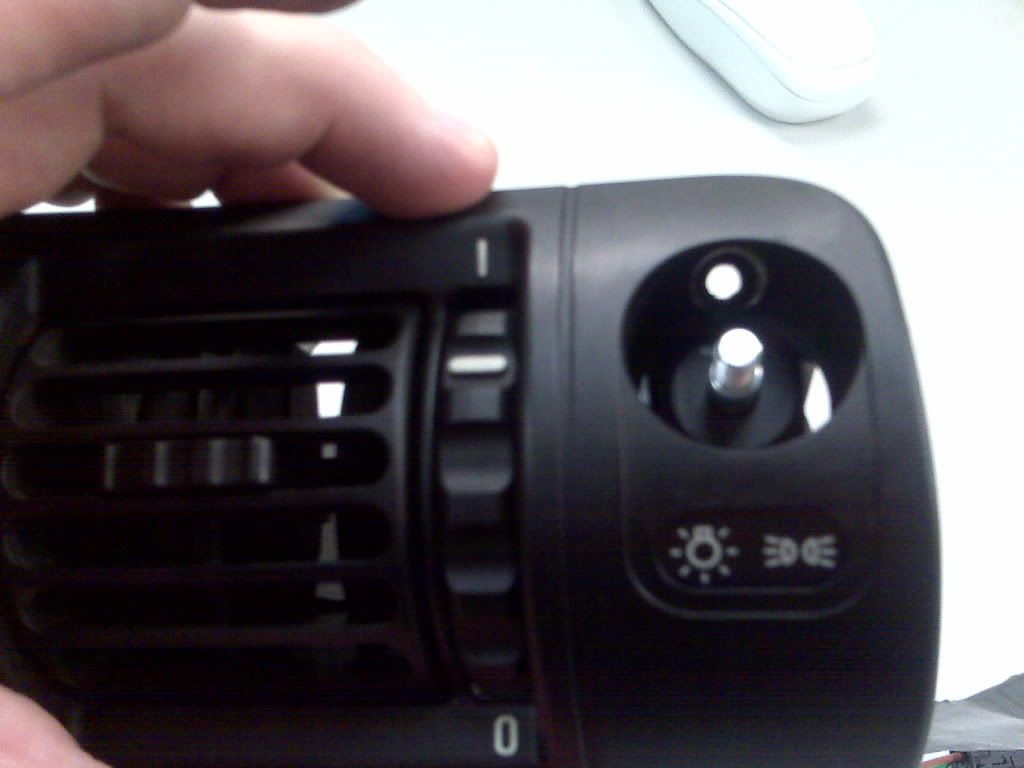
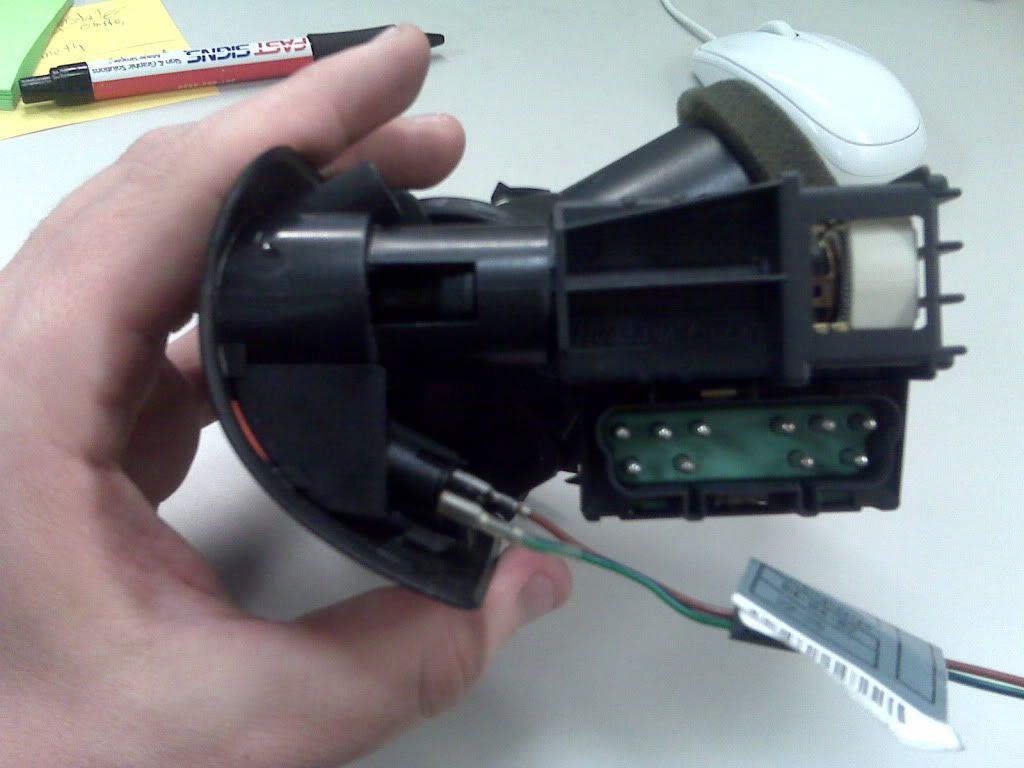
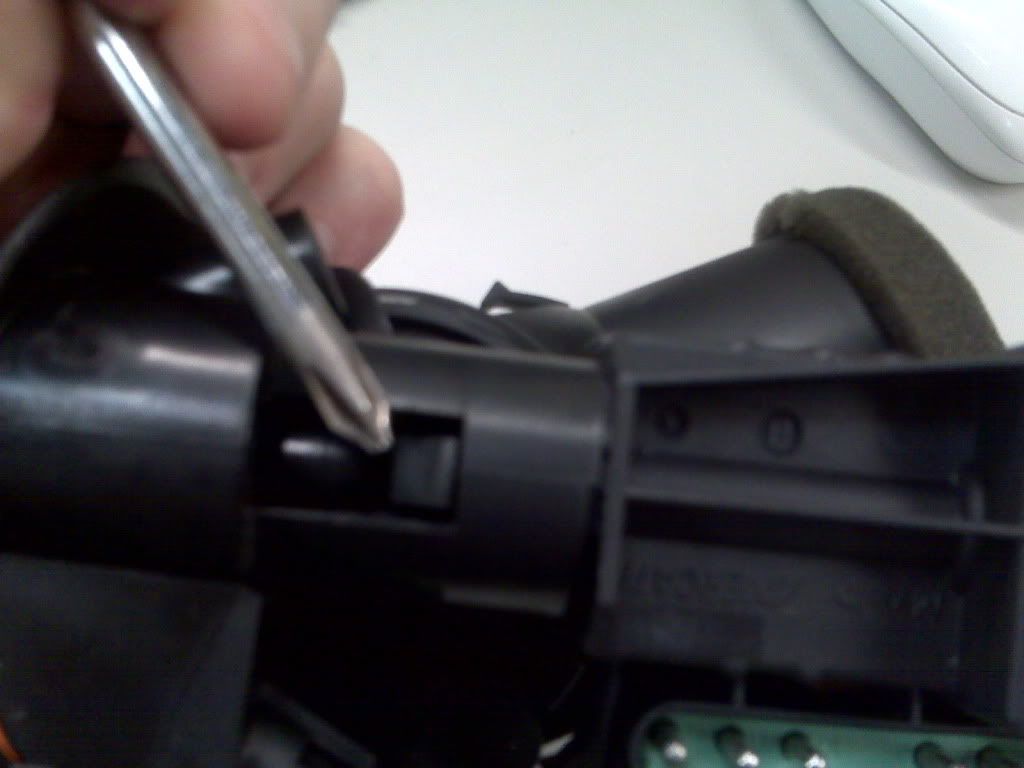
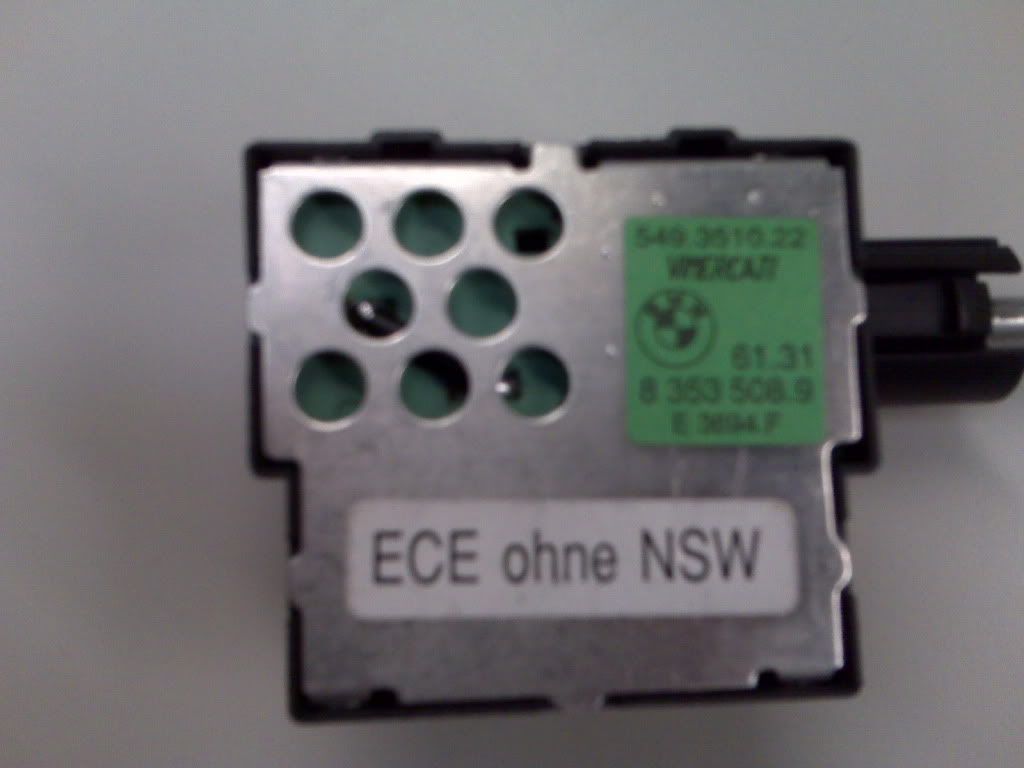
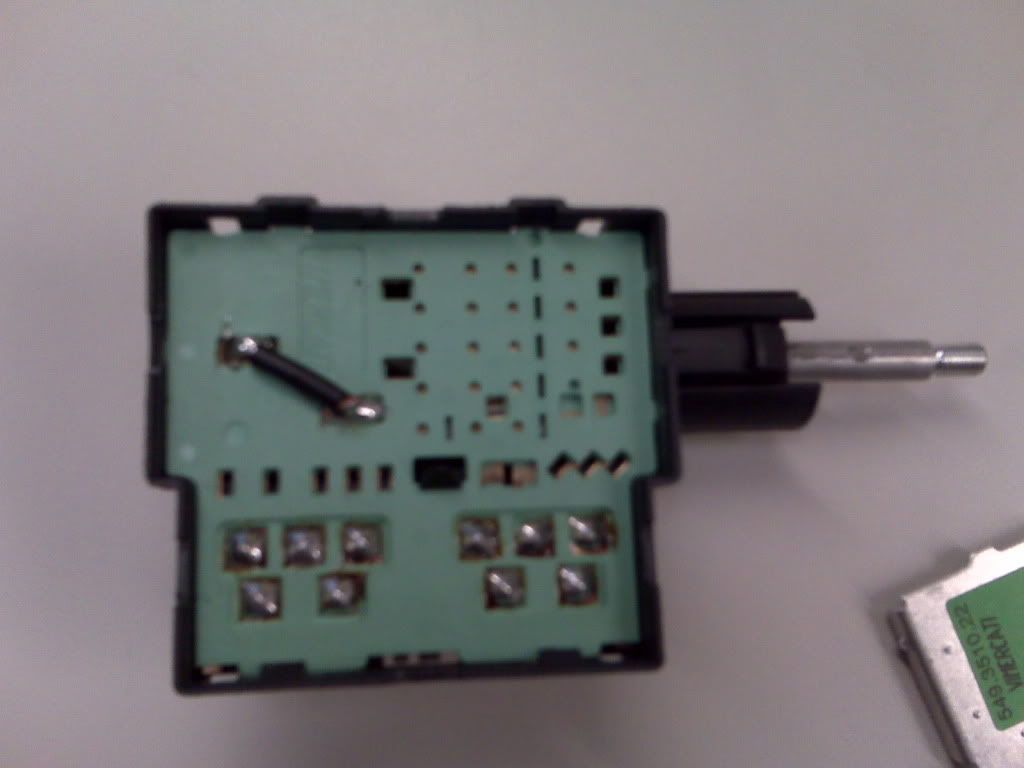
pics:
Remove this nut (8mm)
Screw that needs to be removed is the hole at the top of the hole left by removing the knob (knob is screwed on as well)
Now the whole thing pulls out. It's kind of tough to get out though.
unplug the wires and you'll have this;
Push in the tab here and on the other side of the spindle.
Now remove the metal covering by using a knife and prying it off (it pops off)
Solder a jumper here:
Re-assemble and see your gauges at night.
edit; just got back from lunch. I put it back in and everything is working now. Of course the dimmer doesn't work but that's not a concern for me.
Last edited by GBimmer; 12-22-2010 at 01:58 PM.
protip: If you're reading the post above, it's probably a joke.
Member
Your pictures suck, but your soldering looks better than mine!
Any chance you can get a better (read: in focus) shot, and we'll use your picture in the future, instead of mine?
Defender of the Innocent
It was using my cell phone. I suppose I can take it all apart again (it's not difficult to do) and re-take the pics with a real camera.
I honestly fixed this at work on my desk today...
Oh and the pics didn't look bad on the small blackberry screen. They suck when blown up though. Must be time to get a new phone, eh?
PS:I was proud of my soldering job too. One of the most perfect looking solders I've ever done. Looks like a robot did it on a computer board in a controlled room. Yeah... it's that good. (don't know about penetration though...)
Last edited by GBimmer; 12-22-2010 at 09:14 PM.
protip: If you're reading the post above, it's probably a joke.
Member
I remembering having a hard time getting adhesion on the second (seen at top) connection; I left it as was, because I was afraid if I got it any hotter, the trace would lift off the board. I really do know how to solder...
The upside, is it's been holding up ever since, must be at least eight (>8) years.
Member
The bypass is a good short-term fix. I really wanted the dimmer to stay functional, even though I always run it at full brightness.
New rheostats are $35 or so from Tischer/Penske, which is outrageous. To forestall future rheo burnouts, I've replaced the 10A fuse for this circuit with a smaller fuse.
I started at 1A, went up through 2A and 3A to 5A. Finally, 5A is holding under normal demands. Hopefully the next short will take the fuse before the dimmer.
YMMV.
-Rob
Defender of the Innocent
I think I must have just got lucky with the wire length and type because when I put it in place the strands locked into the small holes in the contact points before I even started. I probably could have just left it like that and the aluminum cover would have held it in place but I decided that it was best to solder it since the iron was already hot. I used a smaller diameter solder with a flux core. I really like the stuff. Got it at Radio Shack. It's p/n 64-002, 60/40 Rosin-Core Solder, .062" diameter. Works very well in small places. You might want to try some since I know you do a lot of this stuff.
On another note: the dash lights are brighter than they ever were with the rheostat. Did you notice that too? I kinda like it as, well, my old and tired eyes.....
protip: If you're reading the post above, it's probably a joke.
Member
I don't find that $35.00 is all that high for a complete hdlt sw (you should try buying parts for cars that have been out of production for 40+ years).
If you saw the diameter of the wire used in the rheostat, I don't think you'd have the same level of confidence in your down-sized fuse. My advice is to not let the gray/red-stripe wire short to ground, and you'll never need to know
Member
You're probably right on both counts.
Member
Just last night, the Dash lights went out without warning. Naturally I tried to rotate the dimmer control. At first it turned, and then it got tight so it would not turn in either direction. Dash lights stayed off but headlights ok. So I turned to this website and found others had the same problem. Thanks again for saving my arse bimmerforums.
Bill, Ontario Canada.
Member
BMW CCA Member
The fix is not complicated but it is a pain in the ass from what I recall, even with rosin it did not want to hold the solder resulting in me dabbing on large amounts. It was a very poor quality solder but it worked.
Ultimately I ended up replacing the unit, it was not hard to find, cost around $40.
- - - Updated - - -
https://www.turnermotorsport.com/p-1...uine-bmw-part/
http://www.koperformance.com/part-nu...08/GENUINE-BMW
https://www.fcpeuro.com/products/bmw...ti-61318353508
http://www.bmwpartsweb.com/Part-Numb..._E095124A.aspx
http://parts.bmwofsouthatlanta.com/s...ssembly=262894
https://www.bavauto.com/se1.asp?dept_id=44
Maybe it was $50, either way, you own a bimmer, stop being cheap! BMW is not a poor mans game :P
- - - Updated - - -
BMW = Burn Money Willingly
Member
2 years later and now the part is $150 D:
 Member
My dash lights stopped working. (I may be repeating something here, but I couldn't find it in this thread). At the plug, I just identified the wire that feeds all the dash lights (GR/RT in the manual), cut it and spliced it to the wire feeding the parking lights (which of course does not go through the dimmer part of the switch). So now my dash lights are on full brightness all the time, which is fine with me. No messing with the switch, no soldering.
Literally a Cat
If you open up the factory electrical manual, go to the light switch details, search for X503 and follow it through the schematics for the light switch (S8) to consolidate all of its involved circuitry into a single page of I/Os so you can use a different switch that is easier to use and separates the dimmer control switch function from the headlight control switch, you can plainly see that the switch was designed by a VERY BAD PERSON.
Mine still operates correctly. The problem I have is I'm tired of accidentally adjusting my dimmer setting every time I try to turn on the bloody headlights. I also don't care for having to move the switch through the parking lights only position to get the the headlights/fog lights + parking lights position. It's a sin, that's what it is.
(note: I'm not actually that angry about it, but I do really hate the switch design enough to try to make a different setup. Rebuilt-titled car, dashboard completely disintegrated--might as well embark on a stupid and frustrating project to keep occupied during the weekends! Plus I've learned more than I ever really wanted to about electrical and electronic technology than I ever thought I even could learn, mashing my face into this dumb project).
Member
Already added to my 'must have" spares list.
Other items there are some headlights, facelift AC switch, marker lights, mirrors.
Whenever I see them cheap, I am trying to acquire them. I believe it's a good investment for a long run. Only problem, I don't want to sell that stuff ever, knowing I might need it myself
Member
I'm the same. Every time I see a Z3 at my local Pick & Pull I rush in and remove a list of parts as long as my arm.
Then store them away for later use.
Ocassionaly I might sell them.
Sold some rear lights, AC control , Dimmer switch and a top switch last month.
Still have spares on hand if needed.
Member
These switches must be popular as price increased to $160 from numerous sources.
www.ecstuning.com/b-genuine-bmw-parts/headlight-pull-switch/61318353508
Help me understand the idea of dropping smaller fuse. If lighted shift knob wires get exposed again, rheostat won't burn out? Instead, smaller fuse (e.g. 5A) will be the first gate?
Which fuse # did you replace? www.realoem.com/bmw/enUS/showparts?id=CM93-USA-10-1998-Z3-BMW-Z3_M&diagId=61_4926
For those of you with workaround of soldering burned rheo, doesn't full brightness shortens life expectancy of gauge bulbs? It's ridiculous amount of man hours to replace bulbs behind clock and oil pressure gauge. Logically, using a dimmer may save you time and effort in the long run.
Sim Simma
Moderator
Think the goal is to blow the fuse before blowing the whole switch
Going into my TENTH YEAR of providing high quality reproduction BMW fabrics!
PRICE CUT on ALL FABRICS
Offering the best prices on the best quality reproduction fabrics!
Member
Makes sense. Sounds like I should I remove 10A fuse, replace it with 5A, then install new rheostat? Is this a safe insurance not to blow new rheostat? After all, ongoing price for new rheostat is $160.
On this note, can I install non-illuminated shift knob with new rheostat and hope it won't blow even with stock 10A fuse? I'm considering all options, including soldering effort with blown rheostat and non-illuminated shift knob as a band-aid solution. For now, I can't justify $170 for a shift knob www.leatherz.com/products/illuminated-zhp-short-shift-knob

Sim Simma
Moderator
Yes you can remove the illuminated knob and tuck the harness out of the way to avoid the issue at all
Going into my TENTH YEAR of providing high quality reproduction BMW fabrics!
PRICE CUT on ALL FABRICS
Offering the best prices on the best quality reproduction fabrics!
 Posting Permissions


 Reply With Quote


Bookmarks