
 Member
Just did this repair tonight. Went to Home Depot and bought 10 feet of Watts clear vinyl tubing for $2.25. The part number was SVEB10 and it was 1/4" X .170" X 10 feet. I disconnected (well it cracked int a bunch of pieces) the tubing at the nozzles, and back down to the flex hose. I cut the tubing at the at the end of the flex hose careful to leave about 3" of material. I taped the new clear hose onto the old hose and guided it back through the flex tubing. Worked like a charm. I didn't use WD40 because I thought it might degrade the tubing so I used dish soap on the connectors and the ends of the hoses. Looks like I used about 6 feet. The whole project took 30 minutes - just in time for the rain.
resident, old fart
Great post James, but for an "old timer" like you to think pump was out and low reservoir sensor were bad simultaneously is not like you! Especially when it came on after a few minutes (like about when the fluid had time to drain out). Gumbi, pull his MOD license for a couple weeks for not making that diagnosis straight away :-) Congrats for fixing it the cheapest I have seen, unless baby sister had an aquarium :-Q
Old, contrary, and out-of-touch,
but still learning sumpin' every day
NOTORIOUSLY long-winded :-(
Member
FYI, I broke a few of the retaining clips that hold the hoses in place along the hood and near the hinge. Found a box of 15 "Mazda Releasable Cable Strap" with the nub insert online for $6. Worked great and way less than the BMW price of $20 a clip from the $tealer.
Member
Very helpful, Thanks!
Member
Great DIY!
Those hoses are really brittle. It is best to just replace the entire thing.
Member
Hey, this discussion was great! My washers suddenly stopped working, but I could hear the pump working, and water sloshed out of the corner of the hood when it was raised. I couldn't see anything so after I took off the sound deadening material, I figured that there must have been a split behind one of the panels that the washer hose snaked through. I just made a cut and pulled the hose out. Getting it off the plastic nipples of the washer spray units was impossible, so I made a slit in each hose where it attached, and then was able to pull it off. My knife is as sharp as a razor blade: if yours isn't use a razor blade or utility knife. I found that the correct hose inside diameter is about 7/32". This was not easily obtained: Advance Auto had it, but it was so bleeding fat on the outside that it never would have snaked through the very small spaces involved. So I went to the hardware store and bought a length of clear vinyl aquarium hose with an inside diameter of 3/16" (which is believe is 1/32" narrower than the actual factory hose.) 1/4" interior diameter hose, which others in this forum have mentioned, is IMHO a little too big to fit tightly -- it did fit, but I was worried that it might come loose or leak. Maybe I was just being overly cautious.
Also, it was mentioned somewhere up above that WD-40 was used to make the hose slip onto the plastic nipples better. Clearly some lubricant is called for, but I think WD-40 and some silicone sprays can degrade plastic, so I didn't use it. I'm sure there is some really good lubricant for plastic out there, but I didn't have time to research it, as I was putting it all together in the parking lot of the hardware store with my mini-knife. I just used saliva, and that seemed to be slippery enough to get the hose onto the plastic nipples.
The factory hose splits into two after coming from the pump, and then those two hoses split into two "Y" couplings inside the left side (as you face it) of the hood, underneath the big rubber grommet that they pass through. I left everything original until after these "Y" couplings. The 3/16" aquarium hose fit nicely onto the plastic nipples on the "Y" couplings (make sure to cut them "square" so that they fit correctly) , and I reassembled everything and gave it a shot.
I was bewildered to see that the left (driver's side) washer worked perfectly and the right (passenger side) washer did absolutely nothing. Since I had taken the time to clean out each little opening with an old guitar string I had lying around, I couldn't initially figure it out. I had not paid any attention to the hoses when I removed them, thinking that if each module had two hoses going to it, that would be close enough. There are two "Y" couplings, giving rise to 4 separate hoses (2 for each washer module). Since I had no idea what was wrong, I figured, maybe it matters which hose goes where. So I switched one of the hoses on the first "Y" coupling with one of the hoses on the second "Y" coupling. Success. It works perfectly now.
My advice is observe carefully which nipple on each of the "Y" couplings goes to which nipple on each washer module. What doesn't seem to work is what I did first, which was to dedicate one "Y" coupling to each washer, without having observed what the actual configuration should be.
If the hose down south of the "Y" couplings fails later, I'll replace it then. For now, I was happy to avoid having to snake a hose through the corrugated wire sleeve on the left, etc. The new system works great, and I don't think there is going to be a lot of problems with heat on the vinyl hose that is threaded through the hood panels.
I paid about 29 cents per foot for the 3/16" hose, and didn't need any connectors (because I used the existing ones on the "Y" couplings). I used about 6' of hose, and I had a little left over. At 29 cents per foot, better to have a little extra in case you make a mistake or accidentally cut the hose. So, my repair was under $2.00 total. Probably would have been cheaper if I had purchased the hose from Home Depot -- but, hey, $2.00 is a pretty good price for a bimmer repair anyday. Thanks so much, everyone, for supplying the ideas.
Member
Heh. One tube is for the intensive cleaning fluid, fed from the small reservoir above the fender. The other is for the regular fluid, stored in the large reservoir behind the wheel well liner. The nozzles get one of each supply. The nozzles have internal check valves to prevent cross-flow.Originally Posted by rjjarvis

I had an earlier post where I replaced only part of the tubing with translucent white PE, bought by the foot. After another failure I replaced all of the tubing, including my earlier fix, with black 1/4" irrigation tubing bought in a 25' coil. Dipping the ends in hot water made the tubing flexible enough to fit over the fittings without excessive force or additional lubrication.
Edit: Note that the pumps do not have a check valve. They are simply an impeller, a seal, an air gap (w/ drain to handle a tiny seal leak), and a standard small motor. Backflow is prevented entirely by the check valves in the nozzles. If the system takes a second or two to start spraying, that suggests a leak in the tubing.
Last edited by djb2; 10-27-2014 at 01:48 PM.
Member
I replaced the washer pump on the 530i today because i couldn't hear it working at all . After that was fixed it pointed out another problem. The broken hose between the injectors. I will do the job tomorrow
www.Autosportstudios.com
Member
Not long ago, I did a write up about replacing my washer nozzles and hoses and using Velcro to put the insulation back in place under the hood over the nozzles and hoses.. the cheap arse plastic tubing breaks on older cars and any decent rubber hoses and new straights, t-joints, connectors etc, to put the water hoses back on... got new heated windshield washer nozzles on ebay and new hoses and connectors at almost any auto parts stores, and some rolls of Velcro with sticky back peeloff.
Member
I had to do this by being a dummy! lol My washer fluid low light came on. I didn't know why b/c I was looking at a full reservoir!! While checking the hoses etc., the brittle 'plastic' broke off and start spewing the fluid. I was able to catch most of it in a bucket. I NOW know we have "2" reservoirs! (smh) The one I was checking had NO issue as the fluid low light was telling me the OTHER reservoir was low. So yes, I broke the "Intensive" reservoir hose. My local stealer was closed, the next one up the road in Bellevue had it..$16.85 w/discount. But it was an hour away. I headed out, passed Autozone and decided to do a U turn and ask in person since the woman on the phone said they didn't carry it. But she didn't mention regular hosing. So I fixed it w/the regular washer fluid hose. I was able to snake it back through the black pipe by first pushing it in as far as it would go, then pulling and using the other wires to help pull it through.
And yes, I poured the fluid back into the Intensive tank and I also filled the "windshield" reservoir eliminating the dash light! :-0
Member
I'm having this same issue trying to find the culprit thanks for the walk through
Member
Nice write up I always thought it would always be the pump. I had to remove the bumper and liner anyway. I'll check on this too while I am at it. Thanks
1973 Clubman GT * 2008 BMW X1 * 2004 BMW 325i Touring* 2000 Honda S2000 *
2016 Mazda Mx5 Club Sport
 Member
BMW CCA Member
Member
BMW CCA Member
Great write up. I ignored my washer fluid warning to the point that I ran out. Once I filled it back up, the sprayers didn't have enough pressure to hit the windshield, so I assumed the pump had been damaged by running dry. Turned out it was disintegrating tubing under the hood, I guess it coincidentally happened to crack open at the same time the fluid ran dry leading me to think it was the pump. I had some aquarium type tubing laying around so I replaced the hoses from the Y connector to the sprayers. The hose upstream of that was still pliable so I'm not messing with it.
Member
Intensive washers (Small tank under hood)
No. Description Supp. Qty From Up To Part Number Price Notes 01 HEATED SPRAY NOZZLE 2 61668361042 $37.35 02 INTENSIVE CLEANING SYSTEM HOSE 1 61608364209 $59.75 COMPRISES AMONG OTHERS
WIRING SET03 LEVEL INDICATOR UPPER PART 1 61608364188 $23.15 04 RESERVOIR HOSE 1 61668361041 $7.77 05 Cable clamp D=14,3 X 12521733330 $0.92 06 Gasket 1 61668364190 $1.53 07 Holder 1 61668364203 $2.18
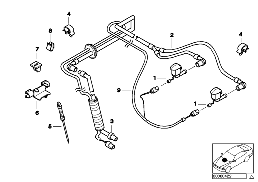
Regular = NO small tank under hood
1 HEATED SPRAY NOZZLE 2 61668361039 $37.35 02 Cleaning system hose 1 61608364200 $44.35 03 RESERVOIR HOSE 1 61668361041 $7.77 04 Cable clamp D=14,3 X 12521733330 $0.92 05 LEVEL INDICATOR UPPER PART 1 61608364188 $23.15 06 Holder 1 61668364203 $2.18 07 Gasket 1 61668364190 $1.53 08 Holder 1 61131387626 $0.57
For those who are having issues with your windshield washers, save yourself a lot of effort by replacing the nozzles, hoses, and pumps at one time. Remove the reservoir from the car and wash out all the trash floating inside from those who have used water only in the past. Or you can go down the fix it piece at a time as shown in this posting. Your choice as it is your car. By the way a new hood insulator pad is only $100. The replacement will brighten up your nicely cleaned engine bay.
Current Garage Highlights
2003 525iT TiSilver
2002 M5 TiSilver
1998 528i KASCHMIRBEIGE METALLIC (301) (Goldie)
Former Garage Highlights
2005 X5 4.8is
2004 325iTs (2x)
1973 Pantera L
1971 Dodge Dart Swinger "Lite Package"
1970 Dodge Challenger T/A 340 Six Pack Alpine White
1970 Dodge Challenger T/A 340 Six Pack GoManGo Green
1969 Road Runner 383
1968 Barracuda Formula S 340 Sea Foam Green
Member
BMW CCA Member
I blew out my nozzles with compressed air, they seem good as new.
Member
Congrats! The crap that grows in the supply tanks (Reservoir) is a bio hazard if the PO used water or other less than Ph balanced liquid. I love the green mold myself.
All of it gets into the pumps, lines, and then gets stuck in the nozzles. FLUSH those tanks with a little Clorox and water mix (1 cup per gal is all that is required). While your under the fender liner, wash everything clean as you will reduce the weight of the average car by 2 lbs flushing out the sand around the tank.
Current Garage Highlights
2003 525iT TiSilver
2002 M5 TiSilver
1998 528i KASCHMIRBEIGE METALLIC (301) (Goldie)
Former Garage Highlights
2005 X5 4.8is
2004 325iTs (2x)
1973 Pantera L
1971 Dodge Dart Swinger "Lite Package"
1970 Dodge Challenger T/A 340 Six Pack Alpine White
1970 Dodge Challenger T/A 340 Six Pack GoManGo Green
1969 Road Runner 383
1968 Barracuda Formula S 340 Sea Foam Green
Member
I did this. I ordered the shorter length part as well. The problem is I ordered it from the cheapest place, Eeuroparts.com and they were terrible. They sent it late and only sent the $9 part, not the $29 part. They showed Paypal the confirmation that the box was delivered as proof they delivered the parts. (Removed my original warning.)
Update: Eeuroparts sent me the part I needed. Ultimately they were OK overall.
Last edited by BMW4RE; 07-22-2020 at 06:28 PM. Reason: Remove "Beware" and add update.
Member
This site is amazing. I think every-darn-thing that has gone wrong in my 2-year ownership has been covered somewhere. I never thought of looking here when this happened to me, but there it is, with Arlo Guthrie's 8x10 glossies.
I hit the windshield washer a couple months back and suddenly nothing sprayed out. I checked the bottle, and filled it, and same results. My friend and I heard water running onto the ground whenever I hit the sprayer and, sho' 'nuff, disintegrated washer hose. We tried splicing some vacuum hose around the broken section, but the original line kept disintegrating until there was nothing left. I ordered the Genuine BMW hose assembly. The hose where it connects at the fenderwell was in really good condition so I didn't have to replace that. The work was a bit fiddly, and I forgot to note the orientation of the rubber gasket when I removed the old one. But install was pretty straightforward otherwise. Except, dealing with antique plastic parts, guess what else broke? Yes, the retention tab on one of the "heated washer nozzles." Ugh. So, I replaced both, which added more expense to this project than I would have liked.
I have also discovered that the washer bottle leaks if I fill it to the top. I suspect the seal where the bottle neck meets the reservoir is shot. It seems a royal PITA to get to the bottle, and it's waaaayy down on the priority list.
Current stable:
2002 525i (Daily Driver)
1994 SN95 Mustang 'Vert (The Bumblebee)
2001 325i Convertible (Beach cruiser project)
Member
Congrats!
Current Garage Highlights
2003 525iT TiSilver
2002 M5 TiSilver
1998 528i KASCHMIRBEIGE METALLIC (301) (Goldie)
Former Garage Highlights
2005 X5 4.8is
2004 325iTs (2x)
1973 Pantera L
1971 Dodge Dart Swinger "Lite Package"
1970 Dodge Challenger T/A 340 Six Pack Alpine White
1970 Dodge Challenger T/A 340 Six Pack GoManGo Green
1969 Road Runner 383
1968 Barracuda Formula S 340 Sea Foam Green
Member
Yep, just about everything related to these near classic cars have been well documented over the years on various forums. At least you researched. Many newbies come along and think it's the 1st time it's happened to anyone/anywhere in the 20+ history of these cars and then want to be spoon fed the info instead of searching/researching. Only issue seems to be lost pictures after uploading many to image hosting sites instead of directly to the forum
Member
+1^ way too many posts on "please tell me how to do xxx?"
Q: Did you look at the DIY posts or use the SEARCH function?
A: No, but......
Current Garage Highlights
2003 525iT TiSilver
2002 M5 TiSilver
1998 528i KASCHMIRBEIGE METALLIC (301) (Goldie)
Former Garage Highlights
2005 X5 4.8is
2004 325iTs (2x)
1973 Pantera L
1971 Dodge Dart Swinger "Lite Package"
1970 Dodge Challenger T/A 340 Six Pack Alpine White
1970 Dodge Challenger T/A 340 Six Pack GoManGo Green
1969 Road Runner 383
1968 Barracuda Formula S 340 Sea Foam Green
Member
But beware, the mods or someone come along and say "be nice to the newbies" or you'll get a vacation! LOL
Member
The first place to check is the fill hose section exposed in the wheel well. Only a short length is exposed, but it's right where road gravel can hit it. The ribbed hose has thin spots that are easily worn through.
You can sometime fix it with silicone and 1" diameter heat shrink tubing. If you buy new, reinforce the exposed area with heat shrink tubing from the start.
Member
Good idea! Thanx! I'll check when I get back into town.
Current stable:
2002 525i (Daily Driver)
1994 SN95 Mustang 'Vert (The Bumblebee)
2001 325i Convertible (Beach cruiser project)
Member
BMW CCA Member
My fill Hose totally disintegrated in that area, I wrapped the new one with aluminum tape in the exposed section hoping it will reflect heat and increase longevity.
For the record the fixes from three years ago that I mentioned earlier in this thread are untouched and fully operational.
Last edited by sienayr; 07-11-2020 at 10:22 AM.
 Posting Permissions


 Reply With Quote
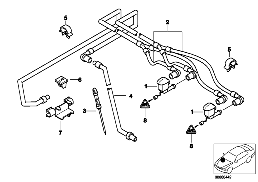


Bookmarks