
 Member
BMW Tech Expert
Member
BMW Tech Expert
One step closer. The front suspension is in and 20 years of grunge has been removed from the transmission. The seals in the tranny have been replaced and it is ready to mate with the engine. I've got an 80k mile engine from a 525i (auto) that used to be in my Spec E30 before I switched to a "built" engine when I built the second car. It has great compression and leak down numbers (much better than the engine was in the car) and runs 65psi of oil pressure (hot) at 5000rpm.
The engine that came out of the car needs, at the least, a head refresh. The leak down & compression numbers are a little disappointing. Until I tear it down and check the wear I won't know if it just needs honing and new rings or an overbore. That can wait, along side of the other engine I have that lost a head gasket (PO let it overheat, big time).
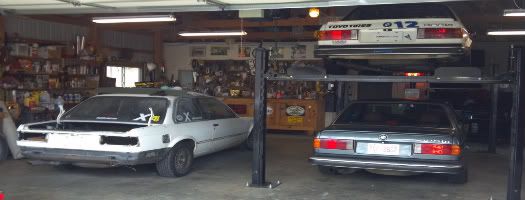
This morning I rebuilt the half shafts and they are ready to go in the car. But as you can see in the third picture there'll be a slight delay. We rarely get snow this far south and it has been a really long time since we've had a white Christmas. As soon as I can install the half shafts I'll set the car back on it's wheels so I can get it in the shop.
A problem that I didn't expect to have turned up when I was installing the front subframe. Although the subframe bolts came out easily and weren't badly rusted, one snapped as I was reinstalling the subframe (probably corrosion cracks) . So I'll have to deal with that before I drop the engine in. Years ago, when I had access to a lathe I made a couple of tools to do this job. But I loaned them out and never got them back. So I need to find someone that can make another set or will let me use a lathe for an hour or so.
The right way to deal with a broken subframe bolt is to use piloted drills. It takes two tools. All these are is a piece of rod a few thou less than the diameter of the sleeve in the subframe with a drill at one end. The first tool is a pilot drill with only about 1/4 of an inch exposed. That ensures that the drill will center on the bolt and not walk. The second tool has a drill that projects far enough to reach the end of the threads. Both drills are left hand twist. Sometimes the left hand torque of the drill is enough to back out the stub. But if not an extractor will usually get the stub out. In a worse case, the pilot hole will guide a larger drill and a Timsert can be installed.
Last edited by thejlevie; 12-25-2010 at 02:49 PM.
The car makes it possible, but the driver makes it happen.
Jim Levie, Huntsville, AL
E30 ADDICT
Lookin' good Jim! I want a statue like that in my front yard too...lol
I tend to over tighten...
http://forums.bimmerforums.com/forum...rogress+photos
http://forums.bimmerforums.com/forum...6#post19108216
Member
looking forward to the journey .. subscribed
Member
BMW Tech Expert
You can easily have that. All it takes is a level spot and some concrete blocks.Originally Posted by DaRvDrUmS

The car makes it possible, but the driver makes it happen.
Jim Levie, Huntsville, AL
Lover of Sharks
Moderator
Are the motor mounts from an E34 M20 the same as an E30 M20?
Member
BMW Tech Expert
No, at least the part numbers are different.
The car makes it possible, but the driver makes it happen.
Jim Levie, Huntsville, AL
Member
BMW Tech Expert
I cleaned and rebuilt the calipers this morning. I can't see spending an inordinate amount of time getting the calipers and carriers super clean as they'll be filthy with brake dust in short order. I just clean the accumulated brake dust off with solvent and detergent and call it good. That should be obvious in the second picture.
Rebuilding calipers is not difficult (and is cheap). You pop out the pistons with compressed air and remove the seals. Then clean everything up. You will probably be surprised at the amount of gunge in calipers, even on a car that has had fluid changes every other year. As long as the pistons don't have corrosion pits the calipers can be rebuilt. Minor rusting and pitting of the caliper bore isn't a problem as that isn't a sealing surface. If there has been some rusting clean the bores with 320-400 grit crocus cloth. A scraper or screw driver will get rid of rust at the base of the bore. It isn't necessary to get to bright shiny metal in the bore. Just get them reasonably clean.
Do pay attention to the seal grooves. They need to really clean and smooth, though bright & shiny isn't necessary. A screwdriver or bent scraper will the job done.
The rear calipers are super simple. Install the seal ring and fit the dust boot to the piston. Lubricate the piston and bore with brake fluid and start the piston in by hand squarely with pressure and rotation. Then use a six inch drift to tap the piston home. Work the dust boot over the grove and install the spring ring. Lubricate with soap and install the guide boots and you are done.
ATE front calipers are more of a challenge. The dust boot has to seat in an internal groove in the bore and over the piston. The best way to do that is to slide the boot onto the piston and position it close to the bottom of the piston (see the first picture). That will allow you to push the boot past the end of the piston to seat the boot in the caliper without the end of the piston in the way. Dribble some brake fluid in between the boot and the end of the piston and lubricate the bore. Then seat the boot in the groove of the caliper bore, making sure that it is seated all the around. A small screwdriver helps in coaxing the boot ring into the groove. Start the piston in the caliper seal squarely and use the drift to tap the piston home. Install the new guide boots and bolts and the job is complete.
After installing the calipers, flush the brake system. Starting with a liter of brake fluid, push a measured 350cc of fluid through the right rear caliper, 150cc through the left rear, and 150cc through each front caliper. A pressure bleeder is the best way to do this as it can't result in air in the system and there is no worry about running the reservoir dry.
Oh yeah. When you remove a caliper plug the line on the body side by wrapping a piece of plastic bag over the end of the line and securing same with a rubber band. That will prevent the brake system from draining itself.
Last edited by thejlevie; 12-27-2010 at 02:35 PM.
The car makes it possible, but the driver makes it happen.
Jim Levie, Huntsville, AL
Running life's race....
Thanks for the brake tutorial.
On a different subject (control arm bushings), I've read of dishwashing liquid and turpentine as two candidates for lubricant. The other advice I read that proper pre-loading of the bushings includes having 450 pounds (driver seat, passenger seat, midway between the rear seats) plus 50 pounds in the trunk. Should I start collecting convertible trunk weights?
Happy New Year when you get the chance,
RM
Last edited by RomeoMike; 12-27-2010 at 06:19 PM. Reason: small grammatical fix
On Christ the solid Rock I stand, all other ground is sinking sand. (Edward Mote 1797-1874)
Member
BMW Tech Expert
Weighting the car overnight to standard ride height immediately after installing control arm bushings would be a good idea, but it probably isn't strictly necessary. It would be just about as good to drive the car for while immediately after installing the bushings.
But what needs to be done is also determined by the bushings used. For OE bushings it is more important to get the bushing in their neutral position before the lube dries than when using solid bushings. The control arm shaft moves in solid bushings.
Liquid soap, cable lube, KY jelly, etc are the best lubricants.
The car makes it possible, but the driver makes it happen.
Jim Levie, Huntsville, AL
YourFriendlyNeighborhood
Jim I'm going to box up some calipers and send them to you!
Member
BMW Tech Expert
Okay... If you include return shipping and furnish the rebuild kits, I'll rebuild them for you. But really this isn't a difficult job once you know the "trick" for ATE front calipers.
The car makes it possible, but the driver makes it happen.
Jim Levie, Huntsville, AL
Member
Just started reading about your build with great interest. What size (power/capacity) compressor do you use for painting?
Member
BMW Tech Expert
It doesn't take much of a compressor for just painting. My large gun is an Eastwood Concours HVLP and it only requires 4cfm at 29psi. My syphon type detail gun draws even less. My compressor is way overkill for that and is an industrial twin cylinder single stage 5hp unit. As I recall it is rated for 18cfm at 90psi.
The car makes it possible, but the driver makes it happen.
Jim Levie, Huntsville, AL
Been Bit By Bimmer Bug
Jim,
Is there any problem with using a three-stone caliper hone on those bores? I ask because I will be performing the same job this coming spring.
Also, can you recommend a good source for stainless steel brake lines?
Thanks.
Jeff
1984 320i Baur TC2 5-Speed Opalgrün (Jeff's)
1987 325e Sedan A/T Zinnoberrot (Dawn's)
1984 633 CSi 5-speed Bronzit (Ours . . . if she says so)
YourFriendlyNeighborhood
http://store.bimmerworld.com/bimmerw...its-p1529.aspx
Been Bit By Bimmer Bug
Greg,
Thanks -- I have now saved the link which you provided.
How about the solid steel lines? Does anyone offer those in pre-bent stainless steel?
Jeff
1984 320i Baur TC2 5-Speed Opalgrün (Jeff's)
1987 325e Sedan A/T Zinnoberrot (Dawn's)
1984 633 CSi 5-speed Bronzit (Ours . . . if she says so)
Member
BMW Tech Expert
You certainly can use a hone on the caliper bores if you have one handy. But that is overkill for what is required and probably won't be necessary. The seal on these calipers is from the seal ring that fits in the caliper bore. So the condition of the bores isn't that important.
If you want SS lines, Bimmerworld is a good source, as Greg pointed out. But I submit that new OE lines work just as well and there is less chance of a separation of the hose and fitting.
I've never seen pre-made SS hard lines, nor have I ever seen pre-bent mild steel lines.
Last edited by thejlevie; 12-28-2010 at 12:53 PM. Reason: Automerged Doublepost
The car makes it possible, but the driver makes it happen.
Jim Levie, Huntsville, AL
Member
BMW Tech Expert
The weather was ameniable to outside work today. So I was able to install the half shafts, rear shocks, parking brake and calipers all around. Then it was just a matter of putting the wheels on and taking it off the blocks. It looks a liitle funny w/o the weight of the engine/transmission...
Now I can start putting the engine together and as soon as I can fix the subframe bolt I can drop the engine in. It is getting closer.
The car makes it possible, but the driver makes it happen.
Jim Levie, Huntsville, AL
Member
BMW Tech Expert
I started on the engine this weekend. I've decided to go ahead and rebuild the engine that came out of the car. I knew, before I started on this project, that the clutch wasn't disengaging, which I assumed was a bad clutch master cylinder. However, when I pulled the pressure plate off I found that the clutch disc was "glued" to the pressure plate. So much so that I had to use a chisel to separate the two. While pretty worn, the disc still had some life left in it. I've never seen anything like this before so I can't explain why the disc siezed to the pressure plate.
I also knew that the cam seal was leaking and had been leaking for a long time. As I was breaking down the engine I noticed a ridge of sealant arnound the cam seal carrier. There isn't supposed to be any sealant there. Once I got the carrier off the reason for the sealant became obvious. The o-ring was conspicious by it's absence. I suspect that to be the explanation for the oil leak.
I haven't pulled the pistons yet and measured the bores, but the cross-hatching is still pretty evident. So maybe all the block will need will be new rings.
The car makes it possible, but the driver makes it happen.
Jim Levie, Huntsville, AL
E30 fan
nice work jim. i'm thinking that should be your spare SE30 car
'91 SpecE30 #523
'12 F30 328i Sport Line
'00 F-350 Dually
BMWCCA #360858 NASA # 128290
https://www.facebook.com/COTABBR
Member
BMW Tech Expert
Naah, I have another that I plan to turn into either a DE or race car. I bought a great body (no dents, no rust) from a salvage yard for a couple of hundred. It is a 5-speed ES with a blown engine, and missing radiator. But I just happen to have everything needed (race engine, diff, drive shaft etc) to transform it.
The car makes it possible, but the driver makes it happen.
Jim Levie, Huntsville, AL
Member
BMW Tech Expert
Work has been crazy and we had the heaviest snow in years (~9"). So progress has been slow.
Rebuilding an engine is about 10 hours to pull it and tear it down and about 80 hours cleaning. Then there's a good 4-6 hours of measuring for wear. The first two pictures show how filthy the engine was. Although I don't have pictures of the "after" everything is clean now.
The cylinders only show a couple tenths of oval or taper wear, which is well within spec. The crank journals are prisentine with only a bit of oil staining where the oil groove is. The crank is in such good condition that I'm not even going to have it polished. The main bearings show about 6 tenths more wear than I'd like and the rods have about 4 tenths. That is within the wear limits, but new bearings should bring the clearance down to about one tenth per inch of journal diameter. I'll check clearances when the new bearings are delivered and if a bit more than I want they'll get coated. The pistons are in really good condition. There's no signs of scuffing and the ring grooves have essentially no wear. A fresh set of rings and honing of the block should be all that is needed. All of this is about what one could expect from 150k'ish engine that has had decent maintenance.
I haven't yet torn the head down. At the least the valves will be ground and new seals installed. Just because of age it may need a light surfacing cut. If the cam is worn I'll have it blueprinted and if there's wear in the guides they'll be replaced.
When tearing down an engine you need a system for organizing the small parts and fasteners that come off. I use plastic containers, one for each area of the engine. For example there's one containter that is holding all of the parts that came off the top of block, another holds all the ones from the front of engine, etc. Later when it is time to put the engine back together it will be a lot easier to find whatever fastener I need.
In the third picture you can see a field expedient crankshaft lock. My big impact gun chose the moment I wanted to remove the front crank bolt to die and I had loaned out my counter hold tool and it never came back. Not wanting to wait for the gun to be fixed I had to come up with another way to lock the crank. It wasn't pretty, but it worked.
The last picture shows the j-hook I use to R&R an engine. It is long enough to make it easy to hook it into the rear pickup point above the starter.
The car makes it possible, but the driver makes it happen.
Jim Levie, Huntsville, AL
E30 fan
nice progress jim. more pics/details of the engine teardown/rebuild would be nice.
'91 SpecE30 #523
'12 F30 328i Sport Line
'00 F-350 Dually
BMWCCA #360858 NASA # 128290
https://www.facebook.com/COTABBR
Member
BMW Tech Expert
I suppose I could have taken more pictures of the teardown, but all of that is just common sense. There's no magic or special techniques involved. Nor cleaning parts merit a photo essay.
It might have been nice to have pictures of the measuring of parts, but when you are working by yourself it is hard to manipulate a micrometer or bore gauge and also take a picture.
In case it isn't evident, the real magic in a quality rebuild is in the control of clearances. And that means, first of all, having the right measuring tools. All total, it takes about $1200 worth of measuring instruments all of which have to have a resolution of 0.0001".
The car makes it possible, but the driver makes it happen.
Jim Levie, Huntsville, AL
Member
bearings are delivered and if a bit more than I want they'll get coated.
How /what are the bearing coated with ? thnx
looking forward to the finished project
 Posting Permissions


 Reply With Quote


Bookmarks