
 BMWCCA 484984
The following is three different DIYs on the adjuster replacement. You'll have to decide which one is the best for your application.
1-
BMW 5-Series Headlight Adjuster Replacement
2-
I wish the author would return and provide photos.Originally Posted by Dude14

__________________________________________________ _____________________
3-
__________________________________________________ ______________________
3-
http://www.m5board.com/vbulletin/e39...some-pics.html
Last edited by jamesdc4; 12-20-2013 at 03:25 PM.
Status Quo!
Its not easy. I have seen this work. Had them done to my lights. Not worth it to do it myself. I have massive hands. No good.
Another FP5241 Creation
Parting out M54 Engine. Intake and all. Cats avail as well. PM ME!
BMWCCA 484984
I hear you, Ken.
When Mark used the term "incision", I got the idea that there had to be some serious, detailed surgical work. At least this guide might provide an alternative to someone in a pinch. The funny thing is I'd be more comfortable doing this kind of procedure than replacing a VC gasket.

Member
I have skinny girly hands, so I might be able to do this, lol
Member
There is no need to make a giant hole in the light like that. If you search my posts you will see I have shared a brief how to that mentions how I repair these sealed lights. It's not overly complicated but you want to make sure that zero dust enters the light as you cannot exactly get inside there to clean it out. You also need to make sure the light is still sealed when you are done. Any moisture in the light will cause it to fog and look like crap when it rains or you wash the car.
I have developed a special process as well as a couple tools to aid in adjuster installation to these sealed hella angel eye lights.
I'm all for someone tackling DIY. That said if you want your Hellas fixed properly in a method that will withstand the elements just send me a PM or email. I've been fixing these e39 angel eye lights for several years and you can rest assured your expensive lights will be better than new.
Last edited by Mark@EAC; 09-17-2010 at 01:28 PM.
BMWCCA 484984
Mark,
This is the best I could come up with.
It sure would be nice to be able to post up the best possible method, but until a better procedure surfaces or is shared, this is it.
Call me Eric :)
+1.
The best procedures are kept in secret. I understand the motivation behind it, but the "effing big hole" is the best I've seen for epoxy glued lights.
Resident Third World Country Advisor
BMWCCA 484984
I agree about not getting any dust in the housing, but from my experience with the E39 headlights, they are not sealed or air tight. There are two vent tubes on the rear of the housing. Are the '03 lights different?
Last edited by jamesdc4; 09-17-2010 at 01:48 PM.
Member
those are vent tubes and the way they are made they are the only airways in and out of the lights. They are designed in a manner to prevent moisture from entering the light. All e39 lights have those.
What you don't want is an open hole or partially sealed hole elsewhere. I've done all the trial and error a man can do with these lights. Seal them up when you are done or they will fog up when it rains.
Member
Mark, how much would you charge for 02 halogen adjuster replacement?
Member
sent you a PM with parts and pricing info. Thank you!
BMWCCA 484984
Thanks, Mark.
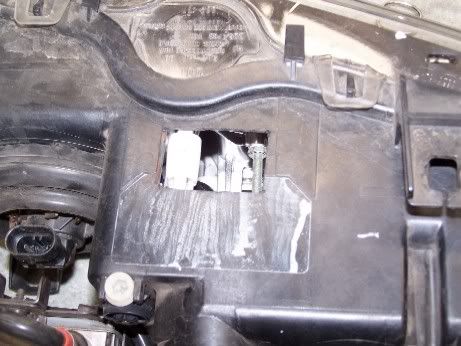
When I installed CCFL AE inverters inside the light housing (pre-facelift lights) the only thing inside the tubes was a loose plug of foam. I had to remove them, thread the inverter wiring through, then reinstall. It seems unlikely the foam could prevent moisture from entering into the housing. It seemed to me that the angle and placement of the tubes had more to do with keeping moisture out than anything else.
You can see the foam plug with the wiring threaded through in this photo I took during the DIY.
One thing's for sure. Trying to remove the moisture from a headlight housing without opening them while not impossible, is a royal PITA!
Last edited by jamesdc4; 09-17-2010 at 07:21 PM.
Member
Mark will you also do FX-R Bi-Xenon upgrades when you open these lights? I want to upgrade my halogens to xenons at some point.
I was thinking of either buying some used OE Hella xenons or halogens if I can't find xenons. Depending on how I like the xenons or if I have to replace adjusters I was thinking of also doing the FX-R upgrade, but if I end up with lights that can't be baked open it would present an issue.
E39 2003 530i: SP, CWP, PP, Manual, Sunshades, Split folding rear seats, 17" Style 42s|
UUC SSK & DSSR, Eibach sway bars, Powerflex bushings, Angel Ibright V3, ZHP illuminated shift knob, e38 Euro Armrest, Dice Media Bridge, spec.dock, OEM Mtech F&R bumpers, Hella Bi-Xenon (EVOX-R)
E28 1987 535is: Manual, Bilstein HDs, 16" Style 5v2 (from e38) [Sold]
Member
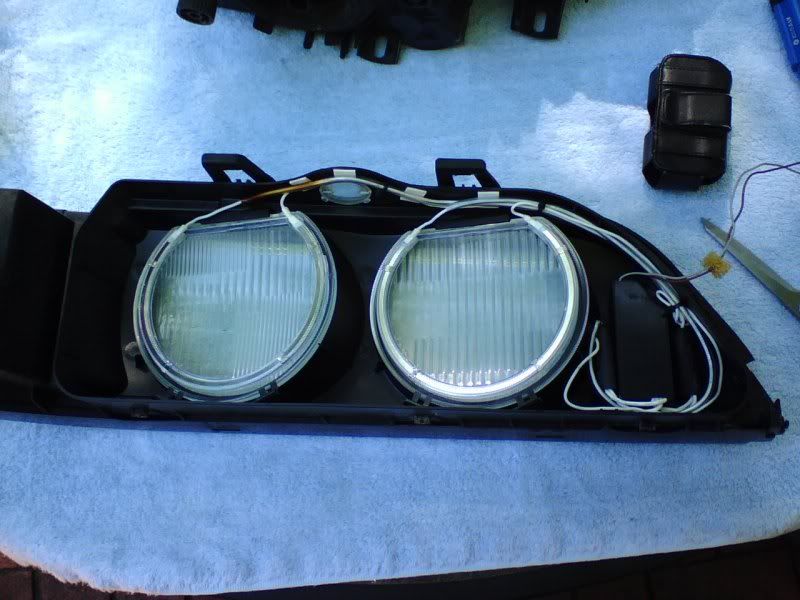
I was able to replace the headlight adjusters in my 2003 headlight assembly tonight without removing the lens and without cutting any holes in the assembly.
You don't need any special tools and everything can be done through the rear bulb holes. I will be doing my other headlight sometime in the next few days and I will take pictures and post a DIY so that this mystery can finally be busted.
P.S. it is not easy and it does takes time and patience. Took me about 2 hours to do the first one. . . I think it will take about an hour to do my next one.
Member
I'm looking forward to seeing your DIY. I have a 2003 E39, the adjusters are still working but a friend of mine is going to make me a set of titanium adjusters just for the fun of it and it would be nice to get them installed without cutting the housing.
Chisum
Member
I too am looking forward to seeing this DIY. I have a 2002 530i. Today I installed the aluminum adjusters on my passenger side headlight. However, I could not get the driver side lens off. The passenger side came off easy with the baking method. Has anyone heard of one headlight having the gooey black stuff and the other having the un-openable epoxy? Hopefully with this DIY it won't matter. Please post soon!
BMWCCA 484984
Member
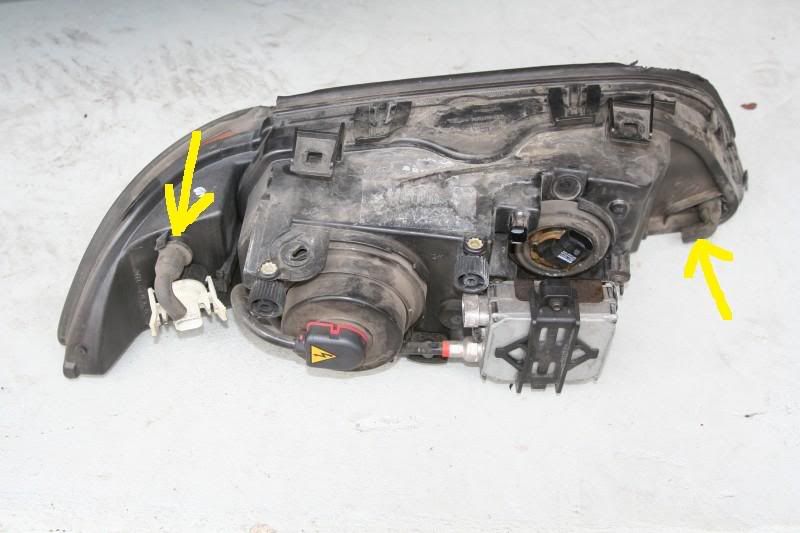
This cutting method is fine if you need to replace the adjuster arm by the high beam. But if you have to do the one attached to the low beam housing the cut needs to be in a different place but it can be done.
Member
Not only is the non-bake replacement of the high beams physically impossible, cutting a hole in the top is also impossible to remove the adjusters.
I don't care what anyone claims, there simply is no physical way to replace the high beam adjusters from the bulb hole or from a cut hole in the top. (ie: without baking open)
The only way to fix your lights is to bake them open. If you can't bake open, buy new headlights.
I'm entitled to my opinion, and do not believe previous posters (unless my 2001 lights have a different internal config)
This is, by far, the most nightmarish DIY I have tried to date. If they don't bake open, you will fail.
You need to be a surgeon with very specific tools for this to even have a 1% chance of working.
There is no way to access the torx bolt holding the high beam ball socket. The angel eye wires do not move to the side.
Last edited by OnTheFence; 04-01-2012 at 03:53 PM.
E39 DIYs done: Wipers, O2 sensors , MAF , Upper/Lower Intake Boots , FSU , ABS module fix , Power Steering Reservoir , Changed Rear Differential Oil , DISA , SAP, Vacuum lines , Radar Detector Hardwire , Fuel Filter , LED Angel Eyes , Headlight Adjusters--> [1],[2], [3] , Headlight Polishing, Punted: Fan Clutch/Tensioner/Pulleys , Oil cap O-rings , Window regulator ,Crumbling Cowl
BMWCCA 484984
OTF,
"I find your lack of faith disturbing."
Look. No one said it was easy, but just because you have difficulty in successfully completing a procedure doesn't mean it's impossible. It just means you lack the skills to do it. Sharing your opinion is fine and perhaps will be a warning for those who are faint of heart to not try doing this themselves.
Member
. YOU are the one that is a failure not the DIY. Just did this last weekend with no issues as my drivers side was a epoxy sealed version. I did the passenger side without baking also as I rather NOT BAKE the lens if I didn't have to. Took me about 3 hours total.
You ask any ricer, any serious ricer. It doesn't matter if the other guy is racing or not. A win is a win.
Status Quo!
The hole method is how mine were done. Its possible and many have done it. Plain and simple. Either you "have it" or you dont.
Another FP5241 Creation
Parting out M54 Engine. Intake and all. Cats avail as well. PM ME!
BMWFXR
Since my method and write up from Odometer Gears is one of the mentioned examples in this string, I am going to chime in. I have heard of some using the heat/bake method and being successful. I think that method is great but we don't have access to an oven in our shop and I am not going to install one just so we can fix these headlights. I came up with the hole method by first experimenting on a set of lights off of a car that belonged to my shop. I was looking for a way to fix these expensive headlights and not have to tell a client they were forced to by a new one because two pieces of plastic failed. The method works fine and have used it on about a dozen since I came up with it. The key here is where you place the hole, and you only need one because the other can be done via the existing openings. To do this you definitely need something like medical clamps which used to be sold at Harbor Freight. I don't know if they still sell them but I bet a "google" search will find other sources. These medical clamps allow you to grab the old adjuster and pieces to remove. It also allows you to grab the new one and fish it into the right position to be able to pull it into place with the adjustment screw on the back of the headlight.
The point is that like other members have pointed out, it can be done. When you are finished you need a highend epoxy(preferably two part and made for plastic repair) to glue a cover in place and seal the headlight. I use at Wurth product but there are several other good products out there.
If you are an impatient individual this repair is probably better left to someone who is. I admit that I am not a patient person but I find patience when working on these cars since impatience can cost you lots of stupid money in broken parts, related and not. For me it comes down to keeping my clientel happy and giving them viable alternatives to dealer repairs and (dis)service.
Have fun and take it slow.
Trent Cole
Lone Star Bavarian, Inc.
Ft. Worth, Texas
817-732-4888
www.bmwfxr.com
Tech Advisor, Lone Star Chapter
Authorized Bosch Service Center
ASE Master Techncians
BMW Master Technicians
BIMRS Member,16 years
BMW CCA Member,25 years
Member
Thanks for the Head lamp Adjuster DIY. Question-Where is the best lace to buy the Adjuster replacement parts? Is that a dealer or aftermarket kit?
BMWFXR
Depends what headlight you have...if it is the earlier style then the dealer will have them. If it is the later style then odometergears.com[/url]
Trent Cole
Lone Star Bavarian, Inc.
Ft. Worth, Texas
817-732-4888
www.bmwfxr.com
Tech Advisor, Lone Star Chapter
Authorized Bosch Service Center
ASE Master Techncians
BMW Master Technicians
BIMRS Member,16 years
BMW CCA Member,25 years
 Posting Permissions


 Reply With Quote

Bookmarks