
 License Suspended
The ignition switch is a very simple switch that is similar to a home's light switch with 6 contacts controlled by a camshaft inside a housing. As you turn your ignition key, the cam lobes turn to make the necessary connections. Because this switch handles a lot of amperage (load), the contacts spark and burn off the contact surface. A simple sanding, much like your dad's ignition point system, will save you money.
On a shoestring budget? It's Saturday evening and the dealership is closed?
Here is a DIY...Remove your Ignition switch according to this DIY: http://www.bimmerboard.com/forums/posts/244045
After removal...
Step 1:
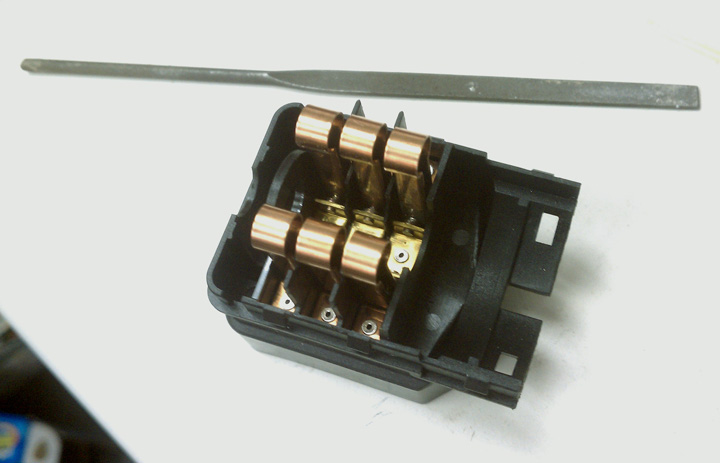
Gather the things you will need...small screw driver, needle nose pliers and 400 grit sandpaper
Step 2:
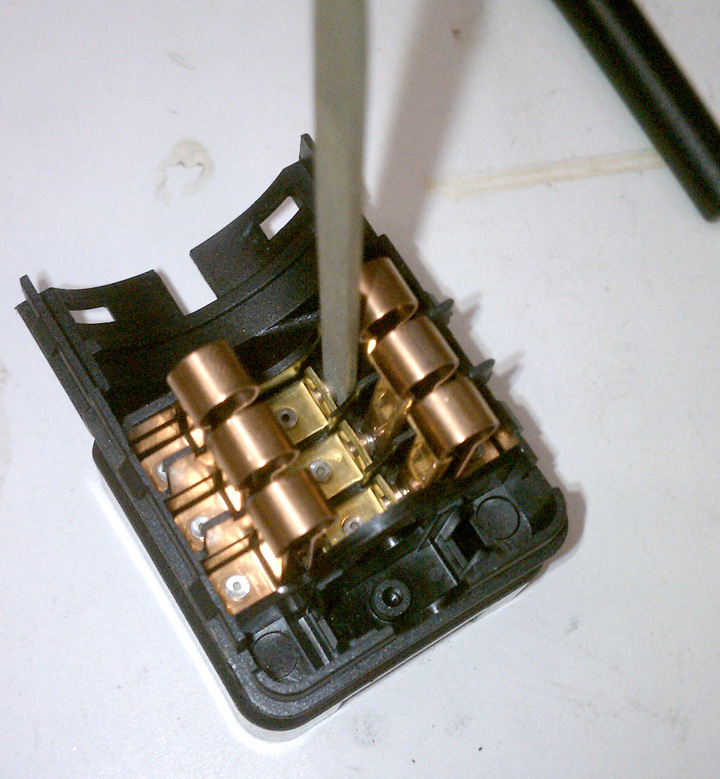
Separate the top and bottom pieces by prying on the 6 tabs that hold it together from the side. Walk your screwdriver along the side of the switch.
Step 3:
Once the tabs are loose, separate the electrical side (white) from the mechanical side (gray or black). Be very patient and try not to lose the small spring that is seated on the electrical side under a small plastic contact. In addition, DO NOT let the cam come off its seat on the mechanical side.
Step 4:
Cut small strips of sandpaper about 5 inches long and 1/8inch wide. You will need about 6-8 of them.
Step 5:
Wrap the grit side of the sandpaper lenghthwise, facing out on the flat tip of your screwdriver. Hold both ends of the sandpaper onto the body of the screwdriver and insert the flat ends of the screwdriver between the contact points. Pinching the copper pieces with a needle nose pliers may help in the insertion process. Sand the contact points, concentrating on the moving side of the contact. Sand all 6 contacts one at a time.
Step 6:
While assembling the 2 pieces together, make sure the spring is seated in the spring cavity and put in the plastic contact with the beveled end facing up.
Step 7:
Align the pieces together. As I was pushing the 2 pieces together, I somewhat started from the back end to align the cam's pointed end on the electrical side so it would slip in on the ring, by the back end. I had to push that ring in, over the cam end. Make sure that all six tabs are sitting in place as before.
Step 7:
Put the ignition switch back in its location and re-assemble the steering column.
I just saved you $50-$70 and all you had to do is spend 30 minutes of your time.
Moderators, MAKE THIS A STICKY!!!
Last edited by cal45fan; 10-09-2010 at 04:53 PM.
Member
Finally...someone did a DIY!

Become a BMW CCA member! Click HERE to join and feel free to use my BMW CCA member #191509 as a referral.
2015 650ix GC (Moonstone/Cohiba Brown) <<~>> 2014 X5 50i (Space Gray/Mocha)
Member
Alright! Another great DIY!
License Suspended
Moderators,is it possible to make the title "Ignition Switch Rebuild DIY"? the way it stands now, it just looks like a DIY for removing and replacing the Ignition Switch. Thanks.
BMWCCA 484984
Done.Originally Posted by cal45fan

Nice job.
BMWCCA 484984
Sorry but no. This thread will be moved into the DIY subforum either immediately or after the thread gets some comments (I've already added it to the DIY Quick Link List).
Resident PITA
Only thing I can think of that could be an issue is ensuring that the contact points are ground parallel to each other, I would recommend that you fold the sandpaper over on itself or a very thin piece of metal so that the faces when closed will be in flat contact with each other. To do this you simply pinch the contacts together as you drag them over the sandpaper. Otherwise you will encounter premature erosion of the point faces.
These are the same kind of points that are used in old distributor ignitions except the amperage loads are much higher making it critical that the maximum area of contact be established to ensure long life and reduce the potential for overheating the contact points.
>'97 528i, 200000 miles, Hella Xenons, 17" Stilauto wheels, Vogtland Drop Springs, Dynomax Race Muffler, Homelink, 540 brake upgrade, 15mm spacers >'65 & '74 MG Midgets BFC OT Lego Club #48 Manual conversion in process!!!
License Suspended
Thanks NNY528i for that observation. This is the reason that I mentioned in the DIY to "pay more attention on sanding the moving side of the contact." Because that side is moving, it has more wear on the contact surface. In addition, DIYers should realize that they should only consider sanding a very minute part of the surface, enought to remove the corrosion. Moreover, after sanding the contacts, spraying the electrical side with electrical cleaner or MAF cleaner would ensure that debris will be eliminated during the rebuild process.
BMWCCA 484984
Are there enough of these done by members to get an idea of the success rate of this DIY as opposed to just replacing with new OEM?
License Suspended
Mine went out after 13 years of service.
I did this DIY because I help build Jet Fighters and I have knowledge of how electricity behaves. This type of DIY is very basic and elementary...
I am doing this DIY for the reason that I do not want an E39 standing still because of a bad ignition switch and it is Saturday night or someone is very short on funds and the car is needed for work Monday. If my instructions were followed and done right, the switch will work as if it were new again, just like cleaning your sparkplugs.
If after the rebuild it gives anyone at least a year of service, they have just been successful.
I think I am the first to attempt this rebuild so we do not really have any conclusive data to study this. As with all rebuilds and DIY's, it is only as successful as the write up presented.
I really hope that someone follows suit to prove my point...remember my Mustang injector write up?
Last edited by cal45fan; 06-12-2012 at 12:13 AM.
Member
Thank you for this.
I agree. Switch can be iffy when on its way out. If it happens to a member on a weekend,and this DIY works you have just been successful and saved a member from possibly being stranded somewhere.
Although I replaced my switch 2 years agao, I'll pull out the old one and try this out one day.
Last edited by CSMBlack-540i; 10-11-2010 at 12:27 AM.
BMWCCA 484984
I was just curious.
Last edited by jamesdc4; 10-11-2010 at 12:36 AM.
Member
I just wonder a nail file (the thing used to file your fingernail) would work here?
Very nice DIY BTW!
Member
Any thoughts on the cams wearing out and not just dirty contacts? When I replaced mine I took it apart and all the contacts were clean.
License Suspended
The cam never wears out because its only job is to prevent the contacts from closing the cicuit. Plus, there very little pressure on it, like holding a penny against a wall to prevent it from falling...it's that little!
Did you happen to see how discolored the contacts were? The discoloration is mostly oxidation which creates very high resistance for current to flow thru.
Last edited by cal45fan; 10-11-2010 at 08:32 AM. Reason: Automerged Doublepost
Member
It's amazing how many german car ills can be cured by simply cleaning switch contacts.
Great DIY. These kinds of tasks make me feel all warm and fuzzy - fixing stuff fo' FREE!
License Suspended
I belive the grit on a nail file is around 100. It may be too rough for the contacts. The whole idea of this DIY is to refinish the contact surface. Using a nail file will certainly change the pressure on the contact point dramatically because it will take off too much metal.
Member
I have a question about ignition switch. Does anyone know if all E39 year model have interchangable ignition switch. thanks
Member
Hello,
Thank you very much for this post. Within a week my ignition went from normal to iffy (airbag light on and steering wheel buttons intermittent), to non-functional (wouldn't even turn over).
I gave this rebuild a shot, and she started first try without any hesitation! Just one remaining question. During the week when the switch was acting up, the abs light would flicker, now the light is on (full brightness). Do I need to get this reset, or do you think I sanded a couple contacts too much and the ignition switch is still a bit buggy?
Thank again,
Member
Thanks, cal45fan......Before running out and buying the part I was told you can clean them etc. And now seeing what it looks like and knowing how it works....I am for sure going to do this. I have a really fine and thin flat modeling file that I believe will work perfectly that I will try to clean with.....and report back on how it went!
License Suspended
Remember to clean JUST the surface of the contact points. Do not take too much metal off of the face.
Be patient with it.
Let us know what happens.
Member
Again, many thanks! I did this DIY tonight and in no time at all I had my car old back again. I went from having all the electrical bugs (most annoying one was the brake lights always on), to first twist of the key.....working beautifully again.
Again...Many Thanks for this DIY!
this is that small real fine tooth hobby file i used....worked beautifully....and I did handle this procedure using "kiddie gloves" just like you suggested.
another look....I believe i got the file set at Harbor Freight Tools year ago for a couple bucks....worth every penny!
License Suspended
I am glad it worked out for you.
BMWCCA 484984
My airbag light would turn on and off intermittently before IS replacement. Afterwards it was off. You may have some other problem or I suppose it could be attributed to the procedure.
We could submit this to bluebee on the fest and we'd have a crazy detailed answer soon.
E XXXIX
I am going to try this today.
Symptoms:
In the middle of a drive, the steering wheel returned to the full up position (as it does when the key is turned off)
The next time I went to start it, it refused the first 8 times. On the 9th try, it started normally. Since then it has started on the nth time I turn the key (n being a random number between 0 and 1000)
Possibly related: My radio has a low frequency interference signal coming through all speakers, rendering it unusable. This frequency does not vary.
Hoping for the best with this DIY. Wasn't looking forward to buying a new ignition switch. (Would rather spend the money on window tint or something to beat this heat!)
To the OP: Thanks in advance!
E39 4/5/6
Download the FairTax.org toolbar
 Posting Permissions


 Reply With Quote


Bookmarks