
 Bear Motorsports
Well, to start this off, I do have a couple videos, and my first half shaft I did, took me almost 3 hours to "figure out" how to put it back together
You will see in one of the video's how I ORIGINALLY thought I could put it back together, only to find out it would NOT work. I made a second video, with the correct steps, and you will be able to see the difference.
Parts
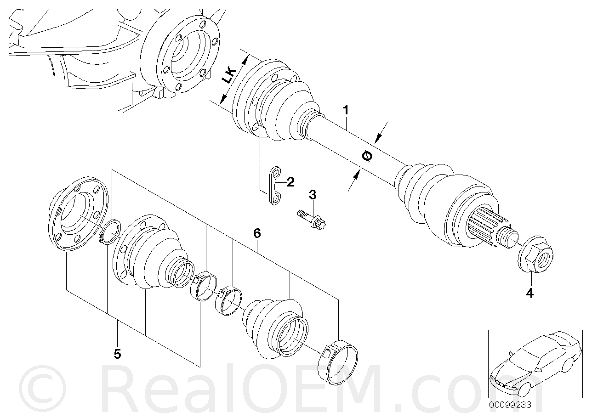
(2) of #5. Part number 33219067805
Bought mine off RMEuropean for $22 a piece
http://www.rmeuropean.com/search.asp...d=31122227250+
(2) of #4, Part number 33411133785
Bought mine off RMEuropean for $7 a piece
http://www.rmeuropean.com/search.asp...d=31122227250+
If you want to do the outer boots (DIY comn soon after I complete) then you will need (2) of the outer kits as well
(2) of #6. Part number 33219067806
Bought mine off RMEuropean for $15 a piece
http://www.rmeuropean.com/search.asp...d=31122227250+
Tools
--2 14oz jar's of Redline CV2 grease. You can buy this anywhere, but I bought mine off Pegasus
http://www.pegasusautoracing.com/pro...p?Product=1694
--Snap Ring Pliers
--about 5 cans of your favorite brake cleaner
--variety of brushes
--LOTS of rags (once you get it all full of grease, it becomes useless, and you have to throw it away)
--Bench vise (not required, but will make your life INFINITELY easier)
--Variety of small flat head screwdrivers
--small rubber mallet
--Boot clamp pair of pliers #30800 on Matcotools.com
http://www.matcotools.com/Catalog/to...&page=1璟
--Some type of bucket, tupperware pan to collect brake cleaner
--small piece of 2x4 wood for tapping boot/plate back on the carrier
Lets get started
1. Insert the half shaft in a vertical position in the bench vise. Take a small screw driver, and your rubber mallet, and slowly tap around the end cap on the inner cv joint. It should slowly start to come off, and will pop off.
You should find something similar to this
2. You will need to remove the lower boot clamp. Take your small flathead screwdriver, and pry it open, and remove
3. Pull down the boot a little bit, and clean up as much grease as possible. Take your snap ring pliers, and remove the snap ring holding the cv joint "carrier"
4. You should be able to now, SLOWLY, pull the entire boot and cv joint up and off the spline. There is a small "ring" on the bottom that you will need to force the boot over as you pull it up, so if you run into some resistance, keep pulling, and you are replacing the boot anyways. There is going to be a small collar in the bottom of the boot. Dont worry, it wont fall out and should come right out with everything else
5. I left the boot on the cv joint carrier, as I found a tupperware pan, to collect the nasty grease/brake cleaner as I worked on cleaning everything up.
6. Once you have cleaned it up as much as possible, you should be able to start rotating the center piece with the ball bearings, and they should start coming out. Keep playing with that carrier, and the ball bearings until you are able to remove it. Once it's out, you will be able to pull the collar out of the boot as well.
TOP of the splined carrier
BOTTOM of the splined carrier. Notice the "ridge" around the splined section
7. Alright, now you can remove the boot off the outer cv joint carrier, lay everything out, and clean up the ball bearings, the splined center section, carrier, and the outer carrier with rags, brushes, and brake cleaner
8. Put the half shaft back in the bench vise, and take your small flat head screwdriver, and take the collar ring off the half shaft. Clean up the splines, and the collar.
NOW WE ARE READY FOR REASSEMBLY
IF YOU ARE DOING THE OUTER CV JOINTS AND BOOTS JUMP TO POST #14
http://forums.bimmerforums.com/forum...4&postcount=14
some of these pics may not match what I say, since I had to change the way I put together the cv joint itself. Follow what I TYPE, but the pictures will help explain
9. Take some of your CV2 grease, and grease up the bottom of the boot, and the half shaft. Leave the clamp on the boot. You will NOT be able to get it on the boot seperately. You will need to use some muscle, some twisting/turning, some swearing, and your screwdriver to get it on fully.
10. Once you have the boot on the halfshaft, go ahead and reinstall the small collar ring on the halfshaft. Once you have done this, go ahead and put the collar on the halfshaft as well. Make sure you have the beveled edge of the collar facing the collar ring on the half shaft. They should go together, and the flat top of the collar will be facing up
11. Go ahead and start greasing everything up, and putting extra grease in the bottom of the boot
12. Here is where I dont have a ton of pictures, due to me having to change up how I put the CV joint back together. I do have a short video though, I will post at the end.
13. Take the outer cv joint carrier, grease the hell out of it on your workbench. Take the inner spline, and "cage" and grease the hell out of that as well. Grease the ball bearings as well. The spline has a top and bottom to it, so make sure the raised center section is for the bottom. Also, watch the first video, and I explain how the splined section and the outer carrier should be matched up.
14. With everything all greased up, the outer carrier, splined center section, and cage, put everything in your hand, and start manipulating everything rotating it around, and inserting ball bearings as possible. The center splined section, and outer carrier have "channels" that go in opposite directions, so be aware that this is not exactly "easy" but it should fall into place, and you rotate and move everything together.
[ame]http://www.youtube.com/watch?v=WUYb-Hgacq0[/ame]
[ame]http://www.youtube.com/watch?v=x-OzYnK-MxA[/ame]
15. Once you have the entire CV joint section together, the video shows you how you just need to rotate it over and place it on the half shaft. It will rest on the collar that you installed earlier.
16. Once the cv joint is on the half shaft, go ahead and reinstall the new snap ring that came in the box for the boot.
17. Now you have the boot on the half shaft, the cv joint on the halfshaft, you need to "mate" them together. Get out your bolts for attaching the half shaft to the differential, and use them to help you line up the boot/cv joint.
18. Once you have it lined up, gently tap around the boot metal plate, and it should snuggly fit on the cv joint outer carrier. Once it's lined up, get a piece of small wood, and really make sure everything is on there snug.
19. Now you have the new boot and the cv joint together, make sure the boot is left "down" on the halfshaft, and take the halfshaft off the bench vise, rotate everything around to verify is working properly, and push the half shaft "in" and "out" of the cv joint for full range of motion. The boot should settle into where it wants to be at.
20. You have everything together, all you have left is to install the top cover plate back on. Leave the differential bolts in the cv carrier, line everything up again, and use your wood block and hammer, and make sure everything is together.
21. Last piece is to take your boot clamp pliers, and pinch the lower boot clamp tight
Thats it.
Take your time, take pictures, and be patient.
Here is the video, and how I "originally" thought I could put everything together actually on the half shaft. I was able to get 4 ball bearings back in the cage, and lined up, but there was no way you could get all 6 back in.
[ame]http://www.youtube.com/watch?v=SOkuFc16iXE[/ame]
There is not enough flexibility in that joint to be able to have it half together, and half apart. Thats why I had to seperate the boot/outer carrier, and put the actual cv joint together seperate on the bench first.
If you have any questions, I'll do what I can to answer them
Last edited by 99MPower; 02-15-2010 at 01:31 PM.
"Torque is like cowbell... you can never have too much." - Michael Cervi
Member
Lookin' good. Thorough DIY! When should one do this rebuild?
Bear Motorsports
when they have everything out of the car already for a rear suspension overhaul, or you need to remove the half shafts to do a wheel bearing replacement..
"Torque is like cowbell... you can never have too much." - Michael Cervi
Member
Is there anyway to remove the half shafts without pulling the diff or removing any suspension components?
[2.25" Magnaflow][3.38 LSD][GC Track/School][3.5" HFM][Cosmos V2 + Tuning][UUC Sway Bars][UUC Subframe Bushings, RTAB, RSM w/ Plates, Trans. Mounts][X-Brace][Brembos]
Bear Motorsports
you might be able to detach from differential, and then let the halfshaft hang.... take the axle nut off, and then get the half shaft to come out of the flange in the trailing arm.Originally Posted by Karuza

I have not done it, but it might be possible....
"Torque is like cowbell... you can never have too much." - Michael Cervi
I'll take ya eyez!
You can remove without dropping. I was going to do wheel bearings cpl weeks ago till decided to pick up new RTAs and freshen all.
Just remove torx bolts from half shafts, then get something to push axle out(I used a 3 jaw puller), and drive the axle out of the RTA.
Or as I did for swapping the RTAs, remove lower shock bolt, drive axle back with half shaft still attached to diff, tie up somewhere, then remove rest of RTA bolts/components to drop/swap
Always Something
What are the symptoms that show these need to be replaced?
thanks
95 M3/2 S52 OBD1
Aim - DontRevMe
4 8 15 16 23 42
nice write up.
#71 SM
04 Silver Grey M3
95 Arctic Silver M3
03 X5 3.0L Titanium Silver
07 GX470- Silver
Molon Labe...
Excellence is a habit, not an act.
Member
If you can turn the halfshaft (by hand) and the wheel doesn't turn. Mine had about 1" of play in it but luckily I had an extra halfshaft from my estoril.
Awesome and very thorough diy.. thanks calvin!
99 Alpine/Gutted ///M3
98 Estoril/M-Technic cloth ///M3
- RIPhttp://forums.bimmerforums.com/forum....php?t=1191513
Bear Motorsports
no prob Z...
"Torque is like cowbell... you can never have too much." - Michael Cervi
Member
Member
Great writeup.
I had a heck of a time with the torx bolts (#3 in the parts diagram) backing out when I swapped my half-shafts long ago. I finally bought new bolts and the problem went away and has stayed away.
Rob
Prior projects:
1998 540i with 6.6 LS2/T56 Chevy Power
- pictures and details
1992 325i with 6.6 LS2/T56 Chevy power - pictures and details
1995 M3 with 6.6 LS2/T56 Chevy power - pictures and details
Member
Interesting.
I guess I'll be replacing those next time I have the rear end out. I know Calvin had a similar issue.
Thanks for the tip Rob!
Bear Motorsports
well boys, I just did the outer cv joints...
To start with, you have to remove the inner cv joints to be able to put the outer boots BACK on.
The outer cv joints are NOT removable from the half shaft arm.
Quick DIY on that..
1. Use previously discussed methods to remove inner cv joint
2. Remove out clamps, and cut boot off of cv joint
3. Get 2 gallons of Laquer thinner, and put in bucket. Take the outer cv joints and soak in thinner to break down the grease. While they are in the bucket, take the ends and move them around, 360 degree, and up and down, and get as much as possible out.
4. Once you feel you have cleaned out the outer cv joint as much as possible, take some brake cleaner with the hose on it, spray around in there, get that last little bit, and drain.
5. Take your air hose from your compressor, and clean out and dry the inside to the best of your ability
6. Put outer cv joint in bench vise, and start packing in the CV2 grease as you move everything around
7. Once you feel you have it packed in, and its GTG, then take your brand new outer cv boot, and put some grease on it to make it easier to slide on the half shaft.
8. Pull boot all the way down the shaft, and over the outer cv joint. Take the outer clamp and inner clamp for the outer boot, and install.
9. You have just completed the outer CV clean/repack/new boot DIY.
10. Use previously mentioned steps to install the inner CV joint
11. Enjoy an essentially brand new half shaft with all new HP synthetic constant velocity grease and new boots
ALSO, I was able to tell the outer cv joints were significantly more smooth after doing the clean/repack on them
Can't wait to get them on the car and get driving this spring
Last edited by 99MPower; 02-14-2010 at 10:39 PM. Reason: Automerged Doublepost
"Torque is like cowbell... you can never have too much." - Michael Cervi
Premium Member
You can use gasoline instead of paint thinner in a bucket to remove the grease. I'm guessing it's cheaper.
Member
Just a Note, it happened to me and others, for some reason the supplied outer Clamp will not fit. I tried everything, then took it to a BMW Shop and they agreed. Due to the limited space (less then 3/8ths inch) a tie wrap wont work, so we Safety Wired mine.
Calvin, You should edit the upper part of this thread before you put the inners back together that if your doing the outers to go down to Post #14 first....then back up. (if you haven't already!)
John
'95 Hellrot M3 w/Dove
AA Euro HFM Stage II (w/21# Injectors & Software) W/Gen III Exhaust - URI Crank Pully - FDM w/3 Row M Coupe Rad - 3.23 LSD - Vogtland Club Spec/Koni SA - UUC Red w/Enforcers - TMS Shims/Rear Camber Bars w/QA1 inners/Sways - VMC F/TMS R End Links - X-Brace - Perf Ultimate/SS Brake Lines - GC Tower Mounts/RTAB Shims - ZKW's w/5000K Hid - Fog Delete - Alpine 9847/Pioneer TS-C130R Kevlar Components/Pioneer PRS-X340/Stealth Box's/Wired Zune 120GB - OE LTW CF Sills/Glove Box Plate - Staggered Black M-Spoke II's w/235/40 (front), 255/40 (Rear) Nitto NT05's - Rolled Fenders!
***Got a '95 M3? (actually pretty common on all years! Even happened to Racer Seth Thomas!) Check Your LSD! http://forums.bimmerforums.com/forum...d.php?t=390209
Bear Motorsports
good call.. thanks John
"Torque is like cowbell... you can never have too much." - Michael Cervi
Bear Motorsports
well John, you were right. The outer clamps that came with the kit did not fit properly, but I modified them and got them "together". When I crimped them to tighten them up, they snapped.
I decided there HAD to be another option for crimp clamp cv boot's but slightly larger. I spent almost 4 hours the other night looking online, and couldnt find ANYTHING. I was extremely frustrated, and decided I had to try SOMETHING. Low and behold, on the 5th store locally, I was able to find some large universal ones at Napa.
Advanced Auto, Auto Zone, Pep Boys, and another local automotive store didnt have ANYTHING that large. This was later at night, they were all open till 9pm, and nothing. The next morning, I walked into Napa with my half shaft, showed him what I needed, and BOOM, they had them.
I actually bought all 10 they had, since I'm doing the same thing for a buddy of mine as well
Clamps for the outer cv boot

Last edited by 99MPower; 02-18-2010 at 09:15 PM. Reason: Automerged Doublepost
"Torque is like cowbell... you can never have too much." - Michael Cervi
Member
Nice Find Calvin!
John
'95 Hellrot M3 w/Dove
AA Euro HFM Stage II (w/21# Injectors & Software) W/Gen III Exhaust - URI Crank Pully - FDM w/3 Row M Coupe Rad - 3.23 LSD - Vogtland Club Spec/Koni SA - UUC Red w/Enforcers - TMS Shims/Rear Camber Bars w/QA1 inners/Sways - VMC F/TMS R End Links - X-Brace - Perf Ultimate/SS Brake Lines - GC Tower Mounts/RTAB Shims - ZKW's w/5000K Hid - Fog Delete - Alpine 9847/Pioneer TS-C130R Kevlar Components/Pioneer PRS-X340/Stealth Box's/Wired Zune 120GB - OE LTW CF Sills/Glove Box Plate - Staggered Black M-Spoke II's w/235/40 (front), 255/40 (Rear) Nitto NT05's - Rolled Fenders!
***Got a '95 M3? (actually pretty common on all years! Even happened to Racer Seth Thomas!
Bear Motorsports
Thanks John... even supplied the part number for everyone else too
I just couldnt wrap my head around the fact that there was NO WHERE that I could get one of those crimp clamps, and searched and searched, and succeeded
"Torque is like cowbell... you can never have too much." - Michael Cervi
Member
BMW CCA Member
Hey Calvin (or anyone else,) in the pictures under step 10 for the inner rebuild, you show a ring and a collar that fit over the splined shaft. Where did those parts come from, I don't recall seeing them come off in your DIY pictures?
I searched through the pieces I removed from mine, and can't find anything like them. I am wondering if they either weren't part of my shafts ('95 M3,) or were left off during previous work (though I doubt these have been off.) Real OEM of course doensn't show any diagram of the joint. Any insight you can share?
Bear Motorsports
The ring HAS to be on the shaft or YOU removed it. It can NOT come off on it's own. The collar very well could be "stuck" to the bottom of the cv joint as you pulled it off the spline. Keep searching...
I have NOT done a set of 95 arms (95 vs 96-99 are different, how different I dont know)
The ring and collar HAVE to be there for the 96+ arms, otherwise there is nothing to stop the cv joint or keep it on the shaft.... Hope it works out for you
"Torque is like cowbell... you can never have too much." - Michael Cervi
Member
Bad idea. Better stay clear of anything you don't want to burn down (house, car, self). The cost for a gallon of mineral spirits isn't that much and it won't ignite so easily...
Hey rebs, hows things in Hogtown?... If you have symptoms (vibration, noises, excessive lash) it's probably gone beyond the preventive maintenance window and new parts are required. Every oil change you should check your CV boots for cracks or signs the grease is slinging out. If you find a problem early, it's a cheap fix if you DIY.
Nice writeup OP!
Last edited by wingnut1961; 02-27-2010 at 08:02 AM. Reason: Automerged Doublepost
License Revoked
I rebuilt my drive shafts on my 930 to save $400, and after I was done I knew next time I would just buy a set out right. One of the worse jobs.
Then I replaced the outer boots on my M3 with the half shalfs still on. I didn't learn, another shitty job.
Though I didn't know the outer CV's were serviceable.
Nice write up.
Bear Motorsports
while doing it the first time was not fun, this is not THAT bad. I just did a second set for a buddy and went VERY smooth
While u can buy a different set of used halfshafts, the cheapest brand new half shafts I've seen have been $575 each. There is no way I'm buying new half shafts.
Also, with what I know now, there is no way you were able to replace the outer cv boot with it still on the car. You have to remove the inner cv joint to get to the outer cv boot, unless you used a generic split boot repair kit
Thanks for the good words guys. I just hope this helps someone else as they do a rear suspension overhaul and see this as another piece of the preventative maintenance piece to help extend the life of the cv joints, and make everything smoother back there
"Torque is like cowbell... you can never have too much." - Michael Cervi
 Posting Permissions


 Reply With Quote


Bookmarks