
 Member
Today's accomplishment:

Eric P.
Member
Nothing a bunch of seam sealer and undercoating won't fix.
Moving on to the other side.

Eric P.
Petrol Head
Good stuff! Keep going!
Member
By the way, your sunroof drains into the frame-rail in case you were wondering.
It also appears to be the place where my garage gnomes discard small rocks, nuts and bolts.

Eric P.
Member
Love seeing the progress!!! I ended up parting out my E21 because of excessive floorpan/inside rocker rust. After parting it out I purchased an e36 which ironically suffered from the same rust so I man'ed up and learned to weld/fabricate to repair them. Looking back I could have easily saved my e21 with what I now know.
How are the rear jack pads on the car? Any other rust besides floorpans?
Member
How is the progress coming along on this guy? This winter is THE winter I tackle this on my e21.
Cars in Perpetual Repair
Sub'd for great info. I've got an E21 that I'm going to start tackling this winter as well. It's nowhere near as bad as this car was, but it needs the whole tail panel replaced as well.
Member
Thanks for the interest! It provides a real shot in the arm for me to keep this project moving forward and I appreciate that.
This past August Mary and I moved our family from Chapel Hill to Asheville.
The good news is the car moved with me, there's a great Bimmer community here and E21s are well represented. That, and Buncombe County has the highest per-capita ratio of craft breweries in the US. But that's another story.
The bad news is I went from a two car garage with storage facilities in the basement and attic down to simply a one-car garage with no storage facilities.
Not to worry.
I've got the compressor wired in but still need to plum an air line or two.
I'm eager to fire up the welder but just need to consolidate a little more space to start work.
The garage is 1/2 underground so the temperature remains constant and comfortable and, unlike the last house, it's set apart from the main house which means I can beat, bang, cut and grind to my heart's content without upsetting the Mrs.
Stay tuned!!
Eric P.
Member
OK people,Four years and two houses later, let's do this...All dressed and ready to try fitment
Wait, no. Not yet dressed.
Yum!
(note centerline markings on valence to match those beneath on the tub to ensure alignment)
OK. I'll fast-forward through all the horse sh1t. Everything was fitting up nicely when ...
I came to the realization that in spite of my many measurements and confirmations ...
while they are alike in many important dimensions, the offset between the trunk frame and taillight frame are different between the pre '79 (valence) and post '79 (chassis) rear ends by approx. 10mm.
That is to say, you can bring either the trunk lip into alignment or the taillight lip into alignment but not both without channeling the entire trunk cross-member.
*If* it's even possible to channel the entire cross-member *and* still keep the trunk latch aligned and center gusset incorporated. Neither of which I bothered exploring at this point. Instead I took a coffee break to window shop sheet metal at Walloth und Nesch.
Issue best illustrated here. Taillight frame in perfect alignment.
Gobs more pics available upon request.

Eric P.
Member
Not to be dissuaded, I said F-It and started after the front (mismatched) sheet metal
Fenders off. Easy peasy.
Stripping 2x.
Left fender is mint. Right fender was hiding about a cup of bondo ...
Left fender light sanded and primed. But guess what? I'm going to strip that rustoleum BS off, too, because I've since ordered a quart of two-part epoxy primer from Eastwood that should seal this $h1t forever.
(focus apologies)
Guess who's next!?
Did this 2x
A buttload of this ...
It looks like it's been beat to hell because of the way the paint came off but in reality, it's nearly perfect on top.
It's now the smoothest hood in the universe. I just can't wait for that epoxy primer to get here ...
On the underside there was a fair amount of surface rust...
So a lot of wire brushing. (Twisted wire on a grinder is too aggressive, BTW. Hence the bronze cup-brush)
Lastly, trying to wire-brush the glue in the middle was a giant PITA.
Since I'd become proficient in use of the stripper, I did that instead.
The rust appears black (purple) below because I've treated with a rust converter.
Still so much to do. Not to mention the rust that's *under* the gussets!
When I need a rest, I move to the "Dinging station"
Where I've been patiently trying my hand at hammer & dolly work ...
Before:
During ...
After? (Saving one is rather moot because after market fenders are still available from W&N for ~$60-$80 shipped)

Eric P.
Member
Nice progress.
Like the plastic sheet idea on the stripper.
I was contemplating how the pros tackle surface rust like you have on the underside of the hood for when i get around to painting my hood.
I guess you could go to the extreme and de-skin it.
That our make a very large bath a rust dissolver and dip the hood.
Seen guys buy citric acid from farm supply stores and make large baths to soak parts in.
Member
This thread reminds me of yesterday when I cut off some steel from the car. The front outside lower floor pan rusts due to the square underneath. There's a square pad of steel and I rimmed it with a cutoff wheel. Then pried it off before grinding and sanded it down. It's the rust starter underneath traps moisture. I never liked the pads or jack points on the edge so trimmed them all off on our project car.Originally Posted by osburn383

Eric sending a PM.
88 M3
91 318is
91 318i
83 320is
08 X3 3.0si
"If it flys, floats, or f*cks, rent it!"
Member
Degrease and sun-dry.
Cast iron appearance of bottom lip is converted rust.
Treated (left & right) Untreated (middle)
Picture of rust because who doesn't love pictures of rust!?
What I'm doing about the concealed rust. Using liquid prayer.
Converter sprayed wholesale into the cowl (seen upside down here.)
Same, again.
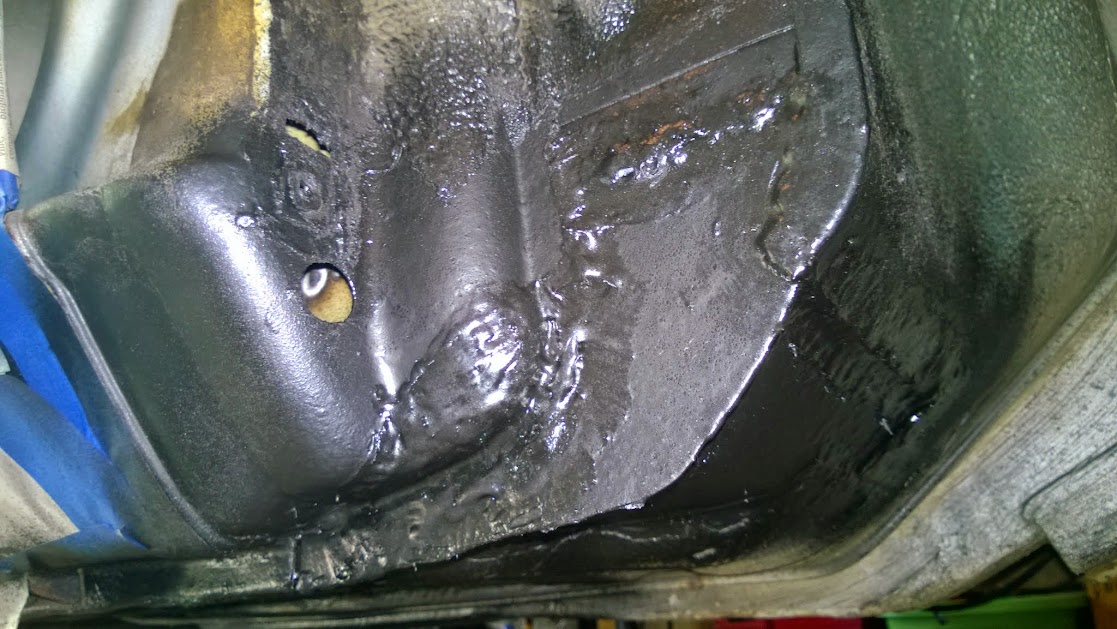
Frame coating results.

Eric P.
Member
pommeree - I have been following your thread and admiring your hard work. Thanks for the heads up on the Eastwood internal frame coating product. Prior to this post, I had never heard of this stuff but have several applications on both my E21 and E30 where it would be very helpful. Will be interested to see where you end up with the rear panel.
MJ
Member
Recruited a volunteer.
"This is fun!" he said.
If you say so ...
Replacement trunk corners
Wire brushed, cleaned, rust converter, rust encapsulator
When you don't clean excess rust converter before painting, what was dry and hard becomes gooey and boils to the surface.
Sand it. Clean it. Do over.
Rust encapsulator ...
"Don't worry! She'll hold together!"
[You hear me Baby? Hold together.]

Eric P.
Member
Trunk is down to bare steel. I want to do a badge delete.
Since it's been a few years since I ran the welder, I figured I'd do some warm ups.
I wanted it at the same work angle.
Definitely glad I'm practicing.
First three shots. Voltage 'A' (lowest) Wire speed '5' (medium)
Slow the wire down. Much better!
"But Eric." you ask "How did you know to slow the wire speed?"
Um, just a hunch.
Top "clean" holes were easy enough.
Before
Will definitely need a touch up.
Before
Lumpy...
Will definitely not pass inspection.
After round two ...
Next phase: Roll of 2.75" adhesive sand paper ... $15 from Amazon.
I shopped long-board, flexible sanders online and they cost anywhere from $40 to $100+ dollars.
This one, however, was free.
Booyah.
Front side.
Back side.
Goopy
Like a baby's bottom.
Forgot about this guy. Will get him next time.
The hood. Naked. Plan is to prep everything then shoot in epoxy.

Eric P.
Member
Great idea with the active mat sand board. I've the exact one from wally world for the knees. Probably use a strip for our minor body work. Noticed we only have roof and rear quarters to doand best part is it ain't gotta be as pretty. If it turns out ugly we'll just drive faster.
need a spare trunk lid? doors? see my last call thead
88 M3
91 318is
91 318i
83 320is
08 X3 3.0si
"If it flys, floats, or f*cks, rent it!"
 Posting Permissions


 Reply With Quote


Bookmarks