
 Member
I made this tool for an e34 but I believe it is the same thing as the e32. If not someone please correct me. Either way I am going to be making some tools for either sale or rental. Sale price is $80 shipped in the US or $87 shipped internationally.
If you want to rent it the cost is $40. You get the tool for 2 weeks, shipping to you is paid but you must pay return shipping. To rent it you would need to paypal me $80 and then I would return half when I get the tool back.
If you are interested you can paypal $80 to jake AT theguestroom DOT net. The price of $80 will be good until monday evening when I put the order in for the tools. After that they will be $90
Here is some info on the procedure and the tool.
Here are a few pictures and explanation of the process:
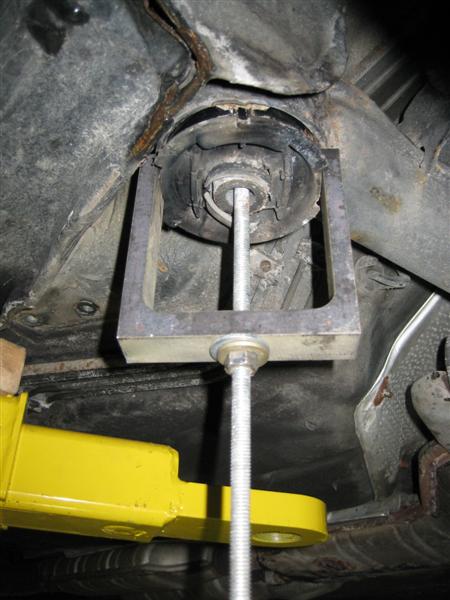
If you do one side at a time it will help keep the subframe in place and not drop down to far. It is good to support the subframe with a floor jack.....
Remove the 22mm nut on the bolt going through the subframe bushing.
Remove the 2 M8/13mm bolts holding the little plate thing on.
Replace the 22mm nut and give that bolt a few solid wacks upward to remove the bolt.
Lower the subframe down a little bit.
Put the round plate on the top of the bushing.
Put the horseshoe looking thing below where the cuts in the bushing are as well as pushing the long threaded rod up through the bushing and the round plate.
Put a nut or two on the top of the plate.
Tighten the nut at the bottom of the bushing to apply pressure to the bushing.
Use a torch and heat up the metal can surrounding the bushing, wait until you can hear the rubber bushing sizzling. Try and heat up the entire metal can.
Tighten the nut below the horse shoe tool some more and the bushing should slide out.
I had to heat one of them a second time to get it to come out.
To install use a little silicone spray or windex to help slide it in.
Allign the bushing in the metal can
Put something above the subframe (large socket)
Use a floor jack and some wood and "jack" the bushing into place.
Replace the big bolt/nut.
Done
Here are a few pictures.

shade tree mechanic
Moderator
E32 and E34 are the same bushes.
One suggestion, add at least a bearing under the nut, otherwise the long bolt will seize and the thread is gone.
My one we made a ' bit' stronger
http://www.bilder-speicher.de/080122...ting-page.html
http://www.bilder-speicher.de/show.p...08012213409220
My friend Wolfgang in Germany made this one
http://www.e32-schrauber.de/bmw/s-tonnenlager.htm
instructions how to http://twrite.org/shogunnew/fixes/subframe.html
professional tool looks like this
http://www.allcarrepair.com/produkte..._satz_315.html
Gert on BB is also renting out his FRANKENSTEIN'S NECKBRACE
http://www.bimmerboard.com/forums/posts/709656
as you can see that is much stronger.
Shogun tricks and tips for the E32 series are HERE!
Member
HI!! I've sent you an email. I want one, as fast as possible. My bushings are gone far away.
3 scoot
shade tree mechanic
Moderator
@alikupa
better edit the post and remove that paypal account!
if you do not get one, make it like this
http://www.bmwe34.net/E34main/Mainte...ameBushing.htm
Pelican parts has a set for sale.
Rear Sub-frame Bushing Master Kit $394.00
BMW Service Tool Reference #33-3-110, fits BMW Chassis E23, E24, E28, E30, E32, E34, E36 318ti (Compact) Models only, Z3 Coupe/Roadster
Product Information: PEL-TOL-3026
Brand: SIR Tools
or here
http://www.amazon.com/Sir-Tools-BMW-.../dp/B007TB8WYE
http://www.samstagsales.com/sirtools.htm
http://www.costplustools.com/BMW-TOOLS_c_938.html
http://www.shoptoolsshoptools.com/sh...id=261&cat=BMW
Shogun tricks and tips for the E32 series are HERE!
Member
Hi Jake, I can wait till next week I just want to be sure tha it will be done by next week, let me know. Thank you
Last edited by alikupa; 05-14-2012 at 12:22 AM.
shade tree mechanic
Moderator
you can do it without such a tool like Bryan did it with a hacksaw
http://www.bryanborough.com/750iL/
or make one by yourselves, here are the instructions:
Replace rear subframe mounting bushings the easy inexpensive way
Buying a $399 special tool was too expensive, and cutting the bushing out with a sawsall sounded like a lot of work, so I made my own special tool for less than $15 and you can too.
Making the tool took about 2 hours (I was in no hurry) and replacing the bushings using the tool took about an hour per side. I made the tool using a mallet, vice, chop saw, drill and a propane torch, but if you don’t have a chop saw a hacksaw will do.
MAKING THE TOOL
I purchased the following from Lowes:
1 ea. ¼” X 1” X 3 foot long steel bar stock
1 ea. ½” diameter X 12” long all thread bar
4 ea. ½” Nuts for the all thread bar
3 ea. ½” washers
From Autozone I got a seal driver loaner tool kit and used the 2.99” driver for a follower plate. You can make a follower plate from the bar stock, but if you do, make sure it is strong enough (several layers thick) and bears directly on the metal rim of the bushing.
The 1” bar stock makes up the body of the tool. Bend it into a “U” shape using the vice and mallet, while heating it with the torch. Heating the metal makes it easier to bend. First mark the bar at 4” and then bend it at a 90 degree angle using the mallet and torch. Make another mark at 3.1” (if you have the new bushing you can use it for measuring, the bushing should just fit into the bottom of the “U”). Then make another 90 degree bend.
At this point check that the arms of the “U” are roughly parallel. Place the “U” face down on a table or floor and make sure that it lays flat. If necessary make adjustments with the mallet. Next, using the chop saw (or hacksaw) cut off the “U” from the rest of the bar stock. Cut it so that the legs of the “U” are equal in length. Smooth any sharp edges to prevent cuts. Now cut another piece or two from the remaining bar stock about 3.5” long, these will be strengthening plates for the bottom of the “U”, as this area will be weakened due to the ½” hole placed in the next step.
Drill a hole in the base of the “U” to accept the ½” all thread. Be sure the hole is centered both ways on the bottom of the tool. Drill similar holes in the strengthening plate(s). The tool is complete. Here is a picture of the tool for illustration, along with a diagram showing dimensions. It may not be pretty, but it works.
pic
http://www.bimmerboard.com/members/h...n/IMGP0367.JPG
drawing how to make it
http://www.bimmerboard.com/members/h...new%20tool.jpg
REMOVING THE BUSHINGS
Here is a picture of the tools you will need.
http://www.bimmerboard.com/members/h...n/IMGP0366.JPG
Jack up the car and support it on jack stands (safety first!). Using a floor jack, support the subframe on the side you will be working on.
Remove this plate from the underside of the car.
http://www.bimmerboard.com/members/h...n/IMGP0382.JPG
There is one 22mm nut and two 13mm bolts. Remove the rear seat and pull back the sound insulation under the seat belt anchor to expose the black sticky patch that covers the bolt head. Replace the 22mm nut back on the threaded bolt to protect the treads, and give the end of the bolt 2-3 good upwards whacks with the mallet to release it from the car body. After it is disengaged, remove the nut and bolt. You may have to remove the seat belt anchor to allow complete removal of the bolt.
Using the jack, lower the subframe about 2-3”. Place the follower plate, washer and a ½” nut up on top of the bushing. Push the all thread rod up through the bushing and thread onto the nut. Next place the “U” and strengthener plates onto the rod and thread an additional nut onto the rod to hold them. Finger tighten the nut. The legs of the U should extend up into the cutouts of the bushing flange and bear directly on the subframe bushing mount. Place the C-clamp onto the legs of the U and tighten. The C-clamp prevents the legs of the U from spreading and slipping off the subframe. Next place two nuts on the bottom of the all thread and tighten them together. This will serve as a way to hold the all thread to keep it from turning as you remove the bushing. The next picture shows the tool in place ready to remove the bushing.
http://www.bimmerboard.com/members/h...n/IMGP0370.JPG
Tighten the nut under the U and put some pressure on the bushing. The center of the bushing should pop down some. If you start to bend the tool, stop.
When all is ready, heat the bushing mount to soften the rubber covering the bushing. This makes the bushing much easier to remove. BMW recommends heating with an industrial heat gun. If you don’t have a heat gun a torch will do, but be very careful that you don’t start a fire under or inside the car or damage any parts, like the brake lines running nearby on the driver’s side. Heat the bushing mount evenly, when the proper temperature is reached, the bushing will pop down a bit, and you can turn off the heat at that point. Now using the tool, remove the bushing. The next picture shows the bushing on the way out.
http://www.bimmerboard.com/members/h...n/IMGP0371.JPG
This picture shows the tool with the removed bushing so you can see how everything goes together.
http://www.bimmerboard.com/members/h...n/IMGP0373.JPG
INSTALL NEW BUSHING
Installing the new bushing is done with a floor jack. Place a large socket or a piece of wood between the subframe and the car body to allow clearance for the bushing to be completely installed. Wet the bushing with some glass cleaner to lubricate it going in, and press it into the hole. Don’t use liquid soap as others have reported problems with the bushing moving around after installation when liquid soap was used. Be sure to align the dimples in the subframe mounting with the slots in the new bushing.
Next reinstall the long bolt and cover plate. Be sure the long bolt is tightened all the way, as you will be pulling the knurling on the end of the bolt into the mounting. Refer to the other side to see how much of the bolt should be protruding past the nut.
Repeat the procedure to replace the bushing on the other side.
94 525i Sedan M50, AT, E34, built 3/94
written by HL HEATON
Shogun tricks and tips for the E32 series are HERE!
Member
All the best
All the best, thank you
Last edited by alikupa; 05-14-2012 at 12:08 AM. Reason: Automerged Doublepost
Member
Are these still available?
 Posting Permissions


 Reply With Quote
Bookmarks