
 Memberish
I wanted to write this DIY to document my adventures with getting the HVAC system in my 633CSi alive and active again. This DIY is for the E12 based cars only, pre 1981. I've done this work on the E12 5 series and found the sixer is very similar in function and appearance. I also suspect that the E12 5er and the E12 based 6er share a lot of the same HVAC parts. You can confirm this buy going to RealOEM.com and using the data base to see what cars a particular part number is used in. This can be very helpful because it would allow you to salvage parts from the E12 5 series (cheap & plentiful) at a wrecker and save substantial money as opposed to buying the same parts new at a dealer.
Before we dive in I just want to talk about a few things. First this is not for the faint of heart. Working on the HVAC in some cases involves ripping the entire center section of the dash apart. It's not all that bad though, BMW put some thought into constructing a system that could be serviced in the future and it's laid out in a logical manner.
Second, there are some procedures that will require you to remove the A/C box. For this you will need to disconnect the refrigerant lines.
Now, if you know your A/C has lost it's charge and no longer functions because of that then disconnecting the lines isn't a problem. If your car still carries a charge of refrigerant do the responsible thing and have it evacuated before you crack open the piping. Letting R12 freon into the atmosphere is not cool and if caught can have some heavy fines attached too. Best thing would be to have it sucked out and reclaimed so you could put it back in. But from here on I'm assuming the A/C system has been evacuated of all refrigerant and is safe to work on. I don't want to get too much into the R12 vs R134a debate here. Hopefully somebody or myself even will write a DIY on doing the R134a retrofit in the future. I'll talk a bit more about the A/C system later.
On my 633CSi the HVAC had several issues I needed to sort.
1. The car didn't blow any heat
2. The heat control didn't have any effect
3. The knob for controlling airflow didnt have any effect
4. The heater blower didn't work
5. The A/C didn't work
Later I found out that the HVAC on my car has been worked on before by a real hack. Things were disconnected and put together half way or improperly which was only part of my problems. After seeing this caliber of work I decided it would be best to rip everything out and go through it all making sure it's 100%.
The first steps to gain access to the HVAC are removing the center console. I'm not sure exactly how to do this because my car came partially pre-disassembled for me already. If when you are dis-assembling something and come across attached wires, Make notes or a drawing on where the wires go with colors before disconnecting them. In my case I found I needed to do the following...
Accessing the HVAC:
· Disconnect the battery before you start and set the parking brake.
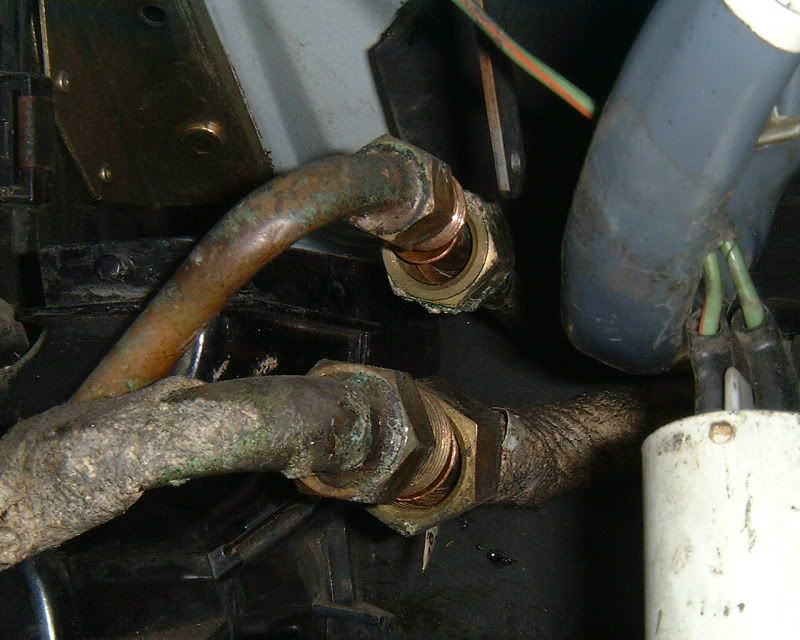
· If you will be working on the heater, the hoses will need to be disconnected. I find if I drain the coolant in the radiator, the level drops enough to allow me to unhook the heater core hoses without too much spillage. Of course, there will be residual coolant in the heater core that could spill later when handling. Not shown in the picture above is a metal plate and foam gasket that fits over the opening in the firewall to stop any drafts from the heater plumbing.
· Remove the glove box.
· Remove the trim cover from under the steering column.
· Pull the ashtray and remove two screws there.
· Pull or remove the shifter surround, disconnect the window switches and label them.
· Remove the hidden screws from under the shifter surround.
· The grill above the ashtray is held in by 3 push on clips, two on top and one bottom center, pull the grill off the clips.
· Under the ashtray I found a support bracket that was held with 4 screws, I found removing this bracket made removal of the center console easier.
· There may be a couple of screws on the top of the center console attaching it to the dash. Mine didn't have any but the holes were there. If you do have them you'll have to pull the cigarette lighter and emerg. flasher switch to get access. Then use a 1/4" ratchet to get at the screws. To pull the cigarette lighter first remove the wires. With the wires off give the outer steel shell a 1/6 turn twist and it should come off. Remove the shell and spring and pull the housing out from the front of the panel.
· With everything disconnected the console should be able to slide back towards the handbrake and work it up and out. If it doesn't want to move look for more hidden screws that need to come out. You shouldn't have to force anything.
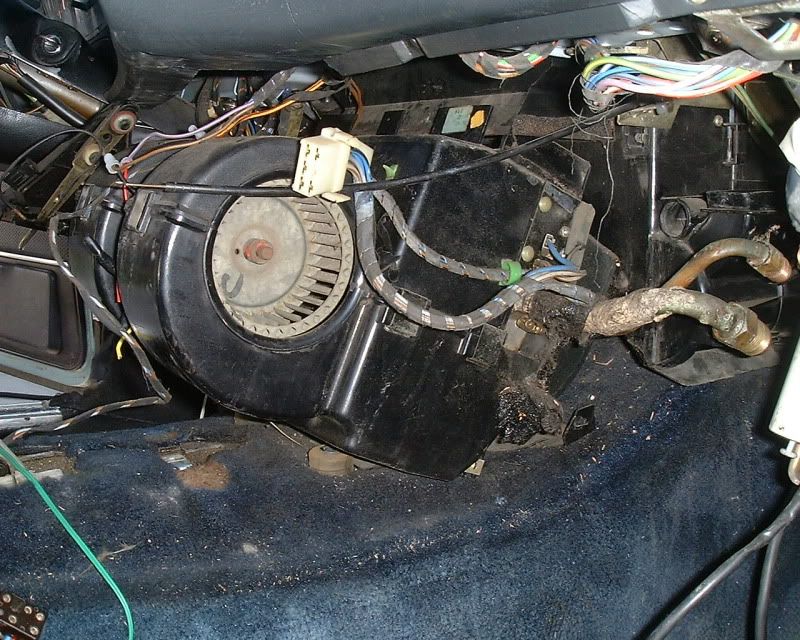
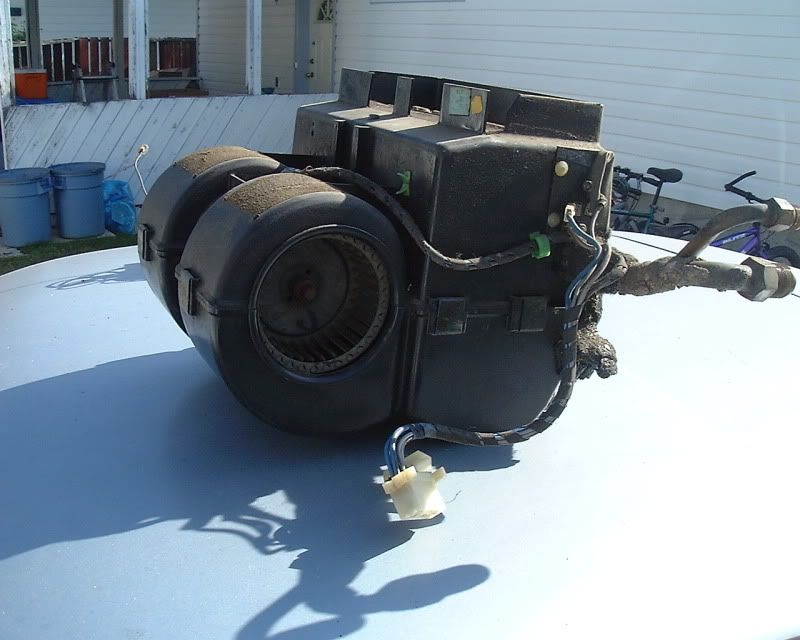
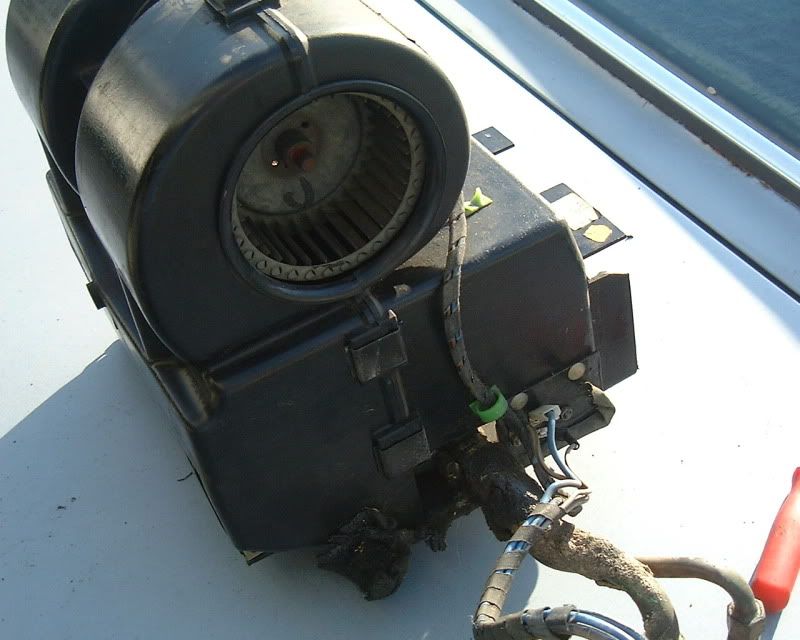
With the console out you'll be staring at the A/C box. It contains the evaporator, expansion valve, A/C blower motor & fans and the blower motor transistor
The A/C box is removed by doing the following...
· Unplug the harness connector for the A/C box.
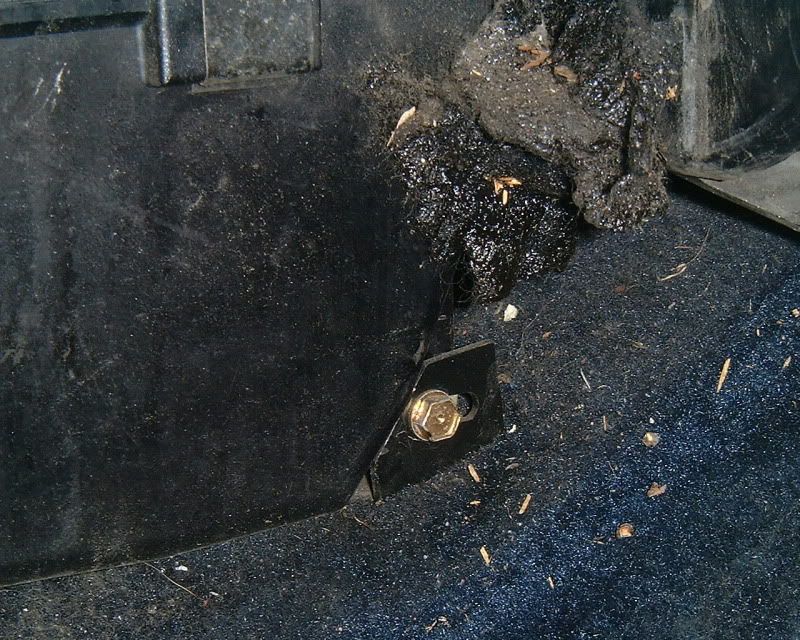
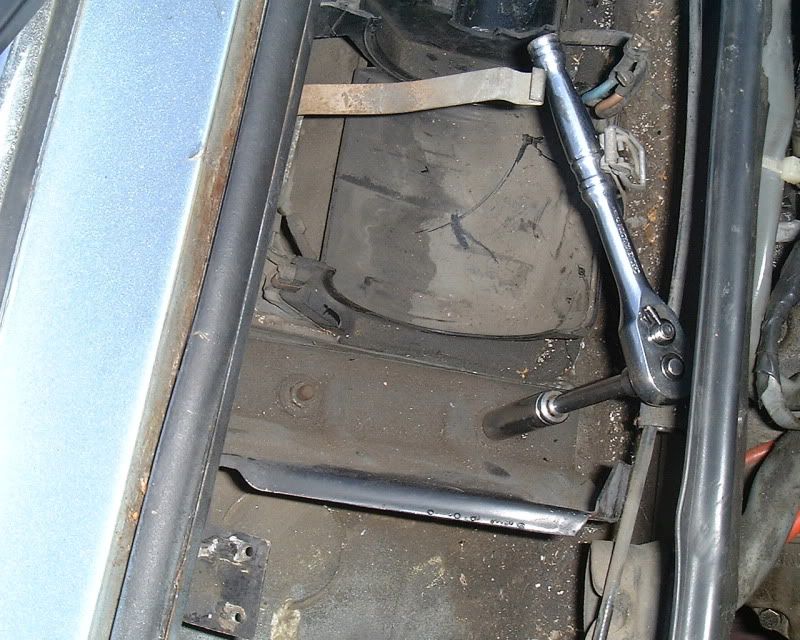
· Remove the two screws from the L shaped bracket. One screw goes into the transmission hump (floor) and the other into the box itself.
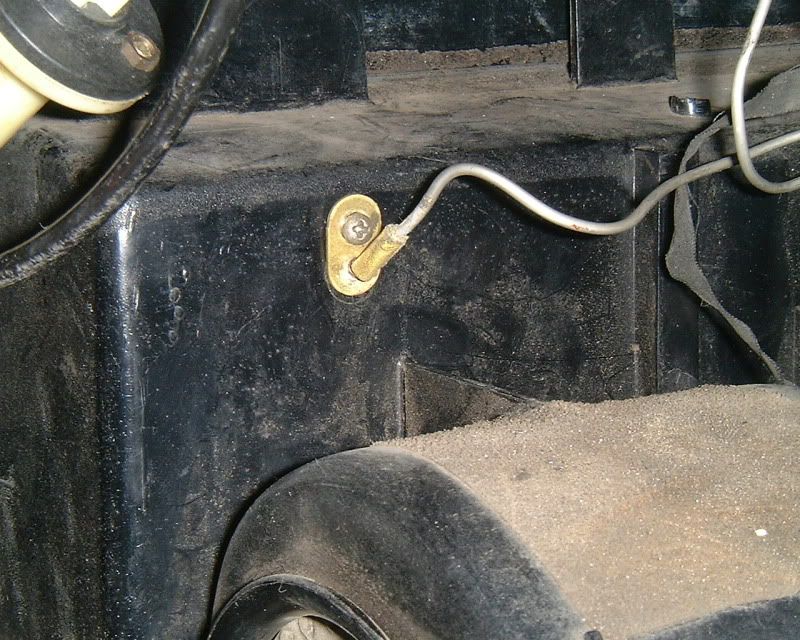
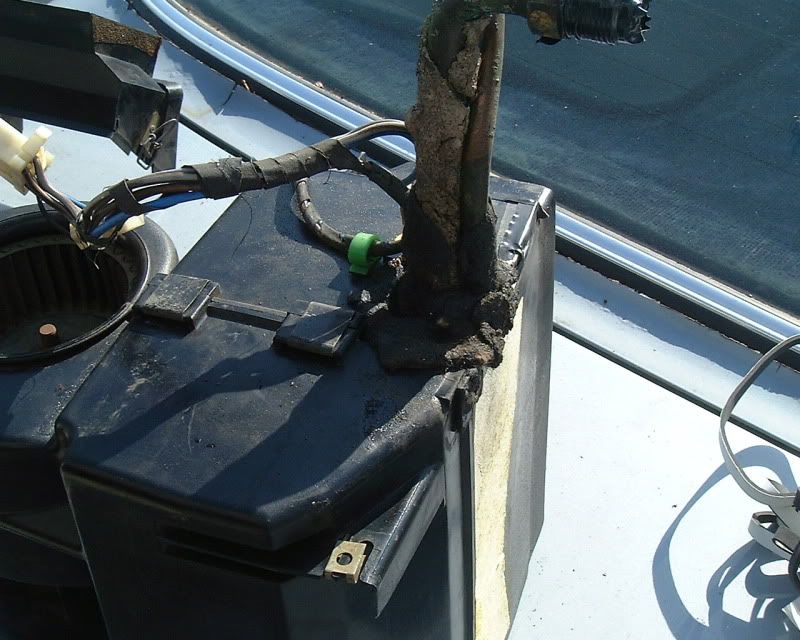
· There is a silver colored wire that enters the box and is held down with a single screw. It is up high on the box on the drivers side. Remove the screw and slide the wire and holder out from the evaporator box. The wire isnt a wire at all but rather a capillary tube that is used to sense the temperature of the cooled air and switch the A/C compressor on or off. So dont bend or fold this tube. Doing so could collapse or tear it open rendering it useless. Treat it with care.
· Remove one screw each side of the floor bracket to A/C box - near the bottom rear corner.
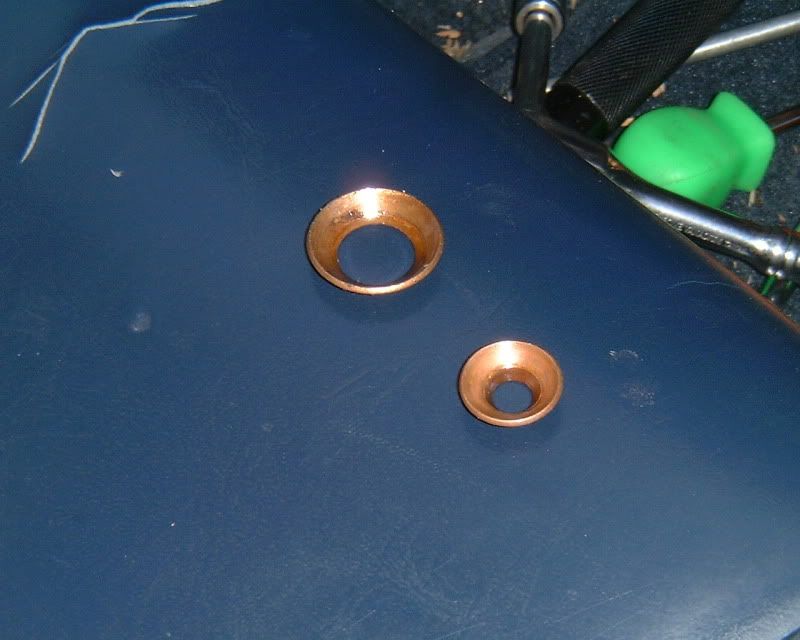
· With TWO wrenches uncouple the two refrigerant pipes by holding the evaporator side and unscrewing the collar nut. There will be a copper crush washer in each joint - make sure you capture these and put them aside if you plan to reuse them. If you buy new from the dealer....BMW part numbers 64531350490 and 64531350491.
The box should now be free. Remove it by sliding the bottom back towards the shifter. The top of the box will want to stay, that's ok the box will sort of roll out until a point where the top will be free. Then you can slide the entire thing backwards and remove it from the car.
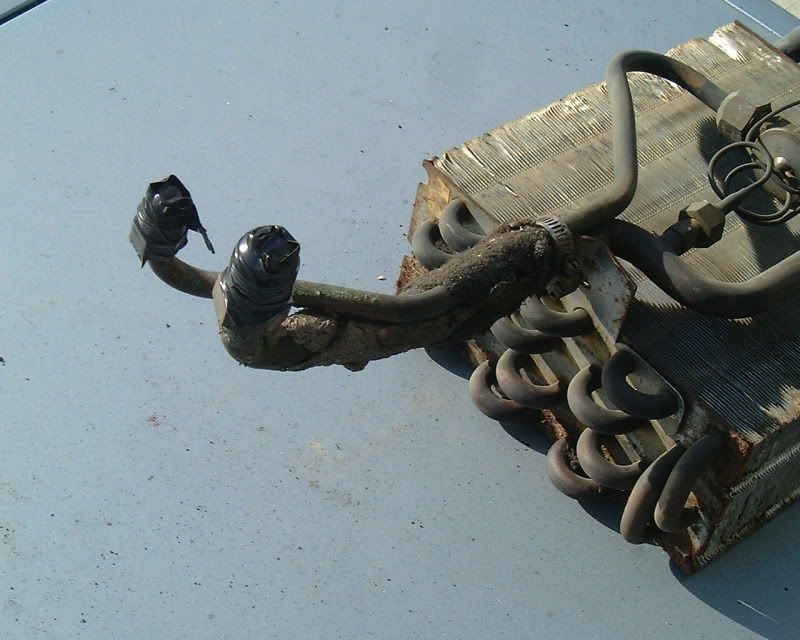
Here it would be a good idea to take some electrical tape and close off the ends of the open pipes on both the car and evaporator box to prevent dirt, air & moisture from entering. You don't have to seal the ends airtight, just cover them. It will help prevent contamination in the pipes. If you had something to plug the ends with that would be even better.
PART 1 THE AIR CONDITIONING EVAPORATOR:
Since the evaporator box came out first, Ill work on this one now. Open up the evaporator box as follows
· Remove the clips with a flat screwdriver. 7 clips total, two on each side, one on each fan and one between the fans.
· On the back corner of one side there is a plastic expansion rivet (not shown). Remove it by using something slender and push the central core of the rivet in. You will later need to retrieve that core to make the rivet work again.
· Disconnect the connectors from the power transistor and make note of where these wires go.
· Remove the black sticky goo from around the refrigerant lines and set it aside.
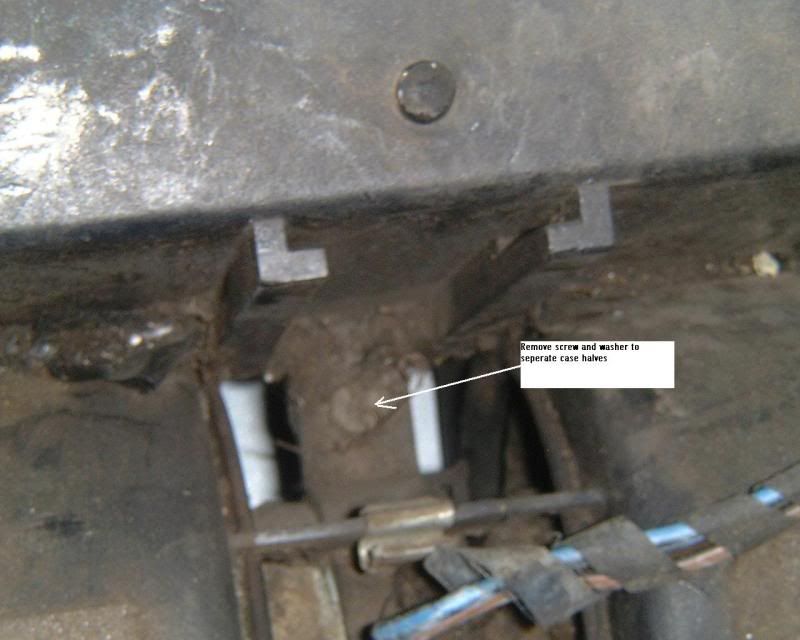
· Between the fans is a screw and washer, remove them the two halves of the box should now be free to separate, carefully pull them apart.
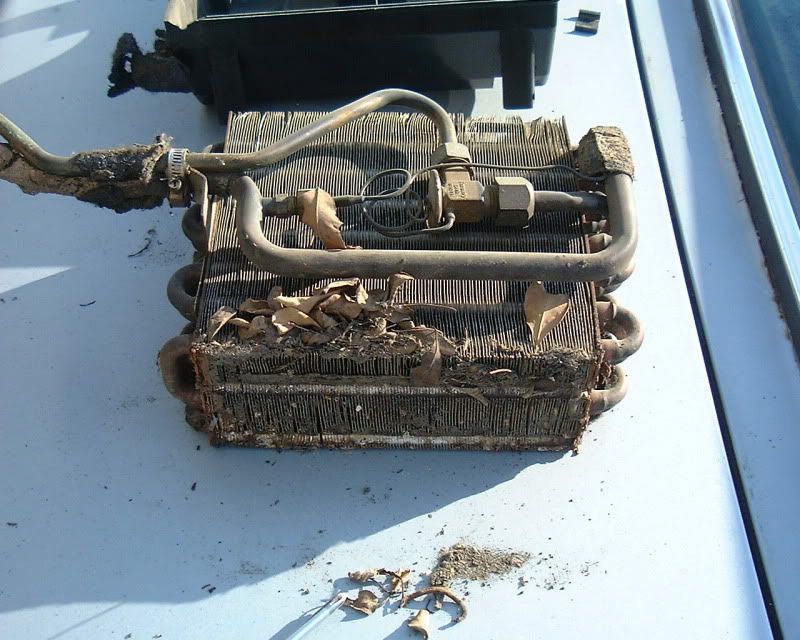
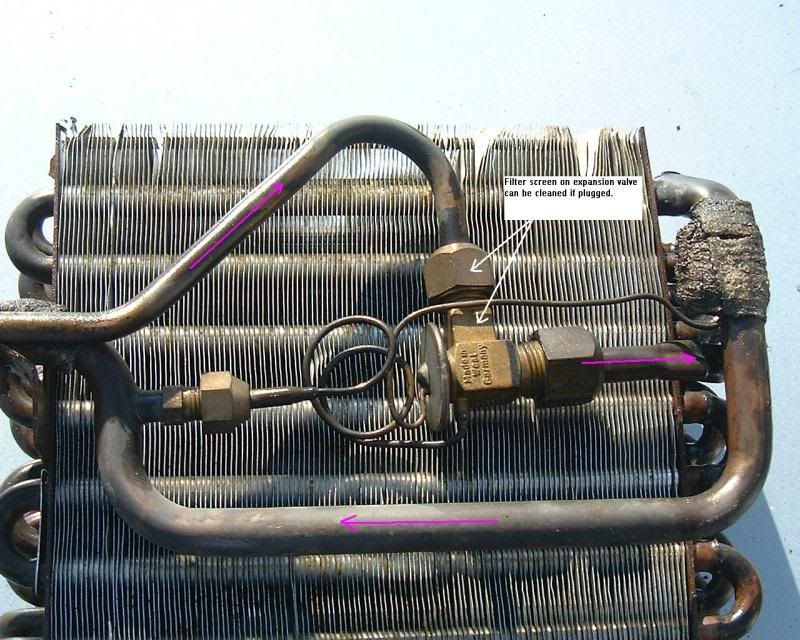
· Inside you will see the fan, evaporator core and expansion valve. Disconnect the two wires to the motor and set the fan assembly aside.
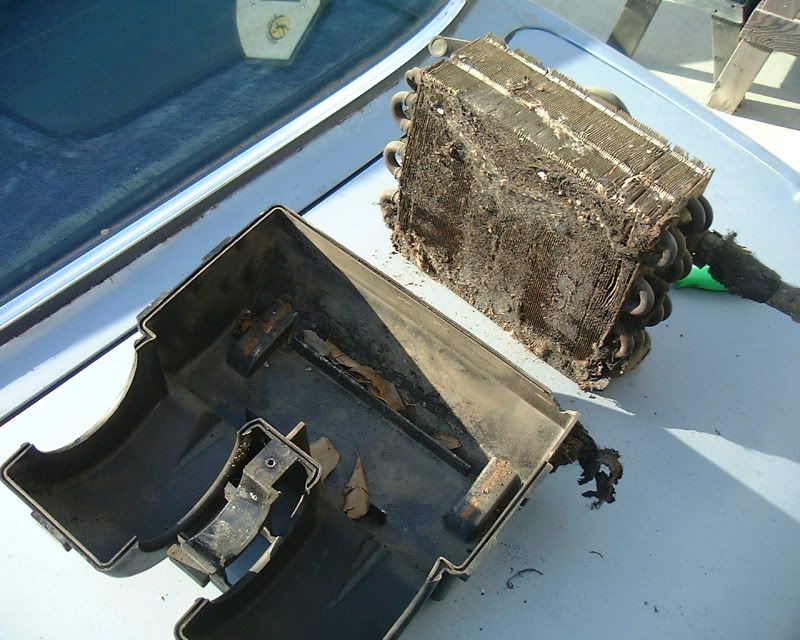
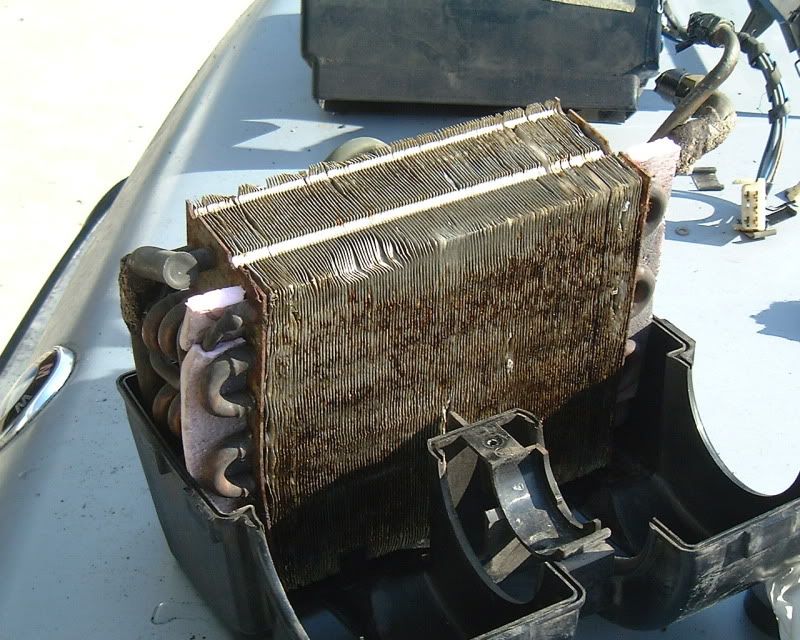
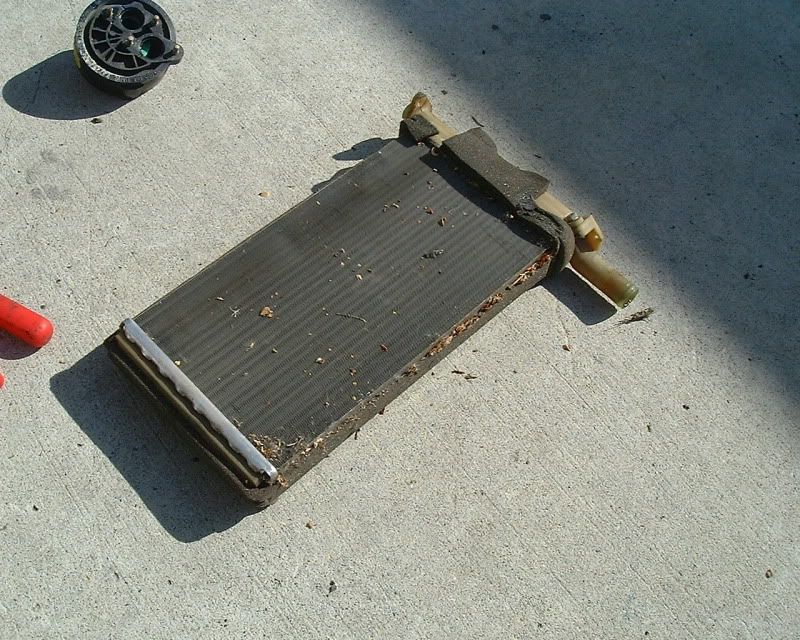
I suspect this is the reason so many BMW A/C systems fail to cool properly anymore. Mine was plugged with crap and I estimate I had about 80% of the airflow through the evaporator core blocked. All this crap will get wet and mold when the A/C is being used which is the cause of stinky A/C systems in our cars. Also, at the ends of the evaporator core there was a foam gasket seal that was to prevent air from flowing around the core rather than through it. All these things reduce the cores efficiency to create cold air for your cabin. The foam gasket on my core perished and was no longer there. The pictures show 30 years of crap accumulation.
Lift the core from the box and handle it with care. It has copper pipes and aluminum fins which are somewhat fragile.
Start cleaning the evaporator core by first using a vacuum cleaner to suck up as much lint, leaves and dust as you can. Once that's done hit it with compressed air. Blow through the fins opposite from natural air flow. Be careful with compressed air because you can bend and fold over the fins if you hit it too hard.
On mine the first two cleaning steps didn't do much to the muck stuck to the fins. I had to break out the fin comb. It's a plastic comb with a hooked end that fits between the fins and will pull the dirt out and straighten fins at the same time.
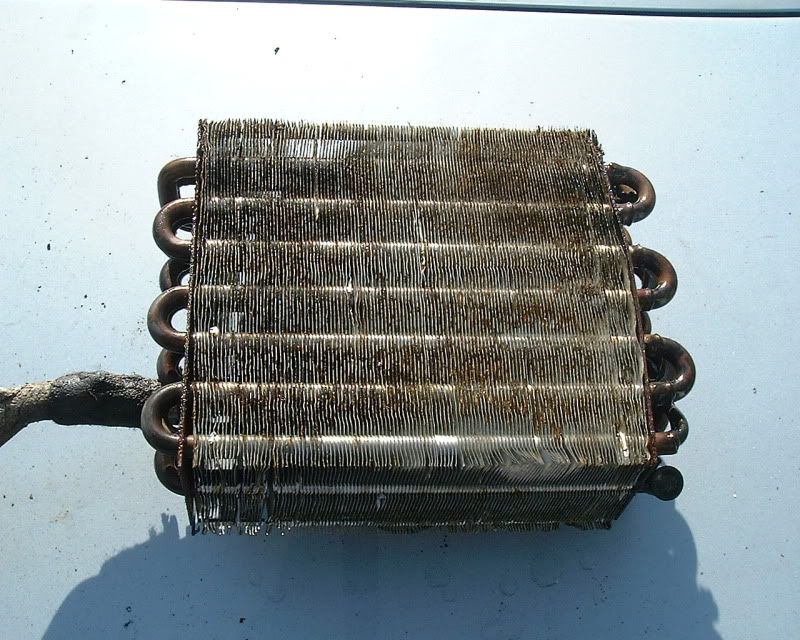
This picture shows half of the evaporator core cleaned using the comb. It works really well and can be found in Canada at Princess Auto. Harbor Freight carries it too for $4.00, item number 37892-1VGA.
Once the core has been cleaned using the first 3 steps (depending on how bad it was) it's time to move onto the forth cleaning step...the garden hose. Spray again opposite normal air flow and then spray with the fins to remove any debris you can. Try not to spray the ends of the pipe and get them wet (they are covered, correct?) At this point the core should be pretty clean. Don't use any cleaners on the core because many will react with the aluminum and cause corrosion.
Dry the core with compressed air and set it in the sun to dry.
While thats drying, clean the inside of the A/C box and blow out the fan squirrel cages with compressed air. The fan bearings last much longer than its heater counterpart. This is for two reasons 1) the motor is inside the car as opposed to being exposed to the elements. 2) The A/C blower is used less generally than the heater blower. There is mention of a filter screen in the expansion valve and could be considered an issue if the cooling efficiency has fallen off. It might be something to check while it's all apart. I didnt crack open the piping on mine (I know Ill be kicking myself over this later .I just know it!).
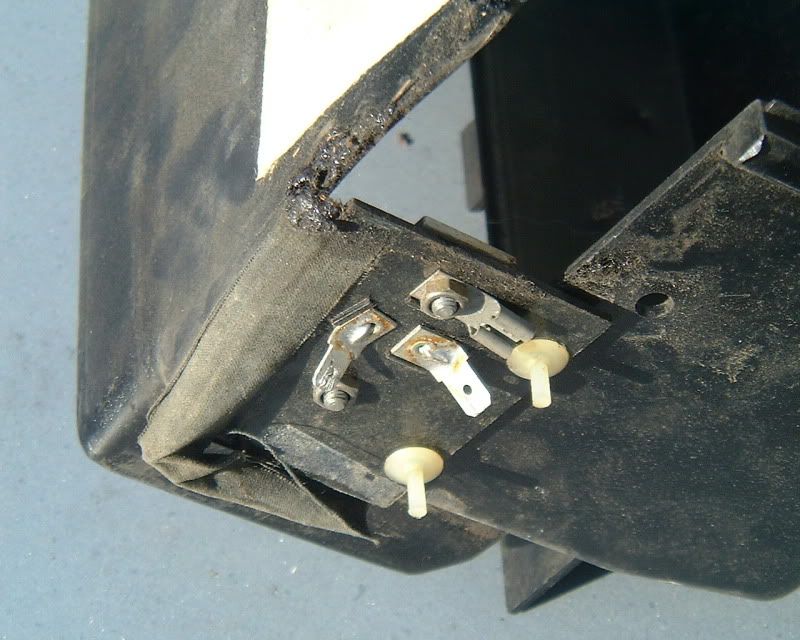
Also, riveted to the evaporator box is the blower motor transistor. If you have variable control over youre A/C blower motor, all is good. If you have a A/C blower stuck on high then the transistor is probably kaput. Im not going to go into any detail on how to change the transistor right now. This procedure is the same as the heater fan transistor thats been covered so well elsewhere. You can remove the transistor by pressing out the central plastic pin in each rivet. Save the pin because youll need it to lock the rivet when you assemble.
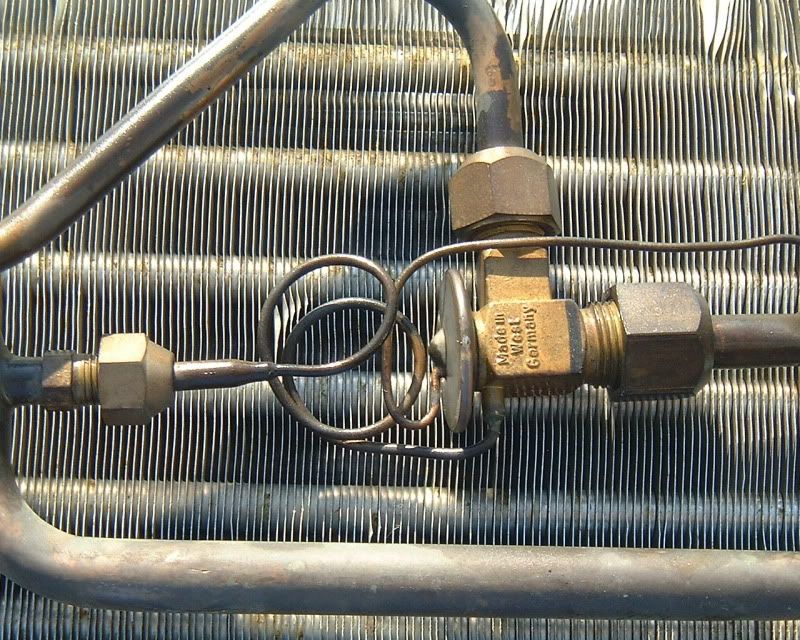
The expansion valve is here too with the evaporator. An easy item to change now that everything is opened up. Copper washers are employed here too. If the connections look relatively clean with no signs of weeping oil, chances are good there are no refrigerant leaks here. The expansion valve does have a filter screen on its input side. If you have had major compressor meltdown, youll want to open this up and check it for debris . That and blowing out all the refrigerant lines.
Assembly:
· Find some ½ thick pink (or blue, or white) Styrofoam insulation (or cut a piece to ½ thick). You will need two pieces cut to fit between the end coils of the evaporator core. These pieces of foam are to replace the perished foam that the factory and will serve to block airflow around the core rather than through it. It doesnt need to be pretty, just functional.
· With the core back in place on the bottom half of the case, place the fan back into its recess. The fan motor is keyed and only fits one way.
· Attach the two wires to the fan and feed them through the upper case half before closing it up.
· With the two case halves together replace the steel clips and screws that held it together. Check to see the fan spins free without rubbing on the housing.
· Attach the remainder of wires to the blower motor transistor.
· With the lump of black sticky goo you removed earlier, seal up the housing around where the refrigerant lines enter the case.
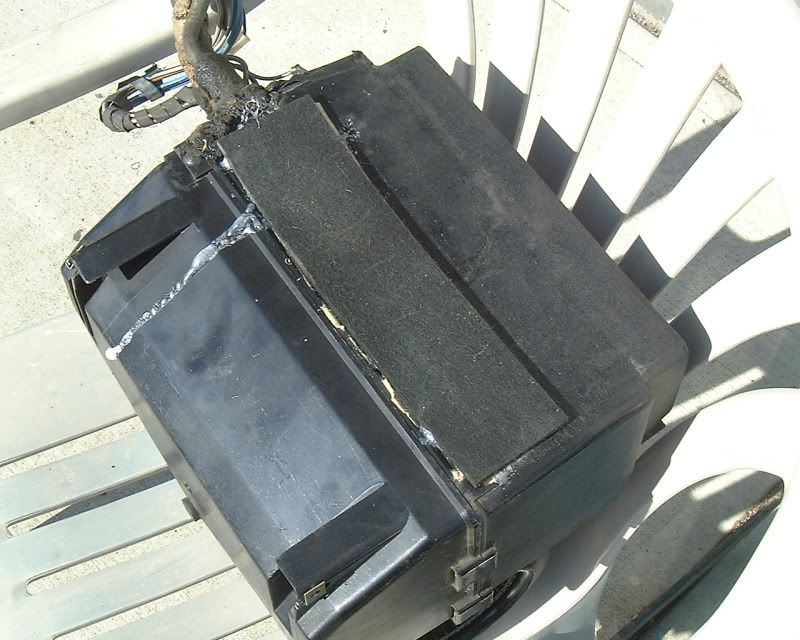
On the back of the evaporator box was a strip of foam rubber that had fallen off. With some spray adhesive, I re-attached it. It serves to deaden the sound on the box (I guess).
Put the assembled unit aside as you turn to work on the rest of the system.
Other Jobs:
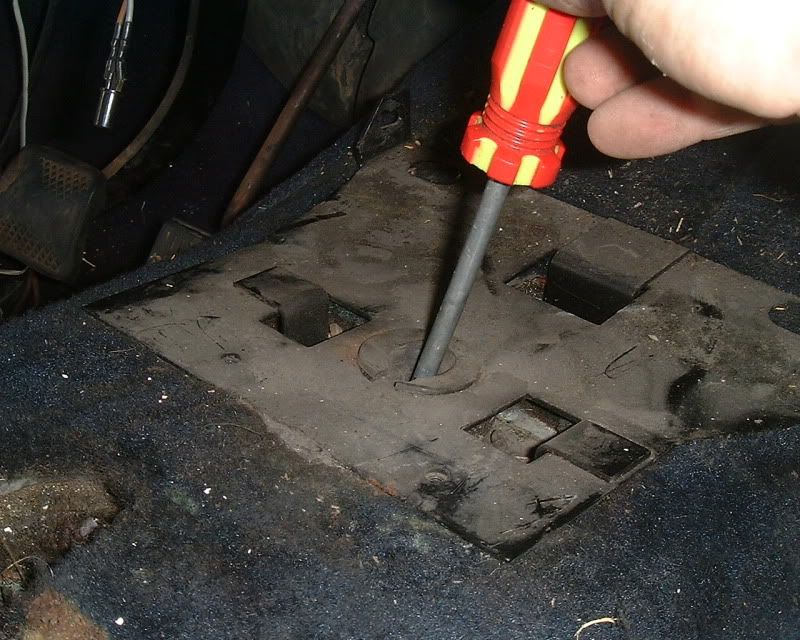
The transmission hump under the evaporator box has a drain. With a screwdriver check to see the drain isnt plugged.
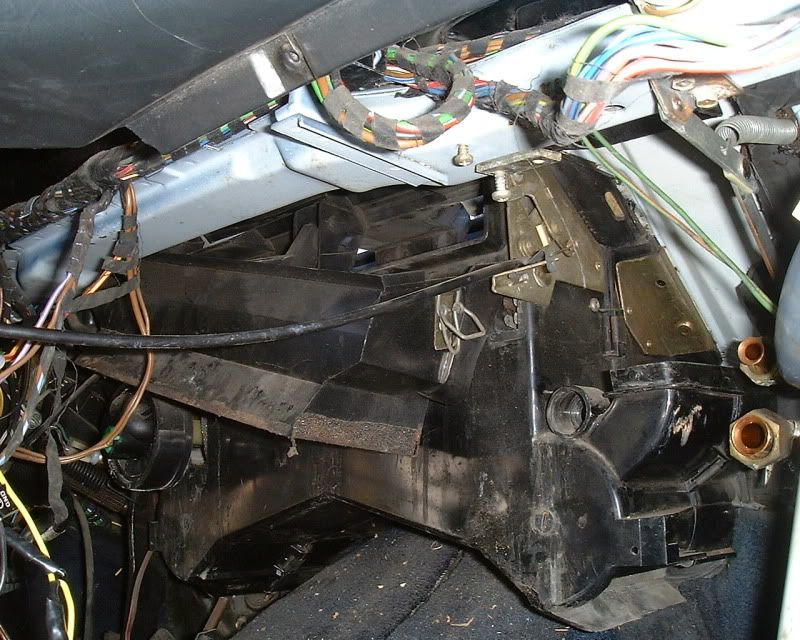
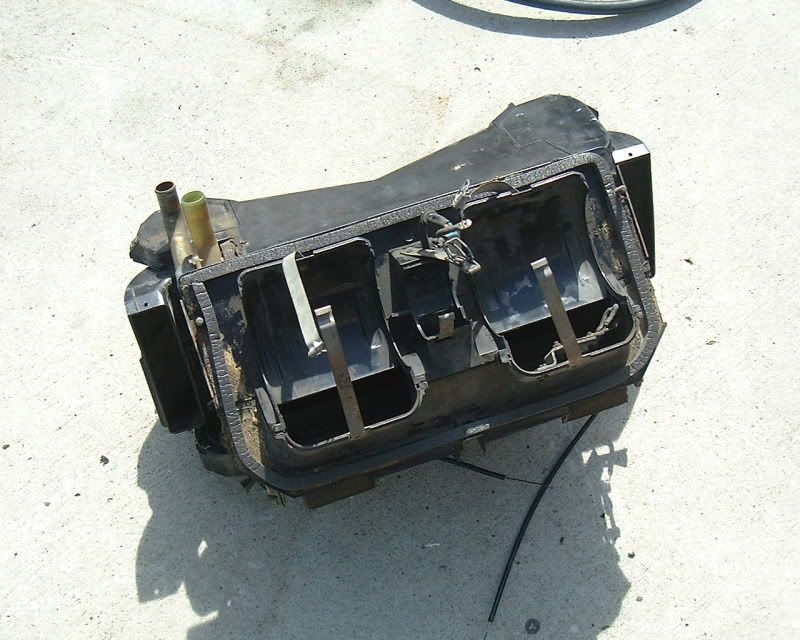
Above the evaporator is a plenum adapter that connects the box to the duct work of the car (up under the dash). Its held in place by two buckle type snaps. Remove it as it will be in the way for removing the heater box. Shown in the picture, one side has dropped.
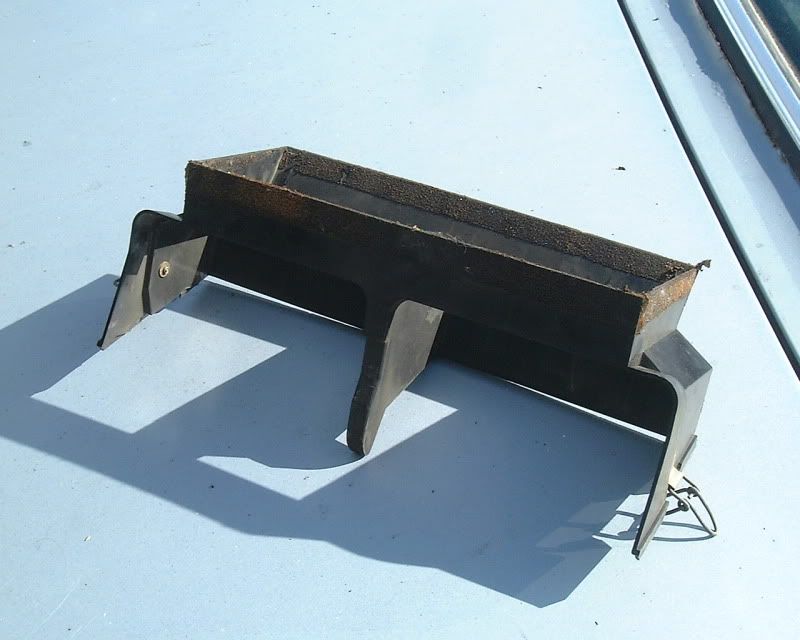
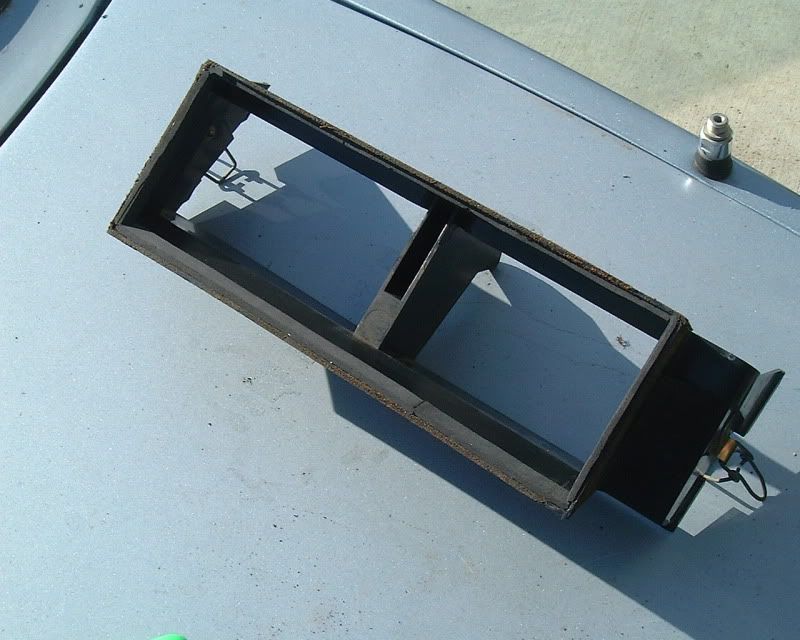
This is what it looks like out of the car.
Again, the foam has perished. I placed some 1/8 x 3/8 self-adhesive foam strips around the inside perimeter to afford a better seal when the evaporator box is re-installed. Without it, A/C efficiency will drop because the cold air will leak out of the plenum before reaching the ducting. If you ever watch Holmes on Homes youll know what Im talking about.
If your evaporator looked anything like mine in the pictures, the above work should restore much, if not all of the cooling efficiency. In the next part of this DIY I will focus on the heater and its components.
Thanks for reading
Mine: 1988 635CSi Euro in Diamantschwarz Metallic, 1989 ALPINA B10 3.5 in Alpineweiss II,1981 528i in Kastanienrot-Metallic, 1958 Isetta 300 currently in rust repair
In the family: 1958 Isetta 300 in Federweiss/Pastellblau, 1987 635CSi, 2000 M5
My YouTube Channel
Expired
Fantastic writeup!
Thanks so much for the contribution.
Alot of those parts look very much like an e28 based six.
Memberish
PART 2 THE HEATER
How do you tell if your heater core needs changing? Well, evidence of leaking would be the most common fault. If you smell a strong odor of antifreeze when you turn the heat on. Even without the heat on you may smell something. This coupled with unexplained disappearing coolant would be a dead give away. Sometimes the leaking coolant will deposit itself on the inside of the windshield leaving a film of residue.
One way to check is get a flashlight and look under the dash where the heater box sits. Carefully look for leaks on both sides of the heater box. Look for a wet carpet beside and below the box. A leaking core will drip coolant out the floor vents. Wipe your finger inside these vents to see if it comes back damp with antifreeze.
Another common location for leaks is the heater valve. With the flashlight, check the heater valve where the shaft connects for drips. Any leaks here will drip either directly onto your right foot or will soak the carpet (and floorpan) under the pedal.
Work on the heater box is only possible by first removing the evaporator box. If you have cause to work on the heater then continue on. Changing the heater core would be the most obvious reason to go further. Also, with the heater box out, its very easy to change the heater valve at this stage. Changing the valve while in the car is most unpleasant, ask me how I know. Broken flaps or as in my case, linkage, would be another reason to dive further. Maybe, as far as you know, your heater works fine and doesnt leak .you just want to open it up to clean out the core. Heres how.
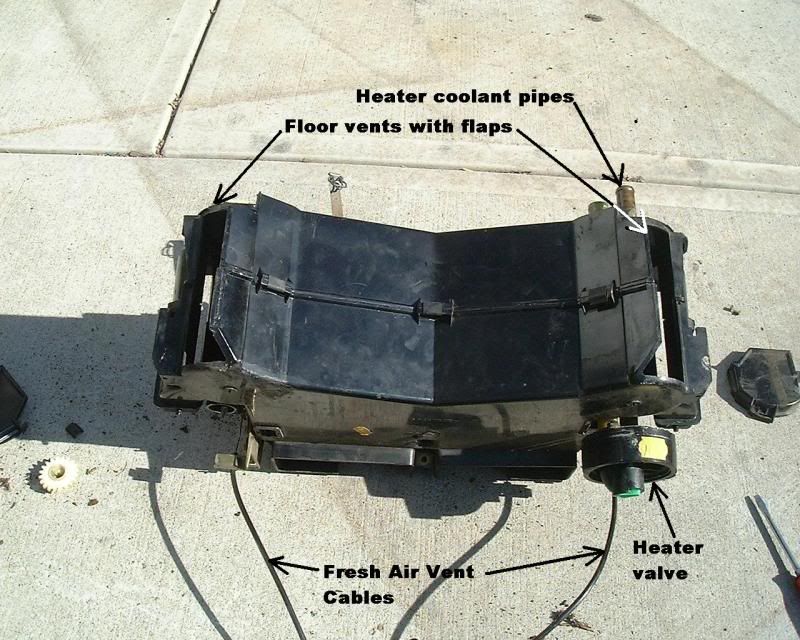
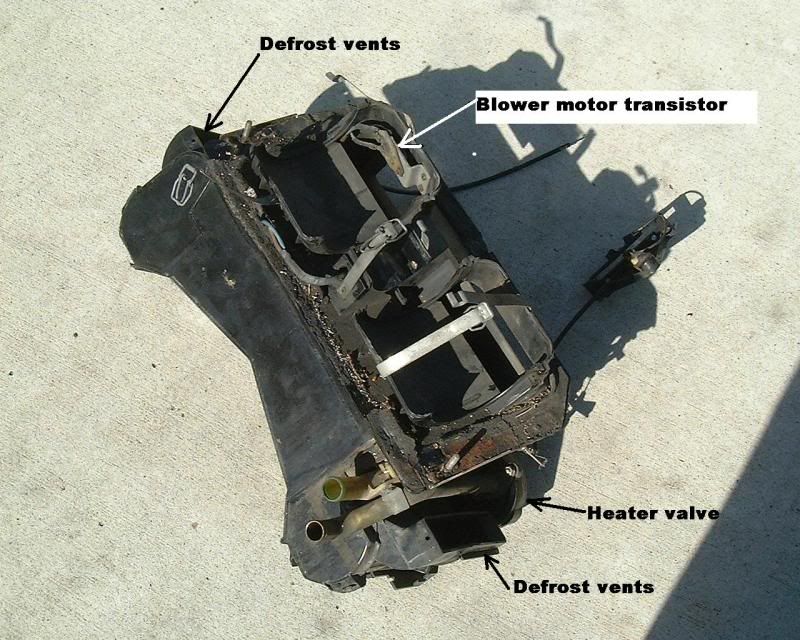
The heater box houses the heater core, some plenum flaps, linkage, plumbing and a heater valve. The blower motor and fans also mount onto this box along with the blower motor transistor & wiring harness.
Removal of the heater box:
Pretty easy stuff if you made it through the evaporator box in Part 1.
Obviously, the evaporator box and plenum adapter will need to be out of the car and the two heater hoses disconnected.
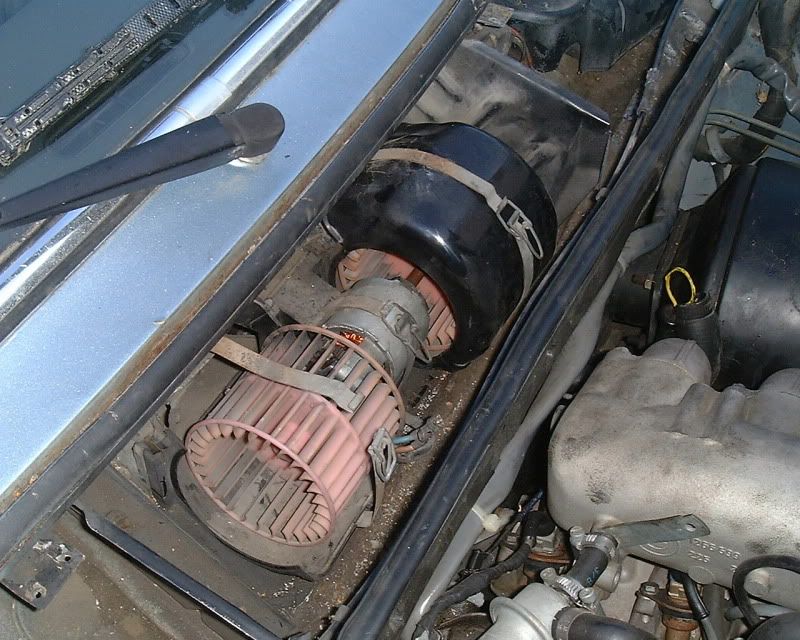
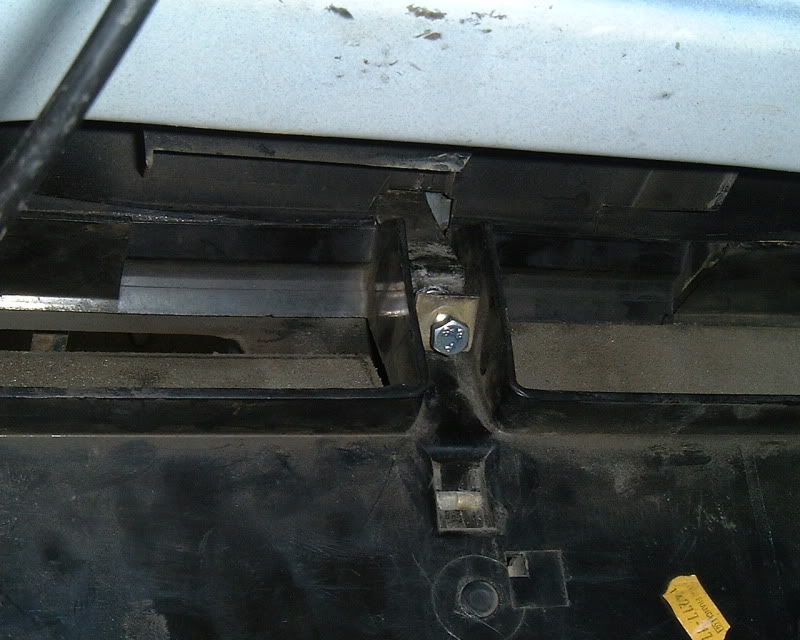
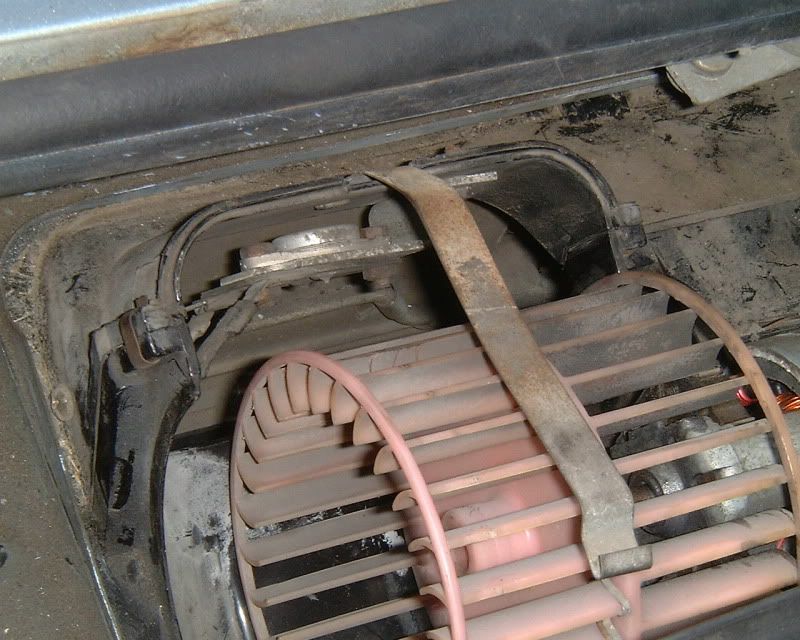
· In the engine bay, remove the rain cover from the fan by removing 9 screws then working the cover up & out.
· Unbuckle the two steel straps that hold down the fan covers; remove covers and end grills
· Unbuckle the steel strap on the fan motor. Lift the motor out and disconnect the two wires.
· Inside the car, the two vent sliders will need to be disconnected from the HVAC control panel. Two screws on each slider hold it in place. The cable can remain attached to the slider, as long as its free from the dash.
· Under the dash in the center, up high there is a single M6 bolt that clamps the heater box to the dash bulkhead. With a 10mm socket loosen the bolt and un-hook it.
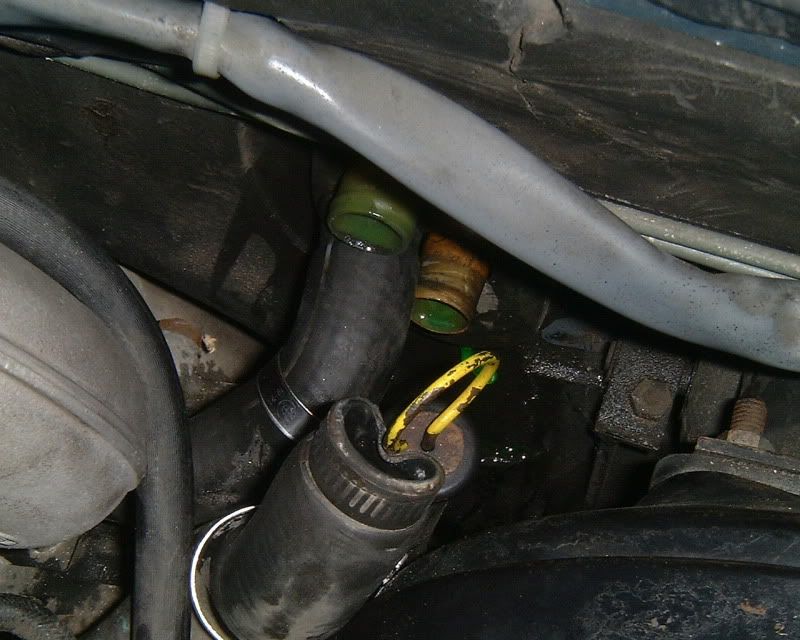
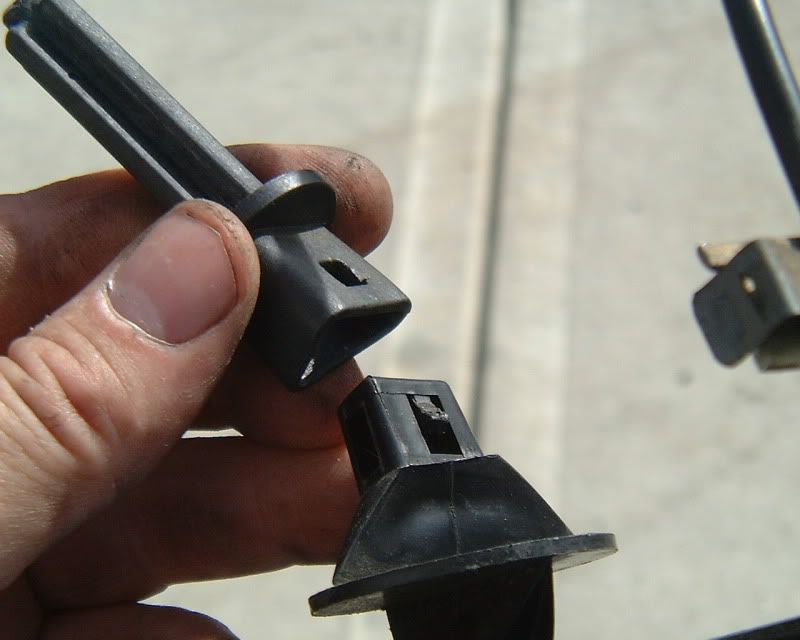
· On each side of the heater box is a control shaft. These shafts connect the control knobs to the heater box so the plenum flaps and heater valve work. To disconnect these, a small plastic nub will have to be pressed in while pulling on the joint. The picture shows the plastic universal joint and how it mates with the end of the shaft. Inside the car things are a lot tougher to access and your vision is obscured. Turn the control knob so the little square window is visible. Then with a small screwdriver press the locking tab in while you pull on the shaft. Both shafts are telescoping so they will shorten once the end is disconnected.
· Separate the harness connector for the heater box.
· Outside the car, remove the two M6 nuts with a 10mm socket. The heater box will start to drop as you remove these nuts.
· Without tipping the heater box forward and spilling residual coolant, remove it from the car.
· Once the heater box is out of the car, drain it into something suitable.
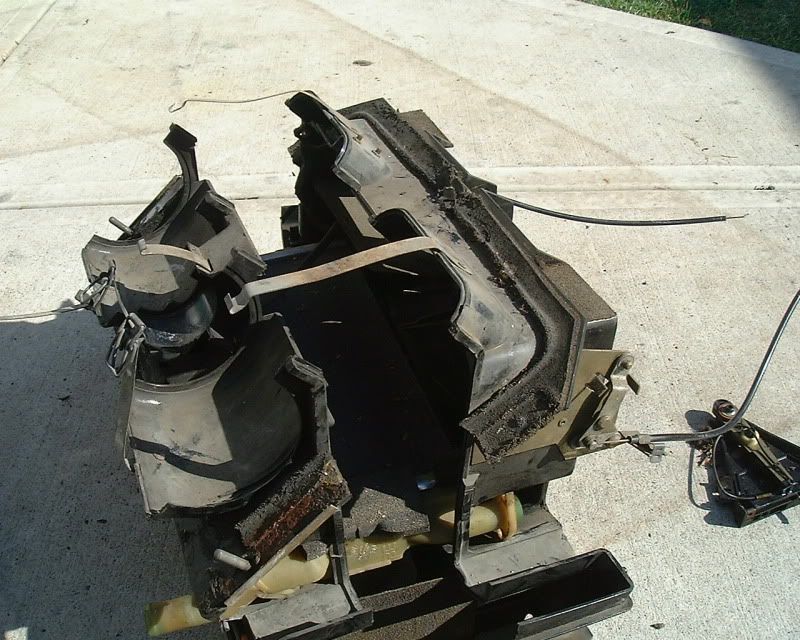
Disassembly:
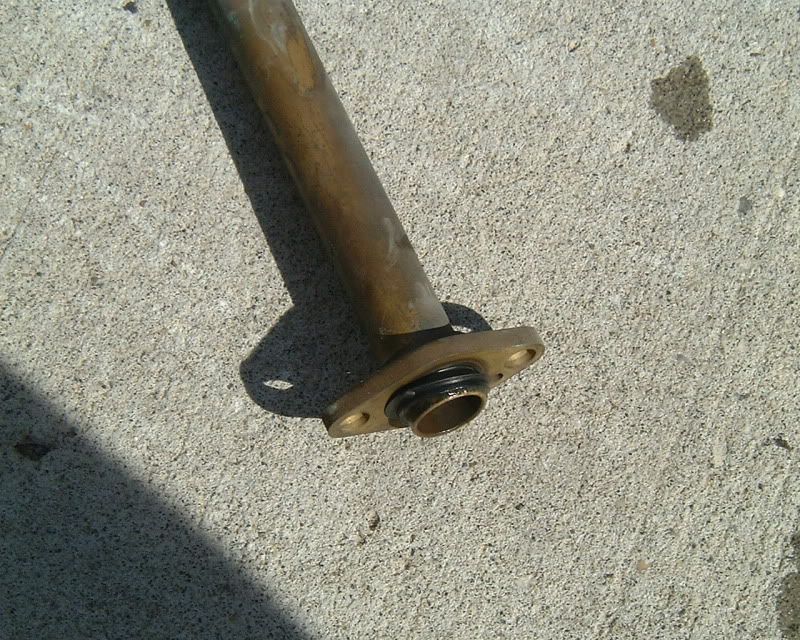
Open er up! The heater box case is two parts, just like the A/C box. Inside, the heater core lies horizontally. Inspect the heater valve. Evidence of leaking coolant will show up where the universal joint snaps in. It may be wet with antifreeze or have a green crusty buildup. Regardless, a slightly leaking valve will only get worse over time so bite the bullet and consider replacing with new. They are pricey (to the tune of $150) at the dealer and difficult to find outside of OEM (BMW part number 64111359634). The good news is a new one should last another 20 or more years.
To open the case youll first need to remove the heater valve and the coolant pipe. To remove the brass coolant pipe there is two nuts securing the flange to the heater valve, remove these. Also there is a single screw holding a clamp on the pipe. With the pipe out of the way, remove the remaining two nuts on the heater valve. This will free the valve from the heater core.
Along the top of the heater box that mates with the firewall will be a foam gasket that, by this time, is most likely perished. Cut the gasket along the case mating line. Remove all the steel clips that secure the case halves together.
Should now be free to separate the case halves. The two metal air flaps will fall out, no worries just pay attention to how it was fit together. The core is held in by the friction of some foam.
With the core out, inspect it for leaks and the telltale crusty residue. Corrosion is pretty easy to spot. It will usually start in one of the corners. The core commonly leaks from the seal on the end caps. Clean the inside of the case as needed.
If your core is good and free of leaks, give it a good vacuum and follow up by flushing with running water inside and out. Blow the fins dry with compressed air so youre not assembling a wet core.
Assembly:
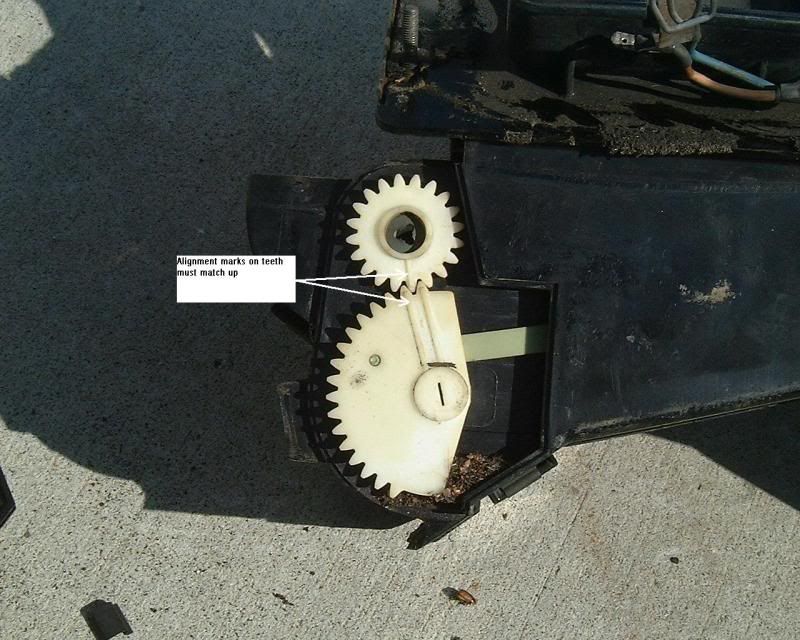
For assembly always use new O-rings on the heater valve. Do not try to re-use the O-rings because they will be deformed and pretty much guaranteed to leak. They are BMW part number 64118377824. Two are needed. Assembly is pretty straight forward. There is a sectored gear and linkage that activates the flaps. This linkage is behind two access panels that can be slid off once the retaining clip is removed.
Here there was a buildup of debris under the gear and linkage that jammed up its operation. At the very least, remove both covers and make sure this area is clean.
Its important to align the marks on the two gears so the two flaps operate in unison. The floor vent flaps have tabs that fit into a plastic bushing on one side and into the gear on the other. Assemble the flaps and with the core in place, bring the two halves together. Test the function of the flaps to ensure they work without binding before buttoning it up. Its important these flaps work without any dragging. Normally this mechanism is assembled dry but I cant see how a little lithium grease on the rotating parts could hurt.
Other Jobs:
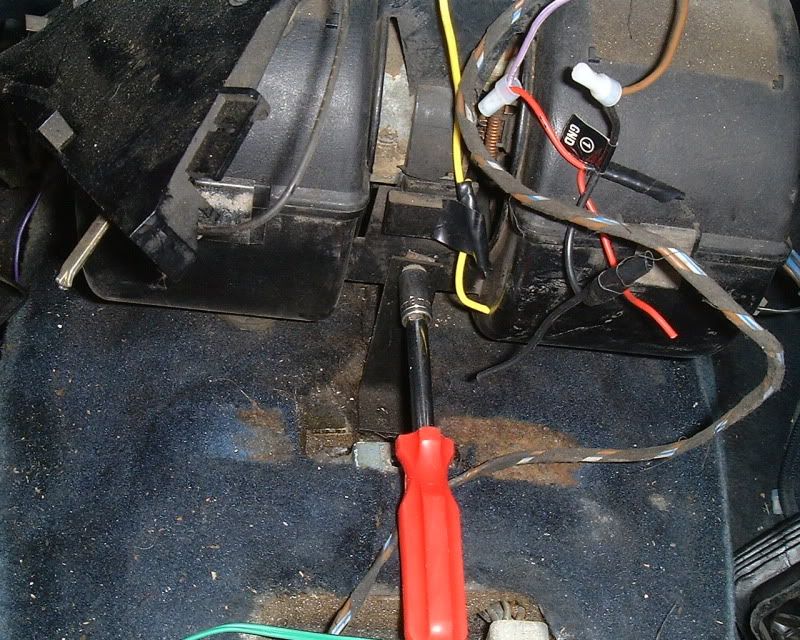
The blower motor transistor is attached to the top of the heater housing. Its job is to give variable control over the blower motor. The only two possible failure modes for this transistor is shorted or open. If the transistor shorts then the fan will be on high continuously regardless of how the control is set. If the transistor opens then the fan wont work at all. You dont need to remove the heater box to access it. From the engine bay remove the rain cover, both fan covers and the fan. Then you would need to remove the two screws that mount it to the plastic housing. Be careful not to drop the screws down into the heater. Unplug the three connecting wires and its out. The three wires are keyed so they are impossible to mix up.
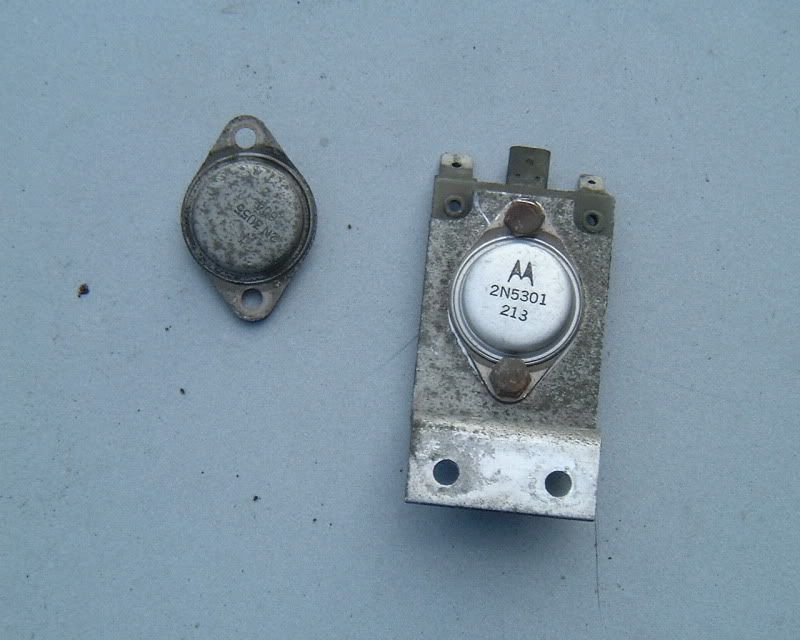
On my car the transistor was blown (like a fuse) and the heater fan wouldnt work at all. So I replace the OEM 2N3055 transistor with a more stout 2N5301.
The substitute transistor isnt critical, its used in a basic series-pass configuration. The substitute transistor must be NPN bipolar and should have the same case style (TO-3), have a collector current rating of at least 15A like the original.
Heres a link that shows how to test transistors.
http://www.hobby-hour.com/electronics/testing-semiconductors.php
If you need to change the transistor, some soldering skills are needed. Google for a How-To or look on You-Tube for a video. Its not terribly difficult to do.
http://www.youtube.com/watch?v=I_NU2ruzyc4
Before installing the heater box back into the car check the function of the fresh air vent flaps. Lube the mechanism if you feel it needs it.
Since the foam gasket on my heater box was pretty much gone, I applied some foam tape around the perimeter of the opening. This will give me a nice air and water tight seal against the firewall. You can pick up the foam self-adhesive tape at any hardware store cheap.
Installation:
Not much to say here. Assembly is going to be the reverse of removal and pretty straight forward. Connect the heater hoses and re-fill the engine with coolant. Make sure you bleed the air out of the engine when filling by loosening the bleed screw on top of the thermostat. It would be a good idea to run the engine up to operation temperature and check for leaks. Open up the heater valve by turning fully clockwise. With the valve open, the flow through the heater core will purge out any air. Warm the engine up to ensure the heater is putting out good heat. It will be easier to deal with any leaks now rather than waiting until the dash is installed.
In the next part Ill be working on the controls for the HVAC.
Mine: 1988 635CSi Euro in Diamantschwarz Metallic, 1989 ALPINA B10 3.5 in Alpineweiss II,
In the family: 1958 Isetta 300 in Federweiss/Pastellblau, 1987 635CSi, 2000 M5
My YouTube Channel
Member
Awesome write up, have you done the HVAC controls write up yet?
Memberish
Thanks. No, I haven't finished the part on the controls yet. It's still in a rough draft. I've been meaning to do it for a long time now but busy with life things. I will get moving on that this spring. I promise.Originally Posted by Finally6

Also, if all goes well, this summer I'll add a part on air conditioning too.
Mine: 1988 635CSi Euro in Diamantschwarz Metallic, 1989 ALPINA B10 3.5 in Alpineweiss II,
In the family: 1958 Isetta 300 in Federweiss/Pastellblau, 1987 635CSi, 2000 M5
My YouTube Channel
Member
"If the transistor shorts then the fan will be on high continuously regardless of how the control is set. If the transistor opens then the fan wont work at all."
How about if it only comes on in the high position (cranked right over)?
Member
Thanks so much for this! I will be using it one day. My '79 has a leaky core (I've bypassed it for now at the firewall and won't be driving in the winter anyway) and the A/C works but not great.
banjo_84us@yahoo.com
Actually this system is surprisingly similar to the E28 based E24's (without rear a/c at least). This write up would definitely be helpful on those. The only major differences I can spot are that the heater valve is under the hood on the later ones (and of course the heater cors is slightly different because of it), and the a/c pipes have O-rings instead of crush washers. Most of the process would be the same.
Member
Hi, I am having a similar problem with my heater blower. My auto electrics experience is extremely limited.
I have replaced the transistor with an identical replacement in my 1982 635csi, and I have tested the 2 relays I found behind the blower control panel (Which both work). I haven't been able to test them under load, though (Don't know how).
I also replaced the heater blower fuse. But the heater still only works on high, with the dial cranked over to the max point. It doesn't work at all on the lover progressive stage.
Could there be something wrong with the dial? If so, what?
Please can you help?
Memberish
Yes, the dial could be damaged. Ensure all the wires on the back of the controls are pressed on and tight, one may have pulled off. Other than that, swapping the control will let you know if it's defective.
Mine: 1988 635CSi Euro in Diamantschwarz Metallic, 1989 ALPINA B10 3.5 in Alpineweiss II,
In the family: 1958 Isetta 300 in Federweiss/Pastellblau, 1987 635CSi, 2000 M5
My YouTube Channel
Member
Hi, CW6er member said that there are essentially 3 transistors. One at the interior blower, on the right side of the center console under the dash, one at the external blower under the rain panel in the engine compartment and apparently there is another behind the blower control panel. Not sure if that is correct, I have the control panel out, but did not see any transistors there, only wires and relays.
The wires all went to terminals, only one brown wire, which I think is an earth, was not connected to anything. There was no spare terminal for it to connect to, oh and all the relays are working fine.
I'm stumped!! Given up for now as I need a drivable car. Put all the panels back, at least the blowers both work on high, and of course there the window!!
If you have any other ideas, please let me know.
Thanks
Simon
Member
Any thoughts on whether the E24 is similar enough to this to use it as a guide?
I get nothing out of my E24 air vents unless I'm moving! At that I get mostly warm to hot air - too bad it's not winter.
BMW E36 Expert
Are there really 2 blowers? I only see one in these pics.
Now unless this is a different design, but from what I have seen, there is only one motor (with 2 fans on it) but on the same shaft.
There is also only one knob to control blower motor speed.
Some later models (new models) like 7 series have 2 blower motors, but this is for each side of the front passengers, but is not a separate heater and AC blower.
The blower motors is just to move air. If you only have AC on, it will get cold, but it always goes through both the evaporator and then the heater raditator. So with heater on and AC on, air first gets cooled, then heated.
But all controlled by the same blower motor.
1998 BMW M3 3.2 Cabrio Alpinweiß III on Schwarz German spec 1 of 12
SMG SRA PDC AUC OBC GSM HK UURS IHKA FGR MFL
IG: https://www.instagram.com/iflok/
Member
Hi MParallel
There are in actual fact 2 blowers. The first which I think is for the heater is located under the scuttle panel in the engine compartment, just below the windshield wipers. The other is located inside the car, in the dash, behind or under the radio and in front of the gear shift. This on I think is for the air conditioner, but I might have them ass about face. Mine don't always work. The heater fan never blows hot, only cold and only on high, but not for very long cause it keeps blowing the fuse, and the air conditioner I cannot turn on yet, cause there's something wrong with the compressor and I don't want to burn it out.
I've changed all transistors or what ever they are, and no difference. I think there might be something wrong with my fan speed controller.
But that's a completely different problem.
Currently battling with a brake booster problem.
Anyone know of a thread?
Thanks
Member
BMW CCA Member
Over in MyE28.com (and I think at BigCoupe.com, as well) is a write up for rebuilding a hydroboost unit with new O rings, etc. Haven't needed to do that, so I don't know how hard it is; but if you've done a heater core (as I am facing), then it's gotta be a snap by comparison.
C.R. Krieger #53302
BMW E36 Expert
I see. That's something new to me in that case.
But both are operated by the one blower speed knob?
1998 BMW M3 3.2 Cabrio Alpinweiß III on Schwarz German spec 1 of 12
SMG SRA PDC AUC OBC GSM HK UURS IHKA FGR MFL
IG: https://www.instagram.com/iflok/
Member
BMW CCA Member
Correct. When you push the A/C button, the blower power switches from one to the other. You can hear it quite clearly.
C.R. Krieger #53302
BMW E36 Expert
Hmm interesting.
What about heating the car and run the AC to dehumidify the air?
Do they both work then?
1998 BMW M3 3.2 Cabrio Alpinweiß III on Schwarz German spec 1 of 12
SMG SRA PDC AUC OBC GSM HK UURS IHKA FGR MFL
IG: https://www.instagram.com/iflok/
Freude am Reparieren
LOL...running both systems at once was decades beyond the technology we had back in 1979...
In all seriousness, the two systems are totally independent. My e24 is very similar to the e12 setup. Both systems share the HVAC controls, but two relays in a flip-flop configuration switch between the heater unit and the A/C unit. My car doesn't even have an a/c switch...it's controlled by turning the temp dial. One or the other can run at any given time...never both! I'll bet it could be rewired though, if you tend toward masochism.
I'm hoping that the OP updates this for A/C and control unit repair. Great stuff, this thread.
Last edited by DesktopDave; 07-05-2012 at 10:31 PM.
BMW E36 Expert
^^
I know absolutely nothing about the older BMW's tech. It's neat though that the AC switches on automatically when you set it to cold (and when that is colder than ambient temperature).
So if I read it correctly, you can't heat up the air and run the AC at the same time...?
1998 BMW M3 3.2 Cabrio Alpinweiß III on Schwarz German spec 1 of 12
SMG SRA PDC AUC OBC GSM HK UURS IHKA FGR MFL
IG: https://www.instagram.com/iflok/
Member
BMW CCA Member
Correct. Dumb, but correct.
C.R. Krieger #53302
BMW E36 Expert
That's pretty surprising, as that is what you want in cold winters. Have nice warm air, but still be able to remove the moisture.
I guess the E24 is off my wishlist then.
1998 BMW M3 3.2 Cabrio Alpinweiß III on Schwarz German spec 1 of 12
SMG SRA PDC AUC OBC GSM HK UURS IHKA FGR MFL
IG: https://www.instagram.com/iflok/
Member
Glad to have the visual for the transistor replacement. BavAuto and others want something like $120 to replace that unit! Forget that! I can solder on a transistor easily enough. I ordered this part from a place in NJ for about $3 + shipping.
- - - Updated - - -
If you have to dehumidify cold air that comes through the heater you may have issues other than the atmospheric moisture. Ambient (relative) humidity in the winter is substantially lower than that in the summer so if you need to dehumidify the air entering the cabin by running the a/c you may have a problem with a leaking heater core or condensation that is not being drained properly from the unit on the a/c side.
If the goal is to "dry out" the incoming warm air in the winter, you shouldn't need to do so unless is in situation where the air is extremely high humidity for any condition. On some cars, the recirculation feature just causes more issues with moisture in the cabin condensing on the glass instead of taking in lower humidity air from outside.
I am not familiar with weather conditions in the Neatherlands so please don't take offense. Here in Western NY we have VERY cold winters that drop the relative humidity below 30% which can quickly "freeze dry" anything overnight.
I still drive daily with no commute...
The Hazard is All, Praise the Hazard!
Member
Trevor M
Good afternoon. I want to install air conditioning in the BMW E24 in 1978. I have everything, but I can not understand where there should be a button starting the compressor? I looked at your picture, I have it all. You can take a picture of your heater control panel and conditioners? thank you so much. with HC Andrew.
Last edited by Tank88; 05-27-2013 at 03:59 PM.
Member
Wanted to thank you for this write up. It was amazingly helpful. I hope you get around the the control panel write up too. I had to give it a go myself. I couldn't figure out how to seperate the front panel from the rear housing, so had to swap out other parts. I pulled out the fan-speed dial and springs and ball bearings went everywhere. Lucky I had a spare for reference
 Posting Permissions


 Reply With Quote
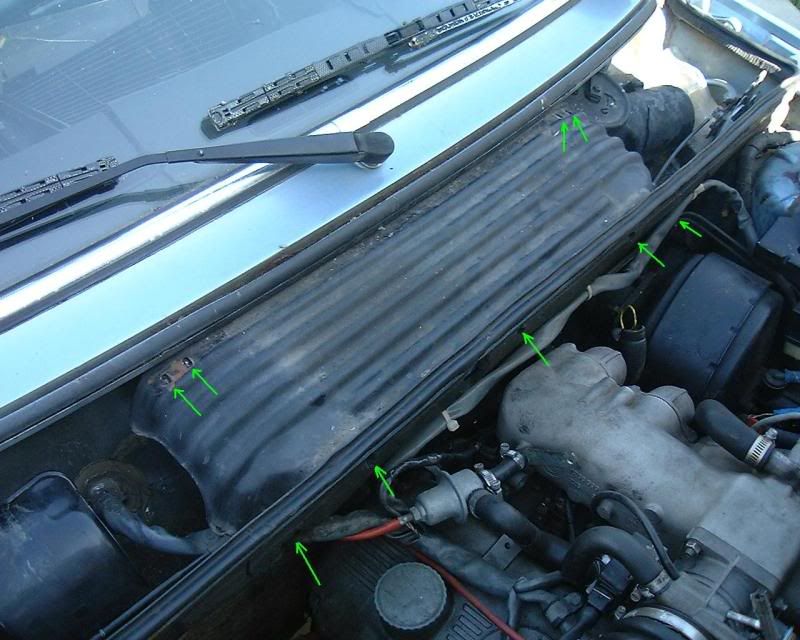


Bookmarks