
 Member
Piece of cake! Air blower very helpful in blowing out debris. Quick and easy. Thanks so much.
Member
This is a great write up! I replaced the old brittle cowl on my E46 yesterday and it went smoothly because of this thread.
I do have to mention, I agree with 2007boss... The removal of the micro-filter (cabin air filter, as the Stealership calls it) tray is not necessary.
Thanks again for posting this.
Go Team USA!
Member
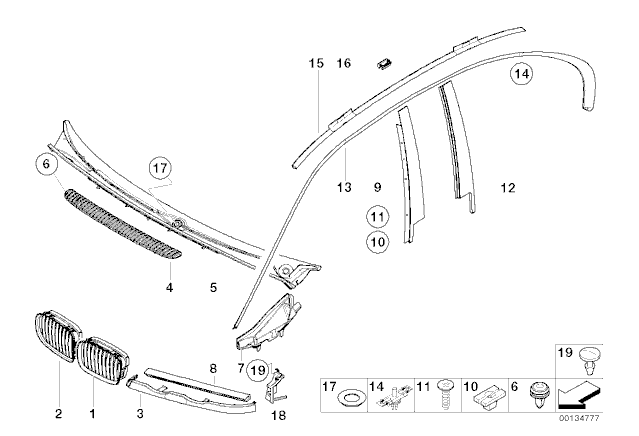
BMW parts system calls it "Cover."Originally Posted by Oli77

"Cowl" is original poster's idea.
hungry like the
Thanks for the writeup! Hardest part was removing each pressure nut.
For what it's worth, I had to remove the air filter lid. But not the entire assembly.
Member
Thanks for the great write-up. Being a new owner, I was horrified when I saw the cowl and relieved that it was such an inexpensive fix.
Thought I'd add my 02c from a newbie
The hardest part for me was removing the windshield wipers. If I had I to do it over I would definitely get a gear puller (Amazon has one for about $12). Jiggling the wipers back and forth with a pretty good amount of pressure made me worry wiggling the wiper motor that much, and I've seen stories about accidentally damaging windshields in doing so.
Mark your windshield wiper position on the bottom position with tape on the windshield before you start. If you do decide to do this without a gear puller, you can get a better angle on the wipers by putting them in at a 45 (or better) angle (run the wipers then turn off the key obviously). Before you put the wipers back on, run the wipers on intermittent and when it stops between cycles, turn the wipers off and you will be back to bottom position.
If you didn't mark your position, the distance of the top edge of the trim to the top edge of the wiper blade is 44m on the driver's side and 24mm on the passenger side.
Torque setting on the nut is 22 ft-lbs
Best price i found was getbmwparts.com $47 + $12 shipping to Calif. When the parts list comes up, you do not need to buy clips, they come installed on the cowl.
A note about that pressure nut. When you're taking the arm off play around with the arm angle in relation to the spine while you are jiggling. Once you start taking the arm off, the arm will not be perpendicular to the spin anymore and any angle will put pressure on the nut making you believe that the nut is not loose yet. If you play around with the angle on the arm so that it is perpendicular, the pressure will be off the nut and if it is released already, it will slide right out.
Last edited by werx23; 09-05-2010 at 12:55 PM. Reason: more info
Member
did mine today took about 20 mins...part was 50 bucks at the dealer for me
Int'l Man of Mystery
Just replaced my cowl this morning - this write up was very useful to me. Thank you.
[IMG][/IMG]
I.Y.A.A.Y.A.S.
Great write up, 25mins tops. Definitely recommend the armor-all on the cowl as suggested.
Member
Ditto on the great instructions and excellent pictures! I did have to use a cheap puller to get the wipers to budge, but other than that the whole process was a piece of cake. Just purchased little 1999 323i as a rolling project car and this was one of the first cosmetics I attempted. Wow, what a difference the new cowl makes for such minimal effort...thanks again. Cheers!
Member
I may be wrong, but I do believe my cowl was leaking water into the passenger floor board. It appears to have been leaking through the holes where the cowl clips in. It's supposed to rain for the next several days so I will report back whether the leak stops now that i've replace the cowl. I've already sealed the vapor barriers in the doors (it is definitely not leaking from the vapor barriers, I even pulled the door panel off in the rain and checked).
Also I got my cowl (99 323i) from KO performance (online) for $57.57 including shipping and tax. They were very personal and prompt with shipping.
Last edited by boyl7132; 04-08-2011 at 04:05 PM.
Member
Just finished installing my new cowl. DIY was perfect. No problems.
Thanks for the DIY
Member
Kinda funny I ran into this DIY cause my cowl is in at the dealer tomorrow!
Member
just finished installed my cowl, Thanks to Krueger for the help...1 hour to do a DIY Oil change and windshiel cowl...few drinks later. Voila!
Chris
Thanks to the thread starter for the DIY!
Last edited by chef423; 04-27-2011 at 09:36 PM.
Member
Great write up. Just did this after getting a new windshield.
If you are having trouble getting the wipers off without the special press tool, use a tie-rod puller. I turned the ignition on and activated the wipers, then turned it off when they were vertical. Tie-rod puller slipped on and worked perfectly.
Last edited by blinkerfluid; 05-10-2011 at 03:58 AM.
Member
Just wanted to thank you for the DIY Couldn't have done it without it. Wouldn't know where to start and it took a little longer than I thought but it looks great. I did order from ECS tuning and it was delivered to my door in 3 days. Thanks again, looking forward to more DIY projects.
Member
I can hear it now... the "Holy thread revival, Batman" comments.
But I'm adding my thanks to list for this excellent write up. I think I knocked mine out in about 20-25 minutes and that includes the 4 minutes I spent chatting with the cute neighbor somewhere between pulling the wiper arms and the cowl itself.

Member
Tipping my hat to this DIY thread. Took me about 45m and job done. Too Easy! Thanks bro...
Member
Hey boyl7132,
I have been having a prblem with when it rains there is water on the passenger side floorboards. Also my cowl is in dire need of being replaced and will get one ordered here next month. Did you notice if the water problem went away after you replaced it?
Member
Just finished this on an '02 325i sedan. A few thoughts:
1. Read post #30 within this thread before doing this job.
2. the "foam" seal referred to in the OP is the rubber weather strip and it is indeed reused (unless yours is torn). But there is also an actual gray foam seal glued to the bottom of the cowl. The new cowl will have this already on it. On new cowls, it's black and a material other than foam and blends into the plastic visually but it's applied in the same zig-zag fashion as the gray foam on the original cowl.
3. At least on the car I was working on ('02 325i sedan), the Torx bolts on the filter housing are size T30. Then again and as noted earlier in the thread, you don't really have to take that out but it is easy to do and allows clean up of the area in question. I also rinsed the dirty housing with water.
And one final question: some recommend replacing the gasket (part #17 in the diagram). It's a 2-piece part but it seemed to me a new one was already built in to both "wiper holes" in the new cowl.
Am I missing something?
Water on floor could be due to incomplete replacement of moisture barrier behind interior door panel. Probably as part of a window regulator replacement. There's a good window regulator DIY here, with info on how to access the barrier, etc.:
http://forums.bimmerforums.com/forum....php?t=1018172
Last edited by aurelius; 06-24-2012 at 04:45 PM. Reason: Automerged Doublepost
Member
This was my first repair to my 2000 323ci. The write up and the follow up comments were spot on. Easy, although I took a lot of time to clean the airbox and waxed up the area under the cowling and just did a thorough cleaning of the general area.
The original cowling was pretty bad.
Thanks for the help guys!
Cannot Be Contained
Ive had my cowl sittin in my garage for months....THANKS, just clicked this thread!
Member
I just did mine and from the time I opened my hood till I closed it took less than 20 minutes. You DO NOT need to remove the micro filter, the cover for it or the wire harness as described in the DIY photos.
Member
Just did this on mine when buttoning everything back up from a VCG and Vaonos seals replacment.
I had the airbox off anyways but I could see where it would be possible to do this with it installed.
One thing I will add though is that with the airbox off it is easier to get those old white plastic peices out as well as see if all of the new ones are properly seated after installing the new cowl.
Member
47th customer served. Awesome write up and so easy. T27 for 2002 325ic
Member
took about 20 minutes when all said and done. Thanks!!
'98 M3 5spd - '03 540it 6spd M-Sport
 Posting Permissions


 Reply With Quote


Bookmarks