
 Member
DIY: 1998 528i S.A.S Pierburg Air Pump Maintenance and Rebuild Info
* Look up how S.A.S. works, basically at cold start, the S.A.S. Air Valve opens and the Air Pump injects extra air into the exhaust system to reduce polution.
* When Air Valve fails in OPEN position, exhaust flows backward into the Air Pump with water vapor, destroying the Air Pump.
Then no extra air is injected into the exhaust system at cold start, the ECU will register a P0410 OBD-II Code (S.A.S. Fault) because the O2 sensor does not sense a change in readings as programmed.
* Best is to prevent damage to Air Pump: Every 80-100K miles:
- replace the Air Valve as there is not much lifespan remaining.
- replace the vacuum hose, use only thick-walled vacuum hose to prevent hose collapse under vacuum suction.
I also own a 1998 Volvo V70, and the Volvo Air Pump is also made by Pierburg, so the idea is the same. The BMW and Volvo Air Pumps are very similar (almost 95% the same). Actually with this info, you can apply to any European Cars (VW, Audi, MB etc.) with this setup of Pierburg Air Pump.
---------
DIY Instructions:
1- To replace the Air Valve. This is a 10-min job.
- Air Valve is #14 (It varies from year to year), Gasket is #15. Vacuum Hose (use any thick-walled vacuum hose that matches size)
http://www.realoem.com/bmw/showparts...39&hg=11&fg=45
- New Pierburg Air Valve is $107 at EACTuning:
http://www.eactuning.com/parts/produ...ls/11727540466
- Make sure you don't over-tighten the 10-mm nuts.
Look it up but I think the torque is 10 Nm, basically snug and tug a bit!
*** Now if you read Step #1 above and change the Air Valve and its hose every 80-100K miles, you don't need to read further. Info below is for those who want to tackle the Air Pump should it become defective.
2. To REMOVE Air Pump for rebuild:
- Front Passenger Tire off
- Passenger Front side on Jackstand
- Front Wheel Vinyl Fender off (8-mm screws)
- Using a Long Extension and Ratchet, remove the 3 screws (10-mm) holding the Air Pump BRACKET. Do not touch the 10-mm nuts holding the Air Pump to the BRACKET because you will regret you did that!
- Disconnect Hose Clamps and Electrical Connector and the Air Pump will come out.
3. To REBUILD Air Pump.
Rebuild only if you are short of budget and has the skills/desires to do it. With proper tools, it is easy.
Without proper tools ---> order new Air Pump!
Information is included here for those who have the skills and tools.
- Follow the instructions in the attached pictures.
- This is from my 1998 Volvo V70 but it is the same for BMW E39, use 6 paper clips to wedge the flange and pull it out:
Here is the BMW E39 Air Pump:
Tips/Tricks:
- To drill out the Six (6) rivets holding the Air Pump, use a 5/32" drill bit, the rivets will come out nicely.
- Use liquid paper to mark alignment of Air Pump housing to make re-installation easier (don't you want your life easier?...)
- To re-install, use #8-32, 1.5 inches long nuts and bolts. You need a tocal of Six (6), Hardware store sells this package for $0.99.
- After the nut is tightened (don't over-tighten the nut), I use a pair of vice-grips and crimp the protruding threads on the bolts to prevent the nuts from working loose; kind of locking the nuts in (I did trick on my Volvo one year ago and the nuts hold tight).
---
BMWCCA 484984
Sweet!
Member
d**n,this is da sh**!!
Last edited by jamesdc4; 10-04-2009 at 04:19 PM.
BMWCCA 484984
Just to be clear, this IS also known as the "secondary air pump", correct?
Member
I love cnn's DIY ! Makes me want to jack up my car and give it TLC.
Jamesdc4: Correct, this is a.k.a. 2ndary air pump
Incidentally, mine produces a whine noise under operation. If I rebuild, would replacing the bearings be easy to remove and replace? Or does it require purchasing assemblies and/or sourcing related individual parts that BMW doesn't carry?
Member
Another great DIY from cnn!
I just started reading this in the middle of the page and immediately realized who is the author...
Member
No need for any BMW part. The bearing is standard SKF bearing for a few dollars. The info is included in the DIY!Originally Posted by DHoang

HTH.
ShutUpWomanGetOnMyHorse
My pump is noisy, but I'm not throwing a CEL. Is this just an indication that it is on its way out? Or is it already dead and I need to replace/rebuild the pump? Again, no CEL.
I've read that replacing the air valve will reduce the noise. Can anyone confirm this before I spend the $100 for a replacement?
CNN: Great write up!
Member
Treat the Air Valve like Tires, after 80-100K there is no lifespan left, replace it to prevent a bigger problem (damaged Air Pump).
The Air Pump can be rebuilt, all you need is:
- Read the DIY carefully to remove the Rotor (the part that makes the wind)
- Replace the bearings and you are done.
Member
I did not have CEL in the beginning. Even when it was noisy. Then, most likely when its stopped functioning, it threw a CEL with code.
Please listen what CNN says - he knows!
Member
Great DIY CNN, I' do have a question regarding the Air valve hose. I need to replace mine because it has a leak, but I can't figure out where the other end is. I saw on the picture there are two hoses that attaches to the air pump. I wonder if you know the part # or just any thick walled hose with same size which you mentioned will work fine. Did you have any problems with the kink in the hose. If you happen to know any online store that I might get the hose from, appreciate it. Tnks.
Member
Hi folks,
Fabulous DIY article. Just the other day we started noticing a squealing sound upon start-up in our '98 328i. I tracked it down to the air pump (it would squeal more/less as I bumped the top of the housing). The squeal would disappear after a minute or so. So this article was JUST what I was looking for -- I purchased a 626 bearing, some small screws, and I dove right in.
I drilled out the housing rivets, and opened the clips on the sides. The top came off nice and easy -- now just pull the impeller off...
GRR!!
...there was NOTHING on the end of the impeller hollow shaft that I could grab onto to allow me to press out the motor shaft. There was a concave radiused aluminum section that ran almost to then end of the shaft, then a very short (1/8" long maybe) section of steel shafting with the same OD as the end of the aluminum section.
So, it was either give up and buy an new air pump or press it out anyway, hope for the best, and continue with the DIY fix -- so I decided to forge ahead. Pressing it out was ugly, real ugly. I couldn't support the impeller hollow shaft in any rigid way so I just put the entire housing on my drill press table and shoved. There was quite a bit of flexing during the press, but the shaft finally broke free and, surprisingly, all plastic bits came through entirely unscathed. Unfortunately the aluminum impellers were somewhat dished. So dished that they would no longer spin freely in their housing.
At this point I did a little swearing and I was close to giving up. But having nothing left to lose I decided to push on.
I had to disassemble the impellers to have any chance of straightening them. There was a flange at the bottom (motor side) end of the impeller shaft that seemed to hold it together. Again, nothing to grab here, so I just ground off this flange and the bottom impeller popped off. Now I could give each impeller individual attention, and I straightening them as best that I could, evaluating my progress by eye. To hold it all together again I welded on a washer to the end of the hollow shaft, then pressed it axially so as to bend it slightly, tightening up the whole assembly.
Now I could continue with the main program. Removing the motor from the plastic housing, opening the motor case, replacing the motor bearing, and replacing the bearing holder spot welds with screws. Regarding the screws, I used #6-32 screws with Locktite, then I ground off the protruding outside threads flush with the motor housing. All of this went beautifully, just as described in the instructions, and it was a piece of cake compared to what I had just come through with the impellers.
I had to be really careful pressing the impeller assembly back onto the motor shaft because, without a non-damaging way to pull it back off, it was a one-way trip. I checked the position repeatedly, nudging it onto the shaft a little at a time until the impellers would spin freely in the housing.
I got everything put back together and installed in the car and it seems to be working just fine now -- no noise, no error messages. Total cost was about $10. If not for the impeller problem I'd be insufferably pleased with myself.
On reflection:
If I had to do it again I would have to come up with some proper way to pull the impeller off the motor shaft -- I consider myself to be very lucky that I got the impeller working again at all. Perhaps I could take a piece of steel plate, drill a hole SLIGHTLY bigger than the end of the shaft, slip it over the shaft and weld inside the hole to the end of the shaft. I could then bear against this new plate to press out the shaft. When all was done I would grind off the plate.
Anyway, all's well that ends well. Thanks a bunch for the inspiration.
Bob
Member
ramoynihan,
Good Job!
1. Make sure you replace the Air Valve too, a bad Air Valve will cause water damage in the Air Pump.
2. As a reminder for others, the most challenging part is getting the Impeller off. You need a proper puller.
Member
Without the puller, you can pull the Impeller using this home-made method:
1. Using a Vice-grip and appropriate nut, bite both the collar and the nut so they become one unit.
2. Then use appropriate bolt to remove the collar.
Basically this is a "home-made" puller!
Member
Ok a quick question here. I have read many of the posts on this but still no clear resolve but total teardown or "CHIP". I have had this e39( the last one was a 98 and i rolled it) my current 01 since 2002 with 71k on it i have been looking into the autoathority chip to widen the parameters on the secondary air pump circut. I have replaced the vaccume switch, the valve and the pump. the only thing left is the aluminum hose and actualy pulling the heads to resolve the carbon build up issue. WHat is the PN for the aluminum hose for this that goes from head to head? Does anyone have a good source for it? What are they going for now. When i bought the pump it was 279 and the valve was 89. i HAVE HEARD OF PEOPLE PUTTING acetone in the hose and letting it soak to remove the carbon. In my eyes this should be a $30 piece of tubing. I have used air to test circut and listen to exhaust to see that the hose adn valve are working and not totaly blocked.
Member
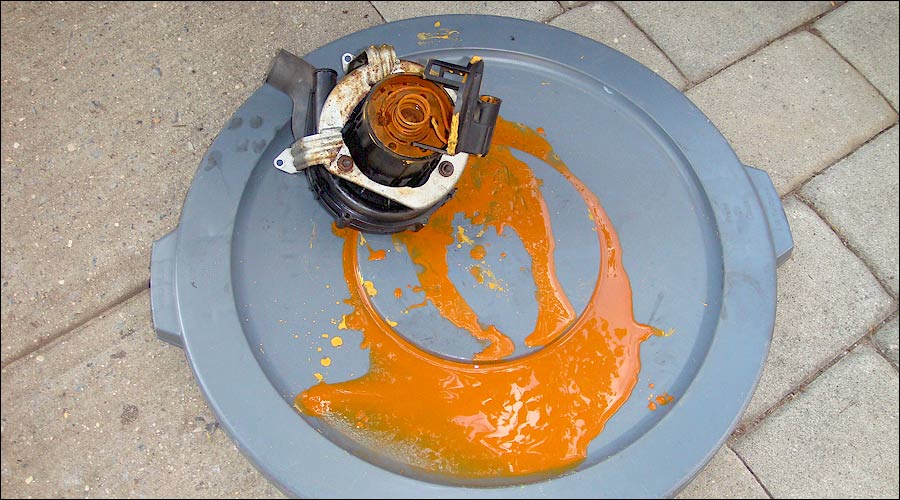
For those of you who want to see the anatomy of a typical Pierburg Air Pump, here it is. I just took the picture today. You can see that the motor shaft is 6-mm and is press-fit into the impeller. So with some WD-40 the day before, vice-grip on the stub of impeller and a 5-mm drift, you can tap the motor out:

Member
got the part
anyone tried it ?
Member
Read the posts by sltx:
http://www.forums.bimmerfest.com/sho...=402816&page=2
Member
didnt see this post before CNN , maybe you can update this with all related info
same story ordered directly from Graupner
Last edited by champaign777; 12-07-2011 at 05:53 PM.
Member
Just tackled this over the weekend. One tip I have for getting the impeller off the motor shaft is use a 6mm bolt and just thread it into the center of the impeller. I didn't have to use a tap for this, the bolt just formed it's own threads. Also, I had to repeatedly spray PB Blaster into the hole, for a couple of days actually, before the bolt would push the motor shaft out. I used a pair of vise grips to hold the center of the impeller. I tried a little heat from a propane torch too, which may have helped to get the pb blaster in there better. Just go easy with it, like 5 seconds max, don't want to melt anything.
CNN, one thing I was confused about. You mention the bearing size as 19x6x6, and the motor shaft is 6mm, but what about the brass spacer? This measures 8mm, so wouldn' you need a 19x8 bearing? Or, are you leaving out the spacer when you put in the new bearing?
Thanks for the great writeup.
*edit, i figured out that it is actually 2 spacers, one on either side of the bearing, so yes it is a 19x6x6 bearing.
Last edited by 69tr6r; 04-03-2012 at 01:55 PM.
Member
Heya guys,
This is from 2009 when I removed Secondary Air Pump...
...and stored away in the garage. I never took it out of box, but I think its long gone.
Anyway I gonna swallow a bullet on this one and order parts.
- Air Valve (P/N 11-72-7-540-467) - Pelican Parts, $103.25
- Air Pump (P/N 11-72-1-427-911) - AutohausAZ, $237.45
cnn, you mentioned thick-walled vacuum hose to prevent hose collapse under vacuum suction
Where can I get one?
TIA,
siny528i
Last edited by siny528i; 06-26-2013 at 09:53 PM.
BMW CCA 434493
who cares
BMW CCA Member
Thankful I found this thread.
I have a pump I removed from my 540i about 4 years ago that was getting VERY loud on startup and eventually died. Turns out the pump didnt die, it just popped the 50a fuse. I ended up getting a new pump unit and when it did not run, thats when I learned to check the 50a fuse under the passenger seat. Also changed ALL of the parts in the secondary air system.
Cleaning out a storage, I found the old pump stored away. I got to taking it apart about as far as just the end caps,.. no further. I will either repair the pump following this thread or sell it to someone interested in doing it themselves... the pump is a pretty expensive part.
Stancing is for drivers trapped in an abusive relationship of their own lives.
 Posting Permissions


 Reply With Quote


Bookmarks