
 Member
1998 BMW 528i COMPLETE FRONT SUSPENSION OVERHAUL
I just did my ENTIRE FRONT END SUSPENSION-STEERING OVERHAUL and here is the DIY.
It is a Long Write-up! So get some Popcorn and Coke to get through it.
At 105K miles, here is my observation:
- The Thrust Arm: Bushings are long gone (may have been gone around 50K) with oil leaking out, rubber cracked; the BJ side is a bit loose but no play yet.
- The Control Arm: Bushings are still OK, the BJ side is a bit loose but no play yet. May have another 30-40K miles.
- Tierods: INNER and OUTER BJ a bit loose but no play yet. May have another 30-40K miles.
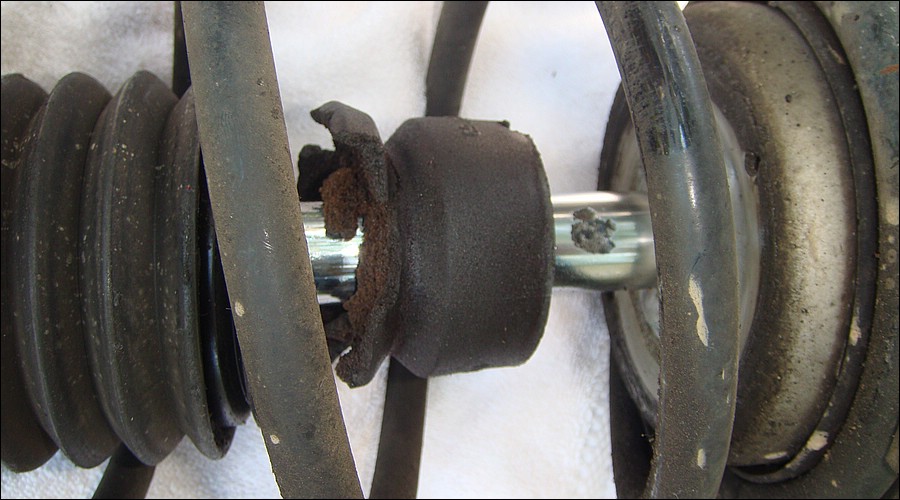
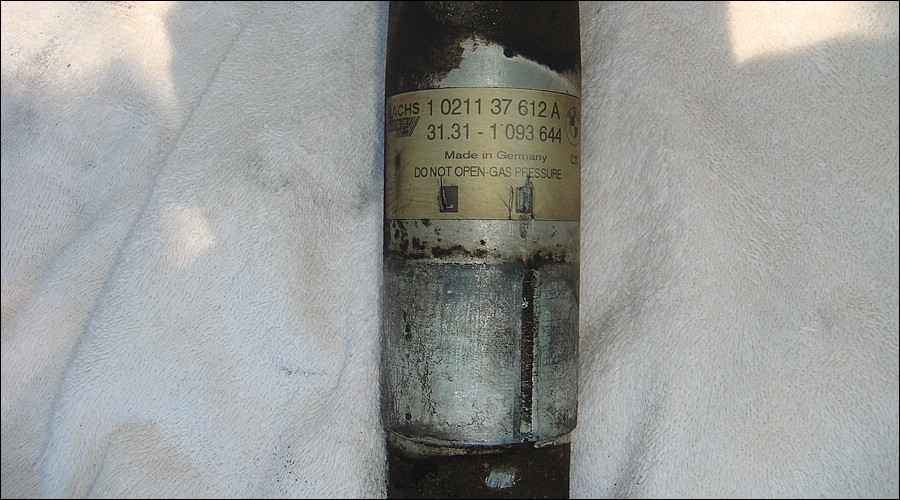
- OEM Struts (Sachs) are long gone with no resistance and oil leaking out the top seal. The Strut Guide (with built-in bearing): grease dried out, there is slight-moderate play in it. May have another 30-40K miles.
- The Sway Bar Rubber bushings: the hole is widened and loose.
Now with Brand New Suspension, car is nice and tight. I will have to wait to do the Rear Suspension later (No time right now with family and kids).
PARTS LIST:
* I got 90% of my parts from EACTuning.com, excellent services/prices. They also know the E39 well, so if you get stuck with any technical stuff, call Jared or Mark at EACTuning.com.
* The Lemforder Thrust Arm comes with liquid-filled Boge bushing, which can leak after 30-40K. Best is to buy the Thrust Arm with Meyle HD already pressed in for you. The Meyle HD Bushing allows the Thrust Arm to last much longer like 100K or so. Only available at EacTuning dot com:
http://www.eactuning.com/e39-thrust-...ngs-p-453.html
* For parts that EACTuning does not carry (such as Stabilizer rubber mountings, nuts/bolts), get them from your local BMW dealer or "Crown Auto" (a large dealership network in NC):
http://www.crownbmw.com/bmw-parts-specials.aspx
* The issue of re-using nuts/bolts: I use New nuts/bolts, but most BMW mechanics re-use the bolts, they simply change the nuts. If you go this way, note that the New Lemforder Items (Tierods, Thrust and Control Arms) come with the extra Nut in addition to the Ball Joint Nut! So the only thing you may need are the Pinch Bolts Nuts holding the strut in to steering knuckle: PN 33326760374.
ITEM..................................PN.......... ......Price/each.....Qty....Subtotal.......Comment
Bilstein HD Front Struts........VE3B406H1........$167.08......x2.... ..$334.16
Strut Mount.......................31336752735.......$43. 18......x2.......$86.36
[Rubber Boot for Strut]......31331091868.........$2.35.......x2.......$4. 70
(Bilstein had its own Rubber Boot and Internal Stopper, so no need to buy Rubber Boot for Strut if you use Bilstein)
Spring Pad UPPER...............31331091867.........$3.72..... ...x2........$7.44
Spring Pad LOWER..............31331091864.........$3.54...... ..x2........$7.08
Collar screw
M12X1,5X95-10.9.............31306779823...................... ...x2..............To get from dealer
Self-locking collar nut
M12X1,5-10 ZNS3............33326760374....................... ..x2..............To get from dealer
LEFT Swing Support..........31351095661..........$35.61...... .x1......$35.61
RIGHT Swing Support.......31351095662..........$35.61.......x1 ......$35.61
Stabilizer rubber mounting...31351093108.....$20......x2........$40. ........To get from dealer
Left tension strut (= Thrust Arm)
LEMFOERDER.................31121141717..........$1 60.............x1...$160
EACTuning.com only
Right tension strut (= Thrust Arm)
LEMFOERDER.....................31121141718........ ..$160.........x1...$160
EACTuning.com only
(NOTE: These are Lemforder Thrust Arms with Meyle HD Bushing pressed in, only at EACuning.com)
Hex bolt with washer
M12X1,5X120...................31106769441......... ..................x2.........To get from dealer
Self-locking collar nut
M12X1,5-10 ZNS3.............33326760668...................... ....x4..........To get from dealer
Left Wishbone (= Control Arm)
LEMFOERDER...................31121094233.........$ 133.14.......x1.........$133.14
Right Wishbone (= Control Arm)
LEMFOERDER...................31121094234.........$ 133.28.......x1.........$133.28
Collar screw
M12X1,5X95-10.9............31306779823....................... .....x2.........To get from dealer
(Control Arm Bolt same is the same PN as the Pinch Bolts for Steering Kuckle)
Tierod Left LEMFOERDER....32111094673.........$60.78........x1 .........$60.78
Tierod Right LEMFOERDER...32111094674........$59.14........x1.. ......$59.14
Rubber boot For Tierods.....32131092876.........$7.29.........x2.. .......$14.58
"Oetiker" Clamp.................32111137132.........$1.79... ......x2........$3.58
"Oetiker" Clamp.................32131094100.........$2.30... ......x2........$4.60
Options:
Front Wheel Bearing
(mfg = F-A-G).............31221093427.........$125.42........ ....x2.........$250.84
Wheel Bearing Bolts.....31121093843............$2.25............ x8...........$18.00
I did not replace the Front Bearings!
TOTAL APPROX............................................ .................$1510 (including Bearings)
-----------------------------------------------------
SPECIAL TOOLS AND NOTES:
1. The 13/16" (= 21mm) Spark Plug Socket, plus Metric Allen Wrenches for counter-holding the bolts:
2. One 2-foot length of black cast iron piping $5 at Home Depot Hardware Store. This helps with the 3/8" ratchet to undo tough nuts/bolts.
3. Harbor Freight Ball Joint Removal Tool: PN 99849 ($18.00):
http://www.harborfreight.com/cpi/cta...emnumber=99849
- This is a MUST! Don't even dream doing this job without this Ball Joint Removal Tool!
- Remember to spray WD-40 (or similar lubricant) onto the Ball Joints and let it sit for 30 minutes before removing it.
- Oil/Grease the BJ Tool a bit before using it. At this stage, you can dream about Bahamas vacation when tightening the BJ Tool (22-mm socket-ratchet with iron pipe) but you will hear a "Rude Awakening" when the BJ comes loose: a loud bang like a shotgun! So Ear plugs are very useful when you get to this stage! Or tape your ear with some masking tape etc.
- The trick: Tighten in increments, let's say 4-5 moves at a time to allow the BJ to adjust to the force; stop and repeat in a few minutes. By the time you reach 110-120 Nm, you should get the loud bang! The BJ Tool will drop to the ground.
4. Strut Nut Socket.
- The Stock Sachs Strut Nut is 21 mm and the 13/16" (= 21mm) Spark Plug Socket works just fine.
- The Bilstein Strut Nut is 22 mm, so you have a few options:
a. From Speaking with local mechanics, they laughed at me when I mentioned I need 22 mm Socket with Hex Sides at the top for a wrench to fit. They all use Impact Air Tool set at the lowest setting to get about 60 Nm. They have done hundreds of shocks without problems.
b. Re-use the Stock Sachs 21mm Nut (it will fit the Bilstein), probably OK to re-use 21-mm stock Nut.
c. The special 22-mm Socket with a Hex Top (Like a spark plug socket) is expensive and difficult to find. What I did was: Get the Harbor Freight Oxygen Sensor Socket Tool: PN 95045 ($4.00):
http://www.harborfreight.com/cpi/cta...emnumber=95045
The Oxygen Sensor Socket Tool is a bit "fat" and cannot be inserted into the Strut Guide to tighten the nut, just grind the socket a bit and you will be able to insert it.
I used a Belt Sander turn upside down and grind it down a bit. You can also use a Stone Wheel Bench Grinder as well. I made a nice tool for Bilstein Strut 22-mm Nut for only $4.00!
5. Liquid Paper: You wonder why right? Yes, use this (or any paint touchup brush) because there are many nuts/bolts and it is easy to forget which one has been torqued or not. At BMW factory, they use blue paint to mark a nut or bolt that has been properly torqued, so later at a glance they know the bolts/nuts have been torqued.
6. Wrenches: Get a complete set of metric anyway to qualify you as a Saturday mechanic......
Most Metric Wrench Set jumps here and there, missing one or 2 wrench sizes. Get a compete set, i.e. every single size from 8-mm all the way to 25-mm for your collection!
* LONG 13-mm. The 13-mm wrench is for the Sway Bar Bushing nut, which is in a very tight place on the passenger's side and you DO need a long wrench for extra leverage!
* You need a total of two (2) 18-mm wrench for the Thrust Arms. The additional 18-mm wrench is for the Thrust Arm, which is in a VERY TIGHT space (i.e., no space for socket); unless you remove the Plastic Housing next to it.
* A 16-mm thin bicycle wrench is very useful to hold the Sway Bar Endlink bolt while you undo the 16-mm nut. The standard 16-mm wrench is a bit 'fat' and can damage the endlink Rubber boot: don't ask me why but I made this mistake in my 1998 Volvo V70, the 16-mm wrench pushed the boot too far out, I spent 45 minutes repairing the rubber boot = not funny!
- If you use a standard 16-mm wrench, then BE VERY CAREFUL not to damage the rubber boot! The 16-mm BICYCLE wrench makes this a breeze! It is $4-5 at local bicycle store, I use 'Park Tool' wrench (This is known as a 'CONE Wrench' in the bicycle world):
http://www.parktool.com/products/
7. The BIG Trick: Jack up BOTH Sides but work only on ONE Side at a time. Why? Because if you jack up only one side of the car and try to remove the end link from the sway bar, you will likely use the 4-letter word! Jacking up both sides makes the job MUCH easier.
Why work only one side at a time? Because you want to leave the other side alone as a reference in case you want to know how nuts/bolts are fitted, orientation etc.
8. From the Start, Undo all the nuts/bolts on both sides but STOP as soon as the nuts are flushed with the end of the bolts, Why? This loosens all the nuts but keep the components (tierods, thrust arms, control arms) in place. Also this allows space for spraying lubricants such as WD-40 into the Ball Joints. For Ball Joints Nuts: if you leave the nut flushed with the end of the Bolts, you now have extra place for the Ball Joint Tool to bite, and less likely to slip out (see pic later)!
9. Do this inside of your garage or out of place in case you don't finish the job in one day, you don't block traffic!
10. Note on BMW terminology: Go and look at let's say a 1998 Volvo V70 with standard A-arm: 2 bushings and one ball joint. BMW simply splits this A-Arm into two (2) separate parts, each with its own bushing and BJ and calls it "Thrust Arm (front part) and "Control Arm" (rear part). This split of the Ball Joints allows the Front Tires to move up and down in a more controlled manner (tires making more contact with the road under different situations) during turns ---> spirited driving ---> Ultimate Driving Machine!
11. Take special care not to damage any Rubber Boot. Nobody sells these Rubber Boots as separate items. If you damage any Rubber Boot, your only recourse is "Energy Suspension" brand aftermarket RUBBER BOOT part.
Another source for Strut DIY is:
http://www.beisansystems.com/procedu..._procedure.htm
-------------
PROCEDURES:
1. Raise and Support car on BOTH Sides but work on ONLY One Side at a time. Remove under car Plastic Shield. And support with Jackstands as shown. It is important to place Jackstands at the proper spot so it does not interfere with removing nuts/bolts later. Chock REAR Wheel. NOTE that I placed the tires under Front Jack Pad as 2nd line of defence in the extremely unlikely situation that the Jackstand fails. Your life is worth more than the Jackstand!
2. Get a container to store nuts/bolts because you can easily lose them. Make note of which nuts/bolts go where etc.
3. Use a Towel to protect paint work above wheel well! Removing the strut can damage paint work if not being careful!
4. Loosen all nuts and leave the nuts flushed with the end of the bolts, i.e. do not remove the nuts yet.
5. Now spray WD-40 on the Ball Joints (BJ) and let it penetrate the parts.
6. Remove Brake Caliper and hang it up using electrical wire:
7. Loosen the Strut TOP nut (21-mm for Sachs and 22-mm for Bilstein) but do NOT remove it. Use a 6-mm Allen Wrench to counterhold it (Trick: use an 8-mm socket and extension to hold the Allen wrench). As mentioned above, 21-mm Nut ---> Large Spark Plug Socket; 22-mm Nut ---> Use the modified Oxygen Sensor Socket (sanded thin a bit):
8. Remove Sway Bar End Links:
9. Remove Outer Tierod BJ:
10. To remove Strut, remove the three (3) 13-mm nuts on the wheel housing. Steps #8-9 are necessary because the steering knuckle must be dropped to remove the Strut. Also Loosening the Thrust/Control Arms Nuts (on the sub-frame side) allows the strut to drop easier because it is not held by the bushing!). Spray some WD-40 at Strut-Steering Knuckle interface. Loosen the Pinch Bolt. Then twist the Strut back and forth to work it loose from the Steering Knuckle:
11. Place a jack below the Steering Knuckle and slowly lower it to allow the Strut to come out. The clearance is very tight, so watch to prevent paint work damage!
12. Now STOP and spend a minute to observe the Strut layout (if this is OEM and has not been changed previously). I think the Spring TOP and BOTTOM are different, so don't mix it up. Mark the TOP of the Spring with Liquid Paper. The BOTTOM of the Spring is about 6 inches to the Right of the Notch on the Strut Perch or roughly at 4:30 o'clock if the Perch Notch is 12 o'clock.
* The Trick: use the old rubber pad as a guide, transfer it over to the New Strut and Mark the spot where the BOTTOM of the Spring should be, this will make your life mush easier and avoid the clunking problem seen in this forum from improper Strut installation. The Bottom line: follow the factory setup!
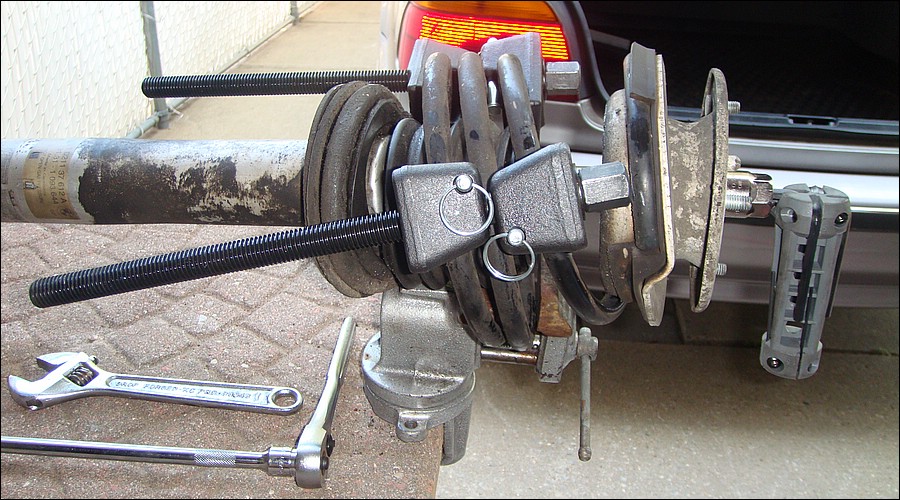
13. I use three (3) Spring Compressors instead of the usual 2 compressors, it is much easier (and SAFER) to compress the Spring this way. Remove the Strut and NOTE the layout. Do NOT lose any washers. Note that at the bottom of the Strut Guide, there is a protective washer, I re-use it. Of course, you can also get a new protective washer.
14. Now install the new Bilstein Strut, Rubber Pads (the UPPER Rubber Pad is different than the Lower Rubber Pad), New Strut Guide, Washers in the appropriate order. Align the Lower Rubber Pad with the Notch on the Strut Perch:
15. Hand-tighten the 22-mm TOP Nut for now, final torquing of this Nut will be done later in the car. Slowly release the 3 Spring Compressors making sure that the Spring lines up exactly as factory setup: TOP of Spring touches the Guide notch and BOTTOM of Spring lines up with the 4:30 o'clock mark on the Perch.
16. NOW Stop! If you want to replace the Thrust Arm, do NOT install the Strut now! I made this mistake…...........Arghhh…...........and later have to undo the Strut-Steering Knuckle attachment because the Thrust Arm BJ cannot be removed with the Strut in place!
NOTE: BJ Removal Tool bites on both the nut (I leave it flushed with the bolt's end) and the bolt:
17. Replace the Thrust Arm with new Thrust Arm, hand-tighten the 22-mm Nut but do not torque it yet (Do all of these Nuts later). Before you can do this, you have to remove the Thrust Arm's protective boot (10-mm bolts) and the Plastic Fender Lower Housing and the Plastic trim (8-mm socket) which itself has three (3) 8-mm screws:
18. Replace the Control Arm with new Control Arm, hand-tighten the 22-mm Nut but do not torque it yet (Do all of these Nuts later).
19. Re-install Strut, taking care not to damage paint work!
- Place a jack below Steering Knuckle and slowly raise it up.
- Twist the new Strut a bit to allow it to sit properly.
- Make sure the Strut bottoms down properly on the Steering Knuckle!
- Also check the R vs L marking lines up correctly as shown.
- Jack up the steering knuckle a bit more, verify that everything is correctly lined up.
- Now torque the Pinch Bolt to 81 Nm.
20. To replace the Tierods:
* Stock BJ Nut is 18-mm
* Steering Rack Driver's Side: 32-mm wrench and counter-hold with adjustable wrench.
* Do NOT forget to:
- Measure the old tierod and set the NEW tierod to same length before installation, this way you come close to previous setting, it makes subsequent alignment easier.
- Apply a bit of extra grease to the output shaft rack and INNER ball joints.
- Protect the Rubber boot.
- The Oetiker clamps: dry fit on the rubber boot first so you know what notch needed to tighten it. Use a Ceramic Tile Cutter (Tips filed blunted) or any Oetiker Clamp Tool to tighten it. Do not over do it. Just tighten it snug.
- The BJ side: adjust the Steering Knuckle a bit here and there (support with jack) so the BJ can go in.
- Passenger's side, no place to counterhold (simply a round Steering Rack Shaft: no place to apply the adjustable wrench), so apply 32-mm wrench and tighten it. I tighten it a bit below the published torque values (71 Nm) to avoid damage to steering rack. Actually when you remove the 32-mm nut, it was not tightened much from factory, it comes out easily. I made this mistake, so EDIT is below in red letters:
- EDIT Jan 14, 2009: The steering gear trick: The only place where you can apply the adjustable wrench on the steering gear (the part that slides R and L) is ON the driver's side. So: undo the driver side but don't install the tierod yet. Then do the pass's side, using the square part on the driver's side to hold it. Then do the driver's side.
21. Sway Bar Bushings: 13-m wrench and Allen wrench to counterhold. Driver's Side is easy.
Passenger's Side 13-mm Nut will drive you Nuttttttttttt! The space is so tight to fit the 13-mm wrench. On the back side, there are two (2) nuts. The Top Nut holds the exhaust shield, which is lifted up a bit to work on the lower nut. Slide the Bracket out, rotate the Rubber Bushing upside down to slide it out. The Pass Side Bushing alone took me 1.5 h! It is a PITA. So, for The Pass Side Bushing, you are allowed to use the 4-letter word…..........…..........The alternative is to turn on some nice radio music to soothe your pain dealing with this nut!
22. Now go around the car and torque ALL nuts/bolts except for the nuts on Thrust Arm and Control Arm (which need to be torque with car on the ground and properly loaded (150lb in each front seat, rear center seat, full gas tank and some luggage and all that blah blah blah…...........
Many people simply torque these Nuts on Thrust Arm and Control Arm with car on the ground w/o the extra weights. Any nuts/bolts that have been torqued, mark with liquid paper or paint touch-up so you know. These include:
- Sway Bar Endlink 16-mm Nuts: 65 Nm
- Strut Suspension Tower 13-mm nuts: 24 Nm
- Strut Main 22-mm Nut: 64 Nm
- Thrust Arm Ball Joint 22-mm Nuts: 80 Nm
- Control Arm Ball Joint 22-mm Nuts: 80 Nm
- Thrust Arm Subframe 18-mm Nuts: 110 Nm***
- Control Arm Subframe 18-mm Nuts: 110 Nm***
*** Torque these bolts ONLY with car on the ground and weighed properly
(150 lbs each front seats, 150 lbs center rear seat, full gas tank…...........blah blah blah)A Rubber Hammer may be useful here because of the tight space.
- Tierod 19-mm Ball Joint Nut (Stock 18-mm, Lemforder 19-mm): 65 Nm
(Remember the Tierod 32-mm INNER Nut for the steering side, Torque is 71 Nm, but it should have been tightened by now).
23. Now: Install Wheels, Remove Jackstands, LOWER the car and drive it up on ramps. Then:
Torque:
- Thrust Arm Subframe 18-mm Nuts: 110 Nm***
- Control Arm Subframe 18-mm Nuts: 110 Nm***
NOTE: As a practice, tighten the Wheel Bolts to 110 Nm using a Torque Wrench so you have an idea of what 110 Nm feels like because under the car, it is virtually impossible to fit a torque wrench, so use your muscles and feel (I did!!!).
*** Torque these bolts ONLY with car on the ground and weighed properly
(150 lb each front seats, 150 lb center rear seat, full gas tank)
I had my 16-year-old and 11-year old kids to sit in the front and that is good enough for me!
A Rubber Hammer may be useful here because of the tight space.
Also, after install, the car WILL appear higher than before, don't panic yet!
Give the Bilstein Strut 30 minutes to settle down before torquing these Thrust Arm and Control Arms Subframe 18-mm Nuts to 110 Nm.
NOTE:
- Old Bushings worn out:
- Car on Wood ramps when torquing the Thrust Arm and Control Arm Nuts. I had my 16-year-old and 11-tear old kids to sit in the front and that is good enough for me!
-----------------
The Alignment DIY:
1998 BMW 528i (data from NTB Alignment Sheet)
Toe-in: -2 minutes to + 6 minutes (or 2 minutes +/- 4 minutes) ---> Adjustable
Camber: -0.7 to 0.3 degrees (or -0.2 degrees +/- 0.5 degrees) ----> Unadjustable (unless you install a camber kit, off topic here!)
Caster: 6.0 to 7.0 degrees (or 6.5 degrees +/- 0.5 degrees) ----> Unadjustable
---> Only Toe-in is adjustable for E39.
1. If you did not sleep through your High School Geometry Class, then I will share with you this best-kept secret: Alignment DIY.
There are 60 minutes (') in one degree (A circle = 360 degrees); and 60 seconds (") per minute.
If you read Alignment Sheets, very often car mfg's misuse these symbols (') and ("). For the most part, it is minutes not seconds.
- Review Tangent and Arctan. Basically, for each stock tire front to rear rubber part is 540 mm.
Since toe-in is given as degrees and most of us don't have the sophisticated alignment tool to measure degrees, I measure using the difference (in mm) in front and rear part of the same tire (front and rear measurements).
Tangent (2/60 degrees) x 540 mm = 0.314 mm TOE-IN!
Tangent (6/60 degrees) x 540 mm = 0.942 mm TOE-OUT!
2. Requirements:
- Car with full gas tank. I by-passed the weighing business (150 lbs front seats, 150 rear seat garbage).
- Tires at 35 psi. All 4 tires should be the same make.
- Level garage at spots where car parks. Take measurements using Carpenter Level.
- 16-mm wrench for tierod adjusting bolt and adjustable wrench for lock nut.
3. The whole idea is to establish parallelism. Using the carpenter square and level coupled with Plumb Bob (see pic), measure the track width at wheel (Front and Rear) Hub Centers.
* Drive car straight out garage. Calculate the difference between Front and Rear Tracks.
* Published Values are:
- Front Track Width = 1512 mm
- Rear Track Width = 1526 mm
- Difference is approx. 14 mm
4. Put car back to similar spot. Apply Parking brake and whatever you do, do NOT move the car after this step, otherwise, you will redo the whole thing again. Remove key and rock steering R and L to lock it. Make sure SW is dead center.
5. Now mark the Front and Rear track widths (with carpenter square) on masking tape on the floor. Since the Front track width on each side is 7 mm (14 mm/2) less than the Rear track width, add 7 mm lateral to the Front Mark.
6. Using a string (held by brick) and draw a straight line between front and rear marks. This represents the straight axis of motion of the car. This line will be used a reference line:
7. Now measure Camber. I have calibrated my device so when the bubble is barely out of the marks, it is roughly 0.50 degrees (or 30 minutes, which is half of a degree). In fact this is –0.50 degrees, so it was good:
8. Now measure the toe-in: -0.314 mm (TOE-IN) up to +0.942 mm (TOE-OUT). You can actually set it at zero. Some people set it at –1.0 mm, which is very typical of many cars.
A bit of TOE-IN is good because the crown of the typical road will have the tendency to bring the tires out a bit. Some people set TOE-OUT more than spec for aggressive track use:
9. Go for a test drive on a smooth highway.
- The chances are the SW is not dead center. Make a note.
- Let's say car goes straight but the SW points a bit to the Right.
- Bring car back to driveway.
- Now, when SW is turned dead straight, both wheels point a bit to Left.
- Then adjust in equal increments (for example, pull L side in and push R side out equally). Again do this in equal increments.
One complete turn of the Tierod moves the Tierod by 1 mm but mathematically it changes the tire difference readings by 2 mm.
- Use liquid paper to mark Tierod original reference position so you know how many turns you have done.
- Tighten the Lock Nut (do not over-tighten it) to lock the Tierod.
Go for test drive again and adjust the Steering Wheel position as appropriate.
Enjoy your Ultimate Driving Machine!!!
-----
Last edited by cnn; 01-14-2010 at 12:16 PM.
Member
All I can say is WOW, nice job. I no doubt will be using this DIY in the future. Thanks.
Member
Once again, cnn / cn90 with the proper DIY and proper tools. Amazing.
Member
Nice DIY. I know they take a lot of work. Thanks.
Member
Thanks.Originally Posted by Flybot

The job alone took 10 hours.
Taking pics and do the write-up is another 10 hours (washing hands to take pics, download, edit pics, write things up, check bolt sizes, torque values etc. etc.).
But anyway hope you guys find it useful.
Member
wow. Nice write up I wish I was that skilled to revamp my suspension.
Member
LOL!
As long as you have the space/ garage to work, the tools, and half a brain, you should have no problem DIY'ing your suspension.
If I can do it, anyone can.
LOL!
CNN-
Since you did your own alignment, are you gong to take your car in to an alignment shop anyways, just to see if you aligned the car correctly?
Last edited by Jason5driver; 09-21-2009 at 06:47 PM. Reason: Automerged Doublepost
Looking for an E39 belly pan , passenger front inner fender liner
BMWCCA 484984
Member
Cool !
Now you will feel your rear
Member
No need for alignment shop because I invented this Alignment Tool some 3-4 years ago using:
- Carpenter Level
- Carpenter Square
- Plumb Bob
The 1st time I did this on my 1998 Volvo V70, I took it to the Alignment shop, dead on, no need for any adjustment.
Happened again to another car: no need for any adjustment.
So after that I gained enough confidence that I don't go to alignment shop any more.
My E39 now runs dead straight on the highway like from factory.
The Bilstein HD feels exactly the same as the Bilstein TC (maybe TC is the same as HD?) in my 1998 Volvo V70.
It is stiff but not too stiff. Basically just perfect.
As a test, I just did a hard cornering at 40 mph, boy the baby hugs the road! Wow...
Member
I read the DIY alignment and that's just genius. Great insight, and such a money saver! It's probably from copying and pasting the published values, but there is an opportunity for correction and extended clarity (in bold):
Camber: -0.7 to 0.3 degrees (or -0.2 degrees +/- 0.5 degrees)
Caster: 6.0 to 7.0 degrees (or 6.5 degrees +/- 0.5 degrees)
Member
Thanks PJB for picking up on the typo.
I took me 10h to write that thing up so some errors happened.
Glad there are a 2nd set of eyes to watch...hehe!
I fixed the errors!
PS: My Alignment Trick, it took me along time to figure it out using Plumb Bob!!!
If you read the Internet, people come up with all kinds of Alignment DIY etc.:
- Many of these DIYs are garbage and do not have a sound principle.
- Many people use Jackstands to pull the string straight: it is garbage because you are talking about mm here. Even 1 mm makes a difference.
- Some people use Carpenter Lase Square but you are at risk for cheap tool inaccuracy!
So the garbage goes on and on and on....
My Alignment trick (using principle of parallelism) is bullet-proof as long as you have a level garage:
- Right to Left level.
- Most garage concrete floor slopes a bit toward the outside (usually one inch every 4-8 feet), so if you place the front of the car facing outside, then you may want to place a 1 x 4 piece of wood under the Front tires to lift it up a bit.
- My technique uses the garage floor (masking tape on the floor) which is solid and does not move!
- Solid Plumb Bob uses the earth gravity is very precise. The key thing is get a good and heavy Plumb Bob.
- Don't let the wind blow the Plumb Bob for obvious reasons!
- Cut a small slot in the Carpenter Square so the Plumb Bob String can go in and out quickly (see my pics in the DIY).
- Also the bricks (see my DIY) keep the tool level: mark the equator of the tires with chalk first.
- When measuring, place the Tool snug against the tire rubbers at equator, then drop the Plumb Bob.
- Periodically check the SW to be sure it is Straight. During adjustment, the SW has a tendency to move:
- So set the SW wheel straight, adjust let's say L side first and set SW again. Then check L tire for proper toe-in, check SW again.
Then move to the R side. Whatever you do, before you move the car out for a test drive, check again SW has to be dead center and both front tires toe-in OK. Then you are in good business.
I learned it the hard way, very often I did the test drive (car tracks straight, i.e. aligned perfectly but SW is not) so I had to adjust the SW, it was a pain. Now with being paranoid about the SW before leaving the garage, I did the alignment in one shot!
Thanks again for picking up the error!
Last edited by cnn; 10-19-2009 at 10:07 AM.
Member
Thanks for the great DIY. I did not follow the alignment that well. Perhaps you can explain better how you measured front toe in. Did you press or pre-load wheels inward at all? Do you measure the front of the front wheel and the rear of the front wheel vs the straight line you laid out on the floor? Thanks again
Black Magic Variant
Member
YES!
- The words in bold are correct!
- Actually this is what mechanics use to align tires. They place the alignment tool on the FRONT wheels' metal part and measure the degrees of toe-in. At home we don't have this tool to measure degrees, so we use "mm" to measure the difference.
- Yes, For EACH tire (yes measure from the rubber not the metal wheel), measure the front part of it and the rear part of it (on an equator marked by chalk). Drop the Plumb Bob and measure it against the perfectly straight line you drew (this straight line is parallel to the axis of the car in that particular location in your garage, i.e., once you move the car even one inch, all the refenrence lines are no longer valid).
- Once you go through this concept in your head (basic geometry) then you will see that it is just common sense. The basic principle is that: when the car moves along the straight section of the highway, where are the front tires poiting to?
Last edited by cnn; 09-23-2009 at 10:31 AM.
Member
Damn awesome writeup ...keep it up.
You never really learn to swear until you learn to drive.
Me breaking the rules? No. I test their elasticity
Member
dude u are the man! and glad to see another canyon red 528im
i have a 97 528im canyon red can't wait to hunt down some style 5's!
i will definitely follow your diy when my suspension gets tired...

Check twice, fix once...
CNN,
Great write up! I'll have to brush up on my geometry and try the alignment on my E30 as it's pulling a little.
Thanks for putting this together!
1999 540it - Schwartz II/Sand Beige, style 5 rims, Conti DWS 235/45 tires, Billy HD/Sports, Stoptech S/S BL, F1 Pinacle 35% tint, Zionsville Cooling kit
1998 318ti Cali Sport - Schwartz II/Schwartz Anthratz, staggered style 23
1997 318ti Sport - Schwartz II/Schwartz Anthratz, staggered style 68 ,
1995 318ti Active - Alpineweib III/Schwartz, squared style 32
1994 325i - Bostongrau/Tan, Billy Sports, H&R springs
1991 318ic - Schwarz/Anthratz Stoff, Bilstien HD, Z4 3.0 SS, Magnaflow, S/S Stress bar, x-brace, M20 FW, Elipsoid/HID, K&N
BMWCCA# 160411
1995 318ti Sport Schwartz II/Schwartz Anthratz - Sold
1985 635CSI - Schwartz\Sand - Sold
1984 533i "Max" - Schwarz/Schwarz, - Sold
1984 318i - Champagne/Tan, Stock - Sold
Member
Fantastic tutorial...I just purchased purchased a 00' 540 and I need to do a complete overhaul of both the suspension and cooling system so your posts will be very helpful...I'm still on the fence however about the Bilstein HDs...Mine is non-sport model and though I like a stiff ride, the local roads are not great...Any feedback as to how the ride quality has been and whether you would still choose the HDs? My last car was a Saab 9k Aero and the HDs were tough on dashboard and trim pieces...I'm sure the Beamers are put together a little better...
Brian
Baltimore
Last edited by bwbeasley; 10-06-2011 at 11:09 AM.
Member
1. Suspension Overhaul:
Yep, Mine is Non-sport as well. The car rides fantastic, maybe 5-10% stiffer than Stock Sachs Struts. I drive it through highway and even country road. It is simply fantastic.
Plus you get the Bilstein L.T. Warranty!
I definitely recommend Bilstein HD struts.
2. Cooling Overhaul
I wrote this for 1998 528i, yours is 2000 and is a bit different. Use realoem dot com to look it up.
Here is my DIY Cooling Overhaul:
www.bimmerboard.com/forums/posts/199986
Good Luck and have fun!
The Cooling System takes priority because once the engine overheats, you are now talking about $4-5K repair!
Member
I have a '97 540i/6. What if anything will be different between the DIY you did for the 528 and the 540/6? Are there some differences in part numbers I need to watch out for when ordering?
I've done a lot of searching over the last few weeks and this is by far the best DIY out there that I can find. I have not found a 540i equivalent, I'm assuming they are all the same parts (except for sway bars and brakes I know are different) but I wanted to be sure before I started placing a big order.
Many thanks for the excellent writeup!
Member
Thanks for this write-up on suspension/alignment CNN. I just used it to replace the springs on my car. I didn't estimate the time to complete this project though, so I still have the back to do, but this was excessively useful to me.
I plan to do the alignment soon, but to clarify this alignment is for toe-in only correct, which would resolve any issues if your car isn't tracking straight. However, what if your car was lowered? Is there an alignment DIY/thread out there for camber? I went from sport suspension to Vogtland springs which really only lowered the car another 1/2", possibly 3/4", and I also just put new wheels/tires on and want to be sure the car's camber is aligned for the best/even tread life. thanks.
2003 BMW M3 - Alpine White - 6 speed
2002 BMW 330i - Gray - 5 speed
Member
Is it possible to remove the front thrust arms with a tie rod fork without loosening the pinch nut around the strut? I don't have a ball joint press and only have the fork and it looks like I can get the nut off without loosening the strut. Anyone done this?
Member
Hey cnn,
What can I say? You are the Man!
I have a problem. My right side strut is leaking, causing that side to go lower about 3/4 of inch compare to other side. Besides yesterday I hit pothole and broke my adjusters (which I blame on leaking strut).
I just want to replace struts with Bilstein like you suggested, but I want to do just struts.
Is it hard to do in general?
Thank you in advance,
siny528
Member
BMW CCA Member
Did this today and I will make a few suggestions.
Unbolt the inner bit of the tie rod from the rack and take both arms off the sub frame then drop the strut. Remove all three bits plus spindle and strut at the same time. Just use a large hammer and hit the top of each stud and remove it from the spindle instead of messing with all these ball joint tools under the car.
M50 3.1L Stroker - TC Kline D/A
Member
Last weekend I finally did my struts!
I found out that my old ones were gone long time ago!
I even was able to push them in and pull out with 2 fingers! I did not use Bilstein like you suggested (and I planned initially).
I realized that if BMW using Sachs, I will go with them as well.
Hardest parts were to remove 18mm Brake Caliper Mounting Bolts (WD40 and some slight hammering to the combo wrench was involved) and of course spring compressing...
Unfortunately, by the time strut was removed and I started the compression, I realized that 2 compressors are simply NOT ENOUGH!
I didn't have 3rd compressor, so I used Clamp-on Vise:
It did the work well, but better (and safer!) to go with 3rd compressor as suggested by cnn. Besides Clamp-on Vise slightly scratched the coil, so second time I did it I put towel in between.
By the way, I didn't tape the fender to avoid scratches while removing strut. I just put towel folded 4 times over strut's top.
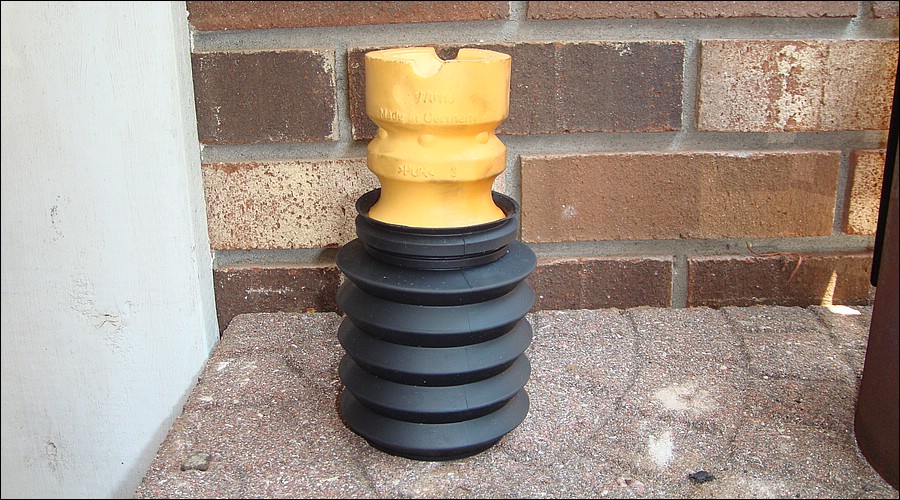
Also, after my RIGHT side was done and I started to do LEFT side, I realized that I made a mistake by putting Rubber Boot (not Front Bump Stop, as I said before) upside down. It cost me couple hours of re-installation of RIGHT side.
Front Bump Stop is supposed to go into Rubber Boot before being placed on strut:
Thanks again, cnn, for your great write-up, and especially for all torques values indicated! I saved a lot of money!
siny528i
Last edited by siny528i; 07-10-2010 at 09:39 AM.
 Posting Permissions


 Reply With Quote


Bookmarks