

 Member
Hey OP thanks for stealing my Thunder!!!
This is fantastic! Beautiful work sir, I am very impressed unfortunately I haven't even tested mine yetI am glad it worked and I am going to copy you and make some similar end plates for my wing at the instruction of some other bf.c members!
DIY Wings FTW, if I make it down to ATL anytime soon I would love to see it in person!!
-Ian
for those of you who haven't seen it, here is my thread
http://forums.bimmerforums.com/forum....php?t=1249500
OPs design is much more practical than mine, prettier too!
Last edited by ianscrawford; 09-12-2009 at 07:55 PM.
Understeer is when you hit the wall with the front of the car and oversteer is when you hit the wall with the rear of the car.
Horsepower is how fast you hit the wall and torque is how far you take the wall with you.
Member
Nice,Finish look great! Did you test to see how well it does under load? Sometimes the foam core only wings fail pretty quickly under higher speeds/loads.
The African Stig
Bravo!!! Excellent work and DIY.
The difference between 'involvement' and 'commitment' is like an eggs-and-ham breakfast: the chicken was 'involved' - the pig was 'committed'.
Member
Sorry, I can't speak for the welds. I'm not a welder which is why I took it to Robinson Racing for that part of the build. To avoid warping, the welder did do sections at a time.Originally Posted by clopez95m3

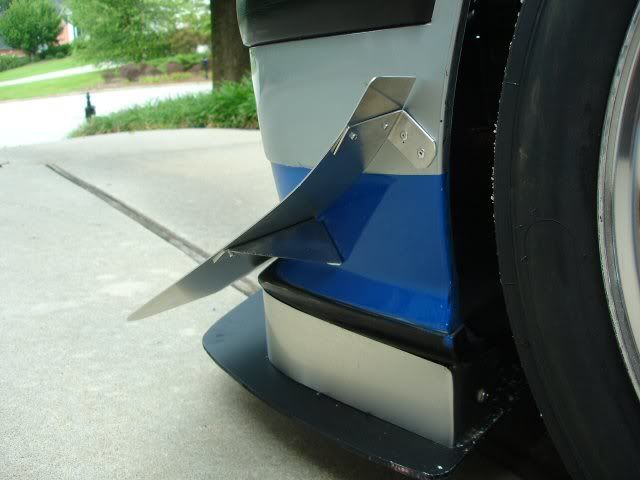
As for the end plates, I saw a thread a while back suggesting that larger end plates improve the "lift" characteristics of the airfoil up to a point, then they just add drag. The reason you want them to extend below the wing and not above is that this prevents air from coming in from the side to fill the vacuum created by the airfoil on the underside of the wing. You want the vacuum to pull the wing down. Without end plates working like a dam, the air would rush in and negate the effect of the low pressure area under the wing, at least at the ends of the wing, but this is where you have the cleanest airflow. As I stated, I was quite surprised to see how effective the end plates were, as they were getting sucked inward as my speed increased. I don't see this as a problem, but may try a thicker sheet of aluminum. And yes these are very easy to fabricate. I just started with a couple of 12"x12" pieces and cut off a corner. Sometimes simple solutions are best.
This was a one-off garage job, so no testing. However, with three plys of carbon fiber I doubt this wing will break. It's very stout.
Last edited by Michael9218; 09-12-2009 at 09:51 PM. Reason: Automerged Doublepost
Lead Disagreement Eng PE
Great looking wing!
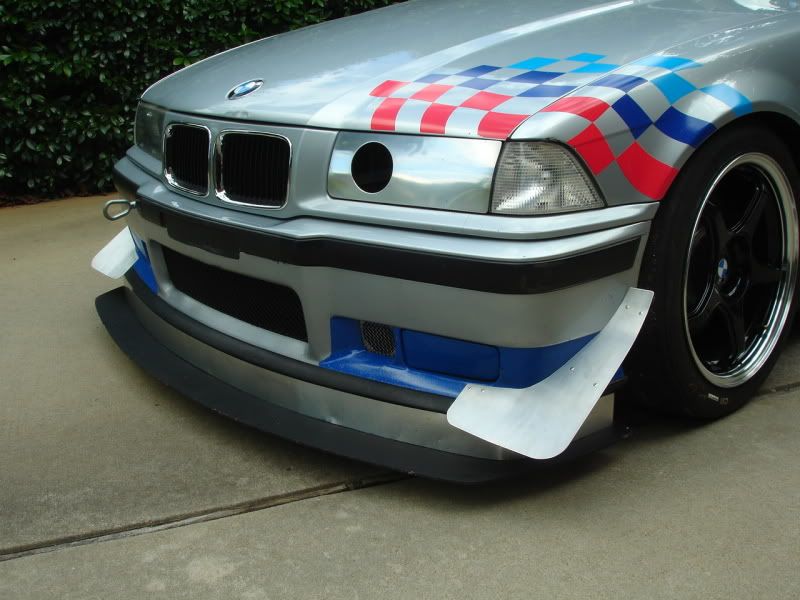
One recommendation, it's hard to tell, but it doesn't look like the rivets you used are the captive pin variety(not sure of the "official name"). In my experience, with heavy vibration and loading(like you'd see in a wing), they'll eventually loosen up and then things start to get ugly. Yes, they can have a high loading capacity when new, but without the pin in there they are not happy when cycled many many times.
Captive pin rivets from CherryQ or the like are almost indestructable from a fatigue/deformation standpoint. Would be a shame to see those rivets potentially fail from vibration on track, so just a suggestion.
Member
BMW E36 M3 Expert
Me too! That was truly ingenious.
Neil
Member
love your ingenuity. excellent work.
Voice of reason
WTG Michael, that's really nice work.
See you in a couple weeks at Oktoberfest.
And start scheming now on how you are going to get a Lemons car for next Spring. It's the most fun that can be had racing.
Member
Michael - I always look forward to seeing your car and the great work you do on it. Thanks for the write up and can't wait to see this in person!
soon to be broke member
Member
Yes, I'm still kind of experimenting with those. They seemed to work fine, but I'll probably fab up a fence on the outside edge.
Member
Cool. Another suggestion is to put some strakes on the sides of the diveplanes to help keep air from spilling over the egde. You can also go a bit more vertical on the trailing edge.
Lead Disagreement Eng PE
I'd probably cut back that triangulating support to at least allow air to try to stay attached over more of the surface. It's also going to generate lift by stagnating any air flowing underneath the dive plane.
Member
you are awesome!!!
David Ortiz
Member
I believe this is the most useful thread I've seen in a very loooong time.
Excellent work, so detailed, with pics and tips.
You should write a book " CF Wing making for Dummies".
Road racing addict.

Juker008 don't send pm soliciting or advertising, against forum rules!!
Wetter is better.....
Mike - Good to catch up a bit at O'fest....sweet wing man!!
Nitin G. Shanbhag
BMWCCA #101510
87 951, 88 M3 2.5, 88 E30 S52 Project, 95 M3/2 Slicktop, 96 E36 "TrackBeater", 97 M3/4 Slicktop, 97 TJ, 98 M3/4 Daily, 00 F150 7700
E36 TrackBeater Project Thread: http://forums.bimmerforums.com/forum...d.php?t=884145
Super Senior Member
Looks great! I bet that foam was a major PITA!
----Dave----
Member
Very cool, exactly the way i made my first efforts. Based on your specs, I think your setup should be plenty strong with that foam and that amount of carbon and resin, albeit a bit heavy, but plenty strong. Great finish you managed with wet sanding - almost looks as good as a mylar/vacuum bag finish. If you ever build another one give me a shout and I have an idea or two i can share.
Brooks
Member
I'm currently working on a very similar build. Could you please explain how you used the aluminum plates on the foam? Did you drill through the carbon after it was fully cured? What was your entire process for mounting?
-Thanks guys
Member
Essentially, you end up with aluminum plate sandwiching the carbon fiber. As you can see from the pictures, base plates are epoxied to the foam, but this really only holds these in place. The carbon fiber laid over them is what creates the strength in these mounts. The outside mounts are riveted to these plates through the carbon fiber. Yes, you drill through the carbon fiber after you test fit and ensure placement. The only thing I would do differently would be to use thicker material on the vertical plate that runs down along the stanchions. This would probably be a little more stout.
Light Fires N Burn Tires
Wow you did a great job!!
I could make all the aluminum stuff at my work really easy. Have you ever thought about an aluminum diffuser? I want to make one.
Where is the seam of the carbon? At the sharp edge of the wing?
Member
Hiding the seam is a trade secret...
I planned the layers to overlap and then had the last layer end at the trailing edge (the sharp edge of the wing). The trick is to trim it close before it sets up and then smooth it down. You couldn't find if you looked at the wing.
Oh, and as an update, I've run the wing at Road Atlanta and twice at CMP and it's worked great. Even had Mike Skeen drive the car Friday at CMP and he complimented me on the cars' aero. He was turning 143's and I've just got a little old stock cammed S50.
Last edited by Michael9218; 10-17-2009 at 10:01 PM.
byzanz owns you
Congrats from a current "Encinitan" for a job well-done!
Member
Very cool project! Wish I had the patience to do the same!
-Zach
2013 NASA Midwest Time Trials "B" Champion and Rookie of the Year
EFFEKTIV Motorsport #188 TTB - E-fab / Motorsport Hardware / NOS Energy Drink
Visit us @ https://www.facebook.com/EffektivMotorsport
E30 hoarder
So after a few years, is the wing holding up well?
Bitsy: 1987 325i 4dr specE30
Blue (aka Sapphire): 1989 325i 4dr
Rosie: 1991 318is 5sp
Goldi: 1990 325i vert; best $450 ever spent
 Posting Permissions


 Reply With Quote


Bookmarks