
 Member
I am actually in the process of trouble shooting my fuel gauge and decided to replace both fuel level sensors. So I figured a DIY would help others.
Here is the subject - 99 E39 528
As shown below the fuel gauge is stuck on empty with the low fuel indicator lit.
Next I performed the cluster test #2 to see if the gauge actually works and it does as shown below:
Step 1:
Make sure you have close to an empty tank of gas or gas will flow out when you pull the sensors. Also you should disconnect the battery ( I did'nt). No sparks or smoking!. Also make sure you have ventilation (gas fumes bad!). I did mine out in the driveway with doors open and respirator ( over kill).
Step 2: Remove Back Seat
Grab the seat under the middle front and give it a hard pull and it will pop off!. You will see I removed the two covers and exposed the sensor lids.
Step 3: Remove lid
Remove the 3 phillips head screws in the lid and remove the lid as shown below. I started with the passenger side sensor. It also connects to the fuel pump. We will see that later. Next you will remove the connector and the hose clamp and remove hose.
Step 4: Unscrew the ring that holds the sensor into the tank. I used a screwdriver and hammer to tap in a counter clockwise direction. It will get loose and you can unscrew by hand.
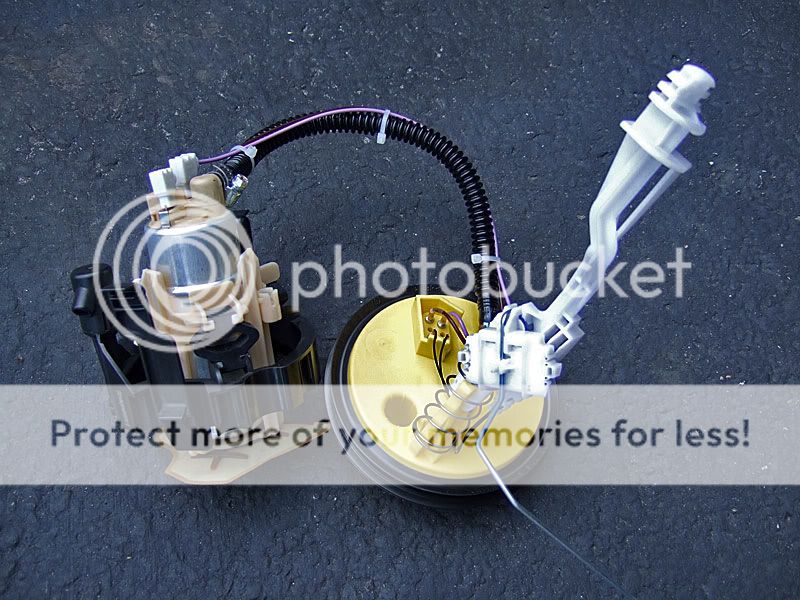
Step 5 : Remove sensor. After a little tugging I removed th sensor and fuel pump. The pic below shows the sensor/pump assembly removed.
A few notes in the above pic. I replaced the rubber gromet. Also the hose clamp that attaches the hose to the fuel pump was the pain in the butt BMW type. I replaced with an adjustible. You just remove the hose from the pump and disconnect the two electrical connectors from the pump. The new sensor is shown below attached to the pump:
Step 6: Reinstall
Slide the fuel pump back into the tank and adjust until the big black tabs snap into place. Then slide the sensor down into the tank. Put the new /old rubber gromet into place first before trying to screw the ring that holds the sensor into the tank.
The pic below shows the top view looking down where the pump will be reinserted:
Below is the method I used to test the sensors with a multimeter:
The following table lists the level sensor resistance in (ohms) for the left and right fuel tank.
With empty tank left side 50-70 ohms
With empty tank right side 50-70 ohms
With full tank left side 401-415 ohms
With full tank right side 401-415 ohms
Shown below is the sensor out of the drivers (left) side tank. Using my cheapo Walmart digital multi meter, I set to measure 2000 ohms. Now touching the leads to the connector pins, I measure 412 ohms which falls in the range of haviing a full tank.
As you can see below, the black float is lifted up towards the top of the sensor simulating a full tank of gas. As I adjust the float downwards the reading / resistance starts to decrease.
This tells me that the sensor is working correctly. No change in resistance means the sensor is not working.
The same proceedure is done for the passenger /fuel pump right side.
Hope this helps you to picture what actually happens as the fuel levels change in your tanks.
Catch u later...back to troubleshooting..

Last edited by jamz; 09-08-2009 at 08:08 PM.
BMWCCA 484984
Member
This is just the help I needed for removing my fuel pump! Thank you so much!!!!
BMWCCA 484984
If you really appreciate the OPs thread/DIY, please go to the bottom of the first post in this thread (bottom right hand side) and vote yes to whether the post was helpful. I'm seeing alot of people mistakenly going to the last post in the thread and voting when the last post is usually something like, "Great DIY, thanks for doing this" and is of no help at all.Originally Posted by linusb

Last edited by jamesdc4; 08-18-2009 at 01:22 PM.
Member
Jamz,
Thanks for the great DIY post.
I have a similar problem with my '03 530, inaccurate fuel gauge readings, sticks at 3/4 then again just before red.
Dealer has replaced fuel level sensors twice, and after 6months or so, the problem returns.
Since your replacement didn't solve the problem, I'd be very interested to hear what you find out.
Thanks
Member
OK..well I had some free time today to play with my diagnostic software.
After clearing all codes and rescan - I see what looks like level sensor 2 is having issues. I will recheck the connections and look for possible cable break
I replaced with new sensors, so I assume they are functioning correctly.

OBD Cluster Test #6:
000305 _ _ 6.0
_ _ 0305 _ _ 6.1
_ _0000 2_6.2
Now if I am analyzing the above data correctly:
6 Fuel Level sensor inputs in liters
6.0 000305 Fuel level averaged; Left sensor input=00.0 liters; Right sensor input=30.5 liters ~ 8 gallons
6.1 0305 Total tank level averaged; 00.0+30.5=30.5 liters
6.2 0000 2_6.2 = I believe says there is a fault in sensor 2 reading 0s
Now I would assume that if the tank capacity is 60-70 liters, I should be reading at least half a tank on the fuel gauge. But I show empty with low fuel light on. Another strange thing is I have a hard time pumping fuel and the automatic shut off at the gas station pump keeps activating. It almost seems like a blockage somewhere.
Oh well..back to troubleshooting
Last edited by jammer310; 09-06-2009 at 09:09 PM. Reason: Automerged Doublepost
Member
By mistake I posted that using my girlfriends account
OK...I disconnected the battery for about 20 minutes. Re-connected and no change in gauge. I disconnected the left sensor and plugged into the old sensor and was playing arount with the float.
All of a sudden the fuel gauge moved up to the full mark. I re-connected the new sensor and the guage still shows full. I entered OBC test #6 and still shows fault.
So I think I confused the computer. I reset the cluster via test #21 and gauge now shows empty with low fuel light on as before. So still not fixed.
And the troubleshooting continues..
Last edited by jamz; 09-07-2009 at 08:30 PM. Reason: Automerged Doublepost
Member
Well I decided that the new drivers side level sensor must have an issue as I was measuring zero resistance with the multi meter.
So as I was removing it from the tank the sensor looked weird like something was missing. Well sure enough there was something missing - the float!
The float must have fallen off the sensor body and was laying in the bottem of the tank. Lucky I had a telescoping magnet and was able to fish it out. I re-attached and placed the sensor in the tank and all is good.
I assume that in order for the fuel gauge to register both sensors must be operational. I thought one working sensor would register..I was wrong.
L8r...Jamz
Member
IN my domestic ride Pontiac GM(Rip Pontiac company) i have to remove rear springs, shocks, sway bar, drop the axle, disconnect and remove the entire cat back exhaust, remove even more suspension parts. drop the tank. then i could change the fuel pump or level sensor. The Bmw sensor swap looks like a walk in the park. My level sensor in the 5 series would read random reading all day. Full, low, no gas readings. Im, going to swap the sensor. it should work. thanks again.
Doctor in Training
Does anyone know if this is the same process for the touring models?
Member
BMW CCA Member
Yes... as far as replacing the both / either sending units and in tank fuel pump as well as "suction jet" that by syphon takes fuel from the driver's saddle side fo the tank and brings to passenger side saddle tank where fuel pump is.
Replaced all with new when trouble shooting my fuel system ... including the "3/2 running loss valve" (includes FPR on some I6 models) under car on driver's side on 1999 / 2000 I6 cars.
Doctor in Training
specifically do you know if the rear seat comes off the same way. I gave it a few tugs earlier and it didnt seem to budge. I dont know if you also have this, but I have attachment points on the front of the seat for child harnesses I believe. Are these hard mounted somehow in a way that they would prevent me from just pulling the seat up like you did?
Thanks
Member
BMW CCA Member
jbro:
Those are storage brackets to install your roll out cover and net from behind the 2nd row seats when you want to remove it ... and store it b/c you are putting the 2nd row seats flat.
Each bracket has two allen headed bolts that are 6 or 7mm (IIRC) that need to be removed. Once the bolts are out, the brackets come off and the seat pops up like a regular sedan rear seat (spring clips on each side) for removal.
Doctor in Training
Excellent! Thank you so much for the information. I was planning to just try to remove the brackets but I have been too busy with school lately to do anything with my car. Thanks again and great thread...made diagnosis much easier!
Member
I'm about to do the Fuel Pump replacement on mine.
One problem is about the clip that you used to replace on the hose.
The BMW factory one is very strong and a tool is used to clip it on.
The adjustable one is with a screw and seems easier.
BUT: I was told that there's a lot of PSI to hold, and that the adjustable clip will eventually fail. If it does, I assume that then it can be too late when you notice the engine die when it uses the last of the fuel in the hose. And the back seat will be full of gasoline!!
Sounds like a scary movie.
I got a $1 metal adjustable clip from NAPA. Is that similar to what you used?
'04 E60 530i & '97 E39 528i
Member
Hey Guys...I've been searching on where to find the best place & price to buy a pair of fuel level floats or sensors for my 99 540i..Im having big problems on my fuel gauge!..Please help cuz I need to buy them..I don't know if I should & only could go to the BMW dealership?..Please help..Thanx in advance
Bernard
Member
Go to http://www.car-part.com for all used parts from auto wrecks.
I got a fuel pump with the floater for $60 from a local place I found using that website.
'04 E60 530i & '97 E39 528i
Member
Jamz,
this is exactly the info I need for my 12/96 E39 528i - thanks Mate
My senders are reading 188ohm left and 315ohm right, so I guess the left one is hopefully stuck at the 188ohm level.
I will remove it and have a good look.
Member
What software is this? What interface?
Kris
Seeking Hwy On Ramps
In the middle of replacing the fuel pump. I've managed to remove the old one, install the 2nd hand one but for the life of me I can't seem to get the twist down collar/ring back on.
Their seems to be a lot of pressure required and although I've tried pushing down with one hand while rotating the ring, it just keeps popping off.
It appears that the ring needs to rotate one full circle and I imagine that I'll finish it off by tapping with a flat blade screwdriver as in removal.
Any ideas? as I'm on the home straight and need to get the car running again.
Member
Did you put the gasket on the cover or the opening? I had the same problem.
Member
something everyone might want to remember here is to be sure and use a brass punch when tapping on the lid for removal or tightening. as the original poster noted, fire is bad. always use a brass punch when working on fuel tanks. great diy though. i hope to avoid this one for a while.
Last edited by texinstyle; 06-01-2011 at 08:11 PM.
Member
Great DIY. I just want to add that it is much easier to place the new black rubber gasket in the the tank portion prior to placing the sensor in the tank. The gasket is very snugly fit to the tank and sensor so fitting it on the sensor before placing the sensor in the tank can be a little difficult at times.
Member
I was having the same issue of the collar not going on right, but then i realized I didnt place the gasket around the plastic opening of the tank and instead i was trying to push the whole asseMbly with gasket down. Once i plced the gasket around the plastic tank it was no problem.
One question I have is, my OEM fuel pump came with a replacement crimp type clamp. I didnt have any end cut type pliers so i just use a set of ordinary pliers to crimp the clamp together. It seems fairly tight, but would that be sufficient? or should i open it back up and crimp again with the correct tool?
Member
Thanks for the great DIY! Shreks is right about the gasket - it goes together much better if you put it in the tank first. I just replaced my fuel pump and wanted to add that to pull the lid off once the lock collar is removed, I was having a bitch of a time. Once I put the elctrical plug back on to use it as a handle, the lid pulled right out!
Couldn't have done it without this writeup. Thanks Jamz!
 Posting Permissions


 Reply With Quote


")


Bookmarks