
 Member
BMW CCA Member
Member
BMW CCA Member
I completed the bushing change last weekend, along with Bilsteins shocks/struts and H&R lowing springs. The bushing replacement wasn't too bad of a job.
bushing.jpg
My differential mount is still in great condition, hope to keep it that way.
Diff mount.jpg
Thank you to all those how preformed this repair.
2000 Alpine White over Estoril Blue & Black Nappa with a Dark Blue Softtop, 1 of 43.
Member
I am going to replace my bushings this summer. Is there someome I can borrow the tool from?
[2011] BMW 735i E32, Benzine, 1987, 155 kW (211 PK), Automatic
[2013] BMW 525TDS E34 Touring, Diesel, 1994, 105 kW (143 PK), Automatic
[2014-today] BMW 320i E36, LPG G3, 1996, 110 kW (150 PK), Automatic
Member
Don't you have all sorts of "pipes" in the Netherlands?Originally Posted by Mevius

In CO, we surely do these days.
Nathan in Denver
1999 M Roadster, VFE V3 S/C, Randy Forbes Reinforced, Hardtop, H&R/Bilstein, Apex PS-7, Supersprint
1999 Z3 2.8 Coupe, Headers, 3.46, Manual Swap, H&R/Koni, M Geometry/Brakes, M54B30 Manifold, Style 42
Member
Can I rent this tool from someone?
Member
Nice write-up! I like the way you think.
Member
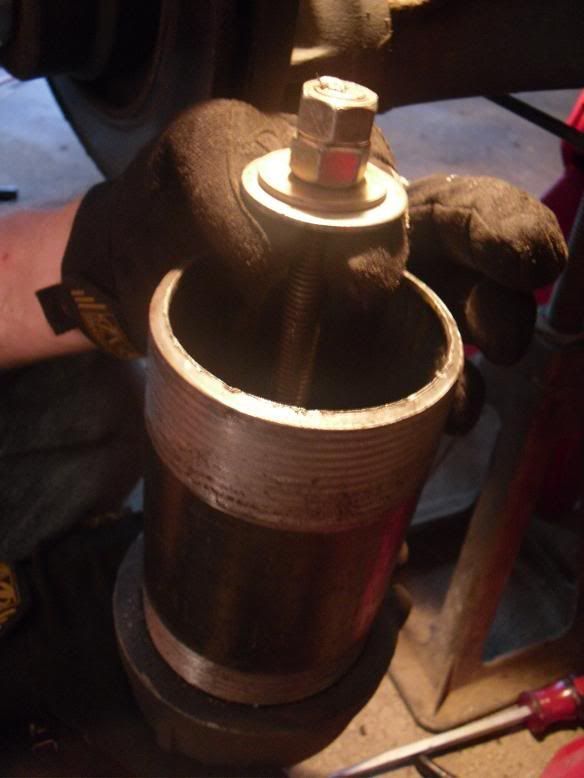
This may not work with the subframe still installed in the car. But this is the tool I used when I did the weld in camber/toe kit since I couldn't find the correct size pipe. For those who don't know it's a gas cylinder cap that I drilled a hole in the center of sorry airgas
!IMAG0209.jpg
Member
LOL! What a simple and yet elegant solution__and right at your fingertips!
Member
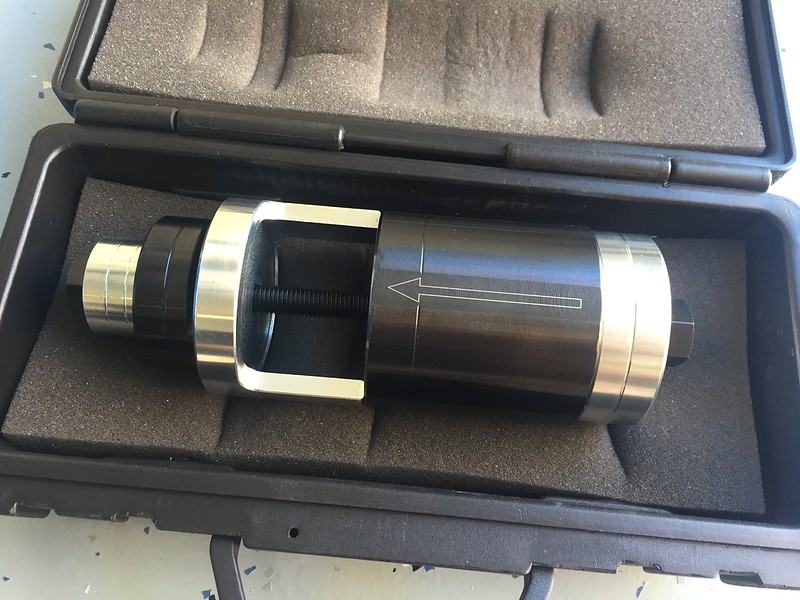
I made the bushing tool following the instruction in original post. Now the job is done, I'm willing to pass the tool onto someone who needs it. All you need is get some large washers. I'm in San Francisco south bay area if you want to pick it up. I can ship, but it's hefty and probably not worth the shipping cost.
IMG_0669.jpg
Member
I've got one as well. I spent about $60 building it, and shipping last time I lent it was around $19 each way. $20 is $20, but if you ever have to do the job a 2nd time, better off just building your own. However, anyone in the Denver area that needs one, I'm happy to lend. I just got Jon Martin's spring BBQ invitation, so I know there are a lot of Coupe owners around.
Nathan in Denver
1999 M Roadster, VFE V3 S/C, Randy Forbes Reinforced, Hardtop, H&R/Bilstein, Apex PS-7, Supersprint
1999 Z3 2.8 Coupe, Headers, 3.46, Manual Swap, H&R/Koni, M Geometry/Brakes, M54B30 Manifold, Style 42
 Member
I just made this tool and used it on my Z3M. Worked great! I used S.S. threaded rod, coupler/nuts, and a heat gun. I pulled the bushing down about 3/4", then applied the heat for about 3 minutes, then pulled the bushing out easily. I disconnected driveshaft and diff mount, but not the shocks, giubo or ctr support. Notes that may be covered, but I didn't see: 1)I cut thd rod to 13" and it worked perfectly. 2) In hindsight, at re-assembly I would have tried starting the 4 d.s. studs before mounting the subframe. I'm not sure this would work, but I'd try it, because hooking up the d.s. last was a real fight. 3) At re-assembly, when lining up the subframe to the studs, it's important to have the diff hole close to it's mounting hole in the frame, about 3" below seems just right, to keep the subframe bushings parallel to the studs as you slide them in place. Also, it would be nice to have 2 jacks. I had to go back and forth a few times, using jack stands.
Member
Thought i'd add my own input from my experience.
I decided to go the route of using a torch on it.
At first I tried a propane torch. It was a complete failure. It did not provide enough heat so even after heating the subframe area around the bushing and burning the bushings a bit, the hammer did absolutely nothing. It didnt budge even a single mm.
I then decided to try a higher heat handheld torch. I went with one of the MAP/PRO ones.
This was what was needed. It only took a few minutes of heating up the bushings and subframe around the bushing and a few wacks of the hammer and boom. Out like butter.
Just another option if people happen to already have a MAP/Pro torch handy. No need to run around buying parts to make a tool.
I scuffed up the subframe with a steel brush on a drill to remove all the rust, sprayed with primer, and then with paint. Ready to go in this week when my subframe reinforcement gets done.
Member
Does anyone know if these parts as described will work on a E53? (2004 X5)
Member
Anyone here have experience using these HF ball joint service kits to remove E36 rear subframe bushings (with the subframe removed from the car)?
Using the ubiquitous 20% off HF coupon, the kit is only $80, which is about what you'd spend to build the homemade pipe press discussed in this thread.
Wondering if the HF kits include adapters of the appropriate size to remove the subframe bushings.
Tipsy
Last edited by TipsyMcStagger; 08-03-2017 at 02:36 PM.
Member
I just did mine. That HF tool looks cumbersome compared to the tool I made per this thread. It cost about $65 to make, plus a drive downtown and an hour labor. That tool is for sale for $50 plus shipping. See my ad on this site or Phoenix CL if interested.
Member
I used a similar method based on this thread using a HF Tie Rod & Pitman Arm Puller $14.99 tool. https://www.bimmerforums.com/forum/s...bframe+bushing
Built S52 w/Dinan ISR-3 kit, NickG Stage 2+ Tune, Dinan Vortech V2 Supercharger, Dinan Air to Air Intercooler, Dinan CAI, Porsche 803 HFM, Buldogge 6" crank pulley, Griptec 2.90" blower pulley, Eurosport UD pulleys, Dinan 3.38 Diff, Dinan front/rear Swaybars, Dinan springs, Koni Yellow Sport Struts, Ground Control end links, South Bend Clutch Stage 3 Organic, AASCO Light Weight Flywheel 18.5#, Zionsville Radiator & Oil Cooler, Riot Racing BBTB, Schrick Intake Manifold, 42# Injectors, Schrick cams 264/256, Forged Wiseco pistons 9.0 comp., Forged Eagle rods, Supertech dual valve springs & valves, VAC crank & bearings, Supersprint mufflers, Euro Z3 midpipe, Raceland euro headers, Walbro 255, Bevauto ignition coils, Vortech Mondo bypass, Bailey Diverter DV30, Ireland Rear Subframe Bushings, Mason Engineering Strut Brace, Mason Engineering Clutch Petal, Apex 18" EC-7 Wheels, Full Custom Sound System, two trunk lids (with & without OE spoiler), Hardtop, Trunk full of AK's...
Member
The HF kit works great. I didn't use the C-Clamp that came with the kit as much as I used threaded rod through the adapters. The good thing about the kit is the variety of sizes that come with it. For some reason, I also seem to remember using a front hub socket from a 4WD Explorer I had many years ago too. Basically, anything I could find lying around that was round and hollow was a candidate for a tool. Since I used solid aluminum diff bushings, I used those bushings to press out the old ones and install the new ones all in one motion.
Clownshoe Diary - My quest for a BMW Z3 Coupe
1972 2002tii - Malaga
2002 Z3 Coupe 3.0i - Sterling Gray
2009 650i - Carbon Black
2015 228i THP - Estoril Blue
2019 Z4 30 - San Francisco Red
Member
Good feedback. Thanks.
Looks like Advance Auto has a free loaner ball joint service kit with plenty of included adapters and I've got some threaded rod in the garage.
Tipsy
Member
Looks like that one has quite a few more adapters than the HF tool kit.
Clownshoe Diary - My quest for a BMW Z3 Coupe
1972 2002tii - Malaga
2002 Z3 Coupe 3.0i - Sterling Gray
2009 650i - Carbon Black
2015 228i THP - Estoril Blue
2019 Z4 30 - San Francisco Red
Member
I am not able to see your pictures. All I see is:
Am I doing something wrong?
Member
Here's is the picture you weren't able to see:

Member
I received IE rear subframe bushings this morning. Does anyone have a RSFB tool they would like to loan, rent, sell?
Thanks,
Brad Cushman
2002 Z3 3.0
1973 450 SL
1967 Camaro SS/RS
Member
$100 shipped
E36/8 2000 M Coupe Cosmos Black/Black
Shark, Conforti CAI, B&B Exhaust, H&R, Bilstein, AKG Subframe/Diff, UUC TME Red/Caps, Swapped Front Hats, Ice>Link.
================================================== =======================
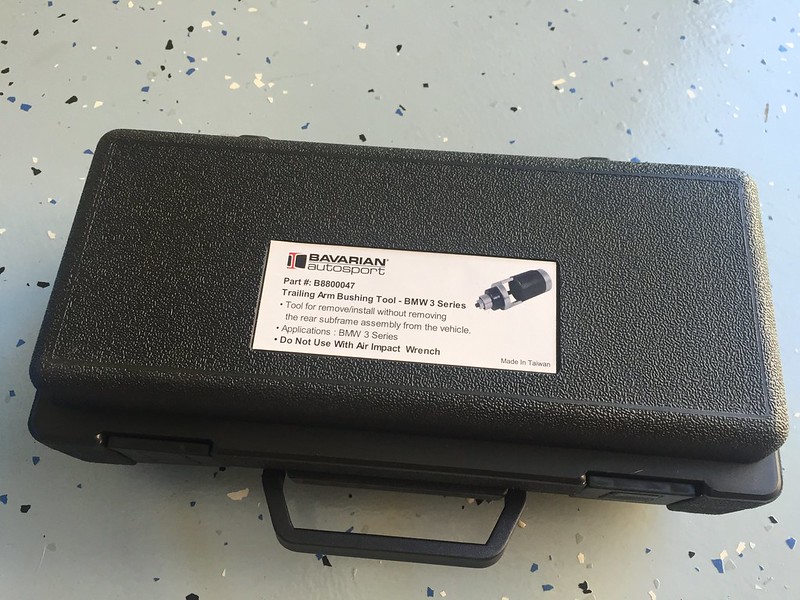
Member
TexaZ3,
That looks right but the label says it is for trailing arm bushings - I'm interested, just need to figure out if it will work on the subframe bushings
Brad Cushman
2002 Z3 3.0
1973 450 SL
1967 Camaro SS/RS
Member
I can't answer your specific question, but I warn you that you may find that the cost of the parts has increased to the point that the difference between this do-it-yourself solution and buying the correct tool is such that it is not worth the added headaches. I used this method to replace the bushings on my Z3 and when all was said and done, I had almost 3/4 the cost invested in the DIY parts as the correct tool would have cost.
Alternatively, you may be able to find a loaner or used tool from people on this Forum.
Member
This is a very good point. I've not priced these tools or parts for at least a decade and it is very likely the tool is no longer 3-400 bucks. As I have said before, the commercial tool works way better. The DYI tool is Joe Lunch Bucket getting by, which I have been known for all my life.
Dan "PbFut" Rose
 Posting Permissions


 Reply With Quote


Bookmarks